AUDIOLINE DECT6500B Bedienungsanleitung
Schnurloses digitales dect-telefon

Verwandte Anleitungen für AUDIOLINE DECT6500B


Inhaltszusammenfassung für AUDIOLINE DECT6500B
- Seite 1 Schnurloses digitales DECT-Telefon Cordless digital DECT telephone Bedienungsanleitung Operating Instructions DECT6500B...
- Seite 2 DECT6500 Bedienungsanleitung__________________________ 1 Operating instructions________________________ 39...
-
Seite 3: Inhaltsverzeichnis
- Inhaltsverzeichnis - 1 Allgemeine Hinweise....................5 2 Bedienelemente ......................7 3 Inbetriebnahme......................8 3.1 Sicherheitshinweise ....................8 3.2 Verpackungsinhalt prüfen ..................8 3.3 Basisstation anschließen ..................8 3.4 Ladestation anschließen ..................8 3.5 Batterien einsetzen/austauschen ................8 3.6 Batteriekapazität ...................... 8 3.7 Uhrzeit einstellen...................... - Seite 4 - Inhaltsverzeichnis - 7 Displayeinstellungen....................24 7.1 Uhrzeit eingeben ....................24 7.2 Displaynamen ändern .................... 24 7.3 Displaysprache einstellen..................25 7.4 Displayhintergrund ändern ..................25 7.5 Displaymenüfarbe ändern ..................25 8 Ruftöne und Signaltöne einstellen................ 26 8.1 Ruftöne für das Mobilteil einstellen (Klingelmelodien)..........26 8.2 Ruftöne für die Basisstation einstellen (Klingelmelodien) ........
-
Seite 5: Allgemeine Hinweise
Übermäßige Belastungen durch Rauch, Staub, Erschütterungen, Chemikalien, Feuchtigkeit, Hitze oder direkte Sonneneinstrahlung müssen vermieden werden. Netzteil - Verwenden Sie nur das mitgelieferte AUDIOLINE Steckernetzteil, da andere Netzteile das Telefon zerstören können. Es besteht Lebensgefahr, wenn das Steckernetzteil geöffnet und nicht vom Stromnetz getrennt wird. - Seite 6 - Allgemeine Hinweise - Laden des Mobilteils - Sollte sich das Mobilteil beim Laden erwärmen, so ist dies normal und ungefährlich. Laden Sie das Mobilteil nicht mit fremden Aufladegeräten, da sonst Beschädigungen auftreten können. Nebenstellenanlagen - Das Telefon kann auch an einer Nebenstellenanlage angeschlossen werden.
-
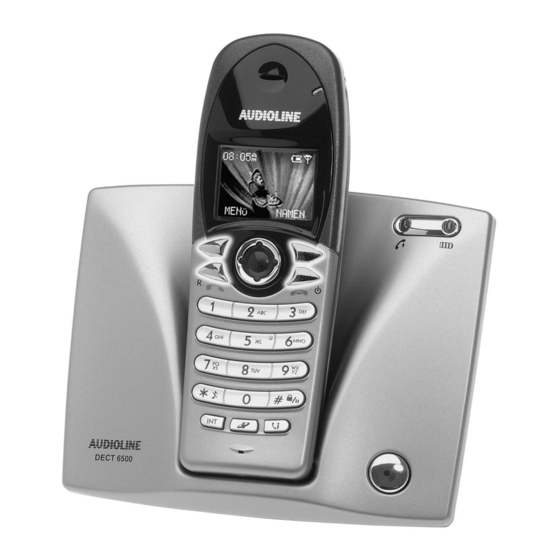
Seite 7: Bedienelemente
- Bedienelemente - 2 Bedienelemente Mobilteil Gesprächsanzeige Displaytaste rechts Gespräch beenden/Mobilteil ein-aus 4-Steuertasten Tastensperre/Pause Anruflisten für verpasste, angenommene und gewählte Rufnummern Sondertelefonbuch Taste für interne Gespräche Rufton ein-/ausschalten Gesprächstaste / R-Signaltaste Displaytaste links Basisstation Gesprächsanzeige Ladekontrollleuchte PAGE-Taste Ladestation Ladekontrollleuchte... -
Seite 8: Inbetriebnahme
- Inbetriebnahme - Inbetriebnahme Sicherheitshinweise ACHTUNG! Lesen Sie vor der Inbetriebnahme unbedingt die Sicherheitshinweise am Anfang dieser Anleitung. Verpackungsinhalt prüfen Zum Lieferumfang gehören: eine Basisstation Steckernetzteil für Basisstation eine Ladestation mit Steckernetzteil eine Bedienungsanleitung zwei Mobilteile mit Gürtelclips vier Standard-Akkus ein Telefonanschlusskabel Basisstation anschließen Stellen Sie das Telefon in der Nähe Ihrer Telefonanschlussdose und einer... -
Seite 9: Bedienung
- Bedienung - 4 Bedienung Das Display Das Display ist mit einer automatischen Hintergrundbeleuchtung ausgestattet, welche das Display bei jedem Tastendruck für ca. 10 Sekunden beleuchtet. Mit einer beliebigen Taste wird das Display wieder beleuchtet. Wird das Mobilteil für länger als 30 Sekunden nicht benutzt, schaltet sich automatisch der Bildschirmschoner in Form einer analogen Uhr ein. -
Seite 10: Anrufe Entgegennehmen
- Bedienung - Anrufe entgegennehmen Erreicht Sie ein Anruf, ertönt der Tonruf am Mobilteil und an der Basisstation. Nehmen Sie das Mobilteil von der Basisstation oder drücken Sie die Gesprächstaste Mobilteil und die Verbindung wird hergestellt. Möchten Sie nicht gestört werden, drücken Sie die Displaytaste RUHE und das Klingelsignal wird direkt für diesen einen Anruf abgeschaltet. -
Seite 11: Externe Gespräche Auf Ein Anderes Mobilteil Verbinden
- Bedienung - Erreicht Sie während einem internen Gespräch ein externer Anruf, hören Sie das Klingeln der Basisstation und im Display der Mobilteile wird bei vorhandener Rufnummernanzeige (CLIP) die Rufnummer angezeigt. Beenden Sie das interne Gespräch mit der Taste und nehmen Sie das externe Gespräch an einem Mobilteil mit der Gesprächstaste entgegen. -
Seite 12: Alle Löschen
- Bedienung - Drücken Sie die Taste Wählen Sie mit den Steuertasten, den Eintrag GESPR. ZEIT und drücken Sie OK. Wählen Sie mit den Steuertasten eine der folgenden Funktionen und bestätigen Sie mit OK. LETZTES GESP = Zeigt die Gesprächdauer des letzten Gesprächs. GEWÄHLT = Zeigt die Gesprächsdauer von allen gewählten Gesprächen. -
Seite 13: Anruferlisten Einsehen
- Bedienung - 4.10.1 Anruferlisten einsehen Hinweis: Sobald ein Anruf verpasst wurde, erhalten Sie eine entsprechende Displaymeldung und Sie können über die Displaytaste ANSEHEN, direkt in die entsprechende Liste gelangen. Drücken Sie die Taste Wählen Sie mit den Steuertasten, welche Anruferliste Sie sehen möchten und drücken Sie OK. -
Seite 14: Anruferlisten Löschen
- Bedienung - 4.10.2 Anruferlisten löschen Mit dem Menüpunkt LISTEN LÖSCH können Sie eine bestimmte Liste oder alle Listen löschen. Drücken Sie die Taste Wählen Sie mit den Steuertasten die Funktion LISTEN LÖSCH und drücken Sie Wählen Sie welche Liste Sie löschen möchten oder löschen Sie alle Listen mit ALLE und bestätigen Sie mit OK. -
Seite 15: Paging Von Der Basisstation Zum Mobilteil
Händler, bei dem die Anlage gekauft wurde. 4.18.2 “R” Taste und das T-Net der DEUTSCHEN TELEKOM Ihr AUDIOLINE-Telefon unterstützt die wichtigsten Mehrwertdienste der DEUTSCHEN TELEKOM (z.B.: Makeln, Anklopfen, Dreier-Konferenz, u.a.). Das T-Net arbeitet mit der Einstellung "FLASH 300ms" (Einstellung siehe 9.3). Zur Freischaltung der T-Net Funktionen wenden Sie sich bitte an die DEUTSCHE TELEKOM. -
Seite 16: Das Telefonbuch
- Telefonbuch - 5 Das Telefonbuch In das Telefonbuch im Mobilteil (PRIVAT) können 100 Rufnummern inklusive eines Namens gespeichert werden. Die maximale Länge einer Rufnummer beträgt 20 Stellen. Zusätzlich können 20 Telefonnummern in der Basisstation (GEMEINSAM) gespeichert werden, die dann auch beim Betrieb von mehreren Mobilteilen an jedem Mobilteil zur Verfügung stehen. -
Seite 17: Übersicht
- Telefonbuch - TIPP! Ihr Telefon kann Rufnummern auch im Schnellspeichermodus speichern. Geben Sie einfach die gewünschte Rufnummer ein und drücken Sie die Displaytaste SPEICH. Geben Sie den zugehörigen Namen ein drücken Sie erneut die Displaytaste SPEICH. Übersicht Taste 1 Leerzeichen Taste 2 À... -
Seite 18: Weitere Funktionen In Telefonbüchern
- Telefonbuch - Weitere Funktionen in Telefonbüchern Im Telefonbuch können Sie weitere Menüpunkte erreichen: ANSEHEN = Mit den Steuertasten können Sie die gespeicherten Einträge ansehen. Über MEHR erhalten Sie weitere Informationen wie BEARBEITEN, LÖSCHEN usw. HINZUFÜGEN = Speichern von Telefonbucheinträgen (siehe 5.1) DIREKTWAHL = Direktwahltasten belegen, ändern, löschen (siehe 5.4.1) STATUS... -
Seite 19: Direktwahltasten Benutzen
- Telefonbuch - 5.4.2 Direktwahltasten benutzen Halten Sie die entsprechende Direktwahltaste 1 bis 9 für 2 Sekunden gedrückt. Die entsprechende Rufnummer wird im Display angezeigt und die Verbindung wird hergestellt. Sondertelefonbuch einrichten Im Sondertelefonbuch Ihres Telefons können Sie weitere 10 Rufnummern speichern. Das Sondertelefonbuch dient zur Speicherung wichtiger Rufnummern, von z.B: Ärzten, Feuerwehr oder Polizei. -
Seite 20: Extras
- Extras - 6 Extras Wecker Extras Babyfon Walky-Talky Timer Stoppuhr Babycall Alarm/Weckfunktion Mit der eingebauten Weck- und Alarmfunktion können Sie eine Alarmzeit eingeben. Ist diese Uhrzeit erreicht, hören Sie für eine Minute Signaltöne vom Mobilteil und das Display zeigt die Meldung ALARM mit der aktuellen Uhrzeit. Um den Alarm zu beenden, drücken Sie entweder die Displaytaste STOP oder die Displaytaste SCHLUMM (Schlummern). -
Seite 21: Interne Raumüberwachung (Babyfon)
- Extras - Interne Raumüberwachung (Babyfon) Mit der internen Raumüberwachung können Sie mit einem zweiten Mobilteil, in einen anderen Raum hineinhören. Dazu wird immer ein zweites Mobilteil benötigt. Weitere Hinweise zur Benutzung von weiteren Mobilteilen erhalten Sie im Kapitel 11. Babyfon am Mobilteil einschalten Drücken Sie die Displaytaste MENÜ, wählen Sie mit den Steuertasten EXTRAS und bestätigen Sie mit der Displaytaste OK. -
Seite 22: Timer
- Extras - Zwischen den Mobilteilen sprechen Drücken Sie an einem Mobilteil die Displaytaste SPRECHE. Wählen Sie das gewünschte Mobilteil, welches Sie rufen möchten und drücken Sie An dem gewählten Mobilteil ertönt ein Rufton. Das Gespräch kann dort mit der Gesprächstaste entgegengenommen werden und beide Mobilteile können miteinander sprechen. -
Seite 23: Babyruf
- Extras - Babyruf Mit dem Babyruf können kleinere Kinder oder auch Senioren durch das Drücken einer beliebigen Taste am Mobilteil einfach eine vorher bestimmte Telefonnummer wählen. Ausgenommen sind die Tasten und ABBRUCH. Babyruf einschalten Drücken Sie die Displaytaste MENÜ, wählen Sie mit den Steuertasten EXTRAS und bestätigen Sie mit der Displaytaste OK. -
Seite 24: Displayeinstellungen
- Displayeinstellungen - 7 Displayeinstellungen Display Uhrformat Mobilt -Name Sprache Hintergrund Farbe Uhrzeit eingeben Die interne Uhrzeit wird zur Anzeige auf dem Display und für die Anruferlisten verwendet. So können Sie später immer auch die Uhrzeit erkennen, wann Sie angerufen wurden. Drücken Sie die Displaytaste MENÜ. -
Seite 25: Displaysprache Einstellen
- Displayeinstellungen - Displaysprache einstellen Die Displayanzeigen sind in den Sprachen Deutsch und Englisch einstellbar. Drücken Sie die Displaytaste MENÜ, wählen Sie mit den Steuertasten DISPLAY und bestätigen Sie mit OK. Wählen Sie mit den Steuertasten SPRACHE und bestätigen Sie mit OK. Wählen Sie nun über die Steuertasten die gewünschte Sprache aus und bestätigen Sie mit OK. -
Seite 26: Ruftöne Und Signaltöne Einstellen
- Ruftöne und Signaltöne einstellen - 8 Ruftöne und Signaltöne einstellen Mobilteil Töne Basis MT-Tastenton MT-Töne Ruftöne für das Mobilteil einstellen (Klingelmelodien) Ihr Mobilteil kann sich mit 20 verschiedenen Tonruf-Melodien melden, wenn Sie ein Anruf erreicht. Betreiben Sie das Telefonsystem mit mehreren Mobilteilen, können Sie für externe und interne Anrufe unterschiedliche Melodien einstellen. -
Seite 27: Ruftöne Für Die Basisstation Einstellen (Klingelmelodien)
- Ruftöne und Signaltöne einstellen - Ruftöne für die Basisstation einstellen (Klingelmelodien) Drücken Sie die Displaytaste MENÜ, wählen Sie mit den Steuertasten TÖNE und bestätigen Sie mit OK. Wählen Sie mit den Steuertasten BASIS und bestätigen Sie mit OK. In der ersten Displayzeile kann mit den Steuertasten links und rechts die Lautstärke des Ruftons in fünf Stufen eingestellt werden. -
Seite 28: Sonderfunktionen
- Sonderfunktionen - 9 Sonderfunktionen Auto Annahme Sonderfunkt. Wahlmodus Flashzeit Pause Vorwählen Amtskennzahl Wahlsperre Anrufe automatisch entgegennehmen Eingehende Anrufe werden automatisch entgegengenommen, wenn Sie das Mobilteil von der Basisstation nehmen. Möchten Sie, dass Anrufe nur über die Taste entgegengenommen werden, können Sie die automatische Annahme ausschalten. Drücken Sie die Displaytaste MENÜ, wählen Sie mit den Steuertasten SONDERFUNKT. -
Seite 29: Flashzeit Für Nebenstellenanlagen Und T-Net
- Sonderfunktionen - Flashzeit für Nebenstellenanlagen und T-NET Haben Sie Ihr Telefon mit einer Nebenstellenanlage verbunden, können Sie alle Möglichkeiten, wie z.B. Anrufe weiterleiten, automatischen Rückruf usw. nutzen. An einer Nebenstellenanlage wird die FLASH-Zeit "100ms" (FLASH1, Werkseinstellung) oder „300ms“ (FLASH2) für T-NET benötigt. Ob Ihr Telefon an Ihrer Nebenstellenanlage einwandfrei funktioniert, erfahren Sie bei dem Händler, bei dem die Anlage gekauft wurde. -
Seite 30: Amtskennzahl Beim Betrieb An Nebenstellenanlagen
- Sonderfunktionen - Drücken Sie die Displaytaste MENÜ, wählen Sie mit den Steuertasten SONDERFUNKT. und bestätigen Sie mit OK. Wählen Sie mit den Steuertasten VORWÄHLEN und bestätigen Sie mit OK. Geben Sie den PIN-Code ein (Werkseinstellung 0 0 0 0) bestätigen Sie mit OK. Wählen Sie nun über die Steuertasten die gewünschte Displayzeile. -
Seite 31: Wahlsperre
- Sonderfunktionen - Wahlsperre Mit den Wahlsperren können Sie bestimmte Rufnummern sperren. Die Wahlsperren lassen sich bei mehreren Mobilteilen für jedes Mobilteil separat einstellen. Zur Programmierung wird der PIN-Code benötigt (Werkseinstellung 0 0 0 0). Drücken Sie die Displaytaste MENÜ, wählen Sie mit den Steuertasten SONDERFUNKT. -
Seite 32: System
- System - 10 System Anmelden System Basiswahl MT abmelden PIN ändern Reset 10.1 Anmelden von Mobilteilen Bevor Sie weitere Mobilteile benutzen können, müssen diese vorher angemeldet werden. Weitere Hinweise zur Verwendung von mehreren Mobilteilen finden Sie im Kapitel 11. 10.2 Automatische Basiswahl Ist ein Mobilteil an mehrere Basisstationen angemeldet, können Sie hier auswählen, mit... -
Seite 33: System Pin-Code Ändern
- System - 10.4 System PIN-Code ändern Einige Funktionen des Telefonsystems werden mit einem PIN Code vor unerlaubter Benutzung geschützt. Der PIN-Code besteht aus bis zu 8 Zahlen. Im Lieferzustand wurde der PIN-Code „0000“ eingestellt. Wird der alte Pin-Code nicht richtig eingegeben, wird der Vorgang abgebrochen. -
Seite 34: Mehrere Mobilteile
- Mehrere Mobilteile - 11 Mehrere Mobilteile Es können bis zu zwei weitere Mobilteile an Ihre Basisstation angemeldet werden. Ein Mobilteil kann an bis zu drei weiteren Basisstationen angemeldet werden. Wichtige Informationen: Über den international genormten GAP Standard können Mobilteile von Fremdherstellern in das Telefonsystem integriert werden. Allerdings stehen nur in Verbindung mit einem DECT6500 Mobilteil alle Funktionen zur Verfügung, die das DECT6500 unterstützt. -
Seite 35: Abmelden Von Mobilteilen
- Mehrere Mobilteile - 11.1.3 Abmelden von Mobilteilen Drücken Sie die Displaytaste MENÜ und wählen Sie den Menüpunkt SYSTEM Bestätigen Sie mit der Displaytaste OK und wählen Sie den Menüpunkt MT ABMELDEN. Wählen Sie, welches Mobilteil abgemeldet werden soll und bestätigen Sie mit der Displaytaste OK. -
Seite 36: Fehlerbeseitigung
- Fehlerbeseitigung - 12 Fehlerbeseitigung Haben Sie Probleme mit Ihrem Telefon, kontrollieren Sie bitte zuerst die folgenden Hinweise. Bei technischen Problemen können Sie sich auch an unsere Hotline unter Tel. 0180 5 00 13 88 (Kosten Telekom bei Drucklegung: 12ct/min) wenden. Bei Garantieansprüchen wenden Sie sich bitte an Ihren Fachhändler. -
Seite 37: Wichtige Informationen
- Wichtige Informationen - 13 Wichtige Informationen 13.1 Technische Daten Standard DECT-GAP Kanalzahl 1880 bis 1900 MHz Stromversorgung Basisstation 220/230V, 50 Hz Reichweite Innen bis zu 50m Reichweite Außen bis zu 300m Standby bis zu 120 Stunden Max. Gesprächsdauer bis zu 8 Stunden Aufladbare Standard-Akkus 2 x 1,2V/750mAh, Typ AAA Wählverfahren... -
Seite 38: Garantie
Sollte Ihr Gerät dennoch einen Defekt innerhalb der Garantiezeit aufweisen, wenden Sie sich bitte unter Vorlage Ihrer Kaufquittung ausschließlich an das Geschäft, in dem Sie Ihr AUDIOLINE - Gerät gekauft haben. Alle Gewährleistungsansprüche nach diesen Bestimmungen sind ausschließlich gegenüber Ihrem Fachhändler geltend zu machen. -
Seite 76: Wichtige Garantiehinweise
WICHTIGE GARANTIEHINWEISE Die Garantiezeit für Ihr AUDIOLINE - Produkt beginnt mit dem Kaufdatum. Ein Garantieanspruch besteht bei Mängeln, die auf Material- oder Herstellungsfehler zurückzuführen sind. Der Garantieanspruch erlischt bei Eingriffen durch den Käufer oder durch Dritte. Schäden, die durch unsachgemäße Behandlung oder Bedienung, natürliche Abnutzung, durch falsches Aufstellen oder Aufbewahren, durch...