
Verwandte Anleitungen für Silvercrest SAR 28 A1 - IAN 85465


Inhaltszusammenfassung für Silvercrest SAR 28 A1 - IAN 85465
- Seite 1 AUTORADIO SAR 28 A1 AUTORADIO AUTORADIO Bedienungsanleitung Mode d’emploi AUTORADIO AUTORADIO Istruzioni per l’uso Gebruiksaanwijzing CAR RADIO Operating instructions IAN 85465...
- Seite 2 Klappen Sie vor dem Lesen die beiden Seiten mit den Abbildungen aus und machen Sie sich anschließend mit allen Funktionen des Gerätes vertraut. Avant de lire le mode d‘emploi, ouvrez les deux pages contenant les illustrations et familiarisez-vous ensuite avec toutes les fonctions de l‘appareil. Prima di leggere aprire le due pagine con le immagini e prendere confi...
-
Seite 5: Inhaltsverzeichnis
Inhaltsverzeichnis Einführung ...........2 Vorwort . -
Seite 6: Einführung
Einführung Einführung Vorwort Herzlichen Glückwunsch zum Kauf Ihres neuen Gerätes. Sie haben sich damit für ein hochwertiges Produkt entschieden. Diese Bedie- nungsanleitung ist Bestandteil des Autoradios SAR 28 A1 (nachfolgend als Gerät bezeichnet) und gibt Ihnen wichtige Hinweise für den bestimmungsgemä- ßen Gebrauch, die Sicherheit, den Einbau und Anschluss, sowie die Bedienung des Gerätes. -
Seite 7: Warnhinweise
Einführung Warnhinweise In der vorliegenden Bedienungsanleitung werden folgende Warnhinweise verwendet: WARNUNG Ein Warnhinweis dieser Gefahrenstufe kennzeichnet eine mögliche gefährliche Situation. Falls die gefährliche Situation nicht vermieden wird, kann dies zu Verletzungen führen. ► Die Anweisungen in diesem Warnhinweis befolgen, um Verletzungen von Personen zu vermeiden. -
Seite 8: Sicherheit
Einführung Sicherheit In diesem Kapitel erhalten Sie wichtige Sicherheitshinweise im Umgang mit dem Gerät. Dieses Gerät entspricht den vorgeschriebenen Sicherheitsbestimmungen. Ein unsachgemäßer Gebrauch kann jedoch zu Personen- und Sachschäden führen. Grundlegende Sicherheitshinweise Beachten Sie für einen sicheren Umgang mit dem Gerät die folgenden Sicher- heitshinweise: ■... -
Seite 9: Lieferumfang Und Transportinspektion
Einführung Lieferumfang und Transportinspektion WARNUNG Erstickungsgefahr! ► Verpackungsmaterialien dürfen nicht zum Spielen verwendet werden. Es besteht Erstickungsgefahr. Das Gerät wird standardmäßig mit folgenden Komponenten geliefert: ▯ Autoradio (inklusive Bedienteil) ▯ Einbaurahmen (aufgesteckt) ▯ Verankerungsblech (inkl. Befestigungsmaterial) ▯ Schlüssel für Einbaurahmen (2x) ▯... -
Seite 10: Bedienelemente
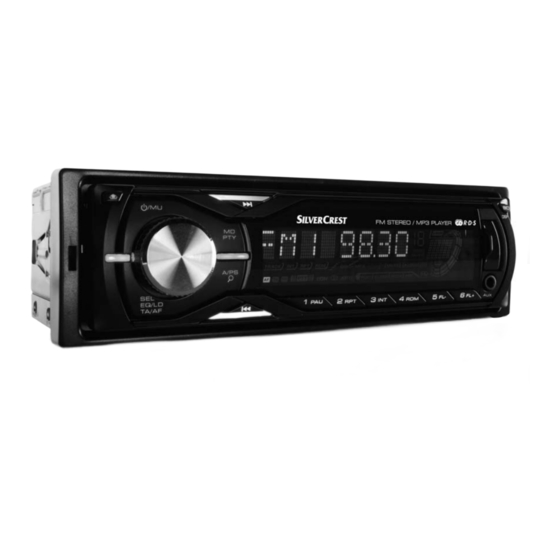
Bedienelemente Bedienelemente Autoradio (siehe vordere Ausklappseite) Abbildung A: Taste : Entriegelung Bedienteil Taste /MU: Gerät ein- und ausschalten/Ton ausschalten Taste MD/PTY: Betriebsmodus einstellen/PTY-Funktion einstellen Taste ▸▸I: Titel-/Sendersuchlauf vorwärts Display USB-Anschluss BD/DISP: Speicherplatzband wählen/Displayinformationen anzeigen AUX: 3,5 mm Stereo-Eingangsbuchse für den Anschluss eines externen Audiogerätes Taste 6/FL+: Senderspeicherplatz 6/Ordner vorwärts bei MP3-/WMA-Wiedergabe Taste 5/FL-: Senderspeicherplatz 5/Ordner rückwärts bei MP3-/WMA-Wiedergabe Taste 4/RDM: Senderspeicherplatz 4/ Zufallswiedergabe bei MP3-/WMA-Wiedergabe... -
Seite 11: Installation
Installation Zubehör (siehe hintere Ausklappseite) Abbildung D: Etui für Bedienteil Einbaurahmen Schlüssel für Einbaurahmen Verankerungsblech (inkl. Befestigungsmaterial) Installation WARNUNG Bei der Installation des Gerätes können Sachschäden auftreten! ► Lassen Sie das Gerät nach Möglichkeit von einem Fachbetrieb einbauen. ► Wenn Sie das Gerät selbst einbauen möchten, beachten Sie für einen sicheren und fehlerfreien Betrieb des Gerätes die Anweisungen für den Anschluss und Einbau. -
Seite 12: Antennenstrom-Anschluss
Installation Belegung Hinten rechts + Hinten rechts - ISO B (Belegung Vorne rechts + Lautsprecher- Vorne rechts - anschlüsse) Vorne links + Vorne links - Hinten links + Hinten links - Um das Gerät an zwei Lautsprecher anzuschließen, verwenden Sie nur die Kabel für die vorderen Lautsprecher. -
Seite 13: Einbau
Installation Anschluss eines externen Subwoofers Für den Anschluss eines externen Subwoofers benutzen Sie den orangen Cinch- Ausgang SUBW . Beachten Sie hierzu die Bedienungsanleitung des externen Subwoofers. Anschlussschema Antenne Subwoofer ISO B ISO A Externer Verstärker Einbau Das Gerät kann in jeden Standard-ISO-Einbauschacht eingesetzt werden. Sollte Ihr Kraftfahrzeug keinen ISO-Einbauschacht besitzen, wenden Sie sich an Ihre Fachwerkstatt, den Fachhandel oder die Fachabteilungen der Warenhäuser. -
Seite 14: Einbau Des Gerätes In Den Iso-Schacht
Installation ■ Bauen Sie das Gerät nicht an einem Platz ein, wo es hohen Temperaturen (z. B. direkte Sonneneinstrahlung oder Heizungsluft), starker Verschmutzung und starken Erschütterungen ausgesetzt ist. ■ Falls Änderungen am Fahrzeug erforderlich sind, wenden Sie sich an Ihren Fahrzeughändler/eine Fachwerkstatt. Einbau des Gerätes in den ISO-Schacht ♦... -
Seite 15: Das Gerät Ausbauen
Installation ACHTUNG Mögliche Beschädigung der Kabel! ► Beachten Sie beim Einschieben die Verlegung der Kabel, um eine Beschädigung zu vermeiden. ♦ Schieben Sie das Gerät vorsichtig in den Einbaurahmen , bis es einrastet. ♦ Nachdem alle Verbindungen hergestellt sind, betätigen Sie die Taste RESET für ca. -
Seite 16: Inbetriebnahme
Inbetriebnahme Inbetriebnahme Bedienteil Zum Schutz vor Diebstahl, können Sie das Bedienteil Ihres Gerätes abnehmen. Bewahren Sie das abgenommene Bedienteil nicht in Ihrem Fahrzeug auf. HINWEIS ► Bewahren Sie das Bedienteil zum Schutz immer im Etui auf. Bedienteil einsetzen ♦ Setzen Sie das Bedienteil zuerst mit der rechten Seite auf den Haltepunkt ♦... -
Seite 17: Bedienung Und Betrieb
Bedienung und Betrieb Bedienung und Betrieb In diesem Kapitel erhalten Sie wichtige Hinweise zur Bedienung und Betrieb des Gerätes. HINWEIS ► Erfolgt innerhalb von etwa 5 Sekunden keine Einstellung bzw. kein Tasten- druck, kehrt das Gerät in die vorherige Betriebsart zurück. Geänderte Einstellungen werden gespeichert. -
Seite 18: Radio Zurücksetzen (Reset)
Bedienung und Betrieb Display ♦ Drücken Sie mehrmals die Taste BD/DISP , um sich nacheinander folgende Informationen anzeigen zu lassen: Radiosender, Uhrzeit (wird bei RDS-Empfang automatisch eingestellt), Frequenz und PTY-Einstellungen (diese RDS-Funktionen werden von den Sendeanstalten in unterschiedlichem Umfang gesendet; siehe auch Kapitel „Radiofunktionen”). HINWEIS ►... -
Seite 19: Weitere Einstellungen Über Die Taste Sel (Eq/Ld/Ta/Af)
Bedienung und Betrieb Weitere Einstellungen über die Taste SEL (EQ/LD/TA/AF) ♦ Halten Sie die Taste SEL ca. 2 Sekunden lang gedrückt und drücken Sie danach so oft die Taste SEL, bis die gewünschte Funktion im Display angezeigt wird. ♦ Drehen Sie den Multiregeler , um die Einstellungen des angezeigten Menüpunktes zu ändern. - Seite 20 Bedienung und Betrieb STEREO/MONO - Audioausgabe einstellen ♦ Drehen Sie den Multiregler , um die Audioausgabe bei Radiobetrieb in Stereo- (STEREO) oder Monoton (MONO) einzustellen. Beim Empfang eines Stereo-Senders erscheint im Display das Stereosymbol LOUD - Loudness-Funktion ein-/ausschalten Drehen Sie den Multiregler, um Bässe und Höhen anzuheben (LOUD ON) ♦...
-
Seite 21: Radiofunktionen
Bedienung und Betrieb Radiofunktionen Senderspeicherband wählen ♦ Drücken Sie die Taste BD/DISP , um zwischen den Senderspeicherbän- dern (FM1, FM2, FM3) zu wechseln. Jedes Senderspeicherband deckt den selben Frequenzbereich (87,5 - 108 MHz) ab und verfügt über 6 Speicherplätze. Sender automatisch suchen ♦... -
Seite 22: Programm-Typ (Pty)
Bedienung und Betrieb Programmtyp (PTY) Mit Hilfe dieser Funktion können Sie nach Sendern eines bestimmten Genres suchen. Folgende Einstellungen sind möglich: POP M SPORT VARIED OLDIES ROCK M EDUCATE JAZZ SOCIAL NEWS DRAMA COUNTRY RELIGION AFFAIRS CLASSICS WEATHER PHONE IN INFO OTHER M FINANCE... -
Seite 23: Usb-Anschluss
Bedienung und Betrieb PTY-Funktion ein-/ausschalten ♦ Um die PTY-Suche zu aktivieren, drücken Sie die Taste MD/PTY Im Display erscheint die Anzeige PTY und der zuletzt gewählte PTY-Eintrag (z.B. POP M). Bei der Sendersuche werden nur Sender der aktuell gewählten PTY-Kennung berücksichtigt. -
Seite 24: Funktionen Mp3/Wma-Wiedergabe
Bedienung und Betrieb Funktionen MP3/WMA-Wiedergabe Wiedergabe ■ Das Gerät kann Dateien im Format MP3 und WMA abspielen. ■ Ein Vermischen von Titeln und Verzeichnissen auf derselben Ebene könnte zu Problemen beim Abspielen führen. ■ Während der Wiedergabe werden die Informationen aus dem ID3-Tag der MP3-Datei ausgelesen und nacheinander im Display angezeigt. -
Seite 25: Titel Kurz Anspielen
Bedienung und Betrieb Titel kurz anspielen . Im Display erscheint kurz INT ON. Es wer- ♦ Drücken Sie die Taste 3/INT den nacheinander alle Titel für ca. 10 Sekunden angespielt. ♦ Drücken Sie die Taste 3/INT erneut, um die Wiedergabe des aktuell ange- spielten Titels zu starten. -
Seite 26: Ein Externes Audiogerät An Das Gerät Anschließen
Bedienung und Betrieb Suche nach Verzeichnissen ♦ Drücken Sie die Taste A/PS dreimal. Das aktuell wiedergegebene Verzeichnis erscheint. ♦ Drehen Sie den Multiregler , um zwischen den vorhandenen Verzeichnis- sen umzuschalten. ♦ Drücken Sie die Taste 1/PAU , um das aktuell angezeigte Verzeichnis auszuwählen. -
Seite 27: Reinigung
Reinigung/Entsorgung Reinigung Sicherheitshinweise ACHTUNG Mögliche Beschädigung des Gerätes ► Stellen Sie sicher, dass bei der Reinigung keine Feuchtigkeit in das Gerät eindringt, um eine irreparable Beschädigung des Gerätes zu vermeiden. Display reinigen ■ Reinigen Sie die Vorderseite des Gerätes / das Display ausschließlich mit einem leicht feuchten, fusselfreien Tuch und einem milden Spülmittel. -
Seite 28: Fehlerbehebung
Fehlerbehebung Fehlerbehebung In diesem Kapitel erhalten Sie wichtige Hinweise zur Störungslokalisierung und Störungsbehebung. Beachten Sie die Hinweise um Gefahren und Beschädigungen zu vermeiden. Sicherheitshinweise WARNUNG Beachten Sie die folgenden Sicherheitshinweise um die Gefahren und Sach- schäden zu vermeiden: ► Reparaturen an Elektrogeräten dürfen nur von Fachleuten durchgeführt werden, die vom Hersteller geschult sind. - Seite 29 Fehlerbehebung Fehler Mögliche Ursache Behebung Der USB-Anschluss ist für Ge- räte, die nach der USB-Norm funktionieren, bestimmt. Nicht Schließen Sie ein Gerät an, das nach Gerät am alle am Markt erhältliche Ge- USB-Norm funktioniert. Stellen Sie USB-Anschluss räte erfüllen diese Norm. Un- sicher, das der Datenträger mit dem funktioniert nicht ter Umständen ist ein Gerät,...
-
Seite 30: Anhang
Anhang Anhang Technische Daten Allgemeines Eingangsspannung V DC Eingangsstrom max. 7,5 Nennleistung 4 x 7 Betriebstemperatur +5 - +40 °C Feuchtigkeit (keine Kondensation) ≤ 75 Abmessungen (L x B x H) 18,6 x 12,7 x 5,7 Gewicht inkl. Zubehör ca. 650 Gerätesicherung KFZ-Flachsteckersicherung Frequenzbereich Radio... -
Seite 31: Hinweise Zur Eg-Konformitätserklärung
Anhang Hinweise zur EG-Konformitätserklärung Dieses Gerät entspricht hinsichtlich Übereinstimmung mit den grundlegenden Anforderungen und den anderen rele- vanten Vorschriften der Kfz-Richtlinie 2004/104/EC. Die vollständige Original-Konformitätserklärung ist beim Importeur erhältlich. Garantie Sie erhalten auf dieses Gerät 3 Jahre Garantie ab Kaufdatum. Das Gerät wurde sorgfältig produziert und vor Anlieferung gewissenhaft geprüft. - Seite 32 SAR 28 A1...
-
Seite 33: Fehlerbeschreibung
Garantie Autoradio SAR 28 A1 Service Deutschland Um einen kostenlosen Reparaturab- Tel.: 01805 772 033 (0,14 EUR/Min. aus dem dt. Festnetz, Mobilfunk max. 0,42 EUR/Min.) lauf zu gewährleisten, setzen Sie E-Mail: kompernass@lidl.de sich bitte mit der Service-Hotline in IAN 85465 Verbindung. - Seite 35 Table des matières Introduction ..........32 Avant-propos .
-
Seite 36: Introduction
Introduction Introduction Avant-propos Toutes nos félicitations pour l'achat de votre nouvel appareil. Ainsi, vous venez d'opter pour un produit de grande qualité. La notice d'utilisation fait partie intégrante de l'autoradio SAR 28 A1 (ci-après désigné "appareil") ; celle-ci contient des consignes importantes pour une utilisation conforme à la des- tination, la sécurité, l'installation, le raccordement et la commande de l'appareil. -
Seite 37: Avertissements
Introduction Avertissements Les avertissements suivants sont utilisés dans ce mode d'emploi : AVERTISSEMENT Un avertissement de ce niveau de danger signale une situation potentiellement dangereuse. Au cas où la situation dangereuse ne peut être écartée, cela peut entraîner des blessures. ►... -
Seite 38: Sécurité
Introduction Sécurité Ce chapitre contient des consignes de sécurité importantes se rapportant à la manipulation de l'appareil. Cet appareil est conforme aux consignes de sécurité prescrites. Une utilisation incorrecte peut toutefois provoquer des dommages corporels et des dégâts matériels. Consignes de sécurité fondamentales Veuillez vous conformer aux consignes de sécurité... -
Seite 39: Fournitures D'origine Et Inspection Après Transport
Introduction Fournitures d'origine et inspection après transport AVERTISSEMENT Risque d'asphyxie ! ► Les matériaux d'emballage ne doivent pas être considérés comme un jouet. Il y a risque d'étouff ement. L'appareil est équipé de manière standard des composants suivants : ▯ Autoradio (élément de commande inclus) ▯... -
Seite 40: Éléments De Commande
Éléments de commande Éléments de commande Autoradio (voir le volet dépliant avant) Figure A : Touche Déverrouillage de l'élément de commande Touche /MU : Allumage et extinction de l'appareil/coupure du son Touche MD/PTY : Réglage du mode de fonctionnement/réglage de la fonction PTY Touche ▸▸I : Recherche en avant de titres/stations Écran Port USB... -
Seite 41: Installation
Installation Accessoires (voir le volet dépliant arrière) Figure D : Étui pour l'élément de commande Châssis de montage Clés pour le châssis de montage Tôle d'ancrage (matériel de fi xation inclus) Installation AVERTISSEMENT Risque de dégâts matériels pendant l'installation de l'appareil ! ►... -
Seite 42: Raccordement D'un Amplifi Cateur Externe
Installation Aff ectation Arrière droit + Arrière droit - ISO B Avant droit + (aff ectation des Avant droit - ports de haut- Avant gauche + parleurs) Avant gauche - Arrière gauche + Arrière gauche - Pour raccorder l'appareil à deux haut-parleurs, utilisez uniquement les câbles aff... -
Seite 43: Montage
Installation Raccordement d'un subwoofer externe Pour raccorder un subwoofer externe, utilisez la sortie cinch orange SUBW Respectez à ce sujet la notice d'utilisation du subwoofer externe. Schéma de raccordement Antenne Subwoofer ISO B ISO A Amplifi cateur externe Montage L'appareil peut être inséré dans n'importe quelle cavité de montage ISO standard. Si votre véhicule ne possède pas de cavité... - Seite 44 Installation ■ Ne montez pas l'appareil à un endroit présentant des températures élevées (par exemple ensoleillement direct ou air du chauff age), des salissures ou de fortes vibrations. ■ S'il s'avère nécessaire de procéder à des adaptations sur le véhicule, adres- sez-vous à...
-
Seite 45: Désinstaller L'appareil
Installation ATTENTION Risque d'endommager les câbles ! ► Lors de l'insertion, tenez compte du cheminement des câbles pour éviter tout endommagement. ♦ Insérez prudemment l'appareil dans le châssis de montage , jusqu'à ce qu'il s'encrante. ♦ Après avoir établi tous les raccordements, appuyez sur la touche RESET pendant environ 6 secondes avec un stylo à... -
Seite 46: Mise En Service
Mise en service Mise en service Élément de commande Pour protéger celui-ci contre le vol, vous pouvez retirer l'élément de commande de votre appareil. Ne laissez pas l'élément de commande retiré dans votre véhicule. REMARQUE ► Pour protéger l'élément de commande, rangez-le toujours dans son étui Mise en place de l'élément de commande ♦... -
Seite 47: Utilisation Et Fonctionnement
Utilisation et fonctionnement Utilisation et fonctionnement Ce chapitre contient des remarques importantes sur l'utilisation et le fonctionne- ment de l'appareil. REMARQUE ► Si dans un délai de 5 secondes, aucun réglage n'est eff ectué ou aucune touche n'est utilisée, l'appareil revient au mode de fonctionnement précédent. Les modifi... -
Seite 48: Réinitialiser La Radio (Reset)
Utilisation et fonctionnement Écran ♦ Appuyez plusieurs fois sur la touche BD/DISP pour affi cher successive- ment les informations suivantes : émetteur radio, heure (réglage automatique en cas de réception RDS), fréquence et réglages PTY (ces fonctions RDS sont émises par les stations émettrices dans un volume variable ;... - Seite 49 Utilisation et fonctionnement Autres réglages via la touche SEL (EQ/LD/TA/AF) ♦ Maintenez la touche SEL appuyée pendant environ 2 secondes puis appuyez répétitivement sur la touche SEL jusqu'à ce que la fonction souhaitée s'affi che. ♦ Tournez le sélecteur pour modifi er les réglages de l'option de menu affi...
- Seite 50 Utilisation et fonctionnement Régler l'écoute sur STEREO ou MONO ♦ Tournez le sélecteur pour régler la radio sur l'écoute en stéréo (STEREO) ou en mono (MONO). Pendant la réception d'un émetteur stéréo, le symbole de la stéréo s'affi che. LOUD - Activer / désactiver la fonction de tonalité Tournez le sélecteur pour hausser les basses et les aiguës (LOUD ON) ou pour ♦...
-
Seite 51: Fonctions Radio
Utilisation et fonctionnement Fonctions radio Choisir la bande d'enregistrement de stations ♦ Appuyez sur la touche BD/DISP pour changer de bande d'enregistre- ment de stations (FM1, FM2 et FM3) Chaque bande d'enregistrement de stations couvre la même plage de fréquences (87,5 - 108 MHz) et dispose de 6 emplacements mémoire. -
Seite 52: Type De Programme (Pty)
Utilisation et fonctionnement Type de programme (PTY) Cette fonction vous permet de rechercher des stations d'un genre précis. Il est possible de confi gurer les paramètres suivants : POP M SPORT VARIED OLDIES ROCK M EDUCATE JAZZ SOCIAL NEWS DRAMA COUNTRY RELIGION AFFAIRS... -
Seite 53: Port Usb
Utilisation et fonctionnement Activer/Désactiver la fonction PTY ♦ Pour activer la recherche PTY, appuyez sur la touche MD/PTY La mention PTY s'affi che ainsi que l'entrée PTY choisie en dernier (par exemple POP M). Lors de la recherche de stations, seules les stations portant le code PTY actuelle- ment sélectionné... -
Seite 54: Fonctions De Lecture Mp3 / Wma
Utilisation et fonctionnement Fonctions de lecture MP3 / WMA Lecture ■ L'appareil peut lire des fi chiers au format MP3 et WMA. ■ Un mélange de titres et de répertoires sur le même niveau peut entraîner des problèmes lors de la lecture. ■... -
Seite 55: Fonctions De Recherche
Utilisation et fonctionnement Lire brièvement un titre . La mention INT ON s'affi che brièvement. ♦ Appuyez sur la touche 3/INT Tous les titres sont lus successivement pendant env. 10 secondes. ♦ Appuyez à nouveau sur la touche 3/INT pour lancer la lecture complète du titre actuellement écouté. -
Seite 56: Raccorder Un Appareil Audio Externe À L'appareil
Utilisation et fonctionnement Recherche par répertoires ♦ Appuyez trois fois sur la touche A/PS . Le répertoire que l'appareil lit actuellement s'affi che. ♦ Tournez le sélecteur pour commuter entre les répertoires présents. ♦ Appuyez sur la touche 1/PAU pour sélectionner le répertoire actuelle- ment affi... -
Seite 57: Nettoyage
Nettoyage/Mise au rebut Nettoyage Consignes de sécurité ATTENTION Risque d'endommager l'appareil ► Lors du nettoyage de l'appareil, assurez-vous qu'aucune humidité ne pénètre dans ce dernier afi n d'éviter tous dommages irréparables. Nettoyer l'écran ■ Nettoyez l'avant de l'appareil / l'écran exclusivement avec un chiff on légère- ment humide qui ne peluche pas et un détergent doux. -
Seite 58: Dépannage
Dépannage Dépannage Ce chapitre vous donne des remarques importantes relatives à la localisation et l'élimination des pannes. Respectez les remarques pour éviter tous dangers et dégâts. Consignes de sécurité AVERTISSEMENT Respectez les consignes de sécurité suivantes pour éviter tous dangers et dégâts matériels : ►... - Seite 59 Dépannage Panne Cause possible Remède Le port USB est prévu pour les appareils qui fonctionnent L'appareil selon la norme USB. Tous Branchez un appareil compatible à branché sur le les appareils disponibles sur la norme USB. Assurez-vous que le port USB ne le marché...
-
Seite 60: Annexe
Annexe Annexe Caractéristiques techniques Généralités Tension d'entrée V DC Intensité d'entrée max. 7,5 Puissance nominale 4 x 7 Température de service de + 5 à + 40 °C Humidité (sans condensation) ≤ 75 Dimensions (L x l x H) 18,6 x 12,7 x 5,7 Poids, accessoires inclus env. -
Seite 61: Remarques Concernant La Déclaration De Conformité Ce
Annexe Remarques concernant la déclaration de conformité CE Cet appareil est conforme aux exigences fondamentales et autres prescriptions pertinentes de la directive automobile 2004/104/EC. La déclaration de conformité originale est disponible chez l'importateur. Garantie Cet appareil bénéfi cie de 3 ans de garantie à compter de la date d'achat. L'appareil a été... - Seite 62 SAR 28 A1...
- Seite 63 Garantie Autoradio SAR 28 A1 Service France Tel.: 0800 919270 Afi n de garantir la gratuité de la E-Mail: kompernass@lidl.fr réparation, veuillez prendre contact IAN 85465 avec la hotline du service après- vente. À cet eff et, tenez votre ticket de caisse à...
- Seite 65 Indice Introduzione ..........62 Prefazione .
-
Seite 66: Introduzione
Introduzione Introduzione Prefazione Congratulazioni per l'acquisto del nuovo apparecchio. Ha scelto un prodotto di alta qualità. Il presente manuale di istruzioni è parte integrante dell'autoradio SAR 28 A1 (di seguito denominata l'apparecchio) e fornisce informazioni importanti per l'uso conforme, la sicurezza, l'installazione e il collegamento nonché... -
Seite 67: Avvertenze
Introduzione Avvertenze Nel presente manuale di istruzioni vengono utilizzate le seguenti avvertenze: AVVISO Un'avvertenza contrassegnata da questo livello di pericolo indica una situazione potenzialmente pericolosa. Qualora sia impossibile evitare tale situazione pericolosa, essa può dare luogo a lesioni. ► Seguire le istruzioni contenute in questa avvertenza per evitare lesioni personali. -
Seite 68: Sicurezza
Introduzione Sicurezza In questo capitolo sono riportate importanti indicazioni di sicurezza per l'uso dell'apparecchio. Questo apparecchio corrisponde alle disposizioni di sicurezza prescritte. L'uso non conforme può tuttavia comportare danni a persone e cose. Avvertenze di sicurezza di base Per l'uso sicuro dell'apparecchio, rispettare le seguenti avvertenze di sicurezza: ■... -
Seite 69: Volume Della Fornitura E Ispezione Per Eventuali Danni Da Trasporto
Introduzione Volume della fornitura e ispezione per eventuali danni da trasporto AVVISO Pericolo di soff ocamento! ► Il materiale di imballaggio non deve essere utilizzato come giocattolo. Sussiste il pericolo di soff ocamento. La fornitura standard dell'apparecchio comprende i seguenti componenti: ▯... -
Seite 70: Elementi Di Comando
Elementi di comando Elementi di comando Autoradio (v. pagina apribile sul fronte) Figura A: Tasto : Sbloccaggio del frontalino Tasto /MU: accensione e spegnimento dell'apparecchio/disattivazione dell'audio Tasto MD/PTY: Impostazione della modalità di funzionamento/ Impostazione della funzione PTY Tasto ▸▸I: ricerca di brano/emittente in avanti Display Porta USB BD/DISP: Selezione banda posizioni di memoria / Visualizzazione informazioni display... -
Seite 71: Installazione
Installazione Accessori (v. pagina apribile sul retro) Figura D: Astuccio per frontalino Telaio di montaggio Chiave per telaio di montaggio Piastra di ancoraggio (incl. materiale di fi ssaggio) Installazione AVVISO Durante l'installazione dell'apparecchio possono verifi carsi danni materiali! ► Se possibile fare installare l'autoradio da un'azienda specializzata. ►... - Seite 72 Installazione Assegnazione Dietro a destra + Dietro a destra - ISO B Davanti a destra + (assegnazione Davanti a destra - connessioni Davanti a sinistra + altoparlante) Davanti a sinistra - Dietro a sinistra + Dietro a sinistra - Per connettere l'apparecchio a due altoparlanti, utilizzare solo il cavo dell'alto- parlante anteriore.
-
Seite 73: Installazione
Installazione Connessione di un subwoofer esterno Per la connessione di un subwoofer esterno, utilizzare l'uscita cinch arancione SUBW . Rispettare in tal caso le istruzioni per l'uso del subwoofer esterno. Schema di collegamento Antenna Subwoofer ISO B ISO A Amplifi catore esterno Installazione L'apparecchio può... - Seite 74 Installazione ■ Non installare l'apparecchio in un luogo caratterizzato da temperature elevate (ad es. irradiazione solare diretta o aria riscaldata), forte incidenza di sporco e forti scosse. ■ Qualora fosse necessario eseguire modifi che al veicolo, rivolgersi al proprio rivenditore/offi cina specializzata. Installazione della radio nel vano ISO ♦...
-
Seite 75: Smontaggio Dell'apparecchio
Installazione ATTENZIONE Possibile danneggiamento del cavo! ► Nell'inserimento, fare attenzione alla posizione del cavo, per evitarne il danneggiamento. ♦ Spingere cautamente l'apparecchio nel telaio di montaggio fi no all'arresto. ♦ Dopo aver eseguito tutte le connessioni, azionare il tasto RESET ca. -
Seite 76: Messa In Funzione
Messa in funzione Messa in funzione Frontalino Per la protezione dai furti, è possibile rimuovere il frontalino dell'apparecchio. Non lasciare il frontalino dell'apparecchio nel veicolo. AVVERTENZA ► Per proteggere il frontalino, riporlo sempre nell'astuccio. Inserimento del frontalino ♦ Inserire il frontalino nel telaio prima con il lato destro sul punto di sostegno ♦... -
Seite 77: Comandi E Funzionamento
Comandi e funzionamento Comandi e funzionamento In questo capitolo sono riportate indicazioni importanti relative ai comandi e al funzionamento dell'apparecchio. AVVERTENZA ► Qualora nel giro di 5 secondi non venga eseguita alcuna impostazione o premuto alcun tasto, l'apparecchio ritorna alla precedente modalità di funzionamento. -
Seite 78: Reimpostazione Radio (Reset)
Comandi e funzionamento Display ♦ Premere più volte il tasto BD/DISP per visualizzare in sequenza le seguenti informazioni: emittente radio, orario (impostato automaticamente alla ricezione RDS), frequenza e impostazioni PTY (queste funzioni RDS vengono inviate dalle emittenti con estensioni diverse; vedi anche capitolo "Funzioni radio"). AVVERTENZA Se non si ricevono informazioni RDS o PTY, nel display comparirà... - Seite 79 Comandi e funzionamento Ulteriori impostazioni tramite il tasto SEL (EQ/LD/TA/AF) ♦ Tenere premuto il tasto SEL per ca. 2 secondi e premere quindi il tasto SEL fi no a visualizzare la funzione desiderata sul display. ♦ Ruotare il multiregolatore per modifi care le impostazioni delle voci di menu visualizzate.
- Seite 80 Comandi e funzionamento STEREO/MONO - impostazione dell'emissione audio ♦ Ruotare il multiregolatore per impostare l'emissione audio in modalità di funzionamento radio su stereo (STEREO) o mono (MONO). Alla ricezione di un'emittente in stereo, sul display compare il simbolo stereo LOUD - disattivazione/attivazione della funzione Loudness Ruotare il multiregolatore, per attivare (LOUD ON) o disattivare (LOUD OFF) i ♦...
-
Seite 81: Funzioni Radio
Comandi e funzionamento Funzioni radio Selezione della fascia di spazi di memoria per emittenti ♦ Premere il tasto BD/DISP per passare da una banda di posizioni di memoria all'altra (FM1, FM2, FM3). Ogni banda di posizioni di memoria copre lo stesso campo di frequenze (87,5 - 108 MHz) e dispone di 6 posizioni di memoria. - Seite 82 Comandi e funzionamento Tipo di programma (PTY) Con l'ausilio di questa funzione è possibile cercare emittenti in base al tema. Sono possibili le seguenti impostazioni: POP M SPORT VARIED OLDIES ROCK M EDUCATE JAZZ SOCIAL NEWS DRAMA COUNTRY RELIGION AFFAIRS CLASSICS WEATHER PHONE IN...
-
Seite 83: Porta Usb
Comandi e funzionamento Attivazione/disattivazione della funzione PTY ♦ Per attivare la ricerca PTY, premere il tasto MD/PTY . Nel display com- pare il messaggio PTY e la voce PTY selezionata per ultima (ad es. POP M). Nella ricerca dell'emittente vengono considerati solo emittenti con il codice PTY correntemente selezionato. -
Seite 84: Funzioni Di Riproduzione Mp3/Wma
Comandi e funzionamento Funzioni di riproduzione MP3/WMA Riproduzione ■ L'apparecchio può riprodurre fi le in formato MP3 e WMA. ■ Mescolare brani e directory sullo stesso livello potrebbe creare problemi al momento della riproduzione. ■ Durante la riproduzione, le informazioni derivanti dai tag ID3 del fi le MP3 vengono lette e visualizzate consecutivamente nel display. -
Seite 85: Funzioni Di Ricerca
Comandi e funzionamento Breve riproduzione di un brano . Nel display compare brevemente INT ON. ♦ Premere il tasto 3/INT Vengono riprodotti tutti i brani in successione per ca. 10 secondi. ♦ Premere nuovamente il tasto 3/INT per avviare la riproduzione del brano di cui è... -
Seite 86: Connessione Di Un Apparecchio Audio Esterno All'apparecchio
Comandi e funzionamento Ricerca directory ♦ Premere tre volte il tasto A/PS . Comparirà la directory correntemen- te riprodotta. ♦ Ruotare il multiregolatore per passare da una directory disponibile all'altra. ♦ Premere il tasto 1/PAU , per selezionare la directory correntemente visualizzata. -
Seite 87: Pulizia
Pulizia/Smaltimento Pulizia Indicazioni relative alla sicurezza ATTENZIONE Possibile danneggiamento dell'apparecchio ► Assicurarsi che durante la pulizia non penetri l'umidità nell'apparecchio, per evitarne un irreparabile danneggiamento. Pulizia del display ■ Pulire il fronte dell'apparecchio / il display esclusivamente con un panno leggermente inumidito e privo di pelucchi e un detergente delicato. -
Seite 88: Guasti E Possibili Rimedi
Guasti e possibili rimedi Guasti e possibili rimedi In questo capitolo sono riportate importanti informazioni per localizzare ed elimi- nare i guasti. Rispettare le indicazioni per evitare pericoli e danneggiamenti. Indicazioni relative alla sicurezza AVVISO Rispettare le seguenti indicazioni di sicurezza per evitare pericoli e danni materiali: ►... - Seite 89 Guasti e possibili rimedi Guasto Possibile causa Rimedio L'attacco USB è destinato ad apparecchi che funzionano in base alla norma USB. L'apparecchio Connettere un apparecchio che funzio- Non tutti gli apparecchi re- collegato all'at- ni secondo la norma USB. Assicurarsi peribili sul mercato sono con- tacco USB non che il supporto dati sia stato formattato...
-
Seite 90: Appendice
Appendice Appendice Dati tecnici Generalità Tensione di ingresso V DC Corrente di ingresso max. 7,5 Potenza nominale 4 x 7 Temperatura di esercizio +5 - +40 °C Umidità (nessuna condensa) ≤ 75 Dimensioni (l x p x a) 18,6 x 12,7 x 5,7 Peso incl. -
Seite 91: Indicazioni Sulla Dichiarazione Di Conformità Ce
Appendice Indicazioni sulla dichiarazione di conformità CE Questo apparecchio è conforme ai requisiti di base e alle altre norme rilevanti della Direttiva autoveicoli 2004/104/EC. La dichiarazione di conformità originale e completa è a disposizione presso l'importatore. Garanzia Questo apparecchio è garantito per tre anni a partire dalla data di acquisto. L'apparecchio è... - Seite 92 SAR 28 A1...
- Seite 93 Garanzia Autoradio SAR 28 A1 Assistenza Italia Tel.: 02 36003201 Per avere la certezza di una ripara- E-Mail: kompernass@lidl.it zione gratuita, mettersi in contatto IAN 85465 con la nostra hotline di assistenza. Tenere lo scontrino a portata di mano. Assistenza Svizzera Tel.: 0842 665566 (0,08 CHF/Min., Indicare chiaramente il mittente: telefonia mobile max.
- Seite 95 Inhoud Inleiding ..........92 Voorwoord .
-
Seite 96: Inleiding
Inleiding Inleiding Voorwoord Hartelijk gefeliciteerd met de aankoop van uw nieuwe apparaat. U hebt hiermee gekozen voor een hoogwaardig product. Deze gebruiksaanwijzing maakt deel uit van de autoradio SAR 28 A1 (hierna aangeduid als apparaat) en bevat belangrijke aanwijzingen voor het gebruik in overeenstemming met de bestemming, de veiligheid, het inbouwen en aansluiten, evenals voor de bediening van het apparaat. -
Seite 97: Waarschuwingen
Inleiding Waarschuwingen In de onderhavige gebruiksaanwijzing worden de volgende waarschuwingen gebruikt: WAARSCHUWING Een waarschuwing op dit niveau van gevaar duidt op een mogelijk gevaarlijke situatie. Als de gevaarlijke situatie niet wordt vermeden, kan dit letsel tot gevolg hebben. ► Neem de aanwijzingen in deze waarschuwingen in acht om letsel van personen te voorkomen. -
Seite 98: Veiligheid
Inleiding Veiligheid In dit hoofdstuk krijgt u belangrijke veiligheidsinstructies voor de omgang met het apparaat. Dit apparaat voldoet aan de gestelde veiligheidsvoorschriften. Verkeerd gebruik kan echter leiden tot persoonlijk letsel en materiële schade. Basisveiligheidsvoorschriften Neem de volgende veiligheidsvoorschriften in acht voor een veilige omgang met het apparaat: ■... -
Seite 99: Inhoud Van Het Pakket En Inspectie Na Transport
Inleiding Inhoud van het pakket en inspectie na transport WAARSCHUWING Verstikkingsgevaar! ► Verpakkingsmateriaal mag niet als speelgoed worden gebruikt. Er bestaat verstikkingsgevaar. Het apparaat wordt standaard met de volgende componenten geleverd: ▯ Autoradio (inclusief bedieningspaneel) ▯ Inbouwframe (opgezet) ▯ Verankeringsplaat (incl. bevestigingsmateriaal) ▯... -
Seite 100: Bedieningselementen
Bedieningselementen Bedieningselementen Autoradio (zie voorste uitvouwpagina) Afbeelding A: Toets : ontgrendeling bedieningspaneel Toets /MU: apparaat in- en uitschakelen/geluid uitschakelen Toets MD/PTY: bedrijfsmodus instellen/PTY-functie instellen Toets ▸▸I: titel-/zenderzoekactie vooruit Display USB-aansluiting BD/DISP: zendergeheugenband kiezen/display-informatie weergeven AUX: 3,5 mm stereo-ingang voor aansluiting van een extern audioapparaat Toets 6/FL+: zendergeheugenpositie 6/map vooruit bij MP3-/WMA-weergave Toets 5/FL-: zendergeheugenpositie 5/map terug bij MP3-/WMA-weergave Toets 4/RDM: zendergeheugenpositie 4/willekeurige weergave bij MP3-/... -
Seite 101: Installatie
Installatie Accessoires (zie achterste uitvouwpagina) Afbeelding D: Etui voor bedieningspaneel Inbouwframe Sleutel voor inbouwframe Verankeringsplaat (incl. bevestigingsmateriaal) Installatie WAARSCHUWING Bij de installatie van het apparaat kan er materiële schade ontstaan! ► Laat het apparaat bij voorkeur inbouwen door een vakbedrijf. ►... -
Seite 102: Aansluiting Van Een Externe Versterker
Installatie Bezetting Achter rechts + Achter rechts - ISO B Voor rechts + (bezetting Voor rechts - luidsprekeraan- Voor links + sluitingen) Voor links - Achter links + Achter links - Gebruik alleen de kabels voor de voorste luidsprekers om het apparaat aan te sluiten op twee luidsprekers. -
Seite 103: Inbouw
Installatie Aansluiting van een externe subwoofer Voor de aansluiting van een externe subwoofer gebruikt u de oranje cinch- uitgang SUBW . Raadpleeg hiervoor de gebruiksaanwijzing van de externe subwoofer. Aansluitschema Antenne Subwoofer ISO B ISO A Externe versterker Inbouw De autoradio kan in iedere standaard ISO-inbouwschacht worden geplaatst. Wend u tot een vakgarage, de vakhandel of een speciale afdeling van een warenhuis als uw voertuig niet over een ISO-schacht beschikt. - Seite 104 Installatie ■ Bouw het apparaat niet in op een plaats waar het blootstaat aan hoge temperaturen (bijv. direct zonlicht of verwarmingslucht), sterke vervuiling of sterke vibraties. ■ Wend u tot uw autodealer/een vakgarage als er veranderingen aan het voertuig noodzakelijk zijn. Inbouw van het apparaat in de ISO-schacht ♦...
-
Seite 105: Het Apparaat Uitbouwen
Installatie LET OP Mogelijke beschadiging van de snoeren! ► Let tijdens het inschuiven op de snoeren, om beschadiging te voorkomen. ♦ Schuif het apparaat voorzichtig in het inbouwframe totdat het vastklikt. ♦ Druk, nadat alle verbindingen tot stand zijn gebracht, ongeveer 6 seconden op de toets RESET met een balpen of een ander puntig voorwerp. -
Seite 106: Ingebruikname
Ingebruikname Ingebruikname Bedieningspaneel Ter beveiliging tegen diefstal kunt u het bedieningspaneel van het apparaat halen. Bewaar het afgenomen bedieningspaneel niet in uw voertuig. OPMERKING ► Bewaar het bedieningspaneel ter bescherming altijd in het etui Bedieningspaneel aanbrengen ♦ Plaats het bedieningspaneel eerst met de rechterkant op het bevestigingspunt ♦... -
Seite 107: Bediening En Gebruik
Bediening en gebruik Bediening en gebruik In dit hoofdstuk krijgt u belangrijke aanwijzingen voor de bediening en het gebruik van het apparaat. OPMERKING ► Als u gedurende ongeveer 5 seconden geen instelling opgeeft, dat wil zeggen op een toets drukt, keert het apparaat terug naar de vorige be- drijfsmodus. -
Seite 108: Radio Resetten (Reset)
Bediening en gebruik Display ♦ Druk steeds op de toets BD/DISP om achtereenvolgens de volgende informatie weer te geven: Radiozender, tijd (wordt bij RDS-ontvangst automatisch ingesteld), frequentie en PTY-instellingen (de omvang van deze RDS-functies is afhankelijk van de zender, zie ook het hoofdstuk “Radiofuncties”). OPMERKING Als u geen RDS of PTY-informatie ontvangt, verschijnt PTY NONE op het ►... -
Seite 109: Ta - Traffi C Announcement (Verkeersinformatie) In-/Uitschakelen
Bediening en gebruik Andere instellingen via de toets SEL (EQ/LD/TA/AF) ♦ Houd de toets SEL ca. 2 seconden lang ingedrukt en druk daarna zo vaak op de toets SEL, tot de gewenste functie op het display verschijnt. ♦ Draai de multi-regelknop om de instellingen van het getoonde menupunt te wijzigen. -
Seite 110: Loud - Loudness-Functie In-/Uitschakelen
Bediening en gebruik STEREO/MONO - audio-uitvoer instellen ♦ Draai aan de multi-regelknop om de audio-uitvoer in de radiomodus in te stellen op stereo- (STEREO) of monogeluid (MONO). Bij ontvangst van een stereozender verschijnt op het display het stereosymbool LOUD - loudness-functie in-/uitschakelen Draai aan de multi-regelknop om de lage en hoge tonen te versterken (LOUD ON) ♦... -
Seite 111: Radiofuncties
Bediening en gebruik Radiofuncties Zendergeheugenband kiezen ♦ Druk op de toets BD/DISP om te schakelen tussen de zendergeheugen- banden (FM1, FM2, FM3). Elke zendergeheugenband bestrijkt hetzelfde frequentiebereik (87,5 - 108 MHz) en beschikt over 6 geheugenposities. Automatisch zenders zoeken ♦ Druk op de toets ▸▸I of I◂◂... -
Seite 112: Programmatype (Pty)
Bediening en gebruik Programmatype (PTY) Met behulp van deze functie kunt u naar zenders van een bepaald genre zoe- ken. De volgende instellingen zijn mogelijk: POP M SPORT VARIED OLDIES ROCK M EDUCATE JAZZ SOCIAL NEWS DRAMA COUNTRY RELIGION AFFAIRS CLASSICS WEATHER PHONE IN... -
Seite 113: Usb-Aansluiting
Bediening en gebruik PTY-functie in-/uitschakelen ♦ Om de PTY-zoekactie te activeren, drukt u op de toets MD/PTY . Op het display verschijnt de indicatie PTY en het laatst gekozen PTY-onderdeel (bijv. POP M). Bij de zenderzoekactie wordt alleen rekening gehouden met zenders van de huidige geselecteerde PTY-groep. -
Seite 114: Functies Bij Mp3/Wma-Weergave
Bediening en gebruik Functies bij MP3/WMA-weergave Weergave ■ Het apparaat kan bestanden van het type MP3 en WMA afspelen. ■ Een vermengen van titels en mappen op hetzelfde niveau zou tot problemen bij het afspelen kunnen leiden. ■ Tijdens de weergave worden de gegevens uit de ID3-tag van het MP3- bestand gelezen en achter elkaar op het display weergegeven. - Seite 115 Bediening en gebruik Titels kort afspelen . Op het display verschijnt kort INT ON. Na ♦ Druk op de toets 3/INT elkaar worden alle titels ca. 10 seconden lang afgespeeld. ♦ Druk nogmaals op de toets 3/INT om de weergave van de op dat moment afgespeelde titel te starten.
-
Seite 116: Externe Audioapparatuur Aansluiten Op Het Apparaat
Bediening en gebruik Zoeken naar mappen ♦ Druk drie keer op de toets A/PS . De huidige weergegeven map verschijnt. ♦ Draai aan de multi-regelknop om te schakelen tussen de aanwezige mappen. ♦ Druk op de toets 1/PAU om de huidige weergegeven map te kiezen. De weergave van de eerste titel van de gekozen map start direct. -
Seite 117: Reinigen
Reinigen/Afvoeren Reinigen Veiligheidsvoorschriften LET OP Mogelijke beschadiging van het apparaat ► Zorg dat er geen vocht in het apparaat binnendringt tijdens het schoon- maken, om onherstelbare schade aan het apparaat te voorkomen. Display reinigen ■ Reinig de voorkant van het apparaat/het display uitsluitend met een licht vochtige, pluisvrije doek en een mild afwasmiddel. -
Seite 118: Problemen Oplossen
Problemen oplossen Problemen oplossen In dit hoofdstuk staan belangrijke aanwijzingen voor het opsporen en verhelpen van storingen. Neem de aanwijzingen in acht om gevaren en beschadigingen te vermijden. Veiligheidsvoorschriften WAARSCHUWING Neem de volgende veiligheidsinstructies in acht om gevaren en materiële schade te voorkomen: ►... -
Seite 119: Mogelijke Oorzaak
Problemen oplossen Probleem Mogelijke oorzaak Oplossing De USB-aansluiting is bedoeld voor apparaten die volgens de USB-norm Sluit een apparaat aan dat volgens Apparaat op functioneren. Niet alle in de de USB-norm functioneert. Vergewis USB-aansluiting handel verkrijgbare appara- u ervan dat de informatiedrager is functioneert niet ten voldoen aan deze norm. -
Seite 120: Appendix
Appendix Appendix Technische gegevens Algemeen Ingangsspanning V DC Ingangsstroom max. 7,5 Nominaal vermogen 4 x 7 Bedrijfstemperatuur +5 - +40 °C Luchtvochtigheid ≤ 75 (geen condensatie) Afmetingen (l x b x h) 18,6 x 12,7 x 5,7 Gewicht incl. accessoires ca. -
Seite 121: Opmerkingen Over De Eg-Conformiteitsverklaring
Appendix Opmerkingen over de EG-conformiteitsverklaring Dit apparaat voldoet van de fundamentele eisen en de andere relevante voorschriften aan de voertuigrichtlijn 2004/104/EC. De volledige originele conformiteitsverklaring is te verkrijgen bij de importeur. Garantie U hebt op dit apparaat 3 jaar garantie vanaf de aankoopdatum. Het apparaat is met de grootst mogelijke zorg vervaardigd en voorafgaand aan de levering nauwkeurig gecontroleerd. - Seite 122 SAR 28 A1...
- Seite 123 Garantie Autoradio SAR 28 A1 Service Nederland Tel.: 0900 0400223 (0,10 EUR/Min.) Neem contact op met de service- E-Mail: kompernass@lidl.nl hotline om verzekerd te zijn van IAN 85465 een kosteloze reparatie. Houd hier- bij uw aankoopnota bij de hand. Afzender a.u.b. duidelijk leesbaar vermelden: Naam Voornaam Adres...
- Seite 125 Table of contents Introduction ..........122 Preface .
-
Seite 126: Introduction
Introduction Introduction Preface Congratulations on the purchase of your new device. You have decided to purchase a high-quality product. These operating instructions are part of the SAR 28 A1 car radio (hereafter referred to as the device) and provide you with important instructions pertaining to the intended use, safety, installation, connection and operation of the device. -
Seite 127: Warnings
Introduction Warnings The following warnings are used in these operating instructions: WARNING A warning of this risk level indicates a potentially hazardous situation. Not averting this hazardous situation could result in physical injury. ► Follow the instructions in this warning to prevent physical injury. CAUTION A warning of this risk level indicates potential material damage. -
Seite 128: Safety
Introduction Safety This section provides you with important safety information regarding the han- dling of the device. The device complies with statutory safety regulations. However, incorrect use can result in injury and material damage. Basic safety instructions For safe handling of the device, follow the safety information below: ■... -
Seite 129: Items Supplied And Transport Inspection
Introduction Items supplied and transport inspection WARNING Risk of suff ocation! ► Packaging material must not be used as a play thing since it poses a risk of suff ocation. This device is supplied with the following components as standard: ▯... -
Seite 130: Controls
Controls Controls Car radio (see front fold out fl ap) Figure A: Button : Unlocking the face plate Button /MU: Switching the device on and off / turning the sound off MD/PTY button: Setting the operating mode / setting the PTY function Button ▸▸I: Title / Station search forwards Display USB port... -
Seite 131: Installation
Installation Accessories (see rear fold out fl ap) Figure D: Case for face plate Installation bracket Key for installation bracket Anchoring plate (including securing material) Installation WARNING Damage can be caused when installing the device! ► If possible, have the device installed by a qualifi ed technician. ►... -
Seite 132: Connection Of An External Amplifi Er
Installation Assignment Rear right + Rear right - ISO B Front right + (speaker connec- Front right - tion assignment) Front left + Front left - Rear left + Rear left - To connect the device to two speakers, only use the cables for the front speakers. NOTE ►... -
Seite 133: Connection Of An External Subwoofer
Installation Connection of an external subwoofer Use the orange SUBW cinch output to connect an external subwoofer. To do this, follow the operating instructions for the external subwoofer. Connection diagram Antenna Subwoofer ISO B ISO A External amplifi er Installation The device can be installed into any standard ISO mounting bay. - Seite 134 Installation ■ Do not install the device where it is subjected to high temperatures (i.e. direct sunlight or heating vents), heavy contamination or strong vibrations. ■ Should modifi cations to the vehicle be necessary, contact your vehicle dealer or specialist workshop. Installing the device into the ISO bay ♦...
-
Seite 135: Removing The Device
Installation CAUTION Possible damage to the cable! ► To avoid damage, observe the position of the cables when sliding the device into the bay. ♦ Carefully push the device into the installation bracket until it locks into place. ♦ After all the connections have been established, press the RESET button for about 6 seconds with a ballpoint pen or other sharp object. -
Seite 136: Using The Device
Using the device Using the device Face plate You are able to remove the face plate from your device as an anti-theft measure. Do not keep the face plate in your vehicle after removal. NOTE ► Always keep the face plate in its case to protect it. -
Seite 137: Handling And Use
Handling and use Handling and use This section provides you with important information on handling and using the device. NOTE ► If no setting is confi gured and/or no button pushed within about 5 seconds, the device returns to its previous operating mode. Settings changed are saved. Switching on and off... -
Seite 138: Radio Reset (Reset)
Handling and use Display ♦ Keep pressing the BD/DISP button to have the following information displayed in turn: Radio station, time (automatically set with RDS reception), frequency and PTY set- tings (these RDS functions are sent by broadcasting services in various volumes; also refer to Section “Radio functions”). - Seite 139 Handling and use Further settings using the SEL button (EQ/LD/TA/AF) ♦ Hold down the SEL button for about 2 seconds and then keep pressing the SEL button until the required function is shown on the display. ♦ Turn the multi-controller to change the settings of the menu item dis- played.
- Seite 140 Handling and use STEREO / MONO - Set the audio output ♦ Turn the multi-controller to set the audio output in radio mode to stereo (STEREO) or mono (MONO). If you are receiving a stereo station, the stereo symbol appears on the display. LOUD - Enable / disable the loudness function Turn the multi-controller to increase base or treble levels (LOUD ON) or to ♦...
-
Seite 141: Radio Functions
Handling and use Radio functions Selecting the station memory band ♦ Press the BD/DISP button to switch between station memory bands (FM1, FM2, FM3). Each station memory band covers the same frequency range (87.5 - 108 MHz) and has 6 memory locations. Automatic station search ♦... - Seite 142 Handling and use Programme type (PTY) You can use this function to search for a particular type of station. The following settings are available: POP M SPORT VARIED OLDIES ROCK M EDUCATE JAZZ SOCIAL NEWS DRAMA COUNTRY RELIGION AFFAIRS CLASSICS WEATHER PHONE IN INFO...
-
Seite 143: Usb Port
Handling and use Disabling / enabling the PTY function ♦ Press the MD/PTY button to activate the PTY search. The PTY symbol is shown on the display with the last PTY entry selected (e.g. POP M). Only stations with the PTY ID currently selected are included in the station search. ♦... -
Seite 144: Mp3 / Wma Playback Functions
Handling and use MP3 / WMA playback functions Playback ■ The device can play back fi les in the MP3 and WMA formats. ■ A mixture of titles and directories on the same level can cause problems when playing back. ■... -
Seite 145: Search Functions
Handling and use Title sampling button. INT ON appears briefl y on the display. All titles ♦ Press the 3/INT are played back one after the other for approximately 10 seconds. ♦ Press the 3/INT button again to commence playback of the title currently selected. -
Seite 146: Connecting An External Audio Device To The Device
Handling and use Search for directories ♦ Press the A/PS button three times. The directory currently being played back is shown. ♦ Turn the multi-controller to switch between the available directories. ♦ Press the 1/PAU button to select the directory currently being displayed. Playback of the fi... -
Seite 147: Cleaning
Cleaning/Disposal Cleaning Safety instructions CAUTION Possible damage to the device ► To avoid irreparable damage, ensure that no moisture penetrates into the device whilst it is being cleaned. Cleaning the display ■ Only clean the front panel of the device / the display with a soft, moist, lint-free cloth and mild dish washing liquid. -
Seite 148: Fault Rectifi Cation
Fault rectifi cation Fault rectifi cation This section contains important information on fault localisation and rectifi cation. Follow the instructions to avert hazards and damage. Safety instructions WARNING Observe the following safety instructions to avert hazards and material damage: ► Repairs to electrical devices may only be carried out by specialists trained by the manufacturer. - Seite 149 Fault rectifi cation Defect Possible cause Rectifi cation The USB port is intended for devices working in accord- ance with the USB standard. Connect a device that works in accord- The device on Not all devices available on ance with the USB standard. Check that the USB port is the marketplace conform to the data carrier is formatted with the...
-
Seite 150: Appendix
Appendix Appendix Technical details General Input voltage V DC Input current max. 7.5 Rated power 4 x 7 Operating temperature +5 - +40 °C Humidity (no condensation) ≤ 75 Dimensions (L x W x H): 18.6 x 12.7 x 5.7 Weight including accessories approx. -
Seite 151: Ec Declaration Of Conformity Information
Appendix EC Declaration of Conformity information This device satisfi es the fundamental requirements and other relevant regulations of Vehicle Directive 2004/104/EC. The full original Declaration of Conformity is available from the importer. Warranty The warranty provided for this device is 3 years from date of purchase. This device has been manufactured with care and inspected meticulously prior to delivery. - Seite 152 SAR 28 A1...
- Seite 153 Warranty Car Radio SAR 28 A1 Service Great Britain Tel.: 0871 5000 720 (£ 0.10/Min.) Please contact the Service hotline E-Mail: kompernass@lidl.co.uk to guarantee free repair. Ensure you IAN 85465 have your sales receipt handy. Sender, please write clearly: Last name First name Street Post code/Town...
- Seite 155 KOMPERNASS GMBH Burgstraße 21 D-44867 Bochum www.kompernass.com Stand der Informationen · Version des informations Versione delle informazioni · Stand van de informatie Last Information Update: 11 / 2012 · Ident.-No.: SAR28A1072012-2 IAN 85465...