Herunterladen Inhalt Inhalt Diese Seite drucken
Klarstein TrinityCook Hybrid Bedienungsanleitung

Klarstein TrinityCook Hybrid Bedienungsanleitung

Kombikochfeld (induktion & keramik)
Inhaltsverzeichnis

Werbung

Verfügbare Sprachen
  • DE

Verfügbare Sprachen

  • DEUTSCH, seite 1
TrinityCook Hybrid
Kombikochfeld (Induktion & Keramik)
Combi Hob (Induction & Ceramic)
Placa de inducción
Table de cuisson à induction
Piano cottura a induzione
10035360

Werbung

Inhaltsverzeichnis
loading

Inhaltszusammenfassung für Klarstein TrinityCook Hybrid

  • Seite 1 TrinityCook Hybrid Kombikochfeld (Induktion & Keramik) Combi Hob (Induction & Ceramic) Placa de inducción Table de cuisson à induction Piano cottura a induzione 10035360...
  • Seite 3: Inhaltsverzeichnis

    Sehr geehrter Kunde, wir gratulieren Ihnen zum Erwerb Ihres Gerätes. Lesen Sie die folgenden Hinweise sorgfältig durch und befolgen Sie diese, um möglichen Schäden vorzubeugen. Für Schäden, die durch Missachtung der Hinweise und unsachgemäßen Gebrauch entstehen, übernehmen wir keine Haftung. Scannen Sie den folgenden QR-Code, um Zugriff auf die aktuellste Bedienungsanleitung und weitere Informationen rund um das Produkt zu erhalten.
  • Seite 4: Sicherheitshinweise

    SICHERHEITSHINWEISE Stromschlagrisiko • Ziehen Sie den Netzstecker des Geräts aus der Steckdose, bevor Wartungen oder Reparaturen am Gerät durchgeführt werden. • Die Verbindung zu einem geerdeten Stromanschluss ist erforderlich und vorgeschrieben. • Veränderungen am Stromanschluss dürfen nur von einem hierfür qualifizierten Elektriker durchgeführt werden.
  • Seite 5 • Bitte stellen Sie diese Informationen demjenigen zur Verfügung, der das Gerät einbaut, da Sie dadurch gegebenenfalls Installationskosten sparen können. • Dieses Gerät muss zur Vermeidung von Sach- und Personenschäden gemäß dieser Bedienungsanleitung installiert werden. • Dieses Gerät muss von einer hierfür qualifizierten Person installiert und geerdet werden.
  • Seite 6: Hinweise Zu Bedienung Und Wartung

    HINWEISE ZU BEDIENUNG UND WARTUNG Stromschlagrisiko • Kochen Sie keinesfalls auf einer kaputten oder gerissenen Kochoberfläche. Sollte die Kochoberfläche brechen oder Risse aufweisen, schalten Sie das Gerät sofort aus, ziehen Sie den Netzstecker aus der Steckdose und kontaktieren Sie einen qualifizierten Techniker.
  • Seite 7 WARNUNG Verletzungsgefahr! Die messerscharfe Klinge eines Kochfeldschabers wird freigelegt, sobald Sie die Sicherheitsabdeckung abnehmen. Lassen Sie bei der Verwendung äußerste Vorsicht walten. Verstauen Sie den Kochfeldschaber immer mit aufgesetzter Sicherheitsabdeckung, außerhalb der Reichweite von Kindern. Das Nichtbefolgen der Hinweise kann zu Verletzungen und Schnitten führen. Allgemeine Sicherheitshinweise •...
  • Seite 8: Funktionsweise Induktionskochfeld

    • Dieses Gerät ist für den Einsatz in Haushalten und ähnlichen Anwendungen vorgesehen, wie z. B. Personalküchen in Geschäften, Büros und anderen Arbeitsumgebungen; in landwirtschaftlichen Betrieben; von Kunden in Hotels, Motels und anderen Wohnumgebungen; in Umgebungen mit Übernachtung und Frühstück. • Berühren Sie die Kochfelder während der Verwendung keinesfalls mit der bloßen Hand.
  • Seite 9: Geräteübersicht

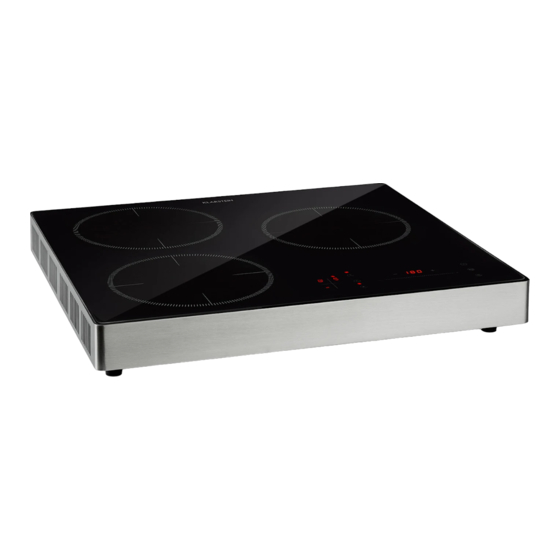
    GERÄTEÜBERSICHT Obere linke Kochzone – Rechte Kochzone – Induktionskochfeld Keramikkochfeld (400-2000 W) (400-2000 W) Untere linke Kochzone – Bedienfeld Induktionskochfeld (Tasten, Anzeigen, Displays) (400-2000 W)
  • Seite 10: Bedienfeld, Tasten Und Anzeigen

    BEDIENFELD, TASTEN UND ANZEIGEN Kochzonen-Anzeige Timer/Temperatur-Display (3 Kontrollleuchten und 3 Displays) Tasten für Bedienfunktionen Plus/Minus-Tasten (Timer, Temperatur, Heizstufe, Ein/Aus, (Zum Einstellen des Timers.) Pause, Tastensperre) Kontrollleuchten für Bedienfunktionen Touch-Schieberegler (-/+) (Timer, Temperatur, Heizstufe, Ein/Aus, (Zum Einstellen der Heizstufe und Pause, Tastensperre) Temperatur.) Hinweis: Die Bedienung erfolgt für alle Zonen über dieses Bedienfeld.
  • Seite 11 Tasten Bild Kontrollleuchten Bild Ein/Aus Ein/Aus Pause Pause Temperatur Temperatur Heizstufe Heizstufe Timer Timer Tastensperre Tastensperre (Kindersicherung) (Kindersicherung) Timer-Einstellung Kochzonen (+/ -) Schieberegler (Touchsteuerung): Zum Einstellen der Heizstufe und Temperatur.
  • Seite 12: Auswahl Des Richtigen Kochgeschirrs

    AUSWAHL DES RICHTIGEN KOCHGESCHIRRS 1.) Induktionskochfeld • Verwendbares Kochgeschirr: Stahl, Gusseisen, emailliertes Eisen, Edelstahl, Pfannen/Töpfe mit flachem Boden und einem Durchmesser von 12 bis 22 cm. Email lierter Eiserner oder Guss eiserne Eiserner Brat- Edel stahl- Eisenplatte Eisen topf email lierter Pfanne Topf pfanne...
  • Seite 13: Inbetriebnahme Und Bedienung

    INBETRIEBNAHME UND BEDIENUNG Hinweise zum Umgang mit dem Induktions- und Keramikstrahlungskochfeld • Legen Sie die Lebensmittel niemals direkt auf die Kochfläche, sondern kochen Sie immer mit Kochgeschirr. • Lassen Sie niemals Öl-Rückstände oder eingeölte Lebensmittel auf der Kochfeldoberfläche zurück, da Öl überhitzt werden und einen Brand erzeugen kann.
  • Seite 14: Induktionskochfeld Einschalten

    Induktionskochfeld einschalten Hinweis: Bevor Sie das Induktionskochfeld und das Keramik-Strahlungskochfeld verwenden, stellen Sie ein Kochgeschirr aus ferromagnetischem Metall auf die Induktionskochfeldoberfläche oder ein Kochgeschirr mit flachem Boden auf das Keramik-Strahlungskochfeld. Berühren Sie die Ein/Aus-Taste . Es ertönt ein Piepton. Auf dem Kochzonen-Display (5) erscheint die folgende Anzeige: Heizstufe einstellen Berühren Sie die Heizstufen-Taste...
  • Seite 15: Pause-Funktion

    Timer einstellen Berühren Sie die Heizstufen-Taste oder die Temperatur-Taste , um die gewünschte Kochzone auszuwählen. Berühren Sie dann die Timer-Taste , die Timer- Kontrollleuchte leuchtet auf und die Kontrollleuchte für die ausgewählte Kochzone blinkt. Stellen Sie mit den Plus- und Minus-Tasten (+/-) eine Zeit zwischen 0-180 Minuten ein. Der Timer-Display (8) geht an.
  • Seite 16: Schutzfunktionen

    2. Die Einstellung der Heizleistung wird auf dem Kochzonen-Display (5) angezeigt. Wenn Sie die Temperatur einstellen, wird auf dem Kochzonen-Display (5) “C” angezeigt und auf dem Temperatur-Display (8) erscheint die eingestellte Temperatur. 3. Nachdem Sie die Temperatur oder die Heizleistung eingestellt haben, berühren Sie die Timer-Taste , um die Timer-Einstellung vorzunehmen, solange die Kontrollleuchte für die Kochzone über dem Kochzonen-Display (5) noch blinkt.
  • Seite 17: Reinigung Und Pflege

    Wenn der Topf vom Kochfeld entfernt wird, unterbricht das Gerät sofort das weitere Erhitzen, es ertönt 1 Minute lang ein Alarmsignal und das Gerät schaltet sich ab. REINIGUNG UND PFLEGE Reinigung • Ziehen Sie den Stecker aus der Steckdose und warten Sie, bis das Gerät vollständig abgekühlt ist.
  • Seite 18: Fehlerbehebung

    FEHLERBEHEBUNG Hinweis: Wenn während des Gebrauchs Störungen auftreten und auf dem Display wird einer der Fehlercodes angezeigt, die in der nachfolgenden Tabelle aufgeführt sind, überprüfen Sie, ob sich das Problem mit der angegebenen Lösungsmöglichkeit beheben lässt, bevor Sie sich an den Hersteller oder den Kundendienst wenden. Fehlercode Mögliche Ursache Lösungsmöglichkeit...
  • Seite 19: Hinweise Zur Entsorgung

    Falls sich die Störungen und Fehlfunktionen nicht beseitigen lassen: • Öffnen Sie nicht das Gerätegehäuse. • Kontaktieren Sie den Hersteller oder den Kundendienst und geben Sie folgenden Informationen an: – Art der Fehlfunktion, – Artikel- und Seriennummer (siehe Typenschild auf der Rückseite des Geräts), –...
  • Seite 21: Technical Data

    Dear Customer, Congratulations on purchasing this device. Please read the following instructions carefully and follow them to prevent possible damages. We assume no liability for damage caused by disregard of the instructions and improper use. Scan the QR code to get access to the latest user manual and more product information.
  • Seite 22: Safety Instructions

    SAFETY INSTRUCTIONS Electrical Shock Hazard • Disconnect the appliance from the mains electricity supply before carrying out any work or maintenance on it. • Connection to a good earth wiring system is essential and mandatory. • Alterations to the domestic wiring system must only be made by a qualified electrician.
  • Seite 23: Instructions On Use And Maintenance

    • This appliance should be connected to a circuit which incorporates an isolating switch providing full disconnection from the power supply. • Failure to install the appliance correctly could invalidate any warranty or liability claims. • This device may be only used by children 8 years old or older and persons with limited physical, sensory and mental capabilities and / or lack of experience and knowledge, provided that they have been instructed in use of the device by a responsible person who understands the associated risks.
  • Seite 24: Health Hazard

    Health Hazard • This appliance complies with electromagnetic safety standards. • However, persons with cardiac pacemakers or other electrical implants (such as insulin pumps) must consult with their doctor or implant manufacturer before using this appliance to make sure that their implants will not be affected by the electromagnetic field.
  • Seite 25: Operating Principle Induction Hob

    • Do not rely on the pan detection feature to turn off the cooking zones when you remove the pans. • Do not allow children to play with the appliance or sit, stand, or climb on it. • Do not store items of interest to children in cabinets above the appliance. Children climbing on the cooktop could be seriously injured.
  • Seite 26: Device Overview

    DEVICE OVERVIEW Upper left cooking zone – Right cooking zone – Induction hob (400-2000 W) Ceramik hob (400-2000 W) Bottom left cooking zone - Control panel Induction hob (400-2000 W) (Buttons, indicators, displays)
  • Seite 27: Control Panel, Buttons And Indicators

    CONTROL PANEL, BUTTONS AND INDICATORS Cooking zones Timer/Temperature display (3 indicators and 3 displays) Control buttons Plus/Minus buttons (Timer, Temperature, Power level, On/Off, (To set the timer.) Suspend, Key lock) Control lamps for operating functions Touch slider (-/+) (Timer, Temperature, Power level, On/Off, (To set the power level and temperature.) Suspend, Key lock) Note: All zones are operated from this control panel.
  • Seite 28 Buttons Picture Control lamp Picture On/Off On/Off Suspend Suspend Temperature Temperature Power level Power level Timer Timer Key lock Key lock (Child lock (Child lock Timer setting Cooking zones (+/ -) Slide control (touch control): For setting the heat level and temperature.
  • Seite 29: Choosing The Right Cookware

    CHOOSING THE RIGHT COOKWARE 1.) Induction hob: • Usable cookware: Steel, cast iron, enameled iron, stainless steel, flat-bottom pans/pots with diameter from 12 to 22 cm. Enameled Iron or Cast-iron Iron Pot Deep-Fry Stainless Iron Plate Iron Pot Enameled Steel Pot Iron Pot •...
  • Seite 30: Commissioning And Operation

    COMMISSIONING AND OPERATION Notes on using the induction hob and ceramic radiant hob • Do not place food directly onto hob surface – always cook with a pot. • Do not arbitrarily leave oil or oiled foods on the hob surface, since oil could be overheated and produce fire.
  • Seite 31 Set power level Touch the power level button to enter power heating mode. The power level control lamp and the selected cooking zone control lamp above the cooking zone display (5) are flashing. “0” is shown on the display of the selected cooking zone. Use the slider to set the desired power level from “1”...
  • Seite 32 Suspend function Touch the suspend button , a beeping sound will be heard. The suspend control lamp lights up and the cooking zone display (5) shows the following and is flashing: The hob will interrupt operation until you press the suspend button again to put the hob back into operation.
  • Seite 33: Protection Functions

    PROTECTION FUNCTIONS Over-temperature protection The appliance is equipped with a temperature sensor device to monitor the temperature inside the hobs. When an excessive temperature is detected, both the Induction Hob and the Hi-Light Ceramic Hob will stop increasing temperature automatically. Detection of small articles (Induction Hob) When the Induction Hob detected the existence of a pot which is less than 80 mm in diameter or small articles (e.g.
  • Seite 34: Cleaning And Care

    CLEANING AND CARE Cleaning • Disconnect the plug from the socket and wait until the appliance has cooled down completely. Clean the appliance after each use. • Wipe using dish washing agent and damp cloth. • Use vacuum cleaner to suck up dirt from the air intake and exhaust vent. •...
  • Seite 35: Troubleshooting

    TROUBLESHOOTING Note: If there are any disruptions in the device operation and the display will show an error code check with the table below if the problem can be solved before you contact the manufacturer or customer service. Error code Possible cause Possible solution There is no cookware on the hob...
  • Seite 36: Hints On Disposal

    HINTS ON DISPOSAL According to the European waste regulation 2012/19/EU this symbol on the product or on its packaging indicates that this product may not be treated as household waste. Instead it should be taken to the appropriate collection point for the recycling of electrical and electronic equipment.
  • Seite 39: Fiche Technique

    Chère cliente, cher client, Toutes nos félicitations pour l’acquisition de ce nouvel appareil. Veuillez lire attentivement et respecter les instructions de ce mode d’emploi afin d’éviter d’éventuels dommages. Nous ne saurions être tenus pour responsables des dommages dus au non-respect des consignes et à...
  • Seite 40: Consignes De Sécurité

    CONSIGNES DE SÉCURITÉ Risque de choc électrique • Débranchez l‘appareil de la prise avant d‘effectuer tout entretien ou réparation. • La connexion à une prise d‘alimentation mise à la terre est requise et obligatoire. • Les modifications de la connexion électrique ne peuvent être effectuées que par un électricien qualifié.
  • Seite 41 • Veuillez fournir ces informations à la personne qui installe l‘appareil, car cela peut réduire les coûts d‘installation. • Cet appareil doit être installé conformément à ces instructions d‘utilisation pour éviter des dommages matériels et des blessures corporelles. • Cet appareil doit être installé et mis à la terre par une personne qualifiée. •...
  • Seite 42: Conseils D'utilisation Et D'entretien

    CONSEILS D‘UTILISATION ET D‘ENTRETIEN Risque de choc électrique • Ne faites jamais la cuisine sur une surface de cuisson cassée ou fissurée. Si la surface de cuisson se brise ou présente des fissures, éteignez immédiatement l‘appareil, débranchez la fiche de la prise et contactez un technicien qualifié. •...
  • Seite 43 MISE EN GARDE Risque de blessure ! La lame tranchante d‘un grattoir pour table de cuisson est exposée dès que vous retirez le couvercle de sécurité. Soyez extrêmement prudent lors de son utilisation. Rangez toujours le grattoir de table de cuisson avec son couvercle de sécurité en place, hors de portée des enfants.
  • Seite 44: Principe De Fonctionnement

    • Cet appareil est destiné à être utilisé dans les ménages et des conditions similaires, telles que les cuisines du personnel dans les magasins, bureaux et autres environnements de travail ; dans les fermes ; chambres des clients des hôtels, motels et autres environnements résidentiels ;...
  • Seite 45: Aperçu De L'appareil

    APERÇU DE L‘APPAREIL Zone de cuisson supérieure Zone de cuisson droite ( gauche 400-2000 W) (400-2000 W) Zone de cuisson inférieure Panneau de commande gauche (Touches, voyants, écrans) (400-2000 W)
  • Seite 46: Panneau De Commande, Touches Et Voyants

    PANNEAU DE COMMANDE, TOUCHES ET VOYANTS Voyants des zones de cuisson (3 voyants Écran de minuterie /température et 3 écrans) Touches de fonctions utilisateur Touches plus/moins (pour le réglage de (Minuterie, température, niveau de chauffage, marche/arrêt, pause, la minuterie.) verrouillage des touches) Voyants de contrôle des fonctions Curseur tactile (-/+) (Pour régler le niveau (Minuterie, température, niveau de...
  • Seite 47 Touches Illustration Voyants contrôle Illustration Marche/Arrêt Marche/Arrêt Pause Pause Température Température Niveau de Niveau de chauffage chauffage Minuterie Minuterie Verrouillage des Verrouillage des touches (contrôle touches (contrôle parental) parental) Réglage de la Zones de cuisson minuterie (+/ -) Curseur de réglage (contrôle tactile) : Pour régler le niveau de chauffage et la température.
  • Seite 48: Choix Du Bon Ustensile De Cuisson

    CHOIX DU BON USTENSILE DE CUISSON 1.) Table de cuisson à induction • Ustensiles de cuisson adaptés Acier, fonte, fer émaillé, acier inoxydable, casseroles / poêles à fond plat et d‘un diamètre de 12 à 22 cm Casserole Casserole en Poêle en Casserole Poêle à...
  • Seite 49: Mise En Marche

    MISE EN MARCHE Instructions de manipulation de la plaque à induction • Ne posez jamais les aliments directement sur la table de cuisson, mais toujours dans des ustensiles de cuisine. • Ne laissez jamais de résidus d‘huile ou d‘aliments huilés sur la surface de la table de cuisson, car l‘huile peut surchauffer et provoquer un incendie.
  • Seite 50 Pour allumer la table de cuisson à induction Remarque : avant d‘utiliser la plaque à induction et la plaque à rayonnement céramique, placez un récipient en métal ferromagnétique sur la surface de la plaque à induction ou un récipient à fond plat sur la plaque à rayonnement céramique. Touchez la commande marche / arrêt.
  • Seite 51 Réglage de la minuterie Touchez la commande de niveau de chauffage ou la commande de température , pour choisir une zone de cuisson. Touchez la commande de minuterie , le voyant de la minuterie s‘allume et le voyant de la zone de cuisson sélectionnée clignote. Utilisez les touches plus et moins (+/-) pour régler la durée entre 0 et 180 minutes.
  • Seite 52: Fonctions De Protection

    2. Le réglage de la puissance de chauffage est indiqué sur l‘écran de la zone de cuisson (5). Lorsque vous réglez la température, „C“ apparaît sur l‘écran de la zone de cuisson (5) et la température réglée apparaît sur l‘écran de la température (8).
  • Seite 53: Nettoyage Et Entretien

    Wenn der Topf vom Kochfeld entfernt wird, unterbricht das Gerät sofort das weitere Erhitzen, es ertönt 1 Minute lang ein Alarmsignal und das Gerät schaltet sich ab. NETTOYAGE ET ENTRETIEN Nettoyage après chaque utilisation • Nettoyez la table de cuisson après chaque utilisation. Avant le nettoyage, assurez- vous que la surface de la table de cuisson n‘est plus chaude.
  • Seite 54: Résolution Des Problèmes

    RÉSOLUTION DES PROBLÈMES Remarque : Si des problèmes surviennent pendant l‘utilisation et que l‘un des codes d‘erreur indiqués dans le tableau ci-dessous apparaît à l‘écran, vérifiez si le problème peut être résolu avec la solution proposée avant de contacter le fabricant ou le service client.
  • Seite 55: Informations Sur Le Recyclage

    Si vous ne parvenez pas à résoudre les problèmes : • N‘ouvrez pas le corps de l‘appareil. • Contactez le fabricant ou le service client et communiquez les informations suivantes : –Type de dysfonctionnement, –Numéro d‘article et de série (sur la plaque signalétique au dos de l‘appareil), – la date d‘achat.
  • Seite 57 Estimado cliente: Le felicitamos por la adquisición de este producto. Lea atentamente el siguiente manual y siga cuidadosamente las instrucciones de uso con el fin de evitar posibles daños. La empresa no se responsabiliza de los daños ocasionados por un uso indebido del producto o por haber desatendido las indicaciones de seguridad.
  • Seite 58: Indicaciones De Seguridad

    INDICACIONES DE SEGURIDAD Riesgo de descarga eléctrica • Cuando realice reparaciones o mantenimiento en el aparato, desconecte el enchufe de la toma de corriente. • Es necesario disponer de una conexión eléctrica con toma de tierra. • Las modificaciones en el sistema eléctrico deberán ser realizadas por un electricista autorizado.
  • Seite 59 • Este dispositivo debe instalarse de acuerdo con estas instrucciones de funcionamiento para evitar daños a la propiedad o lesiones personales. • Este equipo debe ser instalado y conectado a tierra por una persona cualificada. • Este equipo debe estar conectado a un circuito con un interruptor que proporcione un aislamiento completo de la fuente de alimentación.
  • Seite 60: Limpieza Y Mantenimiento

    LIMPIEZA Y MANTENIMIENTO Riesgo de descarga eléctrica • En ningún caso utilice la placa si está averiada o rota. Si la superficie de cocción se rompe o presenta brechas, apague inmediatamente el aparato, desconecte el enchufe de la toma de corriente y contacte con un técnico cualificado. •...
  • Seite 61 ADVERTENCIA Riesgo de lesiones. La cuchilla afilada de un rascador de vitrocerámica quedará expuesta en cuanto retire la cubierta de seguridad. Por ello, manipule el utensilio con extremo cuidado. Guarde el rascador de vitrocerámica siempre con la tapa puesta y fuera del alcance de los niños.
  • Seite 62: Funcionamiento

    • El aparato solo está indicado para usos en espacios interiores y en entornos domésticos para cocinar. • Nunca toque la zona de cocción con las manos sin protección mientras esté en funcionamiento. • Los niños menores de 8 años no deben situarse cerca del aparato. FUNCIONAMIENTO La cocción con inducción se trata de una tecnología de cocción avanzada, eficiente y rentable.
  • Seite 63: Vista General Del Aparato

    VISTA GENERAL DEL APARATO Zona de cocción superior Zona de cocción derecha izquierda (400-2000 W) (400-2000 W) Zona de cocción inferior Panel de control izquierda (Teclas, indicadores, pantalla) (400-2000 W)
  • Seite 64: Panel De Control, Teclas E Indicadores

    PANEL DE CONTROL, TECLAS E INDICADORES Indicador de las zonas de cocción (3 Pantalla del temporizador y temperatura indicadores luminosos y 3 pantallas) Teclas de funciones de control Teclas más/menos (Para configurar el (Temporizador, temperatura, nivel de potencia, on/off, pausa, bloqueo de las temporizador) teclas) Indicadores luminosos y funciones de...
  • Seite 65 Teclas Imagen Indicadores Imagen luminosos On/off On/off Pausa Pausa Temperatura Temperatura Nivel de potencia Nivel de potencia Temporizador Temporizador Bloqueo de las Bloqueo de las teclas (Bloqueo teclas (Bloqueo infantil) infantil) Configuración del temporizador Zonas de cocción (+/-) Regulador deslizante (control táctil): Para configurar el nivel de potencia y la temperatura.
  • Seite 66: Elección Utensilios De Cocina Adecuados

    ELECCIÓN UTENSILIOS DE COCINA ADECUADOS 1.) Placa de inducción • Utensilios de cocina utilizables: Acero, hierro fundido, hierro esmaltado, acero inoxidable, ollas con fondo plano y un diámetro de 12 a 22 cm. Olla de Casserole en Sartén Olla de Sartén Olla de Placa de hierro...
  • Seite 67: Puesta En Marcha Y Funcionamiento

    PUESTA EN MARCHA Y FUNCIONAMIENTO Notas sobre el uso de la placa de inducción y la placa radiante de cerámica • No coloque la comida directamente sobre la superficie de la placa, siempre cocina con una olla. • No dejes arbitrariamente aceite o alimentos aceitados en la superficie de la placa de cocción, ya que el aceite podría producir fuego.
  • Seite 68 Encienda la placa de inducción Nota: Antes de usar la inducción y la placa radiante de cerámica, ponga un utensilio de cocina hecho de metal ferromagnético en la superficie de la placa o cualquier utensilio de cocina de fondo plano en la placa radiante. Toca el botón de encendido y apagado , se escuchará...
  • Seite 69 Ajustar el temporizador Toque el botón de nivel de potencia o el botón de temperatura para seleccionar la zona de cocción. A continuación, pulse el botón del temporizador , la lámpara de control del temporizador se enciende y la lámpara de control de la zona de cocción seleccionada parpadea.
  • Seite 70: Funciones De Protección

    2. La configuración del nivel de potencia aparece en la pantalla de las zonas de cocción (5). Cuando selecciona la temperatura, en la pantalla de las zonas de cocción (5) aparece „C“ y en la pantalla de temperatura (8) se muestra la temperatura seleccionada.
  • Seite 71: Limpieza Y Cuidado

    Si se retira el recipiente de la placa, el aparato interrumpe inmediatamente el calentamiento, suena una señal de alarma durante 1 minuto y el aparato se apaga automáticamente. LIMPIEZA Y CUIDADO Limpieza después de cada uso • Limpie la placa de cocción después de cada uso. Antes de la limpieza, asegúrese de que la superficie de la placa no esté...
  • Seite 72: Reparación De Anomalías

    REPARACIÓN DE ANOMALÍAS Advertencia: Si se producen problemas durante el uso y en la pantalla se muestra un código de error detallado en la siguiente tabla, compruebe si puede solucionar el problema con la opción indicada antes de contactar con el fabricante o con el servicio de atención al cliente.
  • Seite 73: Retirada Del Aparato

    Si las averías o fallos de funcionamiento no se pueden solucionar: • No abra la carcasa. • Contacte con el fabricante o con el servicio de atención al cliente e indíquele la siguiente información: –Tipo de fallo en el funcionamiento –Número de serie y de artículo (consulte la placa técnica situada en la parte trasera del aparato) –...
  • Seite 75 Gentile Cliente, La ringraziamo per aver acquistato il dispositivo. La preghiamo di leggere attentamente le seguenti istruzioni per l’uso e di seguirle per evitare possibili danni tecnici. Non ci assumiamo alcuna responsabilità per danni scaturiti da una mancata osservazione delle avvertenze di sicurezza e da un uso improprio del dispositivo.
  • Seite 76: Avvertenze Di Sicurezza

    AVVERTENZE DI SICUREZZA Rischio di scosse elettriche • Staccare la spina dalla presa di corrente prima di realizzare manutenzione o riparazioni sul dispositivo. • Il collegamento a un sistema con messa a terra è necessario e obbligatorio. • Modifiche alla canalizzazione elettrica devono essere realizzate da un elettricista qualificato.
  • Seite 77 • Il dispositivo deve essere installato e dotato di messa a terra da una persona qualificata. • Questo dispositivo deve essere collegato a un circuito elettrico con disgiuntore di sicurezza, in modo da poterlo scollegare completamente dall’alimentazione elettrica. • Un’installazione errata può comportare la perdita di validità della garanzia. •...
  • Seite 78: Utilizzo E Manutenzione

    UTILIZZO E MANUTENZIONE Rischio di scossa elettrica • In nessun caso si deve utilizzare la piastra se è danneggiata o rotta. Se il piano di cottura è rotto o presenta una fessura, spegnere immediatamente l‘apparecchio, staccare la spina dalla presa e contattare un tecnico qualificato. •...
  • Seite 79 AVVERTENZA Pericolo di lesione! La lama affilatissima di un raschietto per piano cottura viene esposta non appena si rimuove la copertura di sicurezza. Utilizzarlo con estrema attenzione e conservare il raschietto fuori dalla portata dei bambini e sempre con la copertura di sicurezza sopra. Il mancato rispetto delle avvertenze può...
  • Seite 80: Funzionamento

    • Questo dispositivo è adatto al solo uso casalingo e ambienti simili, come cucine del personale presso negozi, uffici e altri ambienti di lavoro, in agriturismi, per ospiti in hotel, motel e bed & breakfast. • Non toccare assolutamente il piano cottura a mani nude mentre è in funzione. •...
  • Seite 81: Descrizione Del Dispositivo

    DESCRIZIONE DEL DISPOSITIVO Zona in alto a sinistra del Zona a destra del piano piano cottura (400-2000 W) cottura (400-2000 W) Zona in basso a sinistra del Pannello di controllo (tasti, piano cottura (400-2000 W) indicazioni, schermi)
  • Seite 82: Pannello Di Controllo, Tasti E Spie

    PANNELLO DI CONTROLLO, TASTI E SPIE Indicazione zone di cottura (3 spie di Timer/Display temperatura controllo e 3 schermi) Tasti per le funzioni di utilizzo (timer, Tasti più/meno (per regolare il timer) temperatura, livello riscaldante, on/off, pausa, blocco tasti) Spie di controllo per le funzioni di Cursore touch (+/-) (per impostare livello utilizzo (timer, temperatura, livello riscaldante e temperatura)
  • Seite 83 Tasti Immagine Spie di controllo Immagine On/Off On/Off Pausa Pausa Temperatura Temperatura Livello riscaldante Livello riscaldante Timer Timer Blocco tasti (sicura Blocco tasti (sicura per bambini) per bambini) Impostazioni timer Zone di cottura (+/-) Cursore (controllo touch): per impostare livello riscaldante e temperatura.
  • Seite 84: Scegliere Le Stoviglie Adatte

    SCEGLIERE LE STOVIGLIE ADATTE 1.) Piano cottura a induzione • Stoviglie utilizzabili: Acciaio, ghisa, ferro smaltato, acciaio inox, padelle/pentole con fondo piatto e diametro di 12-22 cm. Pentola Pentola di Padella di Pentola di Padella Pentola Piastra di ferro di ferro ferro o ferro ghisa ferro...
  • Seite 85: Messa In Funzione E Utilizzo

    MESSA IN FUNZIONE E UTILIZZO Informazioni sull’utilizzo del piano cottura a induzione e del piano in ceramica a irraggiamento • Non poggiare mai gli alimenti direttamente sulla superficie del piano cottura, ma utilizzare sempre stoviglie appropriate. • Non lasciare mai residui d’olio o alimenti unti sulla superficie del piano cottura, dato che l’olio si surriscalda e può...
  • Seite 86 Accendere il piano cottura a induzione Avvertenza: prima di accendere il piano di cottura a induzione, posizionare il contenitore metallico ferromagnetico sulla superficie di cottura. Toccare il tasto On/Off . Viene emesso un segnale acustico. Sul display della zona di cottura (5) compare la seguente indicazione: Regolazione del livello di potenza Premere il tasto dei livelli di potenza .
  • Seite 87 Impostare il timer Toccare il tasto Livello riscaldante o Temperatura per selezionare la zona desiderata. Toccare poi il tasto Timer . La spia di controllo per il timer si illumina e la spia per la zona selezionata sopra al relativo schermo lampeggia. Impostare un tempo tra 0 e 180 minuti con i tasti Più...
  • Seite 88: Funzioni Di Protezione

    2. L’impostazione della potenza riscaldante viene mostrata sul display della zona di cottura (5). Se si imposta la temperatura, sul display della zona (5) compare “C” e sul display della temperatura (8) viene mostrata la temperatura impostata. 3. Dopo aver impostato temperatura o potenza riscaldante, toccare il tasto Timer per inserire l’impostazione del timer, a patto che la spia di controllo per la zona di cottura sopra al relativo display (5) lampeggi ancora.
  • Seite 89: Pulizia E Manutenzione

    Quando la pentola viene tolta dal piano cottura, il dispositivo interrompe immediatamente il riscaldamento, viene emesso un segnale di allarme per 1 minuto e il dispositivo si spegne. PULIZIA E MANUTENZIONE Pulizia dopo ogni utilizzo • Pulire il piano cottura dopo ogni utilizzo. Prima di procedere alla pulizia, assicurarsi che la superficie non sia più...
  • Seite 90: Correzione Degli Errori

    CORREZIONE DEGLI ERRORI Nota: se compaiono problemi durante l’utilizzo del dispositivo e il display mostra un codice di errore contenuto nella tabella seguente, controllare se è possibile risolverlo con le indicazioni fornite, prima di rivolgersi al produttore o al servizio di assistenza ai clienti.
  • Seite 91: Smaltimento

    Se non è possibile risolvere i problemi e i malfunzionamenti: • Non aprire l’alloggiamento del dispositivo. • Contattare il produttore o il servizio di assistenza ai clienti e fornire le seguenti informazioni: Tipo di malfunzionamento. Numero articolo e numero di serie (v. targhetta sul retro del dispositivo). Data di acquisto.

Diese Anleitung auch für:

10035360

Inhaltsverzeichnis