Herunterladen Diese Seite drucken

Werbung

Verfügbare Sprachen
  • DE

Verfügbare Sprachen

  • DEUTSCH, seite 1
Taurus NG
Taurus NG
Bedienungsanleitung
Bedienungsanleitung
DE/AT/CH
Instruções de utilização
PT
Istruzioni per l'uso
IT/CH
Mode d'emploi
Mode d'emploi
FR/CH
Instruction manual
Instruction manual
GB/IE
Instrukcja Obsługi
Instrukcja Obsługi
PL
Návod k použití
Návod k použití
CZ
45x-135x

Werbung

loading

Inhaltszusammenfassung für Bresser Taurus NG

  • Seite 1 Taurus NG Taurus NG Bedienungsanleitung Bedienungsanleitung DE/AT/CH Instruções de utilização Instruções de utilização Istruzioni per l’uso Istruzioni per l’uso IT/CH Mode d’emploi Mode d’emploi FR/CH Instruction manual Instruction manual GB/IE Instrukcja Obsługi Instrukcja Obsługi Návod k použití Návod k použití...
  • Seite 2 (DE/AT/CH) WARNUNG! Schauen Sie mit diesem optischen Gerät niemals direkt oder in die Nähe der Sonne! Achten Sie besonders darauf, wenn es von Kindern benutzt wird! Es besteht ERBLINDUNGSGEFAHR! Verpackungsmaterial (Plastiktüten, Gummibänder, etc.) von Kindern fernhalten! (PT) AVISO! Nunca olhe directamente para o sol com este aparelho óptico! Tenha muito cuidado quando o aparelho é...
  • Seite 3 Fig. 1 Fig. 2 Fig. 3...
  • Seite 4 Fig. 4 Fig. 8 Fig. 9 Fig. 10 Fig. 11 Fig. 13 Fig. 12 Fig. 14a Fig. 14b Fig. 5 Fig. 6 Fig. 7...
  • Seite 5 Fig. 15 Fig. 18 Fig. 16 Fig. 19 Fig.
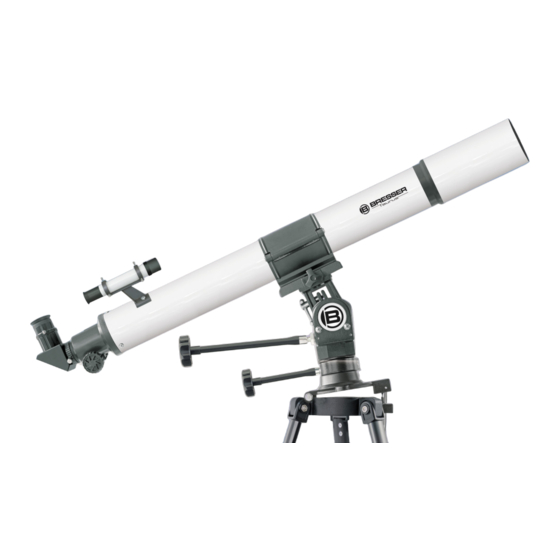
  • Seite 6: Teile (Fig. 15): Montierung

    Alle Teile (Fig. 1-3) Schelle wieder zu. Die Schraube an der Halterung bitte handfest anziehen. Teleskop-Tubus Sucherfernrohr Setzen Sie nun den Tubus inkl. Tubusschelle mit der Justierschrauben (Sucher) Objektivöffnung Richtung Norden auf die Montierung. Befestigen Tubusöffnung Sie nun die Tubushalterung mit der Klemmschraube am Objektiv Montierungskopf (Fig.
  • Seite 7 Die lange biegsame Welle (Fig. 1, 14) wird parallel zum weil die Ausrichtung sonst verloren geht. Das Teleskop ist nun kor- Teleskoptubus montiert. Die Befestigung erfolgt mit einer rekt ausgerichtet. Klemmschraube an der vorgesehenen Einkerbung der Achse. Diese Prozedur ist notwendig damit die Nachführung der Die kurze biegsame Welle (Fig.
  • Seite 8: Anhang

    Die Ausnahme bildet der Polarstern. Durch ihn verläuft die verlän- Anhang gert gedachte Polachse der Erde. Er bildet den Ausgangspunkt aller Sternenkarten. Auf der Zeichnung sehen Sie einige bekannte Sternbilder und Sternanordnungen, die das ganze Jahr über sicht- 1. Mögliche Beobachtungsobjekte bar sind.
  • Seite 9 2. Technische Daten: • Bauart: achro matischer Refraktor (2 Linsen) • Brennweite: 900 mm • Objektivdurchmesser: 90 mm • Vergrößerung: 45 - 135 fach (je nach Okular) Mit Umkehrlinse 1,5x: 67,5 - 202,5 fach (je nach Okular) • Sucher: 6x30 •...
  • Seite 10 Peças (Fig. 1-3): Coloque agora o tubo incl. a braçadeira do tubo com a abertura para a objectiva na montagem no sentido norte. Fixe o suporte do tubo telescópico tubo com o parafuso de aperto na cabeça da montagem (fig. 7). visor telescópico parafusos de adjuste (visor) 5.
  • Seite 11 O cabo de transmissão comprido (Fig. 1, 14) é montado para o solo, o sentido da objectiva para a estrela polar. Solte o paralelamente ao tubo do telescópio. A fixação é feita com um grampo da barra de ajuste da latitude e o eixo DEC e coloque a parafuso de aperto no entalhe previsto no eixo.
  • Seite 12 Caso o seu telescópio tenha pó ou humidade por dentro, não SUGESTÃO: tente limpar. Dirija-se antes ao técnico especializado, ou seja, ao As oculares são o sistema de lentes viradas para o olho. Meade Service Center do seu país, indicado nestas instruções Com a ocular grava-se a imagem original no ponto focal da objectiva, i.e., feito de forma visível e ampliado Anexo...
  • Seite 13 2. Dados técnicos: Tipo de construção: refractor acromático (2 lentes) Distância focal: 900 mm Diâmetro da objectiva: 90 mm Ampliação: 45 - 135x (de acordo com ocular) Visor: 6x30 Montagem: equatorial (EQ-3) em tripé de alumínio ajustável em altura 3. Correcção de erros Erros: Ajuda: Sem imagem...
  • Seite 14 Componenti (fig. 1-3): Sistemare il tubo centrandolo rispetto al sostegno e richiudere il morsetto. Chiudete il morsetto stringendo bene la vite che era tubo del telescopio stata precedentemente allentata. cercatore vite di regolazione (cercatore) Posizionare il tubo inclusivo di morsetto sulla montatura con Apertura del tubo ottico l'apertura dell'obiettivo rivolta verso nord.
  • Seite 15 8. Montaggio – Aste flessibili 5. Allineamento finale Per agevolare la regolazione di precisione degli assi di Ruotare l'asse di declinazione (fig. 15, C), incluso il supporto del declinazione e di ascensione retta, inserire le aste flessibili negli telescopio, di 90°. appositi supporti posti su entrambi gli assi.
  • Seite 16 Se nonostante le dovute precauzioni il Suo telescopio dovesse CONSIGLIO: essere venuto a contatto con sporcizia o polvere, se ne consiglia prima la rimozione con un pennello. Più indicata è ancora l’aria Gli oculari sono sistemi di lenti fatti apposta per l’occhio compressa di una bomboletta spray! Successivamente pulire la umano.
  • Seite 17 2. Dati tecnici: Tipo: telescopio rifrattore acromatico (2 lenti) Distanza focale: 900mm Diametro obiettivo: 90mm Ingrandimento: 45 - 135x (a seconda dell’oculare) Cercatore: 6x30 Montatura: Equatoriale (EQ-3) treppiede alluminio regolabile in altezza 3. Rimozione delle anomalie: Anomalia: Intervento: Nessuna immagine Rimuovere il coperchietto protettivo dall’apertura dell’obiettivo.
  • Seite 18 Toutes les pièces (Fig. 1-3) Posez maintenant le tube, avec le collier de serrage du tube, sur le montage avec l’ouverture de l’objectif orienté vers le Nord. Fixez Tube du télescope le support du tube à l’aide de la vis de serrage sur la tête de mon- Télescope chercheur tage (graph.
  • Seite 19 L’axe flexible court (graph. 1, 15) est monté latéralement. La fixa- scope est maintenant orienté correctement. tion se fait à l’aide d’une vis de serrage dans l’entaille prévue à cet Ce procédé est nécessaire afin d’assurer la poursuite des objets effet sur l’axe.
  • Seite 20 à la base de toutes les cartes du ciel. Sur le dessin vous trouvez Annexe quelques constellations connues et dispositions d'étoiles qui sont visibles durant toute l'année. La disposition des astres toutefois 1. Objets à observer possibles dépend la date et de l'heure. Ci-après nous avons sélectionné...
  • Seite 21 2. Données Techniques : Type de construction: Réfracteur achromatique (2 lentilles) Distance focale: 900mm Diamètre de l’objectif: 90mm Grossissement: 45 - 135 fois (selon l’oculaire utilisé) Viseur: 6x30 Monture: Équatoriale (EQ-3) sur trépied en aluminium réglable en hauteur 3. Elimination de défauts : Défaut : Aide: Pas image...
  • Seite 22 All parts (Fig. 1-3) Now secure the mounting by tightening the screw. Telescope tube Place the tube including clip with the objective opening facing Viewfinder scope north on the mounting. Fasten the tube holder using the clamping Adjusting-screws (viewfinder) screw to the mount head (illustration 7). Tube opening Objective Eyepiece connection...
  • Seite 23 secured in place with a clamping screw in the axis notch Manual use of the hours axis (R.A. axis) via the flexible shaft provided. (illustration 15 D) compensates for the earth's rotation so that objects remain always in the eyepiece visual field. If you want to Your telescope is now ready for use.
  • Seite 24 Hint: Constellation Orion: The great Orion nebula / M 42 (Fig. 21) Right Ascension: 05h 33’ (hours : minutes) Focal length telescope : Focal length Eyepiece = Magnification Declination: -05° 25’ (Degrees : minutes) 900 mm : 20 mm = 45 x 900 mm : 10 mm = 135 x...
  • Seite 25 2. Technical Data Design: achromatic refracting telescope with 2 lenses Focal length: 900 mm Lens diameter: 90 mm Magnification: 45 - 135x (depending on eyepiece). Viewfinder: 6x30 Mount: equatorial (EQ-3) on a vertically adjustable aluminium tripod. 3. Troubleshooting: Mistakes: Help: No picture Remove dust protection cap and sunbathe-shield from the objective...
  • Seite 26 Wszystkie części (rys. 1-3) 4. Montaż – tubus: Tubus teleskopu Aby zamontować tutbus teleskopu (rys. 1, 1) proszę odkręcić Szukacz teleskopu śrubę zacisku tubusa (rys. 6, X) i otworzyć ją. Pokrętła regulujące (szukacz) Wejście tubusu Następnie proszę ustawić tubus na środku uchwytu i ponownie Obiektyw zamknąć...
  • Seite 27 7. Montaż – pokrywy przeciwpyłowe: 4. Regulacja szerokości geograficznej: Aby ochronić wnętrze Państwa teleskopu przed kurzem i brudem, wlot Szerokość geograficzną stanowiska obserwacyjnego możesz ustalić teleskopu jest chroniony przez pokrywy przeciwpyłowe (rys. 12, X). przy pomocy mapy drogowej, atlasu lub znaleźć w internecie. Niemcy Pokrywy przeciwpyłowe znajdują...
  • Seite 28 dokładne ustawienie na gwiazdę, jak również ustawienie ostrości 12. Obsługa – konserwacja: obrazu za pomocą pokrętła ustawienia ostrości (rys. 15, F). Państwa teleskop jest wysokowartościowym urządzeniem optycznym. Z Oprócz tego mogą Państwo teraz poprzez wymianę okularu (mniejsza tego powodu powinni Państwo nie dopuszczać, aby kurz lub wilgoć ogniskowa) ustawić...
  • Seite 29 Mgławica Dumbell M27 lub Mgławica Hantel w Gwiazdozbiorze Lisek była pierwszą odkrytą planetarną mgławicą. 12 lipca 1764 r. odkrył Charles Messier tą nową i fascynującą klasę obiektów. Widzimy ten obiekt dokładnie z jego płaszczyzny równikowej. Oglądanoby Mgławicę Dumbell z jednego z biegunów, wykazałaby ona formę pierścienia i jej widok podobny byłby do tego, jaki znamy z Mgławicy Pierścieniowej M57.
  • Seite 30 Všechny díly (Obr. 1-3): 4. Nastavení tubusu: Tubus teleskopu Pri montáži tubusu teleskopu (obr. 1, 1) uvolnete šrouby objímky Teleskopický hledáček tubusu (obr. 6, X) a roztáhnete objímku. Seřizovací šrouby (hledáček) Otvor tubusu Vložte tubus do stredu objímky a stáhnete objímku. Objímku Objektiv uzavrete dotáhnutím dríve uvolnených šroubu.
  • Seite 31 8. Stavba – Ohybné hřídele: 5. Konečné nasměrování Pro ulehčení nastavení deklinační a rektascenzní osy jsou na Otočte osou deklinace (obr. 15, C) včetně držáku dalekohledu o příslušných držácích os nasazeny ohybné hřídele. (Obr. 13, X) 90°. Dlouhý ohybný hřídel je namontován (obr. 1, 14) rovnoběžně s tubu- Umístěte tubus správně...
  • Seite 32 9. Obsluha – hledání hvezdy: Pokud se do vnitřních částí teleskopu dostane prach nebo vlhkost, nepokoušejte se zařízení sami čistit, ale obraťte se v tomto případě Na zacátku bude pro Vás težké zorientovat se v hvezdném nebi, na svého prodejce popř. na servisní centrum Lidl ve své zemi. vzhledem k tomu, že hvezdy a souhvezdí...
  • Seite 33 2. Technical Data Design: achromatic refracting telescope with 2 lenses Focal length: 900 mm Lens diameter: 90 mm Magnification: 45 - 135 X (depending on eyepiece). Viewfinder: 6x30 Mount: equatorial (EQ-3) on a vertically adjustable aluminium tripod. 3. Poruchy Poruchy: Pomoc: žádný...
  • Seite 34 (code QR) pour voir les versions disponibles. Vous pouvez également nous envoyer un e-mail à l’adresse manu- als@bresser.de ou nous laisser un message au +49 (0) 28 72 – 80 74-220*. Indiquez toujours votre nom, votre adresse exacte, un numéro de téléphone et une adresse e-mail valides ainsi que le...
  • Seite 35 - 35 -...
  • Seite 36 - 36 -...
  • Seite 37 f=20 mm f=10 mm Fig. 20 Der Mond Fig. 21 Orion-Nebel (M42) Fig. 22 Ringnebel in der Leier (M57) Fig. 23 Hantel-Nebel im Füchslein (M27) - 37 -...
  • Seite 38 Bresser GmbH Gutenbergstr. 2 · DE-46414 Rhede/Westf. Germany +49 (0) 2872 80 74 210 www.bresser.de Reservation of technical alterations...