Victron energy Phoenix 12/3000 Anleitung
Vorschau ausblenden
Andere Handbücher für Phoenix 12/3000:
- Anleitung (154 Seiten) ,
- Installationsanleitung (107 Seiten) ,
- Anleitung (153 Seiten)
Inhaltsverzeichnis
Werbung
Verfügbare Sprachen
Verfügbare Sprachen
Werbung
Inhaltsverzeichnis

Verwandte Anleitungen für Victron energy Phoenix 12/3000


Inhaltszusammenfassung für Victron energy Phoenix 12/3000
- Seite 1 Manual Handleiding Manuel Anleitung Manual Användarhandbok Phoenix Inverter (with firmware xxxx1xx) 12 | 3000 | 230V 24 | 3000 | 230V 48 | 3000 | 230V 24 | 5000 | 230V 48 | 5000 | 230V Downloaded from www.Manualslib.com manuals search engine...
- Seite 2 Downloaded from www.Manualslib.com manuals search engine...
-
Seite 3: Safety Instructions
1. SAFETY INSTRUCTIONS In general Please read the documentation supplied with this product first, so that you are familiar with the safety signs en directions before using the product. This product is designed and tested in accordance with international standards. The equipment should be used for the designated application only. -
Seite 4: Transport And Storage
Install the product in a heatproof environment. Ensure therefore that there are no chemicals, plastic parts, curtains or other textiles, etc. in the immediate vicinity of the equipment. Transport and storage On storage or transport of the product, ensure that the battery leads are disconnected. No liability can be accepted for damage in transit if the equipment is not transported in its original packaging. - Seite 5 2. DESCRIPTION SinusMax - Superior engineering Developed for professional duty, the Phoenix range of inverters is suitable for the widest range of applications. The design criteria have been to produce a true sine wave inverter with optimised efficiency but without compromise in performance. Employing hybrid HF technology, the result is a top quality product with compact dimensions, light in weight and capable of supplying power, problem-free, to any load.
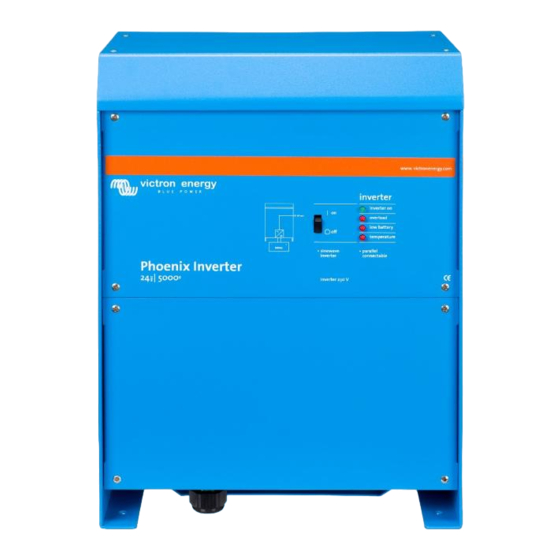
- Seite 6 3. OPERATION 3.1 On/Off Switch When switched to "on", the product is fully functional. The inverter will come into operation and the LED "inverter on" will light up. 3.2 Remote control Remote control is possible with a simple on/off switch or with a Phoenix Inverter Control panel.
- Seite 7 inverter inverter on overload The inverter is switched off due to overload or short circuit. low battery temperature inverter inverter on overload The battery is almost fully exhausted. low battery temperature inverter inverter on overload The inverter has switched off due to low battery voltage.
- Seite 8 inverter inverter on The inverter has switched off due to overload the electronics temperature being too high. low battery temperature inverter inverter on -If the LEDs are flashing alternately, the battery is nearly exhausted and overload the nominal output is exceeded. -If "overload"...
- Seite 9 4. INSTALLATION This product may only be installed by a qualified electrical engineer. 4.1 Location The product must be installed in a dry and well-ventilated area, as close as possible to the batteries. There should be a clear space of at least 10 cm around the appliance for cooling.
- Seite 10 4.2 Connection of battery cables In order to utilize the full capacity of the product, batteries with sufficient capacity and battery cables with sufficient cross section should be used. See table. 12/3000 24/3000 48/3000 Recommended battery capacity (Ah) 400–1200 200–700 100–400 Recommended DC fuse 400A...
-
Seite 11: Optional Connections
4.3 Connection of the AC cabling This is a Safety Class I product (supplied with a protective grounding terminal). The neutral output of the inverter is connected to the enclusure. This to ensure proper functioning of a GFCI (or RCCB) to be installed in the AC output of the Inverter. - Seite 12 4.4.3 Parallel Connection The Phoenix Inverter can be connected in parallel with several identical devices. To this end, a connection is established between the devices by means of standard RJ45 UTP cables. The system (Two or more Inverters plus optional control panel) will require subsequent configuration (see Section 5).
-
Seite 13: Configuration
5. CONFIGURATION • Settings may only be changed by a qualified electrical engineer. • Read the instructions thoroughly before implementing changes. 5.1 Standard settings: ready for use On delivery, the Phoenix Inverter is set to standard factory values. In general, these settings are suitable fo stand-alone operation. - Seite 14 Search Mode (Applicable in stand-alone configuration only) If search mode is ‘on’, the power consumption in no-load operation is decreased by approx. 70%. In this mode the inverter is switched off in case of no load or very low load, and switches on every two seconds for a short period. If the output current exceeds a set level, the inverter will continue to operate.
- Seite 15 5.4 Implementing settings with a VE.Net panel To this end, a VE.Net panel and the VE.Net to VE.Bus converter is required. With VE.Net you can set all parameters, with the exception of the multi-functional relay and the VirtualSwitch. 5.5 Configuration with DIP switches A number of settings can be changed using DIP switches (see appendix A, position I).
- Seite 16 5.5.1 AES (Automatic Economy Switch) Procedure: set ds5 to the required value: off = AES off on = AES on Note: The AES option is only effective if the unit is used ‘stand alone’. 5.5.2 Inverter voltage Procedure: set ds4 to the required value: off = 240V on = 230V 5.5.3 Inverter frequency...
- Seite 17 Setting ds2 and ds1 for stand-alone operation DS-8 not used Set off DS-7 not used Set off DS-6 not used Set off DS-5 AES Set as desired DS-4 Inverter voltage Set as desired DS-3 Inverter frequency Set as desired DS-2 Stand-alone operation DS-1 Stand-alone operation Examples of DIP switch settings for stand-alone mode are given below.
- Seite 18 Setting ds2 and ds1 for parallel operation Master Slave 1 Slave 2 (optional) DS-8 not used DS-8 not used DS-8 not used DS-7 not used DS-7 not used DS-7 not used DS-6 not used DS-6 not used DS-6 not used DS-5 AES DS-5 na DS-5 na...
-
Seite 19: Fault Indications
Avoid moisture and oil/soot/vapours, and keep the device clean. 7. FAULT INDICATIONS With the procedures below, most errors can be quickly identified. If an error cannot be resolved, please refer to your Victron Energy supplier. 7.1 General error indications Problem Cause... - Seite 20 7.2 VE.Bus LED indications Inverters included in a VE.Bus system (a parallel or 3-phase arrangement) can provide so-called VE.Bus LED indications. These LED indications can be subdivided into two groups: OK codes and error codes. 7.2.1 VE.Bus OK codes If the internal status of a device is in order but the device cannot yet be started because one or more other devices in the system indicate an error status, the devices that are in order will indicate an OK code.
-
Seite 21: Technical Specifications
8. TECHNICAL SPECIFICATIONS Phoenix Inverter 12/3000 24/3000 48/3000 INVERTER Input voltage range (V DC) 9,5 – 17 19 – 33 38 – 66 Output Output voltage: 230VAC ± 2% Frequency 50Hz ± 0,1% Cont. output power at 25°C (VA) 3000 3000 3000 Cont. - Seite 22 Phoenix Inverter 24/5000 48/5000 INVERTER Input voltage range (V DC) 19 – 33 38 – 66 Output Output voltage: 230 VAC ± 2% Frequency 50 Hz ± 0,1% Cont. output power at 25°C (VA) 5000 5000 Cont. output power at 25°C (W) 4000 4000 Cont.
-
Seite 23: Veiligheidsaanwijzingen
1. VEILIGHEIDSAANWIJZINGEN Algemeen Lees eerst de bij dit product geleverde documentatie, zodat u bekend bent met de veiligheidsaanduidingen en aanwijzingen voordat u het product in gebruik neemt. Dit product is ontworpen en getest conform de internationale normen. De apparatuur mag enkel worden gebruikt voor de bedoelde toepassing. WAARSCHUWING: KANS OP ELEKTRISCHE SCHOK Het product wordt gebruikt in combinatie met een permanente energiebron (accu). -
Seite 24: Vervoer En Opslag
Zorg ervoor dat de apparatuur wordt gebruikt onder de juiste bedrijfsomstandigheden. Gebruik het product nooit in een vochtige of stoffige omgeving. Zorg ervoor dat er rondom het product steeds voldoende vrije ruimte is voor ventilatie en dat de ventilatieopeningen niet geblokkeerd zijn. Installeer het product in een hittebestendige omgeving. - Seite 25 2. BESCHRIJVING SinusMax - superieur engineering Omdat de Phoenix-serie omvormers is ontwikkeld voor professionele taken, is deze geschikt voor de meest uiteenlopende toepassingen. De ontwerpcriteria waren om een zuivere sinusgolf-omvormer met geoptimaliseerde efficiëntie te maken, maar zonder afbreuk te doen aan de prestaties. Door hybride HF-technologie toe te passen, is het resultaat een product van topkwaliteit met compacte afmetingen, licht in gewicht en in staat om elke belasting probleemloos van stroom te voorzien.
- Seite 26 3. BEDIENING 3.1 Aan/uit-Schakelaar Als de schakelaar op “on” wordt gezet, is het apparaat volledig functioneel. De omvormer wordt ingeschakeld en de led “inverter on” gaat branden. 3.2 Afstandsbediening Afstandsbediening is mogelijk met een eenvoudige aan/uit-schakelaar of met een Phoenix Omvormer-bedieningspaneel. 3.3 Led-aanduidingen led uit led knippert...
- Seite 27 inverter inverter on overload De omvormer is uitgeschakeld door overbelasting of kortsluiting. low battery temperature inverter inverter on overload De accu is bijna leeg. low battery temperature inverter inverter on overload De omvormer is uitgeschakeld door een te lage accuspanning. low battery temperature inverter...
- Seite 28 inverter inverter on De omvormer is uitgeschakeld overload doordat de temperatuur van de elektronica te hoog is. low battery temperature inverter -Als de LEDs afwisselend knipperen, inverter on is de accu bijna leeg en wordt het nominale vermogen overschreden. overload -Als "overload"...
- Seite 29 4. INSTALLATIE Dit product mag uitsluitend worden geïnstalleerd door een gekwalificeerde elektromonteur. 4.1 Locatie De MultiPlus dient in een droge, goed geventileerde ruimte te worden geïnstalleerd, zo dicht mogelijk bij de accu’s. Rondom het apparaat dient een ruimte van tenminste 10 cm te worden vrijgehouden voor koeling.
- Seite 30 4.2 Aansluiten van de accukabels Om de volledige capaciteit van het product te kunnen benutten, dient uitsluitend gebruik te worden gemaakt van accu’s met voldoende capaciteit en van accukabels met de juiste doorsnede. Zie tabel. 12/3000 24/3000 48/3000 Aanbevolen accucapaciteit (Ah) 400–1200 200–700 100–400...
-
Seite 31: Optionele Aansluitingen
4.3 Aansluiten van de AC-kabels Dit is een product uit veiligheidsklasse I (dat wordt geleverd met een aardklem ter beveiliging). De neutrale uitgang van de omvormer is aangesloten op de behuizing. Dit om voor een juiste werking van een GFCI (of RCCB) te zorgen die in de AC-uitgang van de omvormer moet worden geïnstalleerd. - Seite 32 4.4.3 Parallelle aansluiting De Phoenix Omvormer kan parallel worden geschakeld met meerdere identieke apparaten. Hiervoor wordt een verbinding tussen de apparaten gemaakt met behulp van standaard RJ45 UTP-kabels. Het systeem (één of meerdere omvormers plus een optioneel bedieningspaneel) moet daarna worden geconfigureerd (zie hoofdstuk 5). Bij het parallel schakelen van units moet aan de volgende voorwaarden worden voldaan: •...
- Seite 33 5. CONFIGURATIE • Instellingen mogen alleen worden gewijzigd door een gekwalificeerde elektrotechnicus. • Lees de aanwijzingen grondig door voordat u wijzigingen doorvoert. 5.1 Standaardinstellingen: klaar voor gebruik De Phoenix Omvormer wordt geleverd met standaardfabrieksinstellingen. Over het algemeen zijn deze instellingen geschikt als het apparaat standalone is. Standaardfabrieksinstellingen Frequentie omvormer 50 Hz...
- Seite 34 Search Mode (zoekmodus, enkel van toepassing in standalone-configuratie) Als de 'search mode' is ingeschakeld, wordt het stroomverbruik bij nullast verlaagd met ca. 70%. De 'search mode' houdt in dat de omvormer wordt uitgeschakeld als er geen belasting is of als deze heel laag is. Iedere 2 seconden zal de omvormer even inschakelen.
- Seite 35 5.4 Implementatie van instellingen met een VE.Net-paneel Hiervoor hebt u een VE.Net-paneel en de ‘VE.Net-naar-VE.Bus-omvormer’ nodig. Met VE.Net kunt u alle parameters instellen, met uitzondering van het multifunctionele relais en de VirtualSwitch. 5.5 Configuratie met DIP-schakelaars Een aantal instellingen kan worden gewijzigd met DIP-schakelaars (zie bijlage A, positie I).
- Seite 36 5.5.2 Omvormerspanning Procedure: stel ds4 in op de vereiste waarde: off = 240V on = 230V 5.5.3 Omvormerfrequentie Procedure: stel ds3 in op de vereiste waarde: off = 60Hz on = 50Hz 5.5.4 Zelfstandige, parallelle en driefase werking DIP-schakelaar ds2 en ds1 zijn gereserveerd voor de selectie van standalone, parallel of 3-fase-bedrijf OPMERKING: •...
- Seite 37 Instelling ds2 en ds1 voor standalone-bedrijf DS-8 niet gebruikt Op off zetten DS-7 niet gebruikt Op off zetten DS-6 niet gebruikt Op off zetten DS-5 AES Naar wens instellen DS-4 Omvormerspanning Naar wens instellen DS-3 Frequentie omvormer Naar wens instellen DS-2 Standalone-bedrijf DS-1 Standalone-bedrijf Onderstaand volgende enkele voorbeelden van DIP-schakelaarinstellingen voor de...
- Seite 38 Instelling ds2 en ds1 voor parallel bedrijf Master Slave 1 Slave 2 (optioneel) DS-8 niet gebruikt DS-8 niet gebruikt DS-8 niet gebruikt DS-7 niet gebruikt DS-7 niet gebruikt DS-7 niet gebruikt DS-6 niet gebruikt DS-6 niet gebruikt DS-6 niet gebruikt DS-5 AES n.v.t.
- Seite 39 Voorkom vocht en olie/roet/dampen en houd het apparaat schoon. 7. STORINGSAANDUIDINGEN Via de onderstaande procedures kunnen de meeste fouten snel worden geïdentificeerd. Als u een fout niet kunt oplossen, neem dan contact op met uw Victron Energy-leverancier. 7.1 Algemene storingsaanduidingen Probleem Oorzaak Oplossing...
- Seite 40 7.2 VE.Bus-LED aanduidingen Omvormers die zijn geïntegreerd in een VE.Bus-systeem (een parallel- of 3-fase configuratie) kunnen zogenaamde VE.Bus-LED aanduidingen bieden. Deze LED aanduidingen kunnen worden onderverdeeld in twee groepen: OK-codes en storingscodes. 7.2.1 VE.Bus-OK-codes Als de interne toestand van een apparaat is orde is, maar het apparaat nog niet kan worden gestart, omdat één of meer andere apparaten in het systeem een storingsstatus aangeven, zullen de apparaten die in orde zijn een OK-code aangeven.
-
Seite 41: Technische Specificaties
8. TECHNISCHE SPECIFICATIES Phoenix Omvormer 12/3000 24/3000 48/3000 OMVORMER Ingangsspanningsbereik (V DC) 9,5 – 17 19 – 33 38 – 66 Uitgang Uitgangsspanning: 230VAC ± 2% Frequentie 50Hz ± 0,1% Cont. uitgangsvermogen bij 25°C (VA) 3000 3000 3000 Continu uitgangsvermogen bij 25°C (W) 2500 2500 2500... - Seite 42 Phoenix Omvormer 24/5000 48/5000 OMVORMER Ingangsspanningsbereik (V DC) 19 – 33 38 – 66 Uitgang Uitgangsspanning: 230VAC ± 2% Frequentie 50Hz ± 0,1% Cont. uitgangsvermogen bij 25°C (VA) 5000 5000 Continu uitgangsvermogen bij 25°C (W) 4000 4000 Continu uitgangsvermogen bij 40°C (W) 3700 3700 Continu uitgangsvermogen bij 65°C (W)
-
Seite 43: Consignes De Sécurité
1. CONSIGNES DE SÉCURITÉ Généralités Veuillez d'abord lire la documentation fournie avec cet appareil avant de l'utiliser, afin de vous familiariser avec les symboles de sécurité. Cet appareil a été conçu et testé conformément aux normes internationales. L'appareil doit être utilisé uniquement pour l'application désignée. ATTENTION : RISQUE DE DÉCHARGE ÉLECTRIQUE L'appareil est utilisé... -
Seite 44: Transport Et Stockage
’ ’ S'assurer qu'il existe toujours suffisamment d espace libre autour de l appareil pour la ventilation et que les orifices de ventilation ne sont pas obstrués. Installer l'appareil dans un environnement protégé contre la chaleur. Par conséquent, il faut s'assurer qu'il n'existe aucun produit chimique, pièce en plastique, rideau ou autre textile, à... - Seite 45 2. DESCRIPTION SinusMax - Technologie avancée Développée pour un usage professionnel, la gamme des convertisseurs Phoenix est parfaitement adaptée aux applications les plus diverses. Ces convertisseurs à sinusoïde pure et à haut rendement ont été conçus sans faire de concession aux performances.
- Seite 46 3. FONCTIONNEMENT 3.1 Commutateur on/off Lorsque le commutateur est positionné sur « on », l'appareil est pleinement fonctionnel. Le convertisseur est mis en marche et la LED « inverter on » (convertisseur en marche) s'allume. 3.2 Commande à distance Il est possible de piloter l'appareil à distance avec un simple interrupteur marche/arrêt ou avec un tableau de commande Phoenix Inverter Control.
- Seite 47 inverter inverter on Le convertisseur s'est arrêté à cause overload d'une surcharge ou d'un court- circuit. low battery temperature inverter inverter on overload La batterie est presque entièrement épuisée. low battery temperature inverter inverter on overload Le convertisseur s'est arrêté à cause d'une tension de batterie faible.
- Seite 48 inverter inverter on Le convertisseur s'est arrêté à cause overload de la température trop élevée de l'électronique. low battery temperature inverter - Si les LED clignotent par inverter on intermittence, la batterie est pratiquement épuisée et la sortie overload nominale est en surcharge. - Si «...
-
Seite 49: Emplacement
4. INSTALLATION Cet appareil doit être installé par un électricien qualifié. 4.1 Emplacement Le produit doit être installé dans un endroit sec et bien ventilé, aussi près que possible des batteries. Conservez un espace libre d'au moins 10 cm autour de l'appareil pour son refroidissement. - Seite 50 4.2 Raccordement des câbles de batterie Pour bénéficier de la puissance maximale de l'appareil, il est nécessaire d'utiliser des batteries de capacité suffisante et des câbles de section suffisante. Voir tableau. 12/3000 24/3000 48/3000 Capacité de batterie recommandée 400-1200 200-700 100-400 (Ah) Fusible CC recommandé...
-
Seite 51: Commande À Distance
4,3 Raccordement du câblage CA Cet appareil est un produit de classe de sécurité I (livré avec une borne de mise à la terre de protection). L'entrée neutre du convertisseur est connectée près du boîtier. Cela permet de garantir le bon fonctionnement d'un GFCI (ou RCCB) à installer sur la sortie CA du Convertisseur. -
Seite 52: Connexion En Parallèle
4.4.3 Connexion en parallèle Le convertisseur Phoenix peut être connecté en parallèle avec plusieurs appareils identiques. Pour ce faire, une connexion est établie entre les appareils par l'intermédiaire de câbles standard RJ-45 UTP. Le système (deux convertisseurs ou plus et un tableau de commande en option) devra être configuré en conséquence (voir la section 5). - Seite 53 5. CONFIGURATION • La modification des réglages doit être effectuée par un électricien qualifié. • Lisez attentivement les instructions avant toute modification. 5.1 Configuration standard : prêt à l'emploi À la livraison, le convertisseur Phoenix est configuré avec les valeurs d'usine standard.
- Seite 54 AES (Automatic Economy Switch) Si ce réglage est défini sur « on » et si aucune charge n'est disponible ou avec des charges faibles, la consommation électrique sera réduite d'environ 20 % en « rétrécissant » légèrement la tension sinusoïdale. Le mode AES peut être configuré...
- Seite 55 Vous pouvez télécharger gratuitement le logiciel sur notre site web www.victronenergy.fr. 5.3.2 VE.Bus System Configurator Pour configurer des applications avancées et/ou des systèmes avec quatre convertisseurs ou plus, il est nécessaire d'utiliser le logiciel VE.Bus System Configurator. Vous pouvez télécharger gratuitement le logiciel VEConfigure3 sur notre site web : www.victronenergy.fr.
- Seite 56 Remarque : Ce manuel est destiné aux convertisseurs ayant un numéro de micrologiciel xxxx1xx (x étant un chiffre quelconque). 5.5.1 AES (Automatic Economy Switch) Procédure : configurez ds5 sur la valeur requise : off = AES désactivé on = AES activé Remarque : L'option AES est effective uniquement si l'appareil est utilisé...
- Seite 57 5.5.4 Fonctionnement indépendant, parallèle ou triphasé Les interrupteurs DIP ds2 et ds1 sont réservés à la sélection du fonctionnement en mode indépendant, parallèle ou triphasé. REMARQUE : • Lors de la configuration d'un système parallèle ou triphasé, tous les appareils associés doivent être interconnectés avec des câbles RJ-45 UTP (voir l'annexe C, D).
- Seite 58 Configuration des interrupteurs ds2 et ds1 pour un fonctionnement indépendant DS-8 non utilisé Configurer sur Off DS-7 non utilisé Configurer sur Off DS-6 non utilisé Configurer sur Off DS-5 AES Réglage souhaité DS-4 Tension convertisseur Réglage souhaité DS-4 Fréquence convertisseur Réglage souhaité...
- Seite 59 Configuration des interrupteurs ds2 et ds1 pour un fonctionnement en parallèle Maître Esclave 1 Esclave 2 (en option) DS-8 non utilisé DS-8 non DS-8 non utilisé utilisé DS-7 non utilisé DS-7 non DS-7 non DS-6 non utilisé utilisé utilisé DS-5 AES n.d.
- Seite 60 Vous pouvez laisser les interrupteurs DIP dans les positions sélectionnées, afin que les réglages puissent toujours être récupérés. Pour démarrer le système : éteignez d'abord tous les appareils. Le système démarrera dès que tous les appareils seront mis en route. Downloaded from www.Manualslib.com manuals search engine...
- Seite 61 7. INDICATIONS DE DÉFAILLANCES La procédure ci-dessous permet d'identifier rapidement la plupart des erreurs. Si une erreur ne peut pas être résolue, veuillez en référer à votre fournisseur Victron Energy. 7.1 Indication d'erreur générale Problème Cause possible...
- Seite 62 7.2 Indications des LED du VE.Bus Les convertisseurs intégrés dans un système VE.Bus (configuration parallèle ou triphasée) peuvent produire des indications des LED du VE.Bus. Ces indications des LED peuvent être divisées en deux groupes : codes OK et codes d'erreur. 7.2.1 Codes OK du VE.Bus Si l'état interne d'un appareil est en ordre mais que l'appareil ne peut pas démarrer parce qu'un ou plusieurs appareils du système signalent un état d'erreur, les appareils...
-
Seite 63: Spécifications Techniques
8. SPÉCIFICATIONS TECHNIQUES Convertisseur Phoenix 12/3000 24/3000 48/3000 CONVERTISSEUR Plage de tension d'entrée (V CC) 9,5 - 17 19 - 33 38 - 66 Puissance sortie conv. à 25 ℃ (VA) (3) Sortie (1) Tension de sortie : 230 VCA ±2 % Fréquence : 50 Hz ±0,1 % 3000 3000... - Seite 64 Convertisseur Phoenix 24/5000 48/5000 CONVERTISSEUR Plage de tension d'entrée (V CC) 19 - 33 38 - 66 Puissance sortie conv. à 25 ℃ (VA) (3) Sortie (1) Tension de sortie : 230 VCA ±2 % Fréquence : 50 Hz ±0,1 % 5000 5000 Puissance sortie en continue à...
-
Seite 65: Sicherheitshinweise
1. Sicherheitshinweise Allgemeines Lesen Sie alle diesbezüglichen Produktinformationen sorgfältig durch, und machen Sie sich mit den Sicherheitshinweisen und den Anleitungen vertraut. Dieses Produkt wurde in Übereinstimmung mit entsprechenden internationalen Normen und Standards entwickelt und erprobt. Nutzen Sie das Gerät nur für den vorgesehenen Anwendungsbereich. -
Seite 66: Transport Und Lagerung
Stellen Sie sicher, dass das Gerät entsprechend den vorgesehenen Betriebsbedingungen genutzt wird. Betreiben Sie das Gerät niemals in nasser oder staubiger Umgebung. Sorgen Sie dafür, dass jederzeit ausreichend freier Lüftungsraum um das Gerät herum vorhanden ist, und dass die Lüftungsöffnungen nicht blockiert werden. Installieren Sie das Gerät in brandsicherer Umgebung. -
Seite 67: Beschreibung
2. Beschreibung SinusMax – Überagende Technik Die Phoenix Wechselrichter Baureihe -entwickelt für professionellen Betrieb- eignet sich für weitest mögliche Einsatzbereiche. Die Entwurfsbedingungen zielten auf einen echten Sinus-Wechselrichter mit optimiertem Wirkungsgrad und mit kompromisslosem Leistungsspektrum. Durch Einsatz von Hybrid HF Technologie entstand ein Qualitätsprodukt mit kompakten Abmessungen, geringem Gewicht und der Fähigkeit problemlos die jeweils benötigte Leistung abzugeben. -
Seite 68: Betrieb
3. BETRIEB 3.1 ein/aus Schalter Nach dem Einschalten (Schalter “on”) ist das Gerät betriebsbereit. Der Wechselrichter arbeitet und die LED-Anzeige „inverter on“ leuchtet auf. 3.2 Fernbedienung Fernbedienung kann über einen einfachen „Ein/Aus“-Schalter oder das Phoenix Wechselrichter Bedienpaneel erfolgen. 3.3 LED Anzeigen LED aus LED blinkt LED leuchtet... - Seite 69 inverter inverter on Der Wechselrichter ist wegen overload Überlast oder Kurzschluss abgeschaltet. low battery temperature inverter inverter on overload Die Batterie ist fast leer. low battery temperature inverter inverter on Der Wechselrichter hat sich wegen overload Unterspannung der Batterie abgeschaltet. low battery temperature inverter...
- Seite 70 inverter inverter on Der Wechselrichter hat sich wegen overload erhöhter Gerätetemperatur abgeschaltet. low battery temperature inverter - Wenn die LEDs abwechselnd inverter on blinken, ist die Batterie fast leer und die Nennleistung ist überschritten. overload - Wenn "overload" und "low battery" gleichzeitig blinken, ist die low battery Oberwellenspannung an den...
-
Seite 71: Einbau
4. Einbau Dieses Produkt darf nur durch qualifiziertes Fachpersonal eingebaut werden. 4.1 Einbauort Das Gerät soll an einem trockenen und gut belüfteten Platz möglichst nahe zur Batterie installiert werden. Ein Abstand von ca.10 cm sollte aus Kühlungsgründen um das Gerät herum frei bleiben Übermäßig hohe Umgebungstemperatur führt zu: •... -
Seite 72: Anschluss Der Batterie Kabel
4.2 Anschluss der Batterie Kabel Zur vollen Leistungs-Nutzung des Gerätes müssen Batterien ausreichender Kapazität sowie Batteriekabel mit entsprechendem Querschnitt eingebaut werden. Siehe Tabelle. 12/3000 24/3000 48/3000 Empfohlene Batteriekapazität (Ah) 400–1200 200–700 100–400 Empfohlene Gleichstromsicherung 400A 300A 125A Empfohlene Klemmenquerschnitte ) für + und - Anschluss 0 –... - Seite 73 Vorgehensweise Bezüglich der Kabelanschlüsse gehen Sie bitte wie folgt vor: Benutzen Sie zur Vermeidung von Kurzschlüssen isolierte Maulschlüssel! Vermeiden Sie Kabelkurzschlüsse! • Lösen Sie die vier Schrauben an der Vorderseite des Gehäuses und nehmen Sie die Frontplatte ab. • Schließen Sie die Batteriekabel an. Sie Anhang A. •...
-
Seite 74: Anschluß Der Wechselstromkabel
4.3 Anschluß der Wechselstromkabel Dieses Produkt entspricht der Sicherheitsklasse I (mit Sicherungserdung) Der Ausgangs Null-Leiter ist amGehäuse befestigt. Damit wird die einwandfreie Funktion der FI-Schutzschalter, die am Wechselstromausgang des Wechselrichters anzuschließen ist, gewährleistet. Das Gehäuse des Gerätes muß mit dem Erde, Fahrzeugrahmen (Landfahrzeug) oder der Erdungsplatte bez. -
Seite 75: Dreiphasen Betrieb
Hierzu müssen die Geräte mit einem Standard RJ45 UTP Kabel verbunden werden. Dann muss das System (zwei oder mehrere Wechselrichter und eventuell ein Kontrollpaneel) entsprechend konfiguriert werden (siehe Abschnitt 5). Wenn mehrere Einheiten parallel geschaltet werden sollen, ist folgendes zu beachten: •... -
Seite 76: Konfiguration
5. Konfiguration • Veränderungen von Einstellungen sollen nur durch qualifizierte Fachkräfte vorgenommen werden. • Lesen Sie vor Einstellungsänderungen sorgfältig die Anweisungen. 5.1 Standard-Einstellungen: Das Gerät ist betriebsbereit Phoenix Wechselrichter werden ab Fabrik mit Standardeinstellungen ausgeliefert. Diese beziehen sich auf den Betrieb als Einzelgerät. Standard Fabrikeinstellungen Wechselrichterfrequenz 50 Hz... -
Seite 77: Konfiguration Mit Dem Pc
Such-Modus (trifft nur beim Einzelbetrieb zu) Steht der Such-Modus auf ‘'on', wird der Stromverbrauch bei Nulllastbetrieb um ungefähr 70 % reduziert. In diesem Modus wird der Umrichter im Falle keiner Last oder sehr niedriger Last abgeschaltet und schaltet sich alle zwei Sekunden für einen kurzen Zeitraum wieder ein. -
Seite 78: Konfiguration Mit Dip-Schaltern
5.4 Einstellungen über das VE.Net Paneel Hierfür wird ein VE.Net Paneel und ein VE.Net zu VE.Bus Konverter benötigt. Mit dem VE.Net Paneel könne Sie alle Parameter mit Ausnahme des multifunktionalen Relais und vom Virtuellen Schalter einstellen. 5.5 Konfiguration mit DIP-Schaltern Eine Anzahl von Einstellungen kann mit DIP-Schaltern verändert werden (siehe Anhang A, Position I) Vorgehensweise:... - Seite 79 5.5.1 AES (Automatic Economy Switch) Einstellung: Setze ds5 auf den entsprechenden Wert: off = AES aus on = AES ein Beachte: Die AES Option ist ausschließlich bei Einzelgerätbetrieb aktiv. 5.5.2 Wechselrichter-Spannung Einstellung: Setze ds4 auf den entsprechenden Wert: off = 240V on = 230V 5.5.3 Wechselrichter Frequenz Einstellung: Setze ds3 auf den entsprechenden Wert:...
- Seite 80 • Beachten Sie bitte, dass nur identische Geräte in ein System integriert werden können. Jeder Versuch unterschiedliche Einheiten in einem System zu benutzen wird fehlschlagen. • Die Kombination ds1=on und ds2=on wird nicht benutzt. Downloaded from www.Manualslib.com manuals search engine...
- Seite 81 Einstellung von ds2 und ds1 für Einzelgerätbetrieb DS-8 ohne Funktion Einstellung off DS-7 ohne Funktion Einstellung off DS-6 ohne Funktion Einstellung off DS-5 AES Spez.Einstellung DS-4 Inverter Spannung Spez.Einstellung DS-3 Inverter Frequenz Spez.Einstellung DS-2 Einzelbetrieb DS-1 Einzelbetrieb Beispiele für DIP Schalter-Einstellungen für Einzelbetriebmodus sind unten angegeben Beispiel 1 zeigt die Fabrikeinstellung (Da sie bei der Herstellung automatisch vorgenommen werden, stehen alle DIP Schalter eines neuen Produktes auf „off“)
- Seite 82 Einstellungen von ds2 und ds1 für Parallelbetrieb Master Slave 1 Slave 2 (optional) DS-8 ohne Funktion DS-8 ohne DS-8 ohne DS-7 ohne Funktion DS-7 ohne DS-7 ohne DS-6 ohne Funktion DS-6 ohne DS-6 ohne DS-5 AES nicht aktiv DS-5 na DS-5 na DS-4 Inv.
- Seite 83 Einstellungen von ds2 und ds1 für Parallelbetrieb Master Slave 1 Slave 2 (optional) DS-8 ohne Funktion DS-8 ohne DS-8 ohne DS-7 ohne Funktion DS-7 ohne DS-7 ohne DS-6 ohne Funktion DS-6 ohne DS-6 ohne DS-5 AES nicht aktiv DS-5 na DS-5 na DS-4 Inv.
-
Seite 84: Wartung
Zum Start des Systems schalten Sie zunächst alle Geräte aus. Das System neu starten, sobald die einzelnen Geräte wieder eingeschaltet sind 6. Wartung Der Phoenix Wechselrichter bedarf keiner speziellen Wartung. Es reicht aus, wenn die Anschlüsse einmal jährlich kontrolliert werden. Feuchtigkeit sowie Staub, Öl- und sonstige Dämpfe sollten vermieden werden. - Seite 85 7.2 VE.Bus LED Hinweise Wechselrichter in einem VE.Bus System (Parallel- oder 3-Phasenbetrieb) können sog. VE.Bus LED Hinweise geben. Diese Hinweise können in zwei Gruppen, nämlich in OK und FEHLER eingeteilt werden. 7.2.1 VE.Bus OK Hinweise Falls ein Gerät prinzipiell korrekt arbeitet, aber dennoch nicht gestartet werden kann, weil ein anderes Gerät oder mehrere im Verbund Fehlermeldungen anzeigen, dann werden die fehlerfreien Geräte einen OK Hinweis anzeigen.
-
Seite 86: Technische Spezifikationen
8. Technische Spezifikationen Phoenix Wechselrichter 12/3000 24/3000 48/3000 Wechselrichter Bereich Eingangsspannung (V DC) 9,5 – 17 19 – 33 38 – 66 Ausgang Ausgangsspannung: 230 VAC ± 2% Frequenz 50 Hz ± 0,1% kont. Ausgangsleistg. 25°C (VA) 3000 3000 3000 kont. - Seite 87 Phoenix Wechselrichter 24/5000 48/5000 Wechselrichter Bereich Eingangsspannung (V DC) 19 – 33 38 – 66 Ausgang Ausgangs-Spannung: 230 VAC ± 2% Frequenz 50 Hz ± 0,1% kont. Ausgangsleistg. 25°C (VA) 5000 5000 kont. Ausgangsleistg. 25°C (W) 4000 4000 kont. Ausgangsleistg. 40°C (W) 3700 3700 kont.
- Seite 88 Downloaded from www.Manualslib.com manuals search engine...
-
Seite 89: Instrucciones De Seguridad
1. INSTRUCCIONES DE SEGURIDAD En general Lea en primer lugar la documentación que acompaña al producto para familiarizarse con las indicaciones de seguridad y las instrucciones antes de utilizarlo. Este producto se ha diseñado y comprobado de acuerdo con los estándares internacionales. -
Seite 90: Transporte Y Almacenamiento
Compruebe que hay suficiente espacio alrededor del producto para su ventilación y que los orificios de ventilación no están tapados. Instale el producto en un entorno a prueba del calor. Compruebe que no haya productos químicos, piezas de plástico, cortinas u otros textiles, etc., en las inmediaciones del equipo. - Seite 91 2. DESCRIPCIÓN SinusMax – Un diseño superior Desarrollado para uso profesional, la gama de inversores Phoenix es ideal para innumerables aplicaciones. El criterio utilizado en su diseño fue el de producir un verdadero inversor sinusoidal con una eficiencia optimizada pero sin comprometer su rendimiento.
- Seite 92 3. FUNCIONAMIENTO 3.1 Conmutador On/Off “ ” Al poner el conmutador en , el producto es plenamente operativo. El inversor se “ ” pone en marcha y el LED inverter on (inversor activado) se enciende. 3.2 Control remoto Es posible utilizar un control remoto con un interruptor on/off sencillo o con el panel de control del Phoenix Inverter.
- Seite 93 inverter inverter on overload El inversor se ha parado debido a una sobrecarga o cortocircuito. low battery temperature inverter inverter on overload La batería está prácticamente vacía. low battery temperature inverter inverter on overload El inversor se ha parado debido a la baja tensión de la batería.
- Seite 94 inverter inverter on El inversor se ha parado debido a la overload temperatura excesiva de los componentes electrónicos. low battery temperature inverter -Si los LED parpadean de manera inverter on alterna, la batería está casi vacía y se ha superado la potencia nominal. overload -Si "overload"...
- Seite 95 4. INSTALACIÓN Este producto debe instalarlo exclusivamente un ingeniero eléctrico cualificado. 4.1 Ubicación El producto debe instalarse en una zona seca y bien ventilada, tan cerca como sea posible de las baterías. Debe dejarse un espacio de al menos 10 cm. alrededor del aparato para refrigeración.
- Seite 96 4.2 Conexión de los cables de batería Para utilizar toda la capacidad del producto, deben utilizarse baterías con capacidad suficiente y cables de batería de sección adecuada. Consulte la tabla. 12/3000 24/3000 48/3000 Capacidad de batería recomendada 400-1200 200-700 100-400 (Ah) Fusible CC recomendado 400A...
-
Seite 97: Opciones De Conexión
4,3 Conexión del cableado CA Este producto es un dispositivo de clase de seguridad I (suministrado con terminal de puesta a tierra). El cable neutro del inversor se conecta a la carcasa. Con esto se garantiza el funcionamiento correcto del GFCI (o RCCB) que deberá... -
Seite 98: Conexión En Paralelo
4.4.3 Conexión en paralelo El Phoenix Inverter pueden conectarse en paralelo con varias unidades idénticas. Para ello se establece una conexión entre los dispositivos mediante cables RJ45 UTP estándar. El sistema (dos o más inversores y un panel de control opcional) tendrá que configurarse posteriormente (ver Sección 5). -
Seite 99: Configuración
5. CONFIGURACIÓN • Este producto debe modificarlo exclusivamente un ingeniero eléctrico cualificado. • Lea las instrucciones atentamente antes de implementar los cambios. 5.1 Valores estándar: listo para usar El Phoenix Inverter se entrega con los valores estándar de fábrica. Por lo general, estos valores son adecuados para el funcionamiento autónomo de la unidad. - Seite 100 Modo de búsqueda (Sólo aplicable para configuración autónoma). Si el modo de búsqueda está activado, el consumo en funcionamiento sin carga disminuye aproximadamente un 70%. En este modo el inversor se apaga si no hay carga o es muy baja, y se enciende cada dos segundos durante un breve periodo de tiempo.
- Seite 101 5.4 Implementación de parámetros con un panel VE.Net Se necesita un panel VE.Net y un convertidor VE.Net a VE.Bus. Con VE.Net podrá establecer todos los parámetros, con la excepción del relé multi- funcional y el VirtualSwitch. 5.5 Configuración con conmutadores DIP Mediante conmutadores DIP se puede modificar una serie de ajustes (ver Apéndice A, punto I).
- Seite 102 – 5.5.1 AES (Automatic Economy Switch conmutador de ahorro automático) Procedimiento: ajustar ds5 al valor requerido: off = AES desactivado on = AES activado Nota: La opción AES sólo es eficaz si la unidad se utiliza en modo autónomo. 5.5.2 Tensión del inversor Procedimiento: ajustar ds4 al valor requerido: off = 240V on = 230V...
- Seite 103 Valores ds2 y ds1 para funcionamiento autónomo DS-8 no se usa Ajustar en off DS-7 no se usa Ajustar en off DS-6 no se usa Ajustar en off DS-5 AES Ajustar como se desee DS-4 Tensión del inversor Ajustar como se desee DS-3 Frecuencia del inversor Ajustar como se desee DS-2 Funcionamiento autónomo...
- Seite 104 Valores ds2 y ds1 para funcionamiento en paralelo Maestro Esclavo 1 Esclavo 2 (opcional) DS-8 no se usa DS-8 no se DS-8 no se DS-7 no se usa DS-7 no se DS-7 no se DS-6 no se usa DS-5 AES DS-6 no se DS-6 no se DS-4 Ten.
- Seite 105 Puede dejar los conmutadores DIP en las posiciones elegidas para poder recuperar siempre los "otros valores". Para arrancar el sistema, primero apague todos los dispositivos. El sistema arrancará tan pronto como todos los dispositivos se hayan encendido. 6. MANTENIMIENTO El Inversor Phoenix no necesita un mantenimiento específico. Bastará con comprobar todas las conexiones una vez al año.
-
Seite 106: Indicaciones De Error
7. INDICACIONES DE ERROR Los siguientes procedimientos permiten identificar rápidamente la mayoría de los errores. Si un error no se puede resolver, consulte al proveedor de Victron Energy. 7.1 Indicaciones generales de error Problema Causa Solución El inversor no se ha La tensión de la batería es muy... - Seite 107 7.2 Indicaciones de los LED de VE.Bus Los inversores incluidos en un sistema VE.Bus (una disposición en paralelo o trifásica) pueden proporcionar las llamadas indicaciones LED VE.Bus. Estas indicaciones LED pueden dividirse en dos grupos: Códigos correctos y códigos de error.
-
Seite 108: Especificaciones Técnicas
8. ESPECIFICACIONES TÉCNICAS Inversor Phoenix 12/3000 24/3000 48/3000 INVERSOR – – – Rango de tensión de entrada (VCC) Salida Tensión de salida: 230 VCA ± 2% Frecuencia: 50 Hz ± 0,1% 3000 3000 3000 Potencia cont. de salida a 25ºC (VA) (3) Potencia cont. - Seite 109 Inversor Phoenix 24/5000 48/5000 INVERSOR – – Rango de tensión de entrada (VCC) Salida (1) Tensión de salida: 230 VCA ± 2% Frecuencia: 50 Hz ± 0,1% 5000 5000 Potencia cont. de salida a a 25ºC (VA) (3) Potencia cont. de salida a 25ºC (W) 4000 4000 Potencia cont.
- Seite 110 Downloaded from www.Manualslib.com manuals search engine...
-
Seite 111: Säkerhetsinstruktioner
1. SÄKERHETSINSTRUKTIONER Allmänt Var vänlig läs dokumentationen som medföljer denna produkt först, så att du är bekant med säkerhetsangivelser och instruktioner innan du använder produkten. Produkten är utvecklad och tested i enlighet med internationella standarder. Utrustningen bör endast användas för sitt avsedda användningsområde. VARNING: FARA FÖR ELEKTRISKA STÖTAR Produkten används i kombination med en permanent strömkälla (batteri). -
Seite 112: Transport Och Förvaring
Installera produkten i en värmeskyddad miljö. Säkerställ därför att det inte finns några kemikalier, plastdelar, gardiner eller andra textilier m.m. i utrustningens omedelbara närhet. Transport och förvaring Vid förvaring eller transport av produkten, säkerställ att batterikablarna är urkopplade. Inget ansvar kommer att accepteras för skador under transport om utrustningen inte transporteras i sin originalförpackning. - Seite 113 2. BESKRIVNING SinusMax - Överlägsen teknik Utvecklade för professionell användning, är Phoenix-urvalet av växelriktare lämpliga för en mängd olika användningsområden. Designkriteriet har varit att producera en riktig sinusvågväxelriktare med optimerad effektivitet men utan att kompromissa med prestandan. Med hybrid-HF-teknik är resultatet en produkt av toppkvalitet med kompakta dimensioner, låg vikt och med kapacitet att tillhandahålla ström problemfritt, med valfri belastning.
- Seite 114 3. ANVÄNDNING 3.1 På/Av-brytare När brytaren ställs in till "på", är produkten fullt funktionsduglig. Växelriktaren kommer “ ” att aktiveras och LED-dioden växelriktare på kommer att tändas. 3.2 Fjärrstyrning Fjärrkontroll är möjlig med en enkel på/av-brytare eller med en kontrollpanel för Phoenix växelriktare.
- Seite 115 inverter inverter on overload Växelriktaren är avstängd på grund av överbelastning eller kortslutning. low battery temperature inverter inverter on overload Batteriet är nästan fullständigt urladdat. low battery temperature inverter inverter on overload Växelriktaren har stängts av på grund av låg batterispänning. low battery temperature inverter...
- Seite 116 inverter inverter on Växelriktaren har stängts av på overload grund av att elektroniktemperaturen är för hög. low battery temperature inverter -Om LED-dioderna blinkar inverter on omväxlande är batteriet nästan urladdat och den nominella overload uteffekten har överskridits. -Om "överbelastning" och "lågt batteri"...
- Seite 117 4. INSTALLATION Denna produkt får endast installeras av en utbildad eltekniker. 4.1 Placering Produkten måste installeras på en torr och välventilerad plats, så nära batterierna som möjligt. Det bör finnas ett fritt utrymme på minst 10 cm runt apparaten för avkylning. För hög omgivningstemperatur kommer att leda till följande: •...
- Seite 118 4.2 Anslutning av batterikablar För att utnyttja produktens fulla kapacitet bör batterier med tillräcklig kapacitet och batterikablar med tillräckligt tvärsnitt användas. Se tabell. 12/3000 24/3000 48/3000 Rekommenderad batterikapacitet – 200-700 100-400 1200 (Ah) Rekommenderad DC-säkring 400 A 300 A 125 A Rekommenderat tvärsnitt (mm ) per + och - anslutningspol...
-
Seite 119: Extra Anslutningar
4.3 Anslutning av AC-kablarna Detta är en produkt av säkerhetsklass I (som levereras med en skyddande jordterminal). Den neutrala utgången för växelriktaren är ansluten till höljet. Detta är för att säkerställa korrekt funktion för en GFCI (eller RCCB) som installeras i AC-utgången för växelriktaren. Produktens chassi måste anslutas till jordningen, eller ramen (för ett fordon) eller jordplattan eller skrovet (för en båt). - Seite 120 4.4.3 Parallellanslutning Phoenix-växelriktaren kan parallellanslutas med flera identiska enheter. För att göra detta upprättas en anslutning mellan enheterna med hjälp av standardkablar av typen RJ45 UTP. Systemet (två eller flera växelriktare samt valfri kontrollpanel) kommer att kräva efterföljande konfigurering (se Avsnitt 5). I händelse av parallellanslutning av enheter, måste följande krav uppfyllas: •...
- Seite 121 5. KONFIGURERING • Inställningar får endast ändras av en utbildad eltekniker. • Läs instruktionerna noggrant innan du genomför förändringar. 5.1 Standardinställningar: Färdig att använda Vid leverans är Phoenix växelriktare inställd på standardfabriksvärden. I allmänhet passar dessa inställningar för fristående drift. Standardfabriksinställningar Växelriktarfrekvens 50Hz...
- Seite 122 Sökläge (Går endast att använda i fristående konfigurering). Om sökläget är aktiverat minskas strömförbrukningen under belastningsfri drift med ungefär 70 %. I detta läge stängs växelriktaren av i händelse av ingen belastning eller väldigt låg belastning och sätts igång varannan sekund under en kort period. Om utgångsströmmen överskrider en inställd nivå...
- Seite 123 5.4 Implementering av inställningar med en VE.Net-panel För att uppnå detta behövs en VE.Net-panel och VE.Net till VE.Bus-omvandlaren. Med VE.Net kan du ställa in alla parametrar, med undantag av det multifunktionella reläet och VirtualSwitch. 5.5 Konfiguration med DIP-switchar Ett antal inställningar kan ändras med hjälp av DIP-switchar (se bilaga A, position I). Procedur: •...
- Seite 124 5.5.3 Växelriktarfrekvens Procedur: ställ in ds3 till önskat värde: off = 60 Hz on = 50 Hz 5.5.4 Fristående, parallell- och 3-fasdrift DIP-switchar ds2 och ds1 är reserverade för val av fristående, parallell eller 3- fasdrift OBS: • När du konfigurerar ett parallellt system eller 3-fassystem, bör alla tillhörande enheter sammankopplas med hjälp av RJ45 UTP-kablar (se bilaga C, D).
- Seite 125 Inställning av ds2 och ds1 för fristående drift DS-8 används ej Ställ in off DS-7 används ej Ställ in off DS-6 används ej Ställ in off DS-5 AES Välj inställning DS-4 Växelriktarspänning Välj inställning DS-3 Växelriktarfrekvens Välj inställning DS-2 Fristående drift DS-1 Fristående drift Exempel på...
- Seite 126 Inställning av ds2 och ds1 för parallell drift Master Slave 1 Slave 2 (tillval) DS-8 används ej DS-8 används DS-8 används DS-7 används ej DS-7 används DS-7 används DS-6 används ej DS-5 AES n/a DS-6 används DS-6 används DS-4 Växelriktarspänning DS-5 na DS-5 na inställd...
- Seite 127 ‘ ’ Du kan nu lämna DIP-switcharna i de valda positionerna, så att andra inställningar alltid kan återfås. För att starta systemet: stäng först av alla enheter. Systemet kommer att starta så snart som alla enheter har slagits på. Downloaded from www.Manualslib.com manuals search engine...
-
Seite 128: Underhåll
år. Undvik fukt och olja/sot/ångor och håll apparaten ren. 7. FELINDIKATIONER Med hjälp av nedanstående procedurer kan de flesta fel identifieras snabbt. Var vänlig rådfråga din Victron Energy-leverantör om ett fel inte kan lösas. 7.1 Allmänna felindikationer Problem Orsak Lösning... - Seite 129 7.2 VE.Bus LED-indikationer Växelriktare som ingår i ett VE.Bus-system (ett parallell- eller 3-fas-arrangemang), kan tillhandahålla så kallade VE.Bus LED-indikationer. Dessa LED-indikationer kan delas in i två grupper: OK-koder och felkoder. 7.2.1 VE.Bus OK-koder Om den interna statusen för en enhet fungerar korrekt, men enheten fortfarande inte kan startas på...
-
Seite 130: Tekniska Specifikationer
8. TEKNISKA SPECIFIKATIONER Phoenix Växelriktare 12/3000 24/3000 48/3000 VÄXELRIKTARE – – – Ingångsspänningsintervall (V DC) Utgång (1) Utgångsspänning: 230VAC ± 2 % Frekvens 50Hz ± 0,1% Kont. utgångsström vid 25 °C (VA) 3000 3000 3000 Kont. utgångsström vid 25 °C (W) 2500 2500 2500... - Seite 131 Phoenix Växelriktare 24/5000 48/5000 VÄXELRIKTARE – – Ingångsspänningsintervall (V DC) Utgång (1) Utgångsspänning: 230 VAC ± 2 % Frekvens 50 Hz ± 0,1% Kont. utgångsström vid 25°C (VA) 5000 5000 Kont. utgångsström vid 25°C (W) 4000 4000 Kont. utgångsström vid 40°C (W) 3700 3700 Kont.
- Seite 132 Downloaded from www.Manualslib.com manuals search engine...
- Seite 133 APPENDIX A1 Overview connections INVERTER 3k ANNEXE A1: Vue d'ensemble des connexions CONVERTISSEUR 3k ANHANG A1: Übersicht über Anschlüsse WECHSELRICHTER 3k APÉNDICE A1: Resumen de conexiones del INVERSOR 3k BILAGA A 1 Översikt anslutningar VÄXELRIKTARE 3k Downloaded from www.Manualslib.com manuals search engine...
- Seite 134 APPENDIX A2 Overview connections INVERTER 5k ANNEXE : A2 Vue d'ensemble des connexions CONVERTISSEUR 5k ANHANG A2: Übersicht über Anschlüsse WECHSELRICHTER 5k APÉNDICE A2: Resumen de conexiones del INVERSOR 5k BILAGA A2 Översikt anslutningar VÄXELRIKTARE 5k Downloaded from www.Manualslib.com manuals search engine...
- Seite 135 B 2x RJ45 connector for remote control and/or parallel / three-phase operation. C Load connection. 3K model AC out: (left to right): N (neutral), L (phase), PE (ground). 5K model AC out (left to right): L (phase), ), N (neutral), PE (ground). E Battery minus.
- Seite 136 B 2x RJ45-Stecker für die Fernsteuerung und/oder Parallel- / 3-Phasenbetrieb. C Lastanschluss 3k Model AC-Ausgang: (von links nach rechts): N (Nullleiter), L (Phase), PE (Erde). 5k Model AC Ausgang (Links nach rechts): L (Phase), N (Nullleiter), PE (Erde). E Batterie Minus. Doppelter M8 Minusanschluss der Batterie. Batterie Plus Doppelter M8 Plusanschluss der Batterie.
- Seite 137 APPENDIX B: Block diagram ANNEXE B : Schéma bloc APPENDIX B: Blockschaltbild APÉNDICE B: Diagrama de bloques BILAGA B: Blockdiagram See table in Chapter 4.2 “Recommended DC fuse”. * Zie de tabel in Hst 4.2 “Aanbevolen DC zekering” * Voir le tableau du Chapitre 4.2 « Fusible CC recommandé ». * Ver tabla en Capítulo 4.2 “Fusible CC recomendado”.
- Seite 138 APPENDIX C: Parallel connection ANNEXE C : Connexion en parallèle ANHANG C: Parallelbetrieb APÉNDICE C: Conexión en paralelo BILAGA C: Parallellanslutning Downloaded from www.Manualslib.com manuals search engine...
- Seite 139 APPENDIX D: Three phase connection ANNEXE D : Configuration triphasée ANHANG D: Drei Phasen-Betrieb APÉNDICE D: Conexión trifásica BILAGA D: Trefasanslutning Downloaded from www.Manualslib.com manuals search engine...
- Seite 140 APPENDIX G: Dimensions ANNEXE G : Dimensions ANHANG G: Maße APÉNDICE G: Dimensiones BILAGA G: Dimensioner Downloaded from www.Manualslib.com manuals search engine...
- Seite 141 Dimensions 3k cabinet Dimensions armoire 3k Maße 3k Gehäuse Dimensiones armario 3k Dimensioner 3k skåp Downloaded from www.Manualslib.com manuals search engine...
- Seite 142 Dimensions 5k cabinet Dimensions armoire 5k Maße 5k Gehäuse Dimensiones armario 5k Dimensioner 5k skåp Downloaded from www.Manualslib.com manuals search engine...
- Seite 143 Downloaded from www.Manualslib.com manuals search engine...
-
Seite 144: Victron Energy
Serial number: Version : 19a Date : September 1 , 2017 Victron Energy B.V. De Paal 35 | 1351 JG Almere PO Box 50016 | 1305 AA Almere | The Netherlands General phone : +31 (0)36 535 97 00 : +31 (0)36 535 97 40 E-mail : sales@victronenergy.com...