Herunterladen Inhalt Inhalt Diese Seite drucken

Werbung

Verfügbare Sprachen
  • DE

Verfügbare Sprachen

  • DEUTSCH, seite 30
INSTALLATION AND USER'S MANUAL
CU - 24V - 1M
Control unit
comunello.com
ISTRUZIONI D'USO E DI INSTALLAZIONE
INSTALLATIONS-UND GEBRAUCHSANLEITUNG
INSTRUCIONS D'UTILISATION ET D'INSTALLATION
INSTRUCCIONES DE USO Y DE INSTALACION
Cod. 91300174 - Rev. 06 - 29.11.19

Werbung

Inhaltsverzeichnis
loading

Inhaltszusammenfassung für Comunello CU-24V-1M

  • Seite 1 INSTALLATION AND USER’S MANUAL CU - 24V - 1M Control unit comunello.com ISTRUZIONI D’USO E DI INSTALLAZIONE INSTALLATIONS-UND GEBRAUCHSANLEITUNG INSTRUCIONS D’UTILISATION ET D’INSTALLATION INSTRUCCIONES DE USO Y DE INSTALACION Cod. 91300174 - Rev. 06 - 29.11.19...
  • Seite 2: Dichiarazione Di Conformitá Ce

    ISTRUZIONI D’USO E DI INSTALLAZIONE CU - 24V - 1M DICHIARAZIONE DI CONFORMITÁ CE Il sottoscritto, sig. COMUNELLO LUCA rappresentante il seguente costruttore F.lli COMUNELLO spa Via Cassola 64, 36027 Rosà (VI) Italy DICHIARA che l’apparecchiatura descritta in appresso: Descrizione:...
  • Seite 3 Nel manuale sono presenti dei QR-CODE con il link diretto al canale You-Tube “COMUNELLO TV” dove sono pubblicati i video tecnici delle programmazioni più importanti per la messa in servizio dell’automazione spiegati passo-passo.
  • Seite 4: Descrizione Dei Collegamenti

    ATTENZIONE: l’ingresso DS1 e quello di STOP, entrambi NC, sono chiusi tramite ponticello di fabbrica. Per cablare rispettivamente fotocellule e pulsante di STOP rimuovere i ponticelli dai relativi ingressi . COMUNELLO ®Copyright 2019 - All rights reserved...
  • Seite 5: Caratteristiche Tecniche

    Codici TX max. in memoria: 120 (CODE PP o CODE PED/2°CH) Dimensioni scheda: 100 x 105 mm. Fusibile 1 : T 6.3A L 250 V (Ritardato) Fusibile 2: T 100mA L250 V (Ritardato) COMUNELLO ®Copyright 2019 - All rights reserved...
  • Seite 6: Esempi Di Collegamento

    Installazione a singolo motore (fino a 9 m OUTPUT MOTOR 1 BLACK +24V 2 ND BATT 2 ND ATTENZIONE: NON CAMBIARE LA CONFIGURAZIONE l’automazione apre a SINISTRA e chiude a DESTRA (vista di profilo come nell’immagine) COMUNELLO ®Copyright 2019 - All rights reserved...
  • Seite 7 0V con M1- 0V con M1+ EAGLE - CONNESSIONE EAGLE - CONNESSIONE 2 ND BATT 2 ND BATT 2 ND 2 ND +24V con M1+ +24V con M1+ 0V con M1- 0V con M1- COMUNELLO ®Copyright 2019 - All rights reserved...
  • Seite 8 Prelampeggio in chiudi Luce di cortesia in apri Funzione disattiva LUCE DI COR- del lampeggiante prima della TESIA chiusura / attivazione luce di cortesia per 3 min all'inzio di ujn comando di apertura Tabella 3 COMUNELLO ®Copyright 2019 - All rights reserved...
  • Seite 9 Funzione disattiva (L1 + L2 + L3+L4+L5+L6+L7 ON) Tabella 5 ATTENZIONE: La centrale permette di essere programmata se tutte le sicurezze (ingressi N.C. della scheda) sono in condizione di riposo con il contatto chiuso. COMUNELLO ®Copyright 2019 - All rights reserved...
  • Seite 10: Collegamenti Elettrici

    La centrale elettronica è dotata di un trimmer “SENS” per la regolazione della ( anche se precedentemente programmato il tempo di pausa). Un ulteriore forza di contrasto necessaria alla rilevazione dell’ostacolo, completamente comando determina la ripresa del moto in senso opposto. COMUNELLO ®Copyright 2019 - All rights reserved...
  • Seite 11: Menu Principale

    Nella fase di chiusura invece un comando proveniente dai pulsanti o dai “P/P Passo – Passo ” (LED L1 acceso); radiocomandi provoca la riapertiura del cancello. se si desidera abilitare la logica di funzionamento “Automatico Apri-Chiudi “, procedere nel seguente modo: COMUNELLO ®Copyright 2019 - All rights reserved...
  • Seite 12 Durante la programmazione è possibile usare al posto del tasto SET, posto - Durante la Programmazione Automatica è possibile usare, al posto del sulla centrale, il tasto del radiocomando solamente se precedentemente tasto SET della centrale, il tasto del radiocomando (se precedentemente memorizzato. memorizzato); COMUNELLO ®Copyright 2019 - All rights reserved...
  • Seite 13 3 secondi prima della manovra di chiusura. • Posizionarsi con il tasto SELECT sul lampeggio del LED L2; Per attivarlo procedere nel seguente modo: • Premendo il tasto SET il LED L2 si accenderà in modo fisso e la COMUNELLO ®Copyright 2019 - All rights reserved...
  • Seite 14 Ciò garantisce un monitoraggio contro i guasti conforme alla Categoria 2 della EN 954-1. Se si desidera tale modalità di funzionamento procedere nel seguente modo: • Assicurarsi di aver abilitato il Menù Esteso 1 (evidenziato dal lampeggio 1 0 1 COMUNELLO ®Copyright 2019 - All rights reserved...
  • Seite 15: Garanzia

    Fratelli Comunello S.p.A. Il materiale in garanzia inviato alla sede della Fratelli Comunello S.p.A., dovrà essere spedito in porto franco e verrà quindi rispedito in porto assegnato. Il materiale ritenuto difettoso ed inviato a Fratelli Comunello S.p.a.
  • Seite 16: Ec Declaration Of Conformity

    INSTALLATION AND USER’S MANUAL CU - 24V - 1M EC DECLARATION OF CONFORMITY: The undersigned Mr. Luca Comunello, representing the following manufacturer, Fratelli COMUNELLO Spa Via Cassola 64, 36027 Rosà (VI) – Italy DECLARES that the equipment described below: Description:...
  • Seite 17 In the manual there are QR-CODEs with the direct link to the You-Tube channel “COMUNELLO TV” where the technical videos of the main functions for the programming of the automation are shared, explained step by step. To watch the videos you will need to have an internet connection and install in your Tablet or Smartphone a QR code reader available in the APPLE STORE for iOs devices or in GOOGLE PLAY for Android devices.
  • Seite 18 ATTENTION: DS1 input and STOP input, both NC, are closed by factory through jumper. To wire the photocells or the stop pushbutton, remove the jumpers from the relevant inputs. COMUNELLO ®Copyright 2019 - All rights reserved...
  • Seite 19: Technical Specifications

    Max TX codes stored in memory: 120 (CODE PP or CODE PED/2°CH) Board dimension: 100 x 105 mm. Fuse 1 : T 6.3A L 250 V (Delayed fuse) Fuse 2: T 100mA L250 V (Delayed fuse) COMUNELLO ®Copyright 2019 - All rights reserved...
  • Seite 20 Single motor installation (up to 9 m OUTPUT MOTOR 1 BLACK +24V 2 ND BATT 2 ND DO NOT CHANGE THE CONFIGURATION: The automations opens LEFT and closes rights(profile view as in the image) COMUNELLO ®Copyright 2019 - All rights reserved...
  • Seite 21 EAGLE - CONNECTION EAGLE - CONNECTION 2 ND BATT 2 ND BATT 2 ND 2 ND OPEN BLACK OPEN BROWN BLUE BLUE CLOSE BROWN CLOSE BLACK * capacitor wired between the two phases COMUNELLO ®Copyright 2019 - All rights reserved...
  • Seite 22 FORCE / SLAM for electric lock release FORCE trimmer LOCK PREFLASH / PRE-FLASH/ COURTESY LIGHT Pre-flashing function or 3 sec. of pre-flashing 3 min. activation of the lamp COURTESY LIGHT courtesy light TAB.03 COMUNELLO ®Copyright 2019 - All rights reserved...
  • Seite 23 Enabled function (L1 + L2 + L3+L4+L5+L6+L7 ON) Disabled function NO. 7 TAB.05 Important note: The control unit allows to be programmed if all the safety devices and buttons (N.C. inputs on terminals) grant a contact closed. COMUNELLO ®Copyright 2019 - All rights reserved...
  • Seite 24 (even if the pause time has been previously programmed). Another command causes the gate to start moving again in the opposite Using the “Motor time” function it is however possible to cancel the slow- direction. COMUNELLO ®Copyright 2019 - All rights reserved...
  • Seite 25 Repeat the procedure if you wish to restore the previous configuration. • When the desired deceleration starting point is reached press the SET key (the leaf continues its stroke at a decelerated speed); COMUNELLO ®Copyright 2019 - All rights reserved...
  • Seite 26: Extended Menu

    • LED L3 becomes steady on and programming will be completed. Repeat the procedure if you wish to restore the previous configuration. Important Note: the Step by Step 1 function overwrites the standard COMUNELLO ®Copyright 2019 - All rights reserved...
  • Seite 27 SELECT twice (obtaining fast flashing of LED L7 as soon as the safety is freed the control unit resumes the opening movement), instead of once) and then press SET. proceed as follows: COMUNELLO ®Copyright 2019 - All rights reserved...
  • Seite 28: Warranty

    In business relationships or in case of products sold for professional use, this warranty is limited to the repair or replacement of product parts that FRATELLI COMUNELLO SPA acknowledges as defective, through COMUNELLO ®Copyright 2019 - All rights reserved...
  • Seite 29 Conventional Warranty is 24 (twenty-four) months from the production date, which can be found on the products. The Warranty shall be effective and binding on COMUNELLO only if the product has been correctly installed and maintained in accordance with the installation and safety rules set out in the documentation provided by COMUNELLO or otherwise available on the website http://www.
  • Seite 30: Ce-Konformitätserklärung

    INSTALLATIONS- UND GEBRAUCHSANLEITUNG CU - 24V - 1M CE-KONFORMITÄTSERKLÄRUNG Der Unterzeichnende, Herr COMUNELLO LUCA , gesetzlicher Vertreter des Herstellers F.lli COMUNELLO spa Via Cassola 64, 36027 Rosà (VI) Italien ERKLÄRT, dass das nachstehend beschriebene Gerät: Beschreibung: Steuereinheit einzelene Motoren 24V für automatische Tore...
  • Seite 31 Die Anlage regelmäßig überprüfen, um eventuelle werden (Abbildung 3B). Schäden sofort zu erkennen. Im Handbuch gibt es QR-CODES mit dem direkten Link zum You-Tube-Kanal „COMUNELLO TV“, in dem die technischen Videos der wichtigsten Programmierungen für die Inbetriebnahme der Automatisierung Schritt für Schritt erklärt werden.
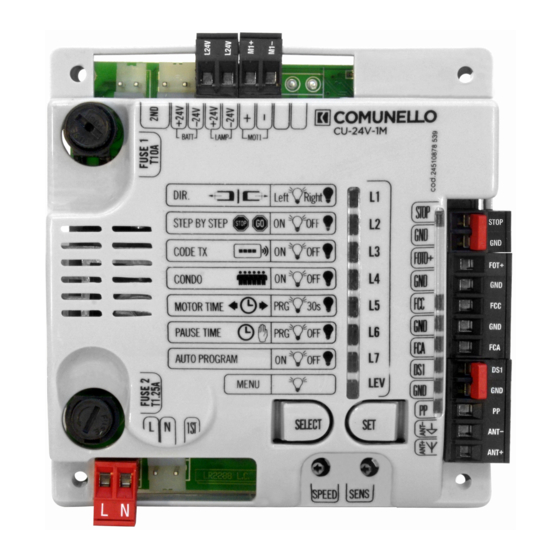
  • Seite 32: Beschreibung Der Anschlüsse

    Durch Drehen mittels eines Schraubendrehers in die Durch Drehen mittels eines Schraubendrehers in die Richtung + wird die Drehzahl des Motors während des normalen Hubs erhöht. d.h. der Motor wird bei der Erfassung eines Hindernis- ses schneller gestoppt. ACHTUNG: COMUNELLO ®Copyright 2019 - All rights reserved...
  • Seite 33: Typ Und Querschnitt Der Kabel

    433 Mhz Sender: 18 Bit o Rolling Code Max. gespeicherte CODE TXs: 120 (CODE PP o CODE PED/2°CH) Abmessungen der Platine: 100 x 105 mm. Sicherung 1: T 6.3A L 250 V (Verzögert) COMUNELLO ®Copyright 2019 - All rights reserved...
  • Seite 34: Anschlussbeispiele

    Einstellung von Hauptmenü, LED L1, um eine Öffnung nach RECHTS (Innenansicht) zu haben (Innenansicht) zu haben LED OFF LED ON 4.2 SALIENT OUTPUT MOTOR 1 BLACK +24V 2 ND BATT 2 ND ACHTUNG: DIE KONFIGURATION DARF NICHT GEÄNDERT WERDEN COMUNELLO ®Copyright 2019 - All rights reserved...
  • Seite 35: Anschlussbeispiel Für Einzelflügeltür

    0V mit M1- 0V mit M1+ EAGLE - ANSCHLUSS EAGLE - ANSCHLUSS 2 ND BATT 2 ND BATT 2 ND 2 ND +24V mit M1+ +24V mit M1+ 0V mit M1- 0V mit M1- COMUNELLO ®Copyright 2019 - All rights reserved...
  • Seite 36: Beschreibung Des Menüs Und Aller Programmierbaren Funktionen

    VORBLINKEN/UM- Aktivierung des Vorblinkens von Vorblinken beim Schließen Umfeldleuchte beim Öffnen Funktion nicht aktiv FELDLEUCHTE 3 Sekunden vor dem Schließen / Aktivierung der Umfeldleuchte für 3 Minuten beim Öffnungsbe- fehl Tabelle 3 COMUNELLO ®Copyright 2019 - All rights reserved...
  • Seite 37 Funktion aktiv (L1 + L2 + L3+L4+L5+L6+L7 EIN) Funktion nicht aktiv digkeit 7 Tabelle 5 ACHTUNG: Das Steuergerät kann programmiert werden, wenn sich alle Sicherheitseinrichtungen (Öffner-Eingänge der Platine) im Ruhezustand mit geschlossenem Kontakt befinden. COMUNELLO ®Copyright 2019 - All rights reserved...
  • Seite 38: Elektrische Anschlüsse

    Endanschläge ein Impuls gesendet wird, schaltet die Steuerung immer den können. Motor sowohl beim Öffnen als auch beim Schließen ab (falls zuvor eine Pausezeit programmiert wurde, steuert sie bei Ablauf das erneute automatische COMUNELLO ®Copyright 2019 - All rights reserved...
  • Seite 39: Zugriff Auf Die Programmierung

    (auf diese Weise wird auf die Sicherheit durch das Rolling Code- • Die LED L1 schaltet sich aus und die Programmierung wird abgeschlossen. Systems effektiv verzichtet). Dieser Vorgang muss wiederholt werden, wenn die vorhergehende Einstellung COMUNELLO ®Copyright 2019 - All rights reserved...
  • Seite 40: Erweitertes Menü

    • Die Taste SET drücken, um den Hub der Motoren zu speichern. Öffnungszyklus beenden; Im selben Zyklus wird automatisch eine Verlangsamung von 15% des gesamten • die LED L2 beginnt wieder regelmäßig zu blinken und der Motor startet die Zyklus eingestellt. Schließphase; COMUNELLO ®Copyright 2019 - All rights reserved...
  • Seite 41 • Die LED L6 schaltet sich aus und die Programmierung wird abgeschlossen. Wenn die Funktion, mit der vom SPEED-Trimmer eingestellten Leistungsstufe - nicht den SOFT STOP mit dem SLOWDOWN verwechseln; der erste wird am COMUNELLO ®Copyright 2019 - All rights reserved...
  • Seite 42 LEDs) und die entsprechende Kraft wird eingestellt. Der Hersteller liefert das Steuergerät mit ausgeschalteter Funktion „Pausezeit“. Den Vorgang wiederholen, indem die Verzögerungskraft auf Stufe 3 eingestellt Zur Freigabe der Funktion muss folgendermaßen vorgegangen werden: COMUNELLO ®Copyright 2019 - All rights reserved...
  • Seite 43: Garantie

    S.p.A. gesendete von der Garantie abgedeckte Material muss frei Haus geliefert werden und wird dann an den zugewiesenen Ort zurückgesandt. Das Material, das als fehlerhaft eingestuft und an Fratelli Comunello S.p.A. gesendet wurde, bleibt Eigentum der letztgenannten Gesellschaft. - Die Arbeitskosten für Reparaturen und Ersatz gehen zu Lasten des Käufers.
  • Seite 44: Déclaration De Conformité Ce

    été identifiée et que sa conformité avec les conditions de la Directive 2006/42/CE et la législation nationale transpose. Dr. LUCA COMUNELLO Fratelli Comunello Représentant légal t légal Fratelli Comunello S.p.A. Société avec système de gestion de la qualité certifié UNI EN ISO 9001:2015. COMUNELLO ®Copyright 2019 - All rights reserved...
  • Seite 45 Le manuel contient des QR-CODE avec lien direct vers la chaîne You-Tube «COMUNELLO TV» où sont publiées les vidéos techniques de la programmation la plus importante pour la mise en service de l’automatisation, qui sont expliquées étape par étape.
  • Seite 46: Description Des Connexions

    Tourner avec un tournevis vers le + augmente la vitesse du moteur pendant le fonctionnement normal. sensibilité et ensuite le moteur bloquera sa course plus rapidement en cas de détection d’un obstacle. ATTENTION : COMUNELLO ®Copyright 2019 - All rights reserved...
  • Seite 47: Caractéristiques Techniques

    Codes TX max. en mémoire : 120 (CODE PP o CODE PED/2°CH) Taille de la carte : 100 x 105 mm. Fusible 1 : T 6.3A L 250 V (Retardé) Fusible 2 : T 100mA L250 V (Retardé) COMUNELLO ®Copyright 2019 - All rights reserved...
  • Seite 48: Exemples De Branchement

    LED OFF LED ON 4.2 SALIENT BLACK +24V 2 ND BATT 2 ND ATTENTION : NE PAS CHANGER LA CONFIGURATION L’automatisation ouvre à GAUCHE et ferme à DROITE (vue de profil comme dans l’image) COMUNELLO ®Copyright 2019 - All rights reserved...
  • Seite 49 0V avec M1- 0V avec M1+ EAGLE - CONNEXION EAGLE - CONNEXION 2 ND BATT 2 ND BATT 2 ND 2 ND +24V avec M1+ +24V avec M1+ 0V avec M1- 0V avec M1- COMUNELLO ®Copyright 2019 - All rights reserved...
  • Seite 50 Lumière de courtoisie en Fonction désactivée MENT/LUMIÈRE de 3 secondes du clignotant ouverture DE COURTOISIE avant la fermeture /activation de la lumière de courtoisie pendant 3 min au début d’une commande d’ouverture Tableau 3 COMUNELLO ®Copyright 2019 - All rights reserved...
  • Seite 51 Fonction activée (L1 + L2 + L3 + L4 + L5 + L6 + L7 allumés) Fonction désactivée MENT 7 Tableau 5 ATTENZIONE : L’unité de commande peut être programmée si tous les dispositifs de sécurité (entrées N.C. de la carte) sont au repos avec le contact fermé. COMUNELLO ®Copyright 2019 - All rights reserved...
  • Seite 52: Connexions Électriques

    Soft Start est activée. lorsque le fin de course d’ouverture est atteint, la deuxième impulsion Remarque  : Un changement dans le trimmer «  SPEED  » nécessite la COMUNELLO ®Copyright 2019 - All rights reserved...
  • Seite 53: Menu Principal

    à code fixe, le récepteur accepte par la suite les L1 ; télécommandes à code fixe ainsi que celles à code variable, mais seulement • Appuyez sur la touche SET ; COMUNELLO ®Copyright 2019 - All rights reserved...
  • Seite 54 7.1.7. LED L7 - PROGRAMMATION AUTOMATIQUE : fonctionnement préétabli du moteur de 10 secondes et sans ralentissement Mémorisation de la course des moteurs par auto-apprentissage (programmable jusqu’à 4 minutes maximum). L’unité de commande permet d’effectuer une programmation automatique COMUNELLO ®Copyright 2019 - All rights reserved...
  • Seite 55 étendu 2 à l’aide des touches SELECT et SET ; au bout de 30 secondes Si vous souhaitez activer la fonction au niveau de puissance réglé par le trimmer supplémentaires, l’unité de commande revient au menu principal. FORCE, répétez la programmation mentionnée ci-dessus, en appuyant deux COMUNELLO ®Copyright 2019 - All rights reserved...
  • Seite 56 été libérée, en passant pendant l’ouverture ou pendant la position de fin de supplémentaires, l’unité de commande revient au menu principal. course en ouverture. Remarque : il n’est possible de programmer cette fonction que si un temps de pause a déjà été programmé. COMUNELLO ®Copyright 2019 - All rights reserved...
  • Seite 57 Fratelli Comunello S.p.A. Il materiale in garanzia inviato alla sede della Fratelli Comunello S.p.A., dovrà essere spedito in porto franco e verrà quindi rispedito in porto assegnato. Il materiale ritenuto difettoso ed inviato a Fratelli Comunello S.p.a.
  • Seite 58: Declaración De Conformidad Ce

    INSTALACIÓN Y MANUAL DE USO CU - 24V - 1M DECLARACIÓN DE CONFORMIDAD CE El abajo firmante, Sr. COMUNELLO LUCA representante del siguiente fabricante F.lli COMUNELLO spa Via Cassola 64, 36027 Rosà (VI) Italy DECLARA que el aparato descrito a continuación: Descripción:...
  • Seite 59 El manual incluye CÓDIGOS QR con el enlace directo al canal You-Tube “COMUNELLO TV” donde están publicados los vídeos técnicos de las programaciones más importantes para la puesta en servicio de la automatización, explicadas paso a paso.
  • Seite 60: Descripción De Las Conexiones

    Girando con un destornillador hacia + aumenta la sensi- dad del motor durante su carrera normal. bilidad y por lo tanto el motor bloqueará su carrera más rápidamente en caso de detectar un obstáculo. ATENCIÓN: los puentes de las respectivas entradas COMUNELLO ®Copyright 2019 - All rights reserved...
  • Seite 61: Características Técnicas

    18 Bit o Rolling Code Códigos TX máx. en memoria: 120 (CODE PP o CODE PED/2°CH) Dimensiones tarjeta: 100 x 105 mm. Fusible 1: T 6.3A L 250 V (Retardado) Fusible 2: T 100mA L250 V (Retardado) COMUNELLO ®Copyright 2019 - All rights reserved...
  • Seite 62: Ejemplos De Conexión

    OUTPUT MOTOR 1 BLACK +24V 2 ND BATT 2 ND ATENCIÓN: NO CAMBIAR LA CONFIGURACIÓN la automatización abre a la IZQUIERDA y cierra a la DERECHA (vista de perfil como en la imagen) COMUNELLO ®Copyright 2019 - All rights reserved...
  • Seite 63 0V con M1- 0V con M1+ EAGLE - CONEXIÓN EAGLE - CONEXIÓN 2 ND BATT 2 ND BATT 2 ND 2 ND +24V con M1+ +24V con M1+ 0V con M1- 0V con M1- COMUNELLO ®Copyright 2019 - All rights reserved...
  • Seite 64 Luz de cortesía en apertura Función desactivada PREVIO/LUZ DE 3 s. de la luz intermitente antes CORTESÍA del cierre / activación luz de cortesía por 3 min con el envío de un mando de apertura Tabla 3 COMUNELLO ®Copyright 2019 - All rights reserved...
  • Seite 65 Función desactivada CIÓN 7 Tabla 5 ATENCIÓN: El cuadro de control puede ser programado cuando todos los dispositivos de seguridad (entradas N.C. de la tarjeta) están en estado de reposo con el contacto cerrado. COMUNELLO ®Copyright 2019 - All rights reserved...
  • Seite 66: Conexiones Eléctricas

    Nota: Una variación del trimmer “SPEED” requiere la repetición del el cierre del cerramiento; si se envía un impulso antes de que transcurra el procedimiento de aprendizaje, puesto que podrían variar los tiempos de COMUNELLO ®Copyright 2019 - All rights reserved...
  • Seite 67: Menú Principal

    • Pulsar la tecla SET; • El LED L1 se apagará y la programación habrá concluido. 7.1.4. LED L4 - CONDO: función “Comunidad”: El funcionamiento Comunidad prevé que el cuadro de control durante la fase COMUNELLO ®Copyright 2019 - All rights reserved...
  • Seite 68 • El LED L2 volverá a destellar normalmente y el motor arrancará en cierre; • Repetir las operaciones descritas más arriba, para la fase de cierre. Para que el cuadro de control no ejecute la desaceleración, durante la COMUNELLO ®Copyright 2019 - All rights reserved...
  • Seite 69 SELECT (se obtiene el destello rápido del LED L6 en lugar de una vez) y luego inversión de movimiento o cuando se activa una fotocélula. pulsar SET. Repetir la operación para restablecer la configuración inicial. COMUNELLO ®Copyright 2019 - All rights reserved...
  • Seite 70 Repetir la operación para restablecer la configuración anterior. 9.1 Test fotocélula: El cuadro de control está preparado para la conexión de dispositivos de seguridad que cumplen el apartado 5.1.1.6 de la normativa EN 12453. A COMUNELLO ®Copyright 2019 - All rights reserved...
  • Seite 71 Comunello Fratelli S.p.A. El material en garantía deberá enviarse a la sede de Fratelli Comunello S.p.A. en porte pagado y será devuelto a portes debido. El material considerado defectuoso y enviado a Fratelli Comunello S.p.a.
  • Seite 72 Via Cassola 64, 36027 Rosà (VI) Italy GCU00BS1L0G00 CU 24V BASIC 1M • • EN61000-6-2 + EN61000-6-3 EN62233 :2008 EN301489-1 + EN301489-3 + EN300220-2 EN60335-1 :2002 Fratelli Comunello S.p.A. UNI EN ISO 9001:2015 COMUNELLO ®Copyright 2019 - All rights reserved...
  • Seite 73 МЕРЫ БЕЗОПАСНОСТИ • В руководстве имеется QR-код с прямой ссылкой на канал YouTube «COMUNELLO TV», где публикуются технические видеоролики с самыми важными настройками для ввода в эксплуатацию автоматики, которые объясняются пошагово. Для просмотра видео вам потребуется подключение к сети Интернет и установка на планшете или...
  • Seite 74 2 PZ. PONTI PASSO 5mm 2 PCS. PLUG-IN BRIDGES, 5mm PITCH FOTOCELLULA - DS (N.C.) ATTIVA IN CHIUSURA PHOTCELL - DS (N.C.) ACTIVE IN CLOSING LINEA POWER SUPPLY 110V 50 - 60Hz TRIMMER SPEED: TRIMMER SENSITIVITY: COMUNELLO ®Copyright 2019 - All rights reserved...
  • Seite 75: Технические Характеристики

    Макс. коды ТХ, хранящиеся в памяти: 120 (CODE PP o CODE PED/2°CH) Размер платы: 100 x 105 mm. Предохранитель 1: T 6.3A 250 В (с задержкой) Предохранитель 2: T 100 мА L250 В (с задержкой) COMUNELLO ®Copyright 2019 - All rights reserved...
  • Seite 76 ВПРАВО (вид изнутри) LED OFF LED ON 4.2 SALIENT OUTPUT MOTOR 1 BLACK +24V 2 ND BATT 2 ND ВНИМАНИЕ! НЕ ИЗМЕНЯЙТЕ КОНФИГУРАЦИЮ автоматика открывается ВЛЕВО и закрывается ВПРАВО (вид профиля, как на рисунке) COMUNELLO ®Copyright 2019 - All rights reserved...
  • Seite 77 0 В с М1+ EAGLE - ПОДКЛЮЧЕНИЕ EAGLE - ПОДКЛЮЧЕНИЕ 2 ND BATT 2 ND BATT 2 ND 2 ND +24 В с М1+ +24 В с М1+ 0 В с М1- 0 В с М1- COMUNELLO ®Copyright 2019 - All rights reserved...
  • Seite 78 для блокировки электрического замка ПРЕДВАРИТЕЛЬНОЕ Активация предварительного Предварительное мигание при Подсветка при открытии Функция отключена МИГАНИЕ/ПОДСВЕТКА 3-х секундного мигания маячка закрытии перед закрытием/включением подсветки на 3 мин. при подаче команды открытия Таблица 3 COMUNELLO ®Copyright 2019 - All rights reserved...
  • Seite 79 ЗАМЕДЛЕНИЕ 7 Замедление на скорости 7 Функция активна (L1+L2+L3+L4+L5+L6+L7 ВКЛ) Функция отключена Таблица 5 ВНИМАНИЕ! Блок управления можно запрограммировать, если все защитные устройства (НЗ входы платы) находятся в состоянии покоя с замкнутым контактом. COMUNELLO ®Copyright 2019 - All rights reserved...
  • Seite 80: Описание Функций

    1: Выход SEC трансформатора 21,7 В, 7,5 A напряжение холостого хода. 2: Выход SEC трансформатора 21,7 В, 7,5 A напряжение холостого хода. 6.2 ОПИСАНИЕ ФУНКЦИЙ 6.2.1 - 6.2.8 - 6.2.9 - 6.2.2 - SPEED SENS 6.2.10 - 6.2.3 - COMUNELLO ®Copyright 2019 - All rights reserved...
  • Seite 81 ВКЛ ВЫКЛ Запрограммированное 30 сек (без MOTOR TIME время замедления) С автоматическим Без автоматического PAUSE TIME закрытием закрытия • PRG AUTOM ВКЛ ВЫКЛ • МЕНЮ ВКЛ 7.1.1. LED L1 - • • • COMUNELLO ®Copyright 2019 - All rights reserved...
  • Seite 82 ВЫКЛ МИГАНИЕ/ПОДСВЕТКА 7.1.6. МЕНЮ 1 МИГАНИЕ • • 7.2.1. LED L1 - • Блок управления поставляется производителем с отключенным режимом • проверки фотоэлемента. Если необходимо активировать такую проверку, выполните следующие • действия: • COMUNELLO ®Copyright 2019 - All rights reserved...
  • Seite 83 • • • • 7.2.3. LED L3 - STEP BY STEP 1: • • 7.2.7. LED L7 - • • Важное примечание: • • 7.2.4. LED L4 - • • • • • COMUNELLO ®Copyright 2019 - All rights reserved...
  • Seite 84 7.3.2 LED L2 - SOFT START: • • 7.3.7 LED L7 - • • • ВНИМАНИЕ: если функция Soft Start включена, блок управления • автоматически отключает начальный толчок и наоборот. • 7.3.3 LED L3 - • • COMUNELLO ®Copyright 2019 - All rights reserved...
  • Seite 85 L1 + L2 + L3 + L4 + L5 ЗАМЕДЛЕНИЕ 7 ВЫКЛ + L6 + L7 МЕНЮ 3 МИГАНИЯ • • • 7.4.1 • • • • 8 СБРОС 9 ДИАГНОСТИКА 9.1 Проверка фотоэлемента: 9.2 Световой индикатор: COMUNELLO ®Copyright 2019 - All rights reserved...
  • Seite 86 NOTES...
  • Seite 87 NOTES COMUNELLO ®Copyright 2019 - All rights reserved...
  • Seite 88 FRATELLI COMUNELLO S.P.A. AUTOMATION GATE DIVISION Via Cassola, 64 - C.P. 79 36027 Rosà, Vicenza, Italy Tel. +39 0424 585111 Fax +39 0424 533417 info@comunello.it www.comunello.com...

Inhaltsverzeichnis