Inhaltsverzeichnis
Werbung
Verfügbare Sprachen
Verfügbare Sprachen
Quicklinks
施工説明書
壁掛け金具
(垂直取り付け型)
Fitting Instructions
Wall-hanging bracket
(Vertical mounting type)
Montageanweisungen
Wandhalterung
(Typ für vertikale Anbringung)
Istruzioni di montaggio
Staffa per montaggio alla parete
(tipo per montaggio verticale)
TY-WK70PV50
Model No.
Instructions d'installation
Applique de ¿ xation au mur
(type pour montage vertical)
Instrucciones de montaje
Soporte para colgar en pared
(Tipo de montaje vertical)
(
(
)
(
)
)
TQZW559
Werbung
Inhaltsverzeichnis

Verwandte Anleitungen für Panasonic TY-WK70PV50


Inhaltszusammenfassung für Panasonic TY-WK70PV50
- Seite 1 TY-WK70PV50 Model No. 施工説明書 Instructions d’installation 壁掛け金具 Applique de ¿ xation au mur (垂直取り付け型) (type pour montage vertical) Instrucciones de montaje Soporte para colgar en pared (Tipo de montaje vertical) Fitting Instructions Wall-hanging bracket (Vertical mounting type) Montageanweisungen Wandhalterung (Typ für vertikale Anbringung)
- Seite 3 • 施工説明書をよくお読みのうえ、正しく安全に施工してください。特に 「安全上のご注意」 は、 施工前に必ずお読みください。機器本体の取扱説明書とともに大切に保管してください。 • 施工説明書に記載されていない方法や、指定の部品を使用しない方法で施工されたことにより事 故や損害が生じたときには、当社では責任を負えません。 • Read the Fitting Instructions carefully so that the product can be properly and safely installed in place. Make sure to read “Safety precautions” in particular before ¿ tting the product. Keep the Fitting Instructions in a safe place, together with the operating instructions for the display.
- Seite 4 安全上のご注意 必ずお守りください 人への危害、財産の損害を防止するため、必ずお守りいただくことを説明しています。 ■誤った使い方をしたときに生じる危害や損害の程度を区分して、説明しています。 警告 「死亡や重傷を負うおそれがある内容」です。 注意 「軽傷を負うことや、 財産の損害が発生するおそれがある内容」です。 ■お守りいただく内容を次の図記号で説明しています。 (次は図記号の例です) してはいけない内容で 実行しなければならな 気をつけていただく内 す。 い内容です。 容です。 警告 ■ 工事専門業者以外は取り付け工 ■ 荷重に耐えられない場所に取り 事及び接続機器の増設や取り外 付けないでください しを行わないでください 取り付け部の強度が弱いと、落 工事の不備により、落下してけ 下してけがの原因となります。 がの原因となります。 ■ 壁掛け金具を分解したり、改造 ■ 取り付け強度上の安全係数を配 しないでください 慮してください 落下したり、破損して、けがの 強度が不足すると、落下してけ 分解禁止 原因となります。 がの原因となります。 ■...
- Seite 5 注意 ■ 通風孔をふさがないでください ■ 機器本体の上下、左右面は ■ 壁掛け金具使用時は機器本体後 10 cm 以上、後面は空間を確 面と壁面との空間をふさがない 保してください でください 火災の原因となることがあります。 内部に熱がこもり、火災の原因 になることがあります。 ■ 機器本体の取り付け、取り外し ■ 取り付けねじや電源コードが壁 は 3 人以上で行ってください 内部の金属部と接触しないよう 機器本体が落下して、けがの原 に設置してください 因となることがあります。 壁内部の金属部と接触して、感 電の原因となることがあります。 ■ 取り付けの際は、専用の構成部 ■ 機器本体を取り外す場合には、 品をご使用ください 壁掛け金具も取り外してくださ 機器本体が落下したり、破損し い て、けがの原因となることがあ 壁掛け金具にあたるなどして、け ります。 がの原因となることがあります。...
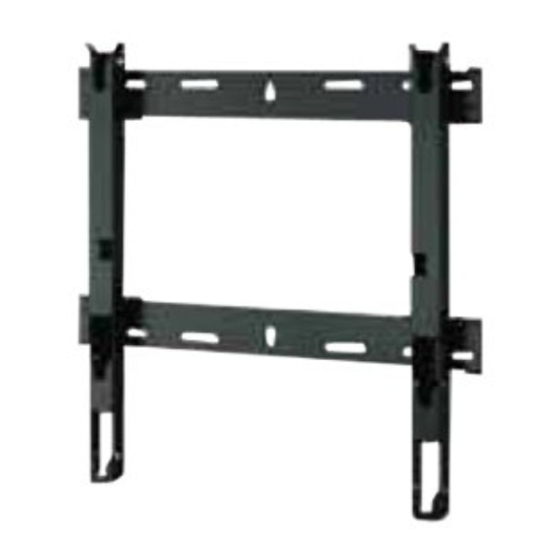
- Seite 6 構成部品 壁掛け金具組み立て用部品 ベース上金具 (1 個) ベース左金具 ベース右金具 金具組み立て用ねじ (1 個) (1 個) M 4×8(8本) モデル銘板 ベース下金具 (1 個) 取り付け用部品 絶縁スペーサー取り付け用 本体抜け防止用ねじ 皿ねじ M 8 × 32 (4 本) M 5 × 570(長) (2 本) 金具完成品図 M 5 × 240(短) (2 本) 皿型歯付き座金(4 個)...
- Seite 7 取り付け工事手順 モデル銘板 1. 壁掛け金具の組み立て ベース上金具 ベース上下金具 とベース左金 具 ・ベース右金具 を図のよ うに置いてください。 切り欠き部 ベース上下金具 の突起部(ツ メ)を、ベース左金具 ・ベー ツメ ス右金具 の切り欠き部にはめ ベース左金具 込 み、 金 具 組 み 立 て 用 ね じ ベース右金具 (8 本)で固定してください。 (締め付けトルクは 1.2 ∼ 1.5 N ・ m) お願い...
- Seite 8 取り付け工事手順 3. 壁面への壁掛け金具の取り付け 外形寸法図(75 ∼ 78 ページ)をもとに壁面に取り付ける穴位置を割り出し、壁面に取り付 けてください。 壁掛け金具に表示されている矢印が上を向く状態に取 り付けてください。 最初に上部中央の穴 をねじ止めしてください。 水平器を使い金具の傾きを修正後、残り5か所の穴を ねじ止めしてください。 お願い ● 壁面がコンクリートなどで、事前にねじまたはナットを 埋め込む必要がある場合は、壁掛け金具の現物合わせ で穴位置を出すか、寸法図をもとに穴位置を割り出し、 「呼び径 6 mm相当」のねじまたはナットを埋め込んで ください。なお、ねじを埋め込む場合は、壁面からの ねじの飛び出しは 10 mm ∼ 15 mmにしてください。 ● 壁面への取り付けねじは、取り付け部の材質に合った 市販品の呼び径 6 mm相当のねじをご使用ください。 ● 必ずねじで6か所以上固定してください。 機器本体を取り付ける目安として、 下図と同じように位置決めパッド (2 枚)を壁に貼っ てください。...
- Seite 9 、皿型歯付き座金 、絶縁スペー サー (各 4 個)を付属の六角レンチ で右図のよ うに取り付けてください。 M8 ねじ:締め付けトルクは 3 ∼ 4 N ・ m ● 絶縁スペーサー取り付け用皿ねじ は機器本体の ねじ穴(M 8)の大きさに合わせてご使用ください。 毛布など 6. 機器本体の壁掛け金具への取り付けと固定 電源コード・各種接続機器の配線を行ってください。 縦型設置時 ディスプレイ本体の Panasonic ロゴが左側になるよ うに右に 90 度回転させた後、横型設置時と同じよう に取り付けてください。 ● 電源コードや接続機器のケーブルが壁や金具にはさ み込まれないように取り付けてください。 お願い ● 機器本体を前後に動かしても電源コードや各種ケーブル を壁掛け金具にはさみ込まないように処理してください。...
- Seite 10 取り付け工事手順 上部切り欠き 壁に貼り付けた位置決めパッドを目安に、機器本体上 部の左右を合わせる。 上側の絶縁スペーサー 機器本体上側の絶縁スペーサーを壁掛け金具本体上部 の切り欠き部に引っかけ、そのままゆっくり下げます。 ③ 機器本体を少し持ち上げながら、下側の絶縁スペーサー 下部の穴 を壁掛け金具本体下部の穴に差し込み、機器本体をそ のまま下げます。 壁 壁 機器本体を必要以上に持ち上げないでく ④ 面 面 ださい 注意 機器本体を持ち上げすぎると 下側の絶縁 落下してけがの原因となるこ スペーサー とがあります。 機器本体を手前に引き出し、手順 4 で へ仮止めした 本体抜け防止用ねじ (左右各 1 本)を締め付けてく ださい。 ( 締め付けトルクは 1.2 ∼ 1.5 N ・ m ) 本体抜け防止用ねじ...
- Seite 11 機器本体下部中央を押して機器本体を垂直に固定して ください。 ④ ● 機器本体を軽く手前に引いて、ロックされているこ 柔らかい とを確認してください。 毛布や布 本体抜け防止用ねじ 機器本体の下部を持ち上げながら手前に引きます。 下側の絶縁スペーサーが外れたらそのまま上に持ち上 床 面 げます。 取り外した機器本体は、前面と後面に負担がかからな いように、立てた状態で取り扱ってください。 使いかた・お手入れ・修理などは、まず、お買い求め先へご相談ください。 その他ご不明な点は下記へご相談ください。 パナソニック システムお客様ご相談センター 受付: 9時∼17時3 0分 (土・日・祝祭日は受付のみ) ホームページからのお問い合わせは https://sec.panasonic.biz/solution/info/ ご使用の回線(IP 電話やひかり電話など)によっては、回線の混雑時に数分で切れる場合があります。 【ご相談窓口におけるお客様の個人情報のお取り扱いについて】 パナソニック株式会社およびグループ関係会社は、お客様の個人情報をご相談対応や修理対応 などに利用させていただき、ご相談内容は録音させていただきます。また、折り返し電話をさ せていただくときのために発信番号を通知いただいております。なお、個人情報を適切に管理 し、修理業務等を委託する場合や正当な理由がある場合を除き、第三者に開示・提供いたしま せん。 個人情報に関するお問い合わせは、ご相談いただきました窓口にご連絡ください。 〒 567-0026 大阪府茨木市松下町1番1号 © Panasonic Corporation 2012 Z1012-0...
- Seite 12 • • • • • • • • • • • • • • • • •...
- Seite 13 M4×8 (8) M 8×32 (4) M 5×570 ( ) (2) M 5×240 ( ) (2) • • • • • •...
- Seite 14 • 26.2 •...
- Seite 15 • • • • • •...
- Seite 16 • • • •...
- Seite 17 ③ • ④ • • • • • •...
- Seite 18 ⑤ • • ④...
-
Seite 19: Safety Precautions
This bracket is intended for only Panasonic display models. Use with other apparatus is capable of resulting in instability causing possible injury. PROFESSIONAL INSTALLATION IS REQUIRED. PANASONIC DISCLAIMS ANY PROPERTY DAMAGE AND/OR SERIOUS INJURY, INCLUDING DEATH RESULTING FROM IMPROPER INSTALLATION OR INCORRECT HANDLING. - Seite 20 Components Parts used to assemble the wall-hanging bracket Base upper ¿ tting (1) Bracket base left Bracket base right Screws for ¿ tting ¿ tting assembling the ¿ xture M4×8 (8) Model nameplate Base lower ¿ tting (1) Parts used for installation Allen head countersunk Screws for securing unit View of fully assembled...
-
Seite 21: Fitting Procedure
Fitting procedure 1. Assembling the Model nameplate wall-hanging bracket Base upper fitting Lay the base upper and lower ¿ ttings and the bracket Cutout base left and right ¿ ttings as shown in the ¿ gure. Bracket base Fit the protrusions (tabs) left fitting of the bracket base upper Bracket base... - Seite 22 Fitting procedure 3. Installing the wall-hanging bracket on the wall See the outline drawings (pages 75 to 78) to con¿ rm the hole positions for installing on the wall. Install the wall-hanging bracket so that the arrows indicated on it are pointing upward. First of all, secure the screw in the upper center hole Use a level to ensure that the ¿...
- Seite 23 Vertical installation Turn the display unit 90° to the right so that the Panasonic logo comes to the left, and attach it in the same way as landscape mounting. • Make sure that the power cord and the cables of connected devices are not caught by the wall and ¿...
- Seite 24 Fitting procedure Using the positioning pads adhered to the wall as Cutout at top guidelines, align the top of the display at the left and Insulation spacer at top right. Engage the insulation spacers at the top of the ③ Hole at display with the cutouts at the top of the bracket bottom...
- Seite 25 How to remove the display from the ⑤ wall-hanging bracket Note • The screws for securing the unit may fall by accident and cause damage to the À oor. Lay a blanket or soft cloth below the display. Pull out the display towards you, and remove the Insulation spacer at screws for securing the unit...
-
Seite 26: Sicherheitsmaßnahmen
4) Vorsichtig bei der Anbringung vorgehen, da durch Stöße Gehäuserisse am Display verursacht werden können. Vorsicht: Diese Halterung ist nur für Display-Modelle von Panasonic vorgesehen. Die Verwendung mit anderen Geräten kann zu Instabilität führen und Verletzungen zur Folge haben. DIE INSTALLATION IST PROFESSIONELL DURCHZUFÜHREN. -
Seite 27: Bauteile Der Wandhalterung
Bauteile Bauteile der Wandhalterung Obere Schiene Linke Schiene (1) Rechte Schiene (1) Schrauben für den Zusammenbau der Schienen M4×8 (8) Typenschild Untere Schiene Befestigungsteile Innensechskant-Senkschrauben Schrauben zum Sichern des Ansicht der Wandhalterung im M 8×32 (4) Gerätes zusammengebauten Zustand M 5×570 (Llang) (2) M 5×240 (kurz) (2) Zahnscheiben (4) Positionierhilfen (2) - Seite 28 Befestigung 1. Zusammenbau der Typenschild Wandhalterung Obere Schiene Legen Sie die obere und untere Schiene sowie die Aussparung linke und rechte Schiene wie in der Abbildung Lasche dargestellt bereit. Linke Schiene Fügen Sie die vorstehenden Rechte Schiene Teile (Laschen) der oberen und unteren Schiene in die entsprechenden Aussparungen der linken...
-
Seite 29: Montage Der Wandhalterung An Der Wand
3. Montage der Wandhalterung an der Wand Überprüfen Sie die Positionen für die Befestigungslöcher an der Wand anhand der Maßzeichnungen (Seite 75 bis 78). Installieren Sie die Wandhalterung so, dass die Pfeile darauf nach oben zeigen. Ziehen Sie zuerst die Schraube im oberen mittleren Befestigungsloch Kontrollieren Sie mit einer Wasserwaage, dass die Halterung nicht zu einer Seite geneigt ist, und ziehen Sie dann die... -
Seite 30: Provisorisches Anziehen Der Schrauben Zum Sichern Des Gerätes
Schließen Sie das Netzkabel und die angeschlossenen Geräte an. Vertikale Installation Drehen Sie das Display 90 Grad im Uhrzeigersinn, sodass sich das Panasonic-Logo auf der linken Seite be¿ ndet. Befestigen Sie das Display dann genauso wie bei der horizontalen Installation beschrieben. - Seite 31 Verwenden Sie die an die Wand geklebten Aussparung an der Oberseite Positionierhilfen als Führungen und richten Sie den Isoliermuffe an der Oberseite oberen Rand des Displays an der linken und rechten Seite aus. ③ Befestigungsloch Passen Sie die Isoliermuffen an der Oberseite des am Boden Displays in die Aussparungen an der Oberseite der Wandhalterung ein und senken Sie sie langsam in...
- Seite 32 Befestigung Demontieren des Displays von der ⑤ Wandhalterung Hinweis • Die Schrauben zum Sichern des Gerätes können versehentlich herunterfallen und den Fußboden beschädigen. Legen Sie eine Decke oder ein weiches Tuch unter das Display. Isoliermuffe am Boden Ziehen Sie das Display nach vorne und entfernen Sie die Schrauben zum Sichern des Gerätes (eine Schraube auf jeder Seite der Wandhalterung).
-
Seite 33: Precauzioni Di Sicurezza
Questa staffa è progettata soltanto per i modelli di schermi Panasonic. L’uso con altri apparecchi potrebbe provocare instabilità e possibili infortuni. È NECESSARIA L’INSTALLAZIONE PROFESSIONALE. PANASONIC NON È RESPONSABILE PER QUALSIASI DANNO DI PROPRIETÀ E/O GRAVE INFORTUNIO, COMPRESA LA MORTE, CAUSATI DALL’INSTALLAZIONE SBAGLIATA O DAL MANEGGIAMENTO SCORRETTO. - Seite 34 Parti Parti usate per l’assemblaggio della staffa di montaggio su parete Raccordo superiore Raccordo sinistro Raccordo destro Vite per assemblaggio base base staffa base staffa dell'apparecchio M4×8 (8) Targhetta modello Raccordo inferiore base Parti usate per l’installazione Vite a testa fresata di tipo Viti per il ¿...
-
Seite 35: Procedura Di Montaggio
Procedura di montaggio Targhetta modello 1. Assemblaggio della staffa di montaggio su paretet Raccordo superiore base Posizionare i raccordi superiore e inferiore della base e i raccordi Intaglio sinistro e destro della base della staffa come mostrato nella Linguetta Raccordo sinistro ¿... - Seite 36 Procedura di montaggio 3. Installazione sulla parete della staffa di montaggio su parete Vedere i disegni del pro¿ lo (pagine da 75 a 78) per confermare le posizioni dei fori per il montaggio a parete. Installare la staffa di montaggio a parete in modo che le frecce indicate su di essa siano rivolte verso l'alto.
- Seite 37 Collegare il cavo di alimentazione e i dispositivi connessi. Montaggio verticale Girare lo schermo a 90° verso destra in modo che il logo Panasonic si trovi sul lato sinistro, quindi procedere al ¿ ssaggio attenendosi alla stessa procedura utilizzata per il montaggio orizzontale.
- Seite 38 Procedura di montaggio Utilizzando i fermi di posizionamento fatti aderire Intaglio sulla parte superiore Distanziatore isolante sulla alla parete in base alle istruzioni fornite, allineare parte superiore la parte superiore dello schermo sul lato sinistro e destro. ③ Foro sulla Inserire i distanziatori isolanti sulla parte superiore parte inferiore dello schermo negli intagli sulla parte superiore...
- Seite 39 Come rimuovere lo schermo dalla staffa per il ⑤ montaggio a parete Nota • Le viti per il ¿ ssaggio dell'unità possono cadere accidentalmente e causare danni al pavimento. Appoggiare una coperta o panno morbido sotto lo Distanziatore schermo. isolante sulla parte inferiore Tirare lo schermo verso di sé...
-
Seite 40: Précautions De Sécurité
Utilisée avec un autre appareil, elle peut se révéler tout à fait inappropriée et être la cause indirecte de blessures. L’INSTALLATION PAR UN PROFESSIONNEL EST INDISPENSABLE. PANASONIC DECLINE TOUT DOMMAGE MATERIEL ET/OU BLESSURE GRAVE, Y COMPRIS LA MORT RESULTANT D’UNE INSTALLATION OU D’UNE MANIPULATION INCORRECTE. - Seite 41 Pièces Pièces utilisées pour monter l’applique de ¿ xation au mur. Fixation supérieure de Fixation gauche de la Fixation droite de la Vis pour le montage la base base de l’applique (1) base de l’applique du dispositif de ¿ xation M4×8 (8) Plaque nominative du modèle Fixation inférieure...
- Seite 42 Mode de pose 1. Montage de l’applique de Plaque nominative du modèle ¿ xation au mur Fixation supérieure de la base Placez les ¿ xations supérieure et inférieure de la base Découpe puis les ¿ xations gauche et droite de la base de Languette Fixation gauche de la l’applique, comme indiqué...
- Seite 43 3. Montage de l’applique de ¿ xation murale sur le mur Déterminez la position des ori¿ ces de montage au mur en fonction du dessin d’encombrement (pages 75 à 78). Fixez l’applique de ¿ xation au mur les À èches dirigées vers le haut.
- Seite 44 Installation verticale Faites pivoter l’écran de 90° à droite de façon à ce que le logo Panasonic se trouve à gauche et ¿ xez-le selon la même procédure que pour l’installation horizontale. • Veillez à ce que le cordon d’alimentation et les câbles de raccordement à...
- Seite 45 Au moyen des blocs de positionnement appliqués Découpe supérieure au mur comme point de référence, alignez le haut de Rondelle isolante supérieure l’écran à droite et à gauche. Introduisez les rondelles isolantes en haut de l’écran ③ Orifice en plaçant les découpes en haut de l’applique et faites inférieur descendre lentement pour les mettre en place.
- Seite 46 Mode de pose Dépose de l’écran de l’applique de ¿ xation au ⑤ Remarque • Les vis de serrage de l’unité pourraient tomber accidentellement et endommager le parquet. Posez une couverture ou un tissu moelleux sous l’écran. Tirez l’écran vers vous et déposez les vis de serrage Rondelle isolante du latérales de l’unité...
-
Seite 47: Precauciones Para Su Seguridad
Si se utiliza con otros aparatos, la instalación no será estable y algunas personas podrían sufrir heridas. LA INSTALACIÓN NECESITA SER REALIZADA POR PROFESIONALES. PANASONIC NO SE HACE RESPONSABLE DE NINGÚN DAÑO CAUSADO EN PROPIEDADES NI TAMPOCO DE LESIONES GRAVES, INCLUYENDO LA MUERTE, DEBIDOS A LA MALA INSTALACIÓN O ALMANEJO INCORRECTO. - Seite 48 Componentes Piezas utilizadas para ensamblar el soporte para colgar en pared Accesorio superior Accesorio izquierdo Accesorio derecho Tornillos para montar de la base de la base del de la base del el soporte M4×8 (8) soporte soporte Placa del nombre del modelo Accesorio inferior de la base Piezas utilizadas para la instalación...
-
Seite 49: Procedimiento De Instalación
Procedimiento de instalación 1. Ensamblaje del soporte Placa del nombre del modelo Accesorio superior de la base para colgar en pared Coloque sobre el suelo los accesorios superior e inferior Hueco de la base y los accesorios izquierdo y derecho de la base Lengüeta Accesorio izquierdo de la del soporte... - Seite 50 Procedimiento de instalación 3. Instalación en la pared del soporte para colgar en pared Consulte los planos acotados (páginas 75 a 78) para con¿ rmar las posiciones de los agujeros para la instalación en la pared. Instale el soporte para colgar en pared de forma que las À echas que aparecen en el mismo estén orientadas hacia arriba.
- Seite 51 Instalación vertical Gire la unidad de la pantalla 90° hacia la derecha, de forma que el logotipo de Panasonic quede a la izquierda, y colóquelo de la misma forma que en el montaje horizontal. • Compruebe que el cable de alimentación y los cables de los dispositivos conectados no queden pillados entre la pared y los soportes.
- Seite 52 Procedimiento de instalación Utilizando las almohadillas de colocación pegadas Hueco de la parte superior Espaciador de aislamiento en la pared como guías, alinee la parte superior de de la parte superior la pantalla a izquierda y derecha. Acople los espaciadores de aislamiento de la ③...
- Seite 53 Como quitar la pantalla del soporte para colgar ⑤ en pared Nota • Los tornillos para asegurar la unidad se podrían caer accidentalmente y estropear el suelo. Extienda una manta o una tela suave debajo de la pantalla. Tire de la pantalla hacia usted, y retire los tornillos Espaciador de aislamiento de para asegurar la unidad...
- Seite 54 • • • • • • • • • • • • • • • • • Panasonic. PANASONIC...
- Seite 55 M4×8 (8) M 5×570 ( ) (2) M 8×32 (4) M 5×240 ( ) (2) ) (1) • • • • • • . .), 40 °C.
- Seite 56 1,5 • ) • 26.2 2,5 . • –...
- Seite 57 . 75 78), • 10 – 15 • • . 75 78). • , – • (TPDF27631/27641) •...
- Seite 58 M5×570 ( ) (2) M5×240 ( ) (2) ) (2) ) (2) • 4 • • (M8) 90° Panasonic • •...
- Seite 59 ③ ④ • 1,5 • ) • • • • • •...
- Seite 60 ⑤ • ④ •...
- Seite 61 • • • • • • • • • • • • • • • • • ‘ ’ Panasonic PANASONIC,...
- Seite 62 M4×8 (8) M 8×32 (4) M 5×570 ( ) (2) M 5×240 ( ) (2) • • • • • • , . .) 40 °C- , . .)
- Seite 63 : 1,2 – 1,5 • ) • 26.2 — 2,5 . •...
- Seite 64 • 10-15 • • • • (TPDF27631/27641) •...
- Seite 65 : M5×570 ( : M5×240 ( ) (2) ) (2) Phillips Phillips • : 3-4 • • (M8) Panasonic 90°- • •...
- Seite 66 ③ ④ • , 4- : 1,2 – 1,5 • ) • • • • • •...
- Seite 67 ⑤ • ④ •...
- Seite 68 • ’ • • • • • • • • • • • • • • • • ’ Panasonic. PANASONIC...
- Seite 69 M4×8 (8) M 8×32 (4) M 5×570 ( ) (2) M 5×240 ( ) (2) • • • • • • 40 °C.
- Seite 70 1,5 • ) • 26.2 2,5 . • – ’...
- Seite 71 . 75 78), • 10 – 15 • • 78). • , – • (TPDF27631/27641) •...
- Seite 72 M5×570 ( ) (2) M5×240 ( ) (2) ) (2) ) (2) (4). • 4 • • (M8) 90° Panasonic • •...
- Seite 73 ③ ④ • ’ 1,5 • ) • • • • • •...
- Seite 74 ⑤ • ④ •...
- Seite 75 外形寸法図 Plan des dimensions extèrieures Dibujo de dimensiones externas External dimensions drawing Abbildung mit externen Abmessungen Schema delle dimensioni esterne 横型設置時 Installation horizontale 単位 : mm Unité: mm Instalación horizontal Unidad: mm Horizontal installation Unit: mm (inches) Horizontale Installation Einheit: mm Montaggio in orizzontale Unità: mm 1604 (63.2)
- Seite 76 Installation verticale 単位 : mm Unité: mm 縦型設置時 Instalación vertical Unidad: mm Vertical installation Unit: mm (inches) Vertikale Installation Einheit: mm Montaggio in verticale Unità: mm 931 (36.7) 117 (4.6) 215.5 (8.5) 215.5 (8.5) 500 (19.7) 28 (1.1) 400 (15.8) 140 (5.6) 220 (8.7) 324 (12.8)
- Seite 77 単位 : mm 横型設置時 Installation horizontale Unité: mm Instalación horizontal Unidad: mm Horizontal installation Unit: mm (inches) Horizontale Installation Einheit: mm Montaggio in orizzontale Unità: mm 1848 (72.8) 117 (4.6) 674 (26.6) 674 (26.6) 500 (19.7) 28 (1.1) 400 (15.8) 140 (5.6) 220 (8.7) 324 (12.8)
- Seite 78 Installation verticale 単位 : mm Unité: mm 縦型設置時 Instalación vertical Unidad: mm Vertical installation Unit: mm (inches) Vertikale Installation Einheit: mm Montaggio in verticale Unità: mm 1073 (42.3) 117 (4.6) 281.5 (11.1) 291.5 (11.5) 500 (19.7) 28 (1.1) 400 (15.8) 5 (0.2) *DISPLAY 140 (5.6)
- Seite 80 Web Site : http://panasonic.net © Panasonic Corporation 2012 Z1012-0...