Herunterladen Inhalt Inhalt Diese Seite drucken
Inhaltsverzeichnis

Werbung

Verfügbare Sprachen
  • DE

Verfügbare Sprachen

  • DEUTSCH, seite 100
DETECTOR MULTIFUNCIONAL /
RILEVATORE MULTIFUNZIONE
DETECTOR MULTIFUNCIONAL
Instrucciones de utilización y de seguridadrnost
RILEVATORE MULTIFUNZIONE
Indicazioni per l'uso e per la sicurezza
DETETOR MULTIFUNÇÕES
Instruções de utilização e de segurança
MULTI-PURPOSE DETECTOR
Operation and Safety Notes
MULTIFUNKTIONSDETEKTOR
Bedienungs- und Sicherheitshinweise
IAN 298736

Werbung

Inhaltsverzeichnis
loading

Inhaltszusammenfassung für Powerfix Profi HG02404

  • Seite 1 DETECTOR MULTIFUNCIONAL / RILEVATORE MULTIFUNZIONE DETECTOR MULTIFUNCIONAL Instrucciones de utilización y de seguridadrnost RILEVATORE MULTIFUNZIONE Indicazioni per l’uso e per la sicurezza DETETOR MULTIFUNÇÕES Instruções de utilização e de segurança MULTI-PURPOSE DETECTOR Operation and Safety Notes MULTIFUNKTIONSDETEKTOR Bedienungs- und Sicherheitshinweise IAN 298736...
  • Seite 2 Instrucciones de utilización y de seguridad Página IT / MT Indicazioni per l’uso e per la sicurezza Pagina 29 Instruções de utilização e de segurança Página 53 GB / MT Operation and Safety Notes Page DE / AT / CH Bedienungs- und Sicherheitshinweise Seite...
  • Seite 5: Inhaltsverzeichnis

    Introducción .......Página 6 Uso adecuado ......Página 6 Descripción de los componentes .........Página 6 Características técnicas ....Página 7 Contenido del paquete ....Página 7 Indicaciones de seguridad ........Página 8 Indicaciones generales de seguridad .........Página 8 Advertencia sobre resultados de medida imprecisos ....Página 10 Indicaciones de seguridad sobre las pilas / baterías ....Página 11 Puesta en...
  • Seite 6: Introducción

    Detector multifuncional Introducción Enhorabuena por la adquisición de su nuevo producto. Ha optado por un pro- ducto de alta calidad. El manual de ins- trucciones forma parte de este producto. Contiene importantes indicaciones sobre seguridad, uso y eliminación. Antes de usar el producto, familiarícese con todas las indicaciones de manejo y de seguridad.
  • Seite 7: Características Técnicas

    Selector de función LASER / DETEC- TOR / DISTANCE (láser / detector / distancia) Botón RM (leer información registrada) Botón de la aguja de sujeción Botón + / = Compartimento de las pilas Botón PUSH (pulsar) Orificio del láser Emisor / receptor ultrasonido Soporte plegable Características técnicas Medición de la distancia...
  • Seite 8: Indicaciones De Seguridad

    Indicaciones de seguridad Indicaciones generales de seguridad Este producto puede ser utilizado por niños mayores de 8 años, así como por personas con capacidades físicas, sensoriales o mentales reducidas o que cuenten con poca experiencia y/o falta de conocimientos, siempre y cuando se les haya enseñado cómo utilizar el producto de forma segura y hayan comprendido los peligros que...
  • Seite 9 producto podría influir en el funciona- miento de dispositivos de auxilio vital. Compruebe que el producto se encuen- tra en perfectas condiciones antes de ponerlo en funcionamiento. Si el aparato está averiado no lo utilice en ningún caso. ¡PRECAUCIÓN! Nunca abra la carcasa del producto.
  • Seite 10: Advertencia Sobre Resultados De Medida Imprecisos

    producirse debido al manejo inade- cuado y a la inobservancia de estas indicaciones de seguridad. Nunca abra la carcasa del aparato. La garantía será anulada en caso de que el aparato sea manipulado por terceros. Este producto no requiere un mantenimiento especial. No utilice el producto para fijar una tensión alternativa en cables descu- biertos o que no estén bien aislados.
  • Seite 11: Indicaciones De Seguridad Sobre Las Pilas / Baterías

    – cableado o tuberías demasiado profundos – conductos de corriente eléctrica blindados – paredes gruesas con tuberías o cableado muy finos – paredes revestidas con metal – ambiente muy húmedo Con este producto no podrá detectar los conductores de corriente en un circuito eléctrico que: –...
  • Seite 12 recalentarse, explotar o provocar un incendio. Nunca arroje pilas / baterías al fuego o al agua. No aplique cargas mecánicas sobre las pilas / baterías. Riesgo de sulfatación de las pilas / baterías Evite condiciones y temperaturas ex- tremas que puedan influir en el fun- cionamiento de las pilas / baterías, por ejemplo, acercarlas a un radiador o exponerlas directamente a la luz solar.
  • Seite 13: Puesta En Funcionamiento

    Riesgo de daño del producto ¡Utilice exclusivamente el tipo de pila / batería indicado! Introduzca las pilas / baterías teniendo en cuenta la polaridad marcada con (+) y (-) tanto en las pilas / baterías como en el producto. ¡Limpie los contactos de las pilas / baterías y del compartimento para pilas antes de colocarlas! Retire inmediatamente las pilas /...
  • Seite 14: Uso

    la pantalla . Si la pila está desgastada obtendrá unos resultados imprecisos o erróneos. Indicaciones para la medición de distancias Para evitar errores de medición, observe las siguientes indicaciones: La medición se efectúa con ultrasonido, que se desplaza en forma de cono desde el emisor / receptor de ultrasonido .
  • Seite 15: Medición De Distancias

    - La superficie de destino debe ser lisa para que el sonido se pueda reflejar bien. Las superficies transparentes como el vidrio generalmente reflejan el sonido. - La pila no debe estar gastada. En la pantalla aparece el símbolo de la pila cuando la pila está...
  • Seite 16: Cómo Sumar Distancias Medidas

    puede eliminarse pulsando breve- mente el botón MODE . Si sigue apareciendo el aviso „Err“, vuelva a pulsar el botón MODE hasta que el aviso „Err“ desaparezca de la pantalla. - Coloque el producto en posición horizontal con respecto a la pared en la que quiere medir la distancia.
  • Seite 17: Medir Superficies

    3. Proceda a medir la siguiente distan- cia. La nueva distancia medida apa- recerá indicada en la parte superior de la pantalla. 4. Vuelva a pulsar el botón + / =. La cantidad nueva se sumará a la antigua en la parte inferior de la pantalla. 5.
  • Seite 18: Medir El Volumen

    3. Pulse el botón MODE . El producto está listo para realizar la segunda medición. 4. Proceda a medir la siguiente superficie. 5. Pulse el botón + / = . En la panta- lla podrá visualizar la indicación „+“. 6. Pulse el botón RM .
  • Seite 19: Cómo Sumar Volúmenes

    5. Pulse el botón READ para medir la altura. En la parte superior de la pantalla aparecerá la altura medida. En la parte inferior de la pantalla aparecerá el cálculo del volumen. Cómo sumar volúmenes 1. Mida el volumen deseado como se indica en el apartado „Medir el volumen“.
  • Seite 20: Consejos Para La Medición

    con una tubería de metal o con conductos de electricidad que ya conozca. En caso de duda, consulte siempre con expertos cualificados. ¡Atención! Si el producto detectara un cable eléctrico con corriente alterna, aparecerá ( ) un aviso en la pantalla. ¡En ningún caso debe perforar en este punto! ¡Riesgo de descarga eléctrica! Consejos para...
  • Seite 21 aparato, significará que el aparato no es apropiado para examinar esta pared. - Evite tocar la pantalla mientras realiza la medición. Esto podría afectar a la precisión del producto. - Tenga en cuenta que los cables de co- rriente también pueden ser localizados como metal o vigas.
  • Seite 22 fusibles deben estar en funcionamiento. Tenga en cuenta que solo se detectarán tensiones de 230 V ~ 50 Hz. La detección de objetos ocultos se rea- liza de la misma forma en los tres modos diferentes (STUD = madera, AC WIRE = corriente eléctrica, METAL = metal).
  • Seite 23: Detección De Objetos De Madera

    7. Durante la búsqueda de cables de corriente, además del indicador de intensidad aparecerá el símbolo de tensión ( ). Detección de objetos de madera 1. Para detectar objetos de madera siga las instrucciones del apartado „Detección de objetos ocultos“. 2.
  • Seite 24 la temperatura ambiental puede pro- yectarse una línea láser de hasta 10 m. Coloque el selector de función en función „LASER“. Se proyectará una línea láser. Línea láser horizontal 1. Mantenga el producto en horizontal respecto a la pared (por ej. en la pa- red de madera).
  • Seite 25: Solucionar Problemas

    2. Cuelgue el producto en el punto de la pared (por ejemplo en un clavo) en el que quiere proyectar la línea láser. Así el producto colgará per- pendicularmente. El láser proyectará una línea vertical con respecto a la pared. Solucionar problemas El producto contiene componentes electrónicos sensibles.
  • Seite 26: Eliminación

    Eliminación El embalaje está compuesto por materiales no contaminantes que pueden ser des- echados en el centro de reciclaje local. Tenga en cuenta el distintivo del embalaje para la separación de residuos. Está compuesto por abreviaturas (a) y números (b) que significan lo siguiente: 1–7: plásticos / 20–22: papel y cartón / 80–98: mate- riales compuestos.
  • Seite 27: Garantía

    en la directiva 2006/66/CE y en sus modificaciones. Recicle las pilas / baterías y / o el producto en los puntos de reco- gida adecuados. ¡Daños en el medio am- biente por un reciclaje indebido de las pilas / baterías! Retire las baterías / paquete de pilas del producto antes de desecharlo.
  • Seite 28 plazo de garantía comienza a partir de la fecha de compra. Por favor, conserve adecuadamente el justificante de compra original. Este documento se requerirá como prueba de que se realizó la compra. Si en el plazo de 3 años a partir de la fecha de compra se produce un fallo de material o fabricación en este producto, repararemos el producto o lo sustituiremos...
  • Seite 29 Introduzione ......Pagina 30 Utilizzo conforme ......Pagina 30 Descrizione dei componenti ..Pagina 30 Dati tecnici ........Pagina 31 Fornitura ........Pagina 31 Indicazioni di sicurezza ..Pagina 32 Avvertenze generali di sicurezza ...Pagina 32 Avvertenze per risultati di misurazione non precisi....Pagina 34 Avvertenze di sicurezza per batterie / accumulatori ....Pagina 35 Messa in funzione ....Pagina 37...
  • Seite 30: Introduzione

    Rilevatore multifunzione Introduzione Congratulazioni per l‘acquisto del vostro nuovo prodotto. Avete optato per un pro- dotto di alta qualità. Le istruzioni d‘uso sono parte integrante di questo prodotto. Esse contengono importanti avvertenze sulla sicurezza, l‘impiego e lo smaltimento. Prima dell‘utilizzo del prodotto, prendere conoscenza di tutte le istruzioni d‘uso e delle avvertenze di sicurezza.
  • Seite 31: Dati Tecnici

    Interruttore di funzionamento LASER / DETECTOR / DISTANCE (laser / rivelatore/ distanza) Tasto RM (leggi memoria) Tasto ago di supporto Tasto + / = Vano portabatterie Tasto PUSH (premere) Apertura raggio laser Ultrasuono trasmettitore / ricevente Sportellino a ribalta Dati tecnici Misurazione distanza tramite ultrasuoni Ricerca di:...
  • Seite 32: Indicazioni Di Sicurezza

    Indicazioni di sicurezza Avvertenze generali di sicurezza Questo prodotto può essere usato da bambini a partire dagli 8 anni di età e da persone con capacità fisiche, sensoriali o mentali limitate, oppure senza esperienza e conoscenza in merito, qualora sorvegliati o istruiti circa un uso sicuro del prodotto e che comprendano i pericoli ad esso con- nessi.
  • Seite 33 mettete in nessun caso in funzione un apparecchio danneggiato. ATTENZIONE! Non aprire mai l’alloggiamento del prodotto. In caso contrario si potrebbero provocare lesioni a persone e / o danneggiare il prodotto. Fare eseguire eventuali ri- parazioni solamente da un elettricista. Il prodotto contiene un laser di classe 2.
  • Seite 34: Avvertenze Per Risultati Di Misurazione Non Precisi

    Non apra l‘involucro. La garanzia de- cade in caso di intervento sul prodotto da parte di terzi. Il Suo prodotto non richede alcuna manutenzione parti- colare. Non usare il prodotto per rilevare la tensione alternata in cavi liberi o non isolati.
  • Seite 35: Avvertenze Di Sicurezza Per Batterie / Accumulatori

    – pareti con rivestimento metallico – eccessiva umidità Con questo prodotto non è possibile rilevare condutture in circuiti elettrici, – isolati dall‘alimentazione di rete. – attraversati da corrente continua. – usati per sistemi di telecomunica- zione o per il computer. Con questo prodotto è...
  • Seite 36 Rischio di perdita di liquido dalle batterie / dagli accumulatori Evitare condizioni e temperature estreme che possano ripercuotersi sulle batterie / sugli accumulatori, quali ad esempio la vicinanza a termosifoni o l‘irraggiamento solare diretto. Evitare il contatto delle sostanze chi- miche con la pelle, gli occhi e le mu- cose in caso di fuoriuscita del liquido dalle batterie / dagli accumulatori!
  • Seite 37: Messa In Funzione

    Inserire le batterie / gli accumulatori secondo il contrassegno della polarità (+) e (-) sulla batteria / sull‘accumula- tore del prodotto. Pulire i contatti della batteria / dell‘ac- cumulatore e del vano portabatterie prima dell‘inserimento! Rimuovere immediatamente le batte- rie / gli accumulatori esausti dal pro- dotto.
  • Seite 38: Utilizzo

    quando sul display viene visualizzato il simbolo della batteria. Usando una batteria debole si ottengono risultati di misurazione imprecisi o errati. Utilizzo Indicazioni per la misurazione della distanza Per evitare errori di misurazione, attenersi alle seguenti indicazioni: la misurazione avviene con ultrasuoni che avanzano con forma conica dal trasmetti- tore / ricevitore di ultrasuoni .
  • Seite 39: Misurazione Di Distanze

    - la superficie bersaglio deve avere una superficie liscia in modo che il suono possa essere riflesso in modo ottimale. Solitamente le superfici trasparenti, come il vetro, riflettono il suono. - la batteria non deve essere scarica. Una batteria scarica viene visualizzata sul display mediante il simbolo della batteria...
  • Seite 40: Sommare Le Distanze

    tratto da misurare deve essere com- presa tra 0,6 m e 16 m (vedi fig. F). - Assicurarsi che prima della misura- zione non compaia sul display alcuna la notifica „Err“. La notifica „Err“ può sempre essere eliminata premendo brevemente il tasto MODE .
  • Seite 41: Misurazione Di Superfici

    2. Premere il tasto + / = . Sul display appare la visualizzazione „+“ e sul rigo sottostante la distanza misurata. 3. Misurare la distanza seguente. La nuova distanza misurata viene visua- lizzata sul rigo superiore del display. 4. Premere nuovamente il tasto + / =. Il nuovo valore misurato viene addizio- nato a quello precedente nel rigo inferiore.
  • Seite 42: Misurazione Del Volume

    2. Premere il tasto M . Sul display appare la visualizzazione „M+“. La superficie misurata è memorizzata. 3. Premere il tasto MODE . Il pro- dotto è ora pronto per la seconda misurazione. 4. Misurare la superficie successiva. 5. Premere il tasto + / = .
  • Seite 43: Addizionare I Volumi

    e la visualizzazione „H“ (altezza) inizia a lampeggiare. 5. Per misurare l‘altezza, premere il tasto READ. Sul rigo superiore del display appare l‘altezza misurata. Sul rigo inferiore appare il risultato del volume calcolato. Addizionare i volumi 1. Misurare un volume come descritto nel capitolo „Misurazione del volume“.
  • Seite 44: Consigli Per La Misurazione

    metallo o nei pressi di una conduttura elettrica del / della quale è nota la posi- zione esatta. In caso di dubbi rivolgersi sempre a una persona specializzata. Attenzione! Se il prodotto dovesse rilevare una condut- tura elettrica con corrente alternata ( ) compare un‘avviso sul display.
  • Seite 45 non è adatto per essere analizzato con questo apparecchio. - Evitare di toccare il display LCD durante la misurazione. Questo potrebbe com- promettere la precisione del prodotto. - Prestare attenzione poiché anche le condutture elettriche possono essere rile- vate come metallo o montanti. Utilizzare sempre la funzione di ricerca della ten- sione per escludere errori.
  • Seite 46 tensione. Allo stesso modo, tutti i fusibili devono essere avvitati e attivati. Tenere presente che è possibile rilevare sola- mente le tensioni di 230 V ~ 50 Hz. Il rilevamento di oggetti coperti è uguale per tutte le tre modalità (STUD = Legno, AC WIRE = linea elettrica, METAL = metallo).
  • Seite 47: Rilevamento Oggetti In Legno

    L‘oggetto nascosto corre tra queste due posizioni. 7. Durante la ricerca di una conduttura elettrica, oltre all‘indicatore di inten- sità, compare anche il simbolo della tensione ( ). Rilevamento oggetti in legno 1. Per rilevare oggetti in legno, procedere come descritto nel capitolo „Rileva- mento di oggetti coperti“.
  • Seite 48 Usare la marcatura laser per allineare quadri, armadi ecc. in orizzontale o verticale. A seconda dell‘illuminazione dell‘ambiente una linea laser può essere proiettata fino a un massimo di 10 m. Spingere l‘interruttore di funziona- mento sulla posizione „LASER“. Viene proiettata una linea laser. Linea laser orizzontale 1.
  • Seite 49: Risoluzione Degli Errori

    l‘utilizzo, assicurarsi che lo sportellino a ribalta sia chiuso. Linea laser verticale 1. Fissare un filo all‘occhiello sul punto di misurazione 2. Appendere il prodotto sul punto della parete (agli aghi) in cui si desidera proiettare la linea verticale. Il prodotto pende come un pendolo in verticale verso il basso.
  • Seite 50: Smaltimento

    Pulire il prodotto solo esternamente con un panno soffice e leggermente inumidito. Smaltimento L’imballaggio è composto da materiali ecologici che possono essere smaltiti presso i siti di raccolta locali per il riciclo. Osservare l‘identificazione dei materiali di imballaggio per lo smaltimento differenziato, i quali sono contrassegnati da abbrevia- zioni (a) e da numeri (b) con il seguente significato: 1–7: plastiche / 20–22: carta...
  • Seite 51: Garanzia

    Le batterie / gli accumulatori difettosi o usati devono essere riciclati secondo la direttiva 2006/66/CE e relative modifiche. Smaltire le batterie / gli accumulatori e / o il prodotto presso i punti di raccolta indicati. Uno smaltimento scor- retto delle batterie / gli accumulatori procura danni all‘ambiente! Estrarre le batterie / il pacchetto batteria...
  • Seite 52 di garanzia ha inizio a partire dalla data di acquisto. Conservare lo scontrino di acquisto originale in buone condizioni. Questo documento servirà a documentare l‘avvenuto acquisto. Il prodotto da Lei acquistato dà diritto ad una garanzia di 3 anni a partire dalla data di acquisto.
  • Seite 53 Introdução ........Página 54 Utilização correta ......Página 54 Descrição das peças ....Página 54 Dados técnicos ......Página 55 Material fornecido ......Página 55 Indicações de segurança ...Página 56 Indicações gerais de segurança ...Página 56 Nota sobre resultados de medição não exactos ....Página 58 Indicações de segurança relativas às pilhas / baterias ..Página 59 Colocação em...
  • Seite 54: Introdução

    Detetor multifunções Introdução Damos-lhe os parabéns pela aquisição do seu novo produto. Acabou de adquirir um produto de grande qualidade. O manual de instruções é parte integrante deste produto. Contém indicações importantes referentes à segurança, utilização e elimi- nação. Familiarize-se com todas as indi- cações de utilização e de segurança do produto.
  • Seite 55: Dados Técnicos

    Tecla RM (ler memória) Tecla agulha de suporte Tecla + / = Compartimento das pilhas Tecla PUSH (premir) Saída de feixe laser Emissor / Receptor de ultra-sons Suporte basculante Dados técnicos Medição de distâncias por ultra-sons Detectar: madeira, fios eléctricos, metal Laaser: classe: Potência de saída max (P...
  • Seite 56: Indicações De Segurança

    Indicações de segurança Indicações gerais de segurança Esse produto pode ser utilizado por crianças a partir dos 8 anos, assim como por pessoas com capacidades físicas, sensoriais ou mentais reduzi- das ou deficiências na experiência e conhecimento, se forem vigiadas ou instruídas em relação ao uso seguro do produto e se compreenderem os perigos que daí...
  • Seite 57 Nunca coloque uma balança danifi- cada em funcionamento. CUIDADO! Nunca abra a caixa do produto. Tal pode provocar ferimen- tos e danos no produto. As reparações devem ser efectuadas apenas por um electricista. O produto contém um laser de classe 2. Não direcione o feixe de laser a pessoas ou animais.
  • Seite 58: Nota Sobre Resultados De Medição Não Exactos

    no aparelho. O seu produto não exige manutenção especial. Não utilize o produto para identificar corrente alternada em cabos livres ou não isolados. Não utilize o produto como substituto de um voltímetro. Manuseie cuidadosamente as agulhas de suporte. Estas são pontiagudas e podem causar ferimentos.
  • Seite 59: Indicações De Segurança Relativas Às Pilhas / Baterias

    Com esse produto não podes identi- ficar cabos em circuitos de eletricidade, – que estejam isolados da alimentação. – que estejam sob corrente contínua. – que sejam usados para redes de computadores ou telefones. Com esse produto somente podes identificar canos de metal. Canos de plástico ou outros materiais não me- tálicos não podem ser identificados com esse produto.
  • Seite 60 Risco de derrame das pilhas / baterias Evite condições e temperaturas extre- mas que possam ter efeito sobre as pil- has ou baterias, por ex. elementos de aquecimento / radiação solar direta. Se uma pilhas / baterias vazar, evite o contato com a pele, os olhos e tecidos e o material químico! Lave imediatamente a zona afetada com bastante água limpa abundante e...
  • Seite 61: Colocação Em Funcionamento

    Limpe os contactos na pilha / bateria e no compartimento de baterias antes de colocar as baterias! Retire de imediato as pilhas ou bate- rias gastas do produto. Colocação em funcionamento Colocação / substituição da pilha Aviso: Remova a película da pilha antes de inserir no compartimento de pilhas Abra o compartimento das pilhas na traseira do produto.
  • Seite 62: Utilização

    Utilização Avisos para a medição de distância Para evitar erros de medição, tenha em atenção as seguintes indicações: A medição ocorre com ultra som que se movimenta de maneira cónica do emissor e recetor . O som é refletido a partir da área-alvo e recebido pelo recetor de ultrassons.
  • Seite 63: Medir De Distâncias

    - A pilha não pode estar vazia. Uma pilha vazia é indicada no visor através do símbolo da pilha - Se uma medição exata não for possível, o display indica a mensagem „Err“. A medição tem então de ser repetida. Medir de distâncias 1.
  • Seite 64: Somar Distâncias

    - Segure o produto verticalmente para a parede para a qual queres medir a distância. O emissor / receptor de ultra-sons tem de apontar para a parede em angulo recto. Para tal use o nível: posicione o produto de forma a que a bolha de ar no nível esteja no meio entre os dos mar- cadores (veja Fig.
  • Seite 65: Medir Superfícies

    Medir superfícies 1. Mova a tecla de função para a posição „DISTANCE“. O visor LC liga-se automaticamente. 2. Prima uma vez o botão MODE No visor pisca a indicação „L“ (cumprimento). 3. Prima a tecla READ para medir o cumprimento. Na fila superior do visor surge o cumprimento medido e a indicação „W“...
  • Seite 66: Medir Volumes

    8. Repita os passos 2 a 7 para somar mais resultados de medição. 9. Pressione o botão MODE para deixar ao modo de somar. Todos os valores medidos são eliminados. Medir volumes 1. Mova a tecla de função para a posição „DISTANCE“.
  • Seite 67: Encontrar Objetos Ocultos

    5. Prima o botão + / =- . No visor surge a indicação „+“. 6. Prima o botão RM . Na parte inferior do visor é mostrado o resul- tado da primeira medição. 7. Prima novamente o botão + / =. Am- bas as medições são somadas e o resultado é...
  • Seite 68 Movimente o produto alguns centímetros para a direita ou esquerda do lado da última calibração e tente novamente. - Repita o processo algumas vezes para assegurar que a medição está correta. - Dependendo da constituição da parede a ser verificada é possível que ocorram erros de medição.
  • Seite 69 objeto procurado encontra-se então no meio, entre ambas as marcas. - Esteja atento para o fato de que objetos de metal podem ser mais facilmente detectados se forem facilmente magneti- záveis. O ferro é, por isso, detetado a uma distância muito maior do que o cobre, por exemplo.
  • Seite 70: Detectar Objectos De Madeira

    5. Movimente o aparelho vagarosamente ao longo da parede. Com o aumento da proximidade do objeto procurado, o número de pilares do indicador de intensidade aumenta. Se o detetor se encontrar precisamente por cima do objeto procurado, as colunas se tocam e ouve-se um som de sinalização con- tínuo (veja Fig.
  • Seite 71: Marcação A Laser

    em posição „STUD“ e repita os passos 1 a 3. Marcação a laser O produto contém um laser da classe 2. Não direcione o feixe de laser a pessoas ou animais. Nunca olhe diretamente para um feixe laser. O laser pode causar sérios ferimentos nos olhos.
  • Seite 72: Eliminar Erros

    agulhas de suporte em paredes de pedra ou metal, mas apenas em pa- redes com uma superfície mole (por exemplo, madeira). Aviso: Caso na linha de projeção horizontal da linha do laser seja ne- cessário um leve ajuste do ângulo, o suporte basculante pode ser usado (veja Fig.
  • Seite 73: Limpeza E Conservação

    funcionamento. No caso deste tipo de interferências, remova brevemente as pilhas e volte a colocá-las. Para tal procede conforme o cap. „Colo- cação / substituição da pilha“. Limpeza e conservação Nunca utilize líquidos e detergentes, pois estes danificam o produto. Limpe o produto apenas por fora com um pano macio e levemente humedecido.
  • Seite 74 As possibilidades de reciclagem dos artigos utilizados poderão ser averiguadas no seu Muni- cípio ou Câmara Municipal. Não deposite o produto utili- zado no lixo doméstico, a favor da proteção do ambiente. Eli- mine-o de forma responsável. Pode infor- mar-se no seu município sobre os locais de recolha adequados e o seu período de funcionamento.
  • Seite 75: Garantia

    Garantia O producto foi cuidadosamente fabricado segundo rigorosas directivas de qualidade e meticulosamente testado antes da sua distribuição. Em caso de falhas deste pro- ducto, possui direitos legais relativamente ao vendedor do producto. Os seus direitos legais não estão limitados pela garantia representada de seguida.
  • Seite 76 Com a troca do aparelho, de acordo com DL 67/2003, o tempo de garantia se inicia novamente. 76 PT...
  • Seite 77 Introduction ........Page 78 Intended use ........Page 78 Description of parts ......Page 78 Technical data .........Page 79 Scope of delivery ......Page 79 Safety instructions ....Page 80 General safety information .....Page 80 Information regarding inaccurate measurement results ......Page 82 Safety instructions for batteries / rechargeable batteries...Page 83 Preparing for use ......Page 85...
  • Seite 78: Introduction

    Multi-Purpose Detector Introduction We congratulate you on the purchase of your new product. You have chosen a high quality product. The instructions for use are part of the product. They contain important information concerning safety, use and disposal. Before using the prod- uct, please familiarise yourself with all of the safety information and instructions for use.
  • Seite 79: Technical Data

    + / =-button Battery compartment PUSH button Laser beam opening Ultrasonic sender / receiver Folding slot Technical data Ultrasonic distance measurement Detects: Wood, AC wires, metal Laser class: Max. power output (P ): < 1 mW Wave length: 635–660 nm Power supply: 9 V block battery...
  • Seite 80: Safety Instructions

    Safety instructions General safety information This product can be used by children aged from 8 years and above and persons with reduced physical, sensory or mental capabilities or lack of ex- perience and knowledge if they have been given supervision or instruction concerning use of the product in a safe way and understand the hazards involved.
  • Seite 81 CAUTION! Never open the product casing. This can result in injury and damage to the product. Repairs must only be carried out by a qualified electrician. The product contains a class 2 laser. Never point the product at yourself, other persons or animals. Never look into the laser beam.
  • Seite 82: Information Regarding Inaccurate Measurement Results

    Do not use the product as a replace- ment voltmeter. Exercise caution with studs. These are sharp and can cause injury. WARNING! Be careful when pressing the stud buttons . The sharp needles can cause injury (see Fig. E). Information regarding inaccurate measurement results Please note that inaccurate measure-...
  • Seite 83: Safety Instructions For Batteries / Rechargeable Batteries

    pipes made of plastic or other non- metallic materials with this product. Safety instructions for batteries / rechargeable batteries DANGER TO LIFE! Keep batteries / rechargeable batteries out of reach of children. If accidentally swallowed seek immediate medical attention. DANGER OF EXPLO- SION! Never recharge non-rechargeable batteries.
  • Seite 84 WEAR PROTECTIVE GLOVES! Leaked or damaged batteries / rechargeable batteries can cause burns on contact with the skin. Wear suitable protective gloves at all times if such an event occurs. In the event of a leakage of batteries / rechargeable batteries, immediately remove them from the product to pre- vent damage.
  • Seite 85: Preparing For Use

    Preparing for use Inserting / replacing the battery Note: Remove the foil from battery be- fore inserting into battery compartment Open the battery compartment on the back of the product. Remove the spent battery, if necessary. Insert a new 9 V block battery into the battery compartment.
  • Seite 86 The product calculates the measured length (see Fig. F) from the travel time of the ultrasonic signal. In order to guarantee an exact measure- ment, the following conditions should be maintained (see Fig. F): - Make sure that the product is always directed at a right angle towards a flat surfaced wall (see Fig.
  • Seite 87: Steps To Do Distance Measurement

    Steps to do distance measurement 1. Slide the function switch “DISTANCE“. The display switches itself on. You can switch between meter and feet. To switch between meter and feet, press and hold the MODE button Then press the READ button release both buttons simultaneously.
  • Seite 88: Addition Of Distances

    stand between the marked lines. (see Fig. F). 2. Press the READ button . The meas- ured distance will be appeared on the display When you hold the READ button pressed down and slowly move the product over the surface to be meas- ured, the product will continuously measure the distances.
  • Seite 89: Measuring Surface Areas

    Measuring surface areas 1. Slide the function switch to the position “DISTANCE“. The display is turned on. 2. Press the MODE button once. The message “L“ (length) appears in the display. 3. Press the READ button to measure the length. The measured length ap- pears in the upper row of the display and the message “W“...
  • Seite 90: Measuring Volumes

    8. Repeat steps 2 to 7 to add further measurements. 9. Press the MODE button to leave the addition mode. All the measure- ments will be deleted. Measuring volumes 1. Slide the function switch to the position “DISTANCE“. The display is turned on.
  • Seite 91: Locating Concealed Objects

    3. Press the MODE button . The product is now ready for the second measurement. 4. Measure the next volume. 5. Press the + / = button . The mes- sage “+“ appears in the display. 6. Press the RM button .
  • Seite 92 - If you calibrate too closely to the object or directly on the object, the calibration can fail. If the calibration fails, the LC display shows the full intensity and a long beeping tone sounds or can’t search any object in the wall. - Move and hold the device several cen- timeters further to the right or left of the previous surface and recalibrate.
  • Seite 93 may signal a finding, before it is over the material. In this case mark the start and end of the signalled area at the indentation of the measuring head. The middle of the sought object lies in the middle between the two markings. - Please note that metal objects are located more readily the easier they can be magnetized.
  • Seite 94: Locating Wooden Objects

    wall thickness. Continue to keep the PUSH button pressed down. 5. Move slowly along the wall with the appliance. As the arrows in the display move closer to the center of the display, you are getting closer to the concealed object.
  • Seite 95: Laser Marking

    Laser marking The product contains a Class 2 laser. NEVER direct the laser beam at people or animals. NEVER look directly into the laser. The laser can cause serious eye damage. Use the laser marking function to align pictures, cupboards, and other things, vertically or horizontally.
  • Seite 96: Troubleshooting

    can be unfolded (see Fig K). It is to be noted that both stud nails cannot be used while folding slot is unfolded. Ensure to fold back the folding slot after usage. Vertical laser line 1. Attach a thread to the eye at the measuring point 2.
  • Seite 97: Cleaning And Care

    Cleaning and care Under no circumstances should you use liquids or detergents, as these will damage the product. Only clean the outside of the product with a soft, slightly damp cloth. Disposal The packaging is made entirely of recy- clable materials, which you may dispose of at local recycling facilities.
  • Seite 98: Warranty

    the household waste. Information on col- lection points and their opening hours can be obtained from your local authority. Faulty or used batteries / rechargeable batteries must be recycled in accordance with Directive 2006/66/EC and its amendments. Please return the batteries / rechargeable batteries and / or the product to the available collection points.
  • Seite 99 legal rights are not limited in any way by our warranty detailed below. The warranty for this product is 3 years from the date of purchase. Should this product show any fault in materials or manufacture within 3 years from the date of purchase, we will repair or replace it –...
  • Seite 100 Einleitung ........Seite 101 Bestimmungsgemäßer Gebrauch ... Seite 101 Teilebeschreibung ......Seite 101 Technische Daten......Seite 102 Lieferumfang ......... Seite 102 Sicherheitshinweise ....Seite 103 Allgemeine Sicherheitshinweise ... Seite 103 Hinweise zu ungenauen Messergebnissen ......Seite 105 Sicherheitshinweise für Batterien / Akkus ......Seite 106 Inbetriebnahme ......
  • Seite 101: Einleitung

    Multifunktionsdetektor Einleitung Wir beglückwünschen Sie zum Kauf Ihres neuen Produkts. Sie haben sich damit für ein hochwertiges Produkt entschieden. Die Bedienungsanleitung ist Teil dieses Produkts. Sie enthält wichtige Hinweise für Sicherheit, Gebrauch und Entsorgung. Machen Sie sich vor der Benutzung des Produkts mit allen Bedien- und Sicher- heitshinweisen vertraut.
  • Seite 102: Technische Daten

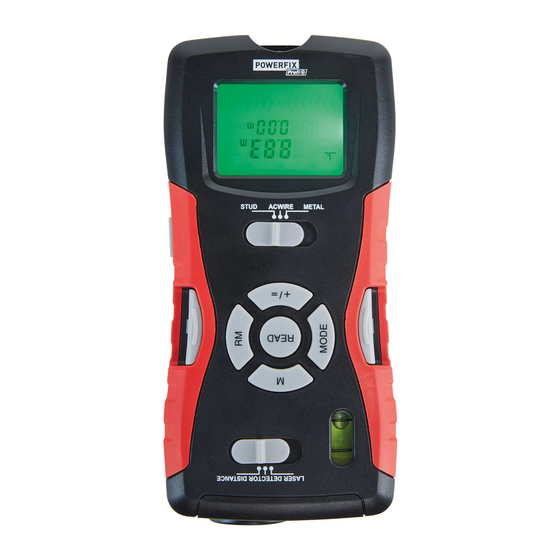
    Funktionsschalter LASER / DETECTOR / DISTANCE (Laser / Detektor / Entfernung) RM-Taste (Speicher lesen) Haltenadel-Taste + / =-Taste Batteriefach PUSH-Taste (Drücken) Laserstrahlöffnung Ultraschall-Sender / Empfänger Klapphalter Technische Daten Entfernungsmessung mittels Ultraschall Aufspüren von: Holz, Strom- leitungen, Metall Laserklasse: Max. Ausgangsleistung <...
  • Seite 103: Sicherheitshinweise

    Sicherheitshinweise Allgemeine Sicherheitshinweise Dieses Produkt kann von Kindern ab 8 Jahren und darüber sowie von Personen mit verringerten physischen, sensorischen oder mentalen Fähigkeiten oder Mangel an Erfahrung und Wissen benutzt werden, wenn sie beaufsichtigt oder bezüglich des sicheren Gebrauchs des Produkts unterwiesen wurden und die daraus resultierenden Gefahren verstehen.
  • Seite 104 kann die Funktion von lebenserhal- tenden Systemen beeinflussen. Kontrollieren Sie das Produkt vor der Inbetriebnahme auf Beschädigungen. Nehmen Sie ein beschädigtes Produkt nicht in Betrieb. VORSICHT! Öffnen Sie niemals das Gehäuse des Produktes. Verletzungen und Beschädigungen des Produktes können die Folge sein. Lassen Sie Reparaturen nur von einer Elektro- fachkraft durchführen.
  • Seite 105: Hinweise Zu Ungenauen Messergebnissen

    Für Unfälle, die durch die unsachge- mäße Handhabung und Nichtbeach- tung dieser Sicherheitshinweise entstehen können, wird keinerlei Verantwortung übernommen. Öffnen Sie nicht das Gehäuse. Die Garantie erlischt bei Fremdeingriff. Ihr Produkt verlangt keine besondere Wartung. Verwenden Sie das Produkt nicht, um Wechselspannung in freiliegenden oder nicht isolierten Leitungen festzu- stellen.
  • Seite 106: Sicherheitshinweise Für Batterien / Akkus

    – schwache Batterie – tiefliegende Leitungen oder Rohre – abgeschirmte Stromleitungen – dicke Wände mit dünnen Rohren oder Leitungen – metallverkleidete Wände – sehr feuchte Bedingungen Mit diesem Produkt können Sie keine Leitungen in Stromkreisen aufspüren, – die von der Netzspannungsversor- gung isoliert sind.
  • Seite 107: Risiko Des Auslaufens Von Batterien / Akkus

    Werfen Sie Batterien / Akkus niemals in Feuer oder Wasser. Setzen Sie Batterien / Akkus keiner mechanischen Belastung aus. Risiko des Auslaufens von Batterien / Akkus Vermeiden Sie extreme Bedingungen und Temperaturen, die auf Batterien / Akkus einwirken können z. B. auf Heizkörpern / direkte Sonnenein- strahlung.
  • Seite 108: Risiko Der Beschädigung Des Produkts

    Risiko der Beschädigung des Produkts Verwenden Sie ausschließlich den angegebenen Batterietyp / Akkutyp! Setzen Sie Batterien / Akkus gemäß der Polaritätskennzeichnung (+) und (-) an Batterie / Akku und des Produkts ein. Reinigen Sie Kontakte an Batterie / Akku und im Batteriefach vor dem Einlegen! Entfernen Sie erschöpfte Batterien / Akkus umgehend aus dem Produkt.
  • Seite 109: Gebrauch

    Hinweis: Wenn das Batteriesymbol im Display angezeigt wird, wechseln Sie die Batterie gegen eine neue aus. Mit einer schwachen Batterie erhalten Sie un- genaue oder falsche Messergebnisse. Gebrauch Hinweise für die Entfernungsmessung Um Messfehler zu vermeiden, beachten Sie die folgenden Hinweise: Die Messung erfolgt mit Ultraschall, der sich kegelförmig vom Sender / Empfänger fortbewegt.
  • Seite 110: Messen Von Entfernungen

    bei einer Länge von 16 m etwa 6 m breit sein (siehe Abb. F). - Die Zielfläche muss eine glatte Oberfläche haben, damit der Schall gut reflektiert werden kann. Durchsichtige Flächen wie Glas reflektieren in der Regel den Schall. - Die Batterie darf nicht leer sein. Eine leere Batterie wird im Display durch das Batteriesymbol...
  • Seite 111: Addieren Von Entfernungen

    muss zwischen 0,6 m und 16 m lang sein (siehe Abb. F). - Stellen Sie sicher, dass vor jeder Messung keine „Err“-Meldung auf dem Display angezeigt wird. Die Meldung „Err“ kann immer durch kurzes Drücken der MODE-Taste gelöscht werden. Wenn die Meldung „Err“...
  • Seite 112: Messen Von Flächen

    2. Drücken Sie die + / =-Taste . Im Display erscheint die Anzeige „+“ und in der Zeile darunter die gemessene Entfernung. 3. Messen Sie die nächste Entfernung. Die neu gemessene Entfernung wird in der oberen Zeile des Displays an- gezeigt.
  • Seite 113: Addieren Von Flächen

    Addieren von Flächen 1. Messen Sie eine Fläche wie in Kapitel „Messen von Flächen“ beschrieben. 2. Drücken Sie die M-Taste . Im Dis- play erscheint die Anzeige „M+“. Die gemessene Fläche ist gespeichert. 3. Drücken Sie die MODE-Taste Das Produkt ist nun bereit für die zweite Messung.
  • Seite 114: Addieren Von Volumen

    gemessene Länge und die Anzeige „W“ (Breite) beginnt zu blinken. 4. Drücken Sie die READ-Taste, um die Breite zu messen. In der oberen Zeile des Displays erscheint die gemessene Breite und die Anzeige „H“ (Höhe) beginnt zu blinken. 5. Drücken Sie die READ-Taste, um die Höhe zu messen.
  • Seite 115: Aufspüren Von Verdeckten Objekten

    9. Drücken Sie die MODE-Taste, um den Additions-Modus zu verlassen. Alle gemessenen Werte werden gelöscht. Aufspüren von verdeckten Objekten Hinweis: Testen Sie das Produkt vor dem ersten Gebrauch an einem Metall- rohr oder einer Stromleitung, dessen / deren Position Sie genau kennen. Fragen Sie im Zweifelsfall immer einen qualifizierten Experten.
  • Seite 116 - Abhängig von der Beschaffenheit der untersuchten Wand kann es zu Fehlmes- sungen kommen. Prüfen Sie deswegen vor jeder Messung die Position eines bekannten Holz- oder Metall-Trägers, eines bekannten Hohlraums oder einer bekannten Stromleitung. Wenn diese von dem Gerät nicht erkannt werden, ist der Untergrund zur Suche mit diesem Gerät nicht geeignet.
  • Seite 117 - Beachten Sie, dass metallene Objekte umso besser geortet werden, je leichter sie magnetisierbar sind. So wird Eisen in einem wesentlich größeren Abstand erkannt als beispielsweise Kupfer. - Beachten Sie, dass Stromleitungen nur als solche erkannt werden können, wenn sie Spannung führen. So müssen Licht- schalter immer eingeschaltet sein, damit der von ihnen abgehende Leiter Spannung führt.
  • Seite 118: Aufspüren Von Holzobjekten

    Intensitätsanzeige zu. Befindet sich der Detektor genau über dem gesuchten Objekt, berühren sich die Balken und es ertönt ein durchgehender Signalton (siehe Abb. D + I). 6. Wiederholen Sie nun den Vorgang, aber nähern Sie sich diesmal dem Objekt von den anderen Seite. Sobald der Signalton ertönt, markieren Sie diese Position (siehe Abb.
  • Seite 119: Lasermarkierung

    Lasermarkierung Das Produkt enthält einen Laser der Klasse 2. Richten Sie den Laserstrahl niemals auf Personen oder Tiere. Blicken Sie nie direkt in den Laserstrahl. Der Laser kann schwere Augenschäden verur- sachen. Benutzen Sie die Lasermarkierung, um Bilder, Schränke o. ä. senkrecht oder waagerecht auszurichten.
  • Seite 120: Fehler Beheben

    Wänden mit einer weichen Oberfläche (zum Beispiel Holz). Hinweis: Falls an der projizierten waagerechten Laserlinie eine leichte Winkeleinstellung erforderlich ist, kann der Klapphalter genutzt werden (siehe Abb. K). Es ist zu beachten, dass beide Haltenadeln nicht verwendet werden können, während der Klapp- halter ausgeklappt ist.
  • Seite 121: Reinigung Und Pflege

    sie erneut ein. Gehen Sie hierzu ge- mäß dem Kapitel „Batterie einsetzen / wechseln” vor. Reinigung und Pflege Verwenden Sie in keinem Fall Flüssig- keiten und keine Reinigungsmittel, da diese das Produkt beschädigen. Reinigen Sie das Produkt nur äußerlich mit einem weichen, leicht angefeuch- teten Tuch.
  • Seite 122: Garantie

    Werfen Sie Ihr Produkt, wenn es ausgedient hat, im Interesse des Umweltschutzes nicht in den Hausmüll, sondern führen Sie es einer fach- gerechten Entsorgung zu. Über Sammel- stellen und deren Öffnungszeiten können Sie sich bei Ihrer zuständigen Verwaltung informieren. Defekte oder verbrauchte Batterien / Akkus müssen gemäß...
  • Seite 123 Anlieferung gewissenhaft geprüft. Im Falle von Mängeln dieses Produkts stehen Ihnen gegen den Verkäufer des Produkts gesetz- liche Rechte zu. Diese gesetzlichen Rechte werden durch unsere im Folgenden dar- gestellte Garantie nicht eingeschränkt. Sie erhalten auf dieses Produkt 3 Jahre Garantie ab Kaufdatum.
  • Seite 124 mín./min. 0,6 m Pared/ máx./max. 16 m Parete Pared/ Parete...
  • Seite 126 OWIM GmbH & Co. KG Stiftsbergstraße 1 DE-74167 Neckarsulm GERMANY Model-No.: HG02404 Version: 03 / 2018 Estado de las informaciones · Versione delle informazioni · Estado das informações · Last Information Update Stand der Informationen: 02 / 2018 Ident.-No.: HG02404022018-5...

Inhaltsverzeichnis