Inhaltsverzeichnis
Werbung
Verfügbare Sprachen
Verfügbare Sprachen
Quicklinks
Werbung
Kapitel
Inhaltsverzeichnis
Fehlerbehebung

Verwandte Anleitungen für LIVARNOLUX HG04243A


Inhaltszusammenfassung für LIVARNOLUX HG04243A
- Seite 1 LÁMPARA SOLAR LED DE JARDÍN LÁMPARA SOLAR LED DE JARDÍN Instrucciones de montaje, de uso y de seguridad LED SOLAR GARDEN LIGHT Assembly, operating and safety instructions SOLAR-GARTENLEUCHTE LED Montage-, Bedienungs- und Sicherheitshinweise IAN 310325...
- Seite 2 Instrucciones de montaje, de uso y de seguridad Página GB / MT Assembly, operating and safety instructions Page DE / AT / CH Montage-, Bedienungs- und Sicherheitshinweise Seite...
- Seite 3 HG04243A / C HG04243B / D HG04243A / C HG04243B / D HG04243A / C HG04243B / D HG04243A / C HG04243B / D...
-
Seite 5: Inhaltsverzeichnis
Leyenda de pictogramas utilizados ...Página Introducción ............Página Uso adecuado ..............Página Descripción de las piezas ..........Página Características técnicas ..........Página Volumen de suministro ..........Página Indicaciones generales de seguridad ............Página Indicaciones de seguridad sobre las pilas / baterías ...Página Función ................Página 10 Antes de la puesta en funcionamiento ......Página 10 Cargar batería ..............Página 10 Instalación ..............Página 11 Instalar el producto... -
Seite 6: Leyenda De Pictogramas Utilizados
Leyenda de pictogramas utilizados Corriente continua Protección contra salpicaduras de agua Alcance del sensor de movimiento: aprox. 5 m Ángulo de alcance del sensor de movimiento: aprox. 100 º La luz de orientación ofrece hasta 6 horas de iluminación con carga completa. Pilas incluidas Duración del LED Lámpara solar LED de jardín... -
Seite 7: Uso Adecuado
Uso adecuado Este producto ha sido diseñado para ser utilizado en exteriores. El producto está pensado únicamente para uso privado y no para uso comercial ni para cualquier aplicación distinta. Este producto no es apto para la iluminación de espacios domésticos. Este producto está... -
Seite 8: Volumen De Suministro
Volumen de suministro 1 unidad principal 1 piqueta 1 batería de iones de litio 1 manual de instrucciones de del tipo 18650, 3,7 V montaje y manejo 1300 mAh (ya instalada) Indicaciones generales de seguridad ¡FAMILIARÍCESE CON TODAS LAS INSTRUCCIONES DE USO Y SEGURIDAD ANTES DE UTILIZAR ESTE PRODUCTO! ¡AD- JUNTE IGUALMENTE TODA LA DOCUMENTACIÓN EN CASO DE ENTREGAR EL PRODUCTO A TERCEROS! -
Seite 9: Indicaciones De Seguridad Sobre Las Pilas / Baterías
Los LED no son reemplazables. Si las bombillas LED llegan al final de su vida útil, deberá reemplazar todo el producto. Indicaciones de seguridad sobre las pilas / baterías ¡PELIGRO DE MUERTE! Mantenga las pilas / baterías fuera del alcance de los niños. ¡En caso de ingestión, acuda inme- diatamente a un médico! ¡PELIGRO DE EXPLOSIÓN! No recargue nunca pilas no recargables. -
Seite 10: Función
Utilice únicamente pilas / baterías del mismo tipo. ¡No mezcle pilas / baterías usadas con nuevas! Retire las pilas / baterías del producto si no va a utilizarlo durante un período de tiempo prolongado. Riesgo de daño del producto ¡Utilice exclusivamente el tipo de pila / batería indicado! Introduzca las pilas / baterías teniendo en cuenta la polaridad marcada con (+) y (-) tanto en las pilas / baterías como en el producto. -
Seite 11: Instalación
punto de venta puede perder algo de carga. Por lo tanto, cargue completamente la batería antes de utilizarla por primera vez. Coloque el interruptor ON / OFF en posición „ON”. La duración de carga de la batería al usar la placa solar depende de la intensidad de la radiación solar y el ángulo de incidencia de los rayos solares en la placa solar . -
Seite 12: Instalar El Producto
Instalar el producto Monte el producto tal como se muestra en las ilustraciones A, E: 1. Gire la carcasa de la placa solar en sentido contrario al de las agujas del reloj y sáquela de la pantalla de la lámpara (ver fig. -
Seite 13: Cambiar Batería
Cambiar batería Nota: Limpie regularmente el sensor y la placa solar para garan- tizar el perfecto funcionamiento de la placa solar (ver „Limpieza y cuidados”). Proceda como se indica a continuación para cambiar la batería: Coloque el interruptor ON / OFF en posición „OFF”. -
Seite 14: Limpieza Y Cuidados
Si debido a las condiciones climatológicas la luz no incide durante el suficiente tiempo, cargue la batería con un cargador externo o cámbiela (ver „Cambiar batería”). Limpieza y cuidados Apague el producto antes de limpiarlo. Utilice un paño sin pelusas ligeramente humedecido y un producto de limpieza suave. -
Seite 15: Eliminación
Problema Causa Solución La batería se La placa solar Limpiar la placa descarga muy solar está sucia. rápido. Reorientar la placa La placa solar solar (ver „Mon- está mal orientada. taje“) Condiciones meteo- Ver „Uso en invierno“ rológicas desfavo- rables La batería está... -
Seite 16: Garantía
Para obtener información sobre las posibilidades de desecho del producto al final de su vida útil, acuda a la administración de su comunidad o ciudad. Para proteger el medio ambiente no tire el producto junto con la basura doméstica cuando ya no le sea útil. Deséchelo en un contenedor de reciclaje. - Seite 17 Este producto dispone de una garantía de 3 años desde la fecha de compra. El plazo de garantía comienza a partir de la fecha de compra. Por favor, conserve adecuadamente el justificante de compra original. Este documento se requerirá como prueba de que se realizó...
- Seite 18 List of pictograms used ........Page 19 Introduction ..............Page 19 Intended use ..............Page 20 Parts description ............... Page 20 Technical data ..............Page 20 Scope of delivery ............. Page 20 General safety instructions ......Page 21 Safety instructions for batteries / rechargeable batteries ... Page 21 Function ................
-
Seite 19: List Of Pictograms Used
List of pictograms used Direct current Splashproof Motion detector range: approx. 5 m Coverage angle of motion detector: approx. 100 ° Orientation light provide up to 6 hours run time when fully charged. Batteries included LED lifespan LED solar garden light Introduction We congratulate you on the purchase of your new product. -
Seite 20: Intended Use
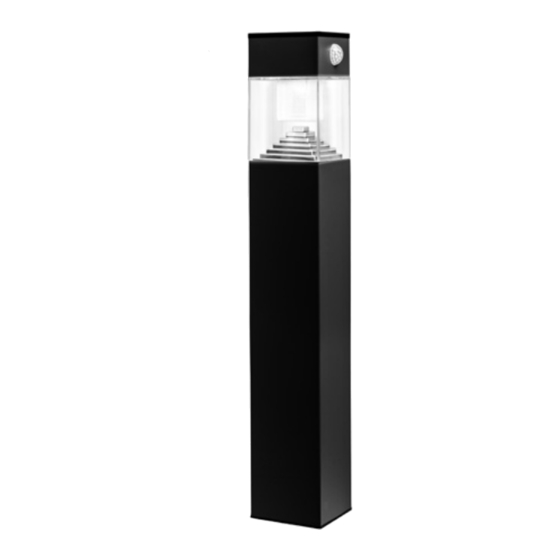
Intended use The product is intended for outdoor use. The product is intended for private use only and is not suitable for commercial use or for use in other applications. Not suitable for household room illumination. This product is suitable for extreme temperatures up to -21 °C. Parts description ON / OFF switch Fastening screw... -
Seite 21: General Safety Instructions
General safety instructions BEFORE USING THE PRODUCT, PLEASE FAMILIARISE YOURSELF WITH ALL OF THE SAFETY INFORMATION AND INSTRUC- TIONS FOR USE! WHEN PASSING THIS PRODUCT ON TO OTHERS, PLEASE ALSO INCLUDE ALL THE DOCUMENTS! This product may be used by children age 8 years and up, as well as by persons with reduced physical, sensory or mental capacities, or lacking experience and / or knowledge, so long as they are supervised or instructed in the safe use of the prod-... - Seite 22 DANGER OF EXPLOSION! Never recharge non- rechargeable batteries. Do not short-circuit batteries / rechargeable batteries and / or open them. Over- heating, fire or bursting can be the result. Never throw batteries / rechargeable batteries into fire or water. Do not exert mechanical loads to batteries / rechargeable batteries.
-
Seite 23: Function
Clean the contacts on the battery / rechargeable battery and in the battery compartment before inserting! Remove exhausted batteries / rechargeable batteries from the product immediately. Function The solar cell converts energy from sunlight into electricity. It charges the rechargeable battery installed in the battery com- partment . -
Seite 24: Preparing For Use
the rechargeable battery if the light output does not improve after charging (see “Replacing the rechargeable battery“). Preparing for use Note: The solar cell also works as a twilight sensor, while the motion sensor only responds to movement. The “ON“ position for the ON / OFF switch features the following functions: If the orientation light is constantly lit up, it will automatically switch... -
Seite 25: Setting Up The Product
6. Insert the ground spike into the base with the tip facing downwards (see Fig. E). 7. Your product is ready for use. Setting up the product Insert the assembled product far enough into the ground (lawn, flower bed) for it to be stable. Make sure you keep proper footing and balance at all times. -
Seite 26: Winter-Time Use
Close the battery compartment lid by tighten the fastening screws again (see Fig. C). Note: Ensure that you tighten the screws, otherwise, water could get into the battery compartment and damage the rechargeable battery or the product. Return the ON / OFF switch to the position “ON“, and connect the solar cell housing again to the lamp shade... -
Seite 27: Troubleshooting
Troubleshooting Problem Cause Solution The product does Set ON / OFF switch Switch set to not switch on. to “ON” position. “OFF“ position. Dirty sensor Clean sensor The rechargeable Charge the rechargea- battery ble battery using drained. an external charging device. -
Seite 28: Disposal
Disposal The packaging is made entirely of recyclable materials, which you may dispose of at local recycling facilities. Observe the marking of the packaging materials for waste separation, which are marked with abbreviations (a) and numbers (b) with following meaning: 1–7: plas- tics / 20–22: paper and fibreboard / 80–98: composite materials. -
Seite 29: Warranty
Batteries / rechargeable batteries may not be disposed of with the usual domestic waste. They may contain toxic heavy metals and are subject to hazardous waste treatment rules and regulations. The chemical symbols for heavy metals are as follows: Cd = cad- mium, Hg = mercury, Pb = lead. - Seite 30 Legende der verwendeten Piktogramme ............Seite 31 Einleitung ..............Seite 31 Bestimmungsgemäße Verwendung ......... Seite 32 Teilebeschreibung ............Seite 32 Technische Daten ............. Seite 32 Lieferumfang ..............Seite 32 Allgemeine Sicherheitshinweise ....Seite 33 Sicherheitshinweise für Batterien / Akkus ......Seite 34 Funktion .................
-
Seite 31: Legende Der Verwendeten Piktogramme
Legende der verwendeten Piktogramme Gleichstrom Spritzwassergeschützt Erfassungsbereich des Bewegungsmelders: ca. 5 m Erfassungswinkel des Bewegungsmelders: ca. 100 ° Orientierungslicht bietet bis zu 6 Stunden Laufzeit bei voller Ladung. Batterien inklusive LED-Lebensdauer Solar-Gartenleuchte LED Einleitung Wir beglückwünschen Sie zum Kauf Ihres neuen Produkts. Sie haben sich damit für ein hochwertiges Produkt entschieden. -
Seite 32: Bestimmungsgemäße Verwendung
Bestimmungsgemäße Verwendung Das Produkt ist zur Anwendung im Außenbereich bestimmt. Das Produkt ist nur für den privaten Gebrauch und nicht für den gewerblichen Einsatz geeignet oder zur Verwendung in anderen Anwendungen vorgesehen. Dieses Produkt ist nicht zur Raum beleuchtung im Haushalt geeignet. Dieses Produkt eignet sich für extreme Temperaturen bis -21 °C. -
Seite 33: Allgemeine Sicherheitshinweise
Allgemeine Sicherheitshinweise MACHEN SIE SICH VOR DER ERSTEN BENUTZUNG DES PRO- DUKTS MIT ALLEN BEDIEN- UND SICHERHEITSHINWEISEN VERTRAUT! HÄNDIGEN SIE ALLE UNTERLAGEN BEI WEITER- GABE DES PRODUKTS AN DRITTE EBENFALLS MIT AUS! Dieses Produkt kann von Kindern ab 8 Jahren und darüber so- wie von Personen mit verringerten physischen, sensorischen oder mentalen Fähigkeiten oder Mangel an Erfahrung und Wissen benutzt werden, wenn sie beaufsichtigt oder bezüglich des siche-... -
Seite 34: Sicherheitshinweise Für Batterien / Akkus
Sicherheitshinweise für Batterien / Akkus LEBENSGEFAHR! Halten Sie Batterien / Akkus außer Reich- weite von Kindern. Suchen Sie im Falle eines Verschluckens sofort einen Arzt auf! EXPLOSIONSGEFAHR! Laden Sie nicht auflad- bare Batterien niemals wieder auf. Schließen Sie Batterien / Akkus nicht kurz und / oder öffnen Sie diese nicht. -
Seite 35: Risiko Der Beschädigung Des Produkts
Risiko der Beschädigung des Produkts Verwenden Sie ausschließlich den angegebenen Batterietyp / Akkutyp! Setzen Sie Batterien / Akkus gemäß der Polaritätskennzeich- nung (+) und (-) an Batterie / Akku und des Produkts ein. Reinigen Sie Kontakte an Batterie / Akku und im Akkufach vor dem Einlegen! Entfernen Sie erschöpfte Batterien / Akkus umgehend aus dem Produkt. -
Seite 36: Inbetriebnahme
dem Einfallwinkel des Lichts auf die Solarzelle . Stellen Sie die Solarzelle möglichst senkrecht zum Lichteinfallwinkel auf. So erhalten Sie die höchste Strahlungsintensität. Tauschen Sie den Akku aus, wenn sich die Leuchtleistung nach der Auf- ladung nicht verbessert hat (siehe „Akku wechseln“). Inbetriebnahme Hinweis: Die Solarzelle funktioniert auch als Dämmerungs-... -
Seite 37: Produkt Aufstellen
4. Nehmen Sie den Sockel mit dem Erdspieß heraus, der sich im Leuchtenkörper befindet. 5. Setzen Sie den Sockel in den Boden des Leuchtenkörpers ein. 6. Stecken Sie den Erdspieß so in den Sockel , dass die Spitze nach unten weist (siehe Abb. E). 7. -
Seite 38: Winterbetrieb
Kabel nicht zu beschädigen. Verwenden Sie nur einen Akku des empfohlenen Typs (siehe „Technische Daten“). Achten Sie beim Einsetzen auf die richtige Polarität. Diese wird im Akkufach angezeigt (siehe Abb. D). Schließen Sie die Akkufachabdeckung , indem Sie die Befestigungsschrauben wieder eindrehen (siehe Abb. -
Seite 39: Fehlerbehebung
Halten Sie insbesondere die Solarzelle im Winter schnee- und eisfrei. Fehlerbehebung Problem Ursache Lösung Das Produkt ON- / OFF-Schalter ON- / OFF-Schalter schaltet nicht ein. ist auf „OFF“- auf „ON“-Position Position. stellen. Sensor Sensor reinigen. verschmutzt. Akku ist leer. Akku mittels eines externen Ladegeräts aufladen. -
Seite 40: Entsorgung
Entsorgung Die Verpackung besteht aus umweltfreundlichen Materialien, die Sie über die örtlichen Recyclingstellen entsorgen können. Beachten Sie die Kennzeichnung der Verpackungsmate- rialien bei der Abfalltrennung, diese sind gekennzeichnet mit Abkürzungen (a) und Nummern (b) mit folgender Bedeutung: 1–7: Kunststoffe / 20–22: Papier und Pappe / 80–98: Verbundstoffe. -
Seite 41: Garantie
Batterien / Akkus dürfen nicht über den Hausmüll entsorgt werden. Sie können giftige Schwermetalle enthalten und unterliegen der Sondermüllbehandlung. Die chemischen Symbole der Schwerme- talle sind wie folgt: Cd = Cadmium, Hg = Quecksilber, Pb = Blei. Geben Sie deshalb verbrauchte Batterien / Akkus bei einer kom- munalen Sammelstelle ab. - Seite 42 DE-74167 Neckarsulm GERMANY Model-No.: HG04243A / HG04243B / HG04243C / HG04243D Version: 11 / 2018 Estado de las informaciones · Last Information Update · Stand der Informationen: 09 / 2018 · Ident.-No.: HG04243A / B / C / D092018-ES IAN 310325...