Polycom EagleEye Director Bedienungsanleitung
Setting up the
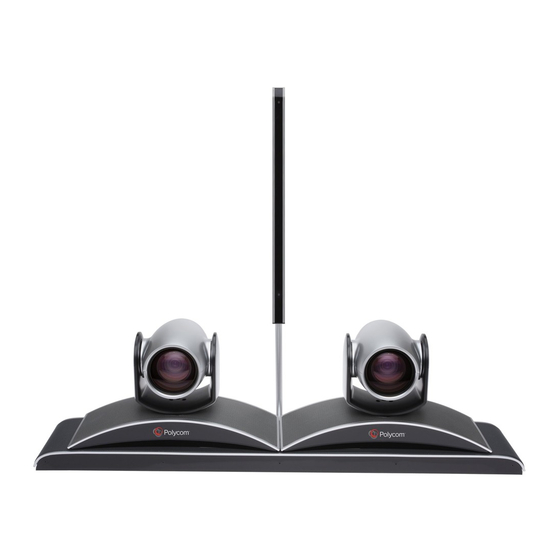
Setting up the Polycom
EagleEye
* Connect the EagleEye Director to the codec using the supplied 3m cable or an
optional 10m cable. To extend the remote camera, order the appropriate length cable.
Optional and ordered separately
DC IN 12V
1465-52748-040
2
hex key
4
Ensure that all four metal pegs are inserted
into the peg sockets in the base.
© 2014, Polycom, Inc. All rights reserved. POLYCOM® and the names and marks associated with Polycom's products are trademarks and/or
service marks of Polycom, Inc. and are registered and/or common law marks in the United States and various other countries.
®
Director
TM
DC IN 12V
1465-09241-001
3m*
O
90
www.polycom.com
August 2014
1725-69178-001/C
1
Ensure that both metal pegs are inserted
into the peg sockets in the base.

Verwandte Anleitungen für Polycom EagleEye Director


Inhaltszusammenfassung für Polycom EagleEye Director
- Seite 1 © 2014, Polycom, Inc. All rights reserved. POLYCOM® and the names and marks associated with Polycom’s products are trademarks and/or service marks of Polycom, Inc. and are registered and/or common law marks in the United States and various other countries.
- Seite 2 DC IN 12V Optional ® Polycom RealPresence Group 300/500 DC IN 12V 12V 6.25A Setting up the Polycom EagleEye Director Camera...
- Seite 3 Polycom RealPresence Group 700 DC IN 12V 100-240VAC 50/60Hz 2.3A Polycom HDX 6000 Series DC IN 12V Setting up the Polycom EagleEye Director...
- Seite 4 Polycom HDX 7000 or 8000 Series DC IN 12V Polycom HDX 9000 Series DC IN 12V VCR/DVD IOIOIO VCR/DVD 100-240VAC 50/60Hz 4A VCR/DVD VCR/DVD Polycom HDX 9001, 9002, and 9004 Polycom HDX 9006 Setting up the Polycom EagleEye Director...
- Seite 5 +9º >12 in. (0.3 m) -30º ≥12 in. (0.3 m) ≥12 in. (0.3 m) ≥12 in. (0.3 m) 5.5 - 7 ft. (1.7 - 2.1 m) < _ 50 ft. (15 m) Setting up the Polycom EagleEye Director...
- Seite 6 Setting up the Polycom EagleEye Director...
- Seite 7 En la interfaz local, diríjase a Administración > Seguimiento de cámara > Calibración. Siga las instrucciones de calibración de la pantalla. Si desea obtener más información, consulte la Guía del Administrador y la Guía del usuario de su producto, disponible en support.polycom.com. Setting up the Polycom EagleEye Director...
- Seite 8 RealPresence Group Series 4.0 verzió vagy újabb: • A helyi interfészen lépjen az Adminisztráció > Camera Tracking > kalibrálása. Kövesse a képernyőn megjelenő kalibrálási utasításokat. További információkért tekintse meg a termékhez tartozó adminisztrátori kézikönyvet és felhasználói útmutatót itt: support.polycom.com. Setting up the Polycom EagleEye Director...
- Seite 9 • В локальном интерфейсе выберите пункт Администрирование > Камеры слежения > Калибровка. Следуйте инструкциям по калибровке на экране. Для получения дополнительной информации см. Руководство администратора и Руководство пользователя для вашего продукта доступна на support.polycom.com. Setting up the Polycom EagleEye Director...
- Seite 10 • 로컬 인터페이스에서 관리 보정으로 화면의 교정 지시를 따르십시오 자세한 내용은 관리자 가이드 및 support.polycom.com 에서 제공하는 귀하의 제품에 대한 사용 설명서를 참조하 십시오 . 日本語 HDX のバージョン 3.0.1 またはそれ以降: ローカルインターフェイスから、[ システム ] > [ 管理者設定 ] > [ カメラ ] > [ カメラ設定 ] の順に選択しま...
- Seite 11 在本地介面上前往 「系統」 > 「管理設定」 > 「攝影機」 > 「攝影機的設定」 。 選取 「偵測攝影機」 。 • 在本地介面上前往 「系統」 > 「管理設定」 > 「攝影機」 > 「攝影機校正」 。 按照畫面上的校正指示進行。 RealPresence Group 系列 4.0 或更高版本: • 在本地介面上前往 「管理設定」> 「攝影機追蹤功能校正」。 按照畫面上的校正指示進行。 詳情請參閱 《管理員指南》和 《使用者指南》 ,下載網址是:support.polycom.com 。 Setting up the Polycom EagleEye Director...