Inhaltsverzeichnis
Werbung
Verfügbare Sprachen
Verfügbare Sprachen
Quicklinks
Werbung
Inhaltsverzeichnis

Verwandte Anleitungen für McQuay A08019025508


Inhaltszusammenfassung für McQuay A08019025508
- Seite 1 OPERATION MANUAL OM-WCCH-0703-McQuay Part Number: A08019025508 Date: JULY 2003 Before using your air conditioner, please read this operating manual carefully and keep it for future reference. © 2003 McQuay International OM-WCCH-0703-McQuay 11/21/05, 11:16 AM...
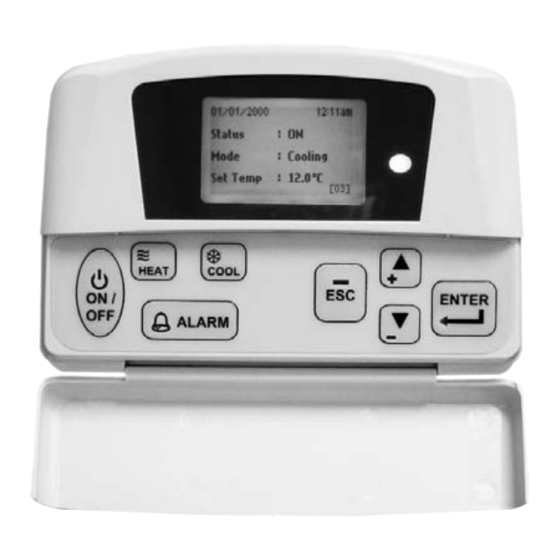
- Seite 2 A. Operating Guide 1. Upon power on of the unit, the LCD displays the main display screen 01/01/2003 12:00am Status : OFF Mode : Cooling Set Temp : 12.0°C [00] (Note: This is just an example for illustration) 2. Press the ON/OFF button for 1 second to switch on the unit if the status shows OFF. The status will display ON.
- Seite 3 B. Main Menu 1. Changes can be made to the factory setting parameter. This is done in the Main Menu. Press ENTER button to go into the Main Menu. 2. The Main Menu consists of Operation Menu, Settings Menu, Timer Menu, Alarm Menu and Display Menu.
-
Seite 4: Operation Menu
Main Menu Press ENTER to go to this menu. MAIN MENU Operation Menu Settings Menu Timer Menu Alarm Menu Display Menu There are 5 sub menus in [Main Menu]. Press 5 or ∞ to select sub menus, ENTER to enter into the sub menu or press ESC to exit to main display screen. -
Seite 5: Timer Menu
Timer Menu Select [Timer Menu] in [Main Menu] and press ENTER to go to this menu. TIMER MENU Clock Setting Date Setting Timer Schedule Timer : Disable All the timer / schedule settings are included in this menu. Press 5 or ∞ to select the required setting, ENTER to enter into the setting or press ESC to exit to [Main Menu]. -
Seite 6: Alarm Menu
Alarm Menu Select [Alarm Menu] in [Main Menu] and press ENTER to go to this menu. ALARM MENU Show Alarms Erase All Alarms This place keeps records for all previous occurred faults / alarms. User can view or clear these records. The panel can keep up to 20 faults / alarm records. Press ESC to exit to [Main Menu]. -
Seite 7: Installation
C. Installation When fastening the LCD panel to the bracket, Push to fasten the LCD panel to the bracket Step 1 Step 2 Hook the LCD panel from the bottom first When removing the LCD panel from the bracket, Remove the LCD panel Step 1 Step 2 from the top part first... -
Seite 8: Guide Des Opérations
A. Guide des Opérations 1. Quand l’unité est branchée à l’alimentation électrique, l’écran LCD affiche la page-écran principale. 01/01/2003 12:00am État : OFF Mode : Réfrigération Temp. Config. : 12.0°C [00] (Remarque : il ne s’agit que d’un exemple) 2. Appuyer sur le bouton ON/OFF pendant 1 seconde pour allumer l’unité, si l’état indiqué est OFF. -
Seite 9: Menu Principal
B. Menu Principal 1. Il est possible de modifier les paramètres saisis en usine. Cette opération doit être effectuée à partir du Menu Principal. Appuyer sur le bouton ENTER pour passer au Menu principal. 2. Le Menu principal comprend le Menu des Opérations, le Menu des Configurations, le Menu du Minuteur, le Menu des Alarmes et le Menu du Afficheur. - Seite 10 Menu Principal Appuyer sur ENTER pour accéder à ce menu. MENU PRINCIPAL Menu des Opérations Menu des Configurations Menu du Minuteur Menu des Alarmes Menu du Afficheur Cette unité dispose de 5 sous-menus dans le [Menu principal]. Appuyer sur le bouton 5 ou ∞ pour sélectionner le sous-menu voulu, appuyer sur ENTER pour accéder à...
- Seite 11 Menu Minuteur Sélectionner [Menu Minuteur] dans le [Menu Principal] et appuyer sur ENTER pour accéder à ce menu. MENU DU MINUTEUR Configuration de L’horloge Configuration de la Date Horaire du Minuteur Minuteur : Désactivé Toutes les configurations du minuteur/ de l’horaire sont incluses dans ce menu. Appuyer sur le bouton 5 ou ∞...
- Seite 12 Menu des Alarmes Sélectionner [Menu Alarmes] dans le [Menu Principal] et appuyer sur ENTER pour accéder à ce menu. MENU DES ALARMES Afficher les Alarmes Effacer toutes les Alarmes C’est là que sont enregistrés les défauts/ alarmes qui se sont produits précédemment. L’utilisateur peut voir et annuler ces enregistrements.
- Seite 13 C. Installation Pour bloquer le panneau LCD sur le support, Commencer à enlever le panneau LCD par le haut Point 1 Point 2 Pousser pour encastrer le panneau LCD sur le support Pour enlever le panneau LCD du support, Commencer à accrocher le Point 1 Point 2 panneau LCD par le bas...
- Seite 14 A. Betriebsanleitung 1. Wenn das Gerät einschaltet ist, erscheint die Hauptbildschirmmaske auf dem LCD-Display. 01/01/2003 12:00am Status : OFF Mode : Cooling Set Temp : 12.0°C [00] (Anmerkung: Hierbei handelt es sich nur um ein Beispiel zur Veranschaulichung) 2. Drücken Sie 1 Sekunde lang die Taste ON/OFF, um das ausgeschaltete Gerät mit Statusanzeige OFF einzuschalten.
- Seite 15 B. Hauptmenü (Main Menu) 1. Die vom Hersteller eingestellten Standardparameter können mit Hilfe des Hauptmenüs geändert werden. Drücken Sie die Taste ENTER (Eingabetaste), um auf das Hauptmenü zuzugreifen. 2. Das Hauptmenü besteht aus folgenden Untermenüs: Operation (Betrieb), Settings (Einstellungen), Timer, Alarm und Display. So wird das Hauptmenü...
- Seite 16 (Main Menu) Hauptmenü Drücken Sie ENTER, um auf dieses Menü zuzugreifen. MAIN MENU Operation Menu Settings Menu Timer Menu Alarm Menu Display Menu Es gibt 5 Untermenüs unter [Main Menu]. Drücken Sie 5 oder ∞, um ein Untermenü auszuwählen, drücken Sie ENTER, um das Untermenüfenster zu öffnen, oder die Taste ESC, um zur Hauptbildschirmmaske zurückzukehren.
- Seite 17 (Timer Menu) Timermenü Wählen Sie vom Hauptmenü [Main Menu] die Option [Timer Menu] und drücken Sie ENTER, um das Optionsfenster zu öffnen. TIMER MENU Clock Setting Date Setting Timer Schedule Timer : Disable Alle Timer-/ Zeitplaneinstellungen erscheinen in diesem Menü. Drücken Sie 5 oder ∞, um die gewünschte Einstellung auszuwählen, drücken Sie ENTER, um das Einstellungsfenster zu öffnen, oder die Taste ESC, um zum Hauptmenü...
- Seite 18 (Alarm Menu) Alarmmenü Wählen Sie vom Hauptmenü [Main Menu] das Alarmuntermenü [Alarm Menu] und drücken Sie ENTER, um das Untermenüfenster zu öffnen. ALARM MENU Show Alarms Erase All Alarms In dieser Funktion werden alle zuvor aufgetretenen Fehler-/ Alarmzustände aufgezeichnet. Benutzer konnen diese Aufzeichnungen anzeigen lassen oder loschen. Es können hier bis zu 20 Fehler- bzw.
- Seite 19 C. Installation Beim Befestigen der LCD-Anzeige an der Halterung, die LCD-Anzeige durch Drücken an der Halterung befestigen Schritt 1 Schritt 2 die LCD-Anzeige zunächst unten festhaken Beim Abnehmen der LCD-Anzeige von der Halterung die LCD-Anzeige zunächst Schritt 1 Schritt 2 die LCD- von oben lösen Anzeige...
- Seite 20 A. Visualizzazione Parametri 1. Quando l’unità è alimentata, il display LCD mostra la videata principale. 01/01/2003 12:00am Stato : OFF Modo : Refrigerazione Temp. Config. : 12.0°C [00] (Nota: Questo è soltanto un esempio illustrativo) 2. Premere il pulsante ON/OFF per 1 secondo per accendere l’unità, se lo stato indicato è OFF. Sarà...
-
Seite 21: Menu Principale
B. Menu Principale 1. Eventuali modifiche all’impostazione dei parametri vanno effettuate attraverso il menu principale. Premere il pulsante ENTER per passare al Menu Principale. 2. Il Menu Principale è costituito dal Menu Operazione, Menu Configurazioni, Menu Timer, Menu Allarme e Menu Display. Come si usa il Menu Principale? Passo 1 Premere ENTER per vedere i sub-menu del Menu Principale. - Seite 22 Menu Principale Premere ENTER per accedere a questo menu. MENU PRINCIPALE Menu Operazione Menu Configurazioni Menu Timer Menu Allarme Menu Display Quest’unità è dotata di 5 sub-menu nel [Menu Principale]. Premere 5 oppure ∞ per selezionare il sub-menu desiderato, premere ENTER per l’accesso a un sub-menu oppure premere ESC per uscire e tornare alla videata del Menu Principale.
-
Seite 23: Menu Timer
Menu Timer Selezionare [Menu Timer] nel [Menu Principale] e premere ENTER per accedere a questo menu. MENU DEL TIMER Impostazione Orario Impostazione Data Orario del Timer Timer: Disattivato Tutte le configurazioni relative ad orario e impostazione data, pianificazioni di funzionamento sono incluse in questo menu. -
Seite 24: Menu Allarmi
Menu Allarmi Selezionare [Menu Allarmi] nel [Menu Principale] e premere ENTER per l’accesso a questo menu. MENU ALLARMI Mostra Allarmi Cancella (Tutti) Allarmi Qui sono registrati tutti i malfuzionamenti / allarmi occorsi precedentemente. L’utilizzatore può vedere o cancellare questi record. Nel pannello è possibile memorizzare fino a 20 record di malfunzionamenti / allarmi. - Seite 25 C. Installazione / Rimozione del Pannello di Controllo Installazione del pannello LCD sul supporto, Agganciare il pannello LCD alla staffa di supporto Passo 1 Passo 2 Incastrare il pannello LCD sulla parte inferiore del supporto Rimozione del pannello LCD dal supporto, Rimuovere il pannello LCD dalla Passo 1 Passo 2...
- Seite 26 A. Guía de utilización 1. 1. Una vez encendido el acondicionador, el LCD muestra la pantalla principal 01/01/2003 12:00am Status : OFF Mode : Cooling Set Temp : 12.0°C [00] (Nota: esta pantalla es sólo un ejemplo ilustrativo) 2. Pulse el botón ON/OFF durante 1 para encender la unidad si "status" (estado) indica OFF. Cambiaráa ON.
-
Seite 27: Menú Principal
B. Menú Principal 1. Se pueden hacer cambios en los parámetros de fábrica. Esto se hace en el menú principal. Pulse el botón ENTER para acceder a este menú. 2. El menú principal está formado por el menú de operación, menú de ajustes, menú de programación, menú... - Seite 28 Menú Principal Pulse ENTER para acceder a este menú. MAIN MENU Operation Menu Settings Menu Timer Menu Alarm Menu Display Menu Hay 5 submenús en el Menú principal. Pulse 5 o ∞ para seleccionar los submenú y pulse ENTER para acceder al submenú o pulse ESC para salir a la pantalla del menú principal. Menú...
- Seite 29 Menú La Hora Seleccione [Timer Menu] en [Main Menu] y pulse ENTER para acceder a este menú. TIMER MENU Clock Setting Date Setting Timer Schedule Timer : Disable Todos los ajustes de programación se incluyen en este menú. Pulse 5 o ∞ para seleccionar el ajuste necesario y pulse ENTER para confirmar el ajuste o ESC para salir a [Main Menu].
- Seite 30 Menú de Alarmas Seleccione [Alarm Menu] en [Main Menu] y pulse ENTER para acceder a este menú. ALARM MENU Show Alarms Erase All Alarms Esta pantalla guarda todos los fallos/alarmas ocurridos previamente. El usuario puede extraer o borrar estos registros. El panel puede guardar hasta 20 registros de fallos / alarmas.
-
Seite 31: Instalación
C. Instalación Para fijar el panel LCD en el soporte, Presionar para fijar el panel LCD en el soporte Paso 1 Paso 2 En primer lugar, enganchar el panel en la parte inferior. Para retirar el panel LCD del soporte, Soltar el panel en primer Paso 1 Paso 2... - Seite 32 A. êÛÍÓ‚Ó‰ÒÚ‚Ó ÔÓ ˝ÍÒÔÎÛ‡Ú‡ˆËË 1. èÓÒΠ‚Íβ˜ÂÌËfl ·ÎÓ͇ ‚ ÒÂÚ¸ ̇ Üäà ÓÚÓ·‡Ê‡ÂÚÒfl „·‚Ì˚È ËÌÙÓχˆËÓÌÌ˚È ˝Í‡Ì 01/01/2003 12:00am ëÓÒÚÓflÌË : Çõäã êÂÊËÏ : éı·ʉÂÌË ìÒÚ. ÚÂÏÔ : 12,0ºC [00] (èËϘ‡ÌËÂ: чÌÌ˚È ÔËÏ Ô˂‰ÂÌ ÚÓθÍÓ ‰Îfl ËÎβÒÚ‡ˆËË) 2. ÖÒÎË ÔÓ͇Á‡ÌÓ ÒÓÒÚÓflÌË Çõäã, ‚Íβ˜ËÚ ·ÎÓÍ Ì‡Ê‡ÚËÂÏ ÍÌÓÔÍË Çäã/Çõäã ‚ Ú˜ÂÌË 1ÒÂÍÛ̉˚.
- Seite 33 B. É·‚ÌÓ ÏÂÌ˛ 1. ìÒÚ‡ÌÓ‚ÎÂÌÌ˚ ̇ Á‡‚Ó‰Â-ËÁ„ÓÚÓ‚ËÚÂΠÁ̇˜ÂÌËfl Ô‡‡ÏÂÚÓ‚ ÏÓÊÌÓ ËÁÏÂÌflÚ¸ ‚ É·‚ÌÓÏÏÂÌ˛. ÑÎfl ÚÓ„Ó, ˜ÚÓ·˚ ÔÂÂÈÚË ‚ „·‚ÌÓ ÏÂÌ˛, ̇ÊÏËÚ ÍÌÓÔÍÛ ÇÇéÑ. 2. É·‚ÌÓ ÏÂÌ˛ ÒÓÒÚÓËÚ ËÁ ÒÎÂ‰Û˛˘Ëı ÔÓ‰ÏÂÌ˛: ꇷÓÚ‡, 臇ÏÂÚ˚, í‡ÈÏÂ, í‚ӄ‡ Ë ÑËÒÔÎÂÈ. ä‡Í ÔÓθÁÓ‚‡Ú¸Òfl É·‚Ì˚Ï ÏÂÌ˛? ò‡„...
- Seite 34 É·‚ÌÓ ÏÂÌ˛ ÑÎfl ÔÂÂıÓ‰‡ ‚ ˝ÚÓ ÏÂÌ˛ ̇ÊÏËÚ ÇÇéÑ. ÉãÄÇçéÖ åÖçû ꇷÓÚ‡ 臇ÏÂÚ˚ í‡ÈÏ ë˄̇ÎËÁ‡ˆËfl ÑËÒÔÎÂÈ [É·‚ÌÓ ÏÂÌ˛] ÒÓ‰ÂÊËÚ 5 ÔÓ‰ÏÂÌ˛. ÑÎfl ‚˚·Ó‡ ÔÓ‰ÏÂÌ˛ ̇ÊËχÈÚ 5 ËÎË ∞, ‰Îfl ‚ıÓ‰‡ ‚ÔÓ‰ÏÂÌ˛ ̇ÊÏËÚ ÇÇéÑ, ‰Îfl ‚ÓÁ‚‡Ú‡ Í „·‚ÌÓÏÛ ˝Í‡ÌÛ – ESC. åÂÌ˛...
- Seite 35 åÂÌ˛ í‡ÈÏÂ Ç [É·‚ÌÓÏ ÏÂÌ˛] ‚˚·ÂËÚ [í‡ÈÏÂ] Ë Ì‡ÊÏËÚ ÇÇéÑ ‰Îfl ÔÂÂıÓ‰‡ ‚ ˝ÚÓ ÏÂÌ˛. íÄâåÖê ìÒÚ‡Ìӂ͇ ˜‡ÒÓ‚ ìÒÚ‡Ìӂ͇ ‰‡Ú˚ ɇÙËÍ Ú‡Èχ í‡ÈÏ : éÚÍβ˜ÂÌ Ç ‰‡ÌÌÓÏ ÏÂÌ˛ ÒÓ‰ÂʇÚÒfl ‚Ò ̇ÒÚÓÈÍË Ú‡Èχ / „‡ÙË͇ ‡·ÓÚ˚. Ç˚·ÂËÚ Ú·ÛÂÏ˚È Ô‡‡ÏÂÚ Ò ÔÓÏÓ˘¸˛ ÍÌÓÔÓÍ 5 ËÎË ∞. ÑÎfl ‚ıÓ‰‡ ‚ ÌÂ„Ó Ì‡ÊÏËÚ ÍÌÓÔÍÛ ÇÇéÑ. ÑÎfl ‚˚ıÓ‰‡‚ [É·‚ÌÓÂ...
- Seite 36 åÂÌ˛ í‚ӄ‡ Ç˚·ÂËÚ ÔÛÌÍÚ [í‚ӄ‡] ‚ [É·‚ÌÓÏ ÏÂÌ˛] Ë Ì‡ÊÏËÚ ÇÇéÑ ‰Îfl ‚ıÓ‰‡ ‚ ˝ÚÓ ÏÂÌ˛. íêÖÇéÉÄ èÓ͇Á‡Ú¸ ÚÂ‚Ó„Ë ëÚÂÂÚ¸ ‚Ò ÚÂ‚Ó„Ë ëÚÂÂÚ¸ ‚Ò ÚÂ‚Ó„Ë á‰ÂÒ¸ ı‡ÌËÚÒfl ËÌÙÓχˆËfl Ó·Ó ‚ÒÂı ̯ڇÚÌ˚ı ÒËÚÛ‡ˆËflı / Ò‡·‡Ú˚‚‡ÌËflı Ò˄̇ÎËÁ‡ˆËË, ÍÓÚÓ˚ ÔÓËÒıÓ‰ËÎË ‡ÌÂÂ. èÓθÁÓ‚‡ÚÂθ ÏÓÊÂÚ èÓθÁÓ‚‡ÚÂθ...
- Seite 37 C. ìÒÚ‡Ìӂ͇ èË ÍÂÔÎÂÌËË Üä-Ô‡ÌÂÎË Í ÍÓ̯ÚÂÈÌÛ. ë̇˜‡Î‡ Á‡ˆÂÔËÚ¸ Üä-Ô‡ÌÂθ ÒÌËÁÛ. ò‡„ 1 ò‡„ 2 ç‡Ê‡Ú¸ ‰Îfl ÙËÍÒ‡ˆËË Üä- Ô‡ÌÂÎË Í ÍÓ̯ÚÂÈÌÛ. èË ÒÌflÚËË Üä-Ô‡ÌÂÎË Ò ÍÓ̯ÚÂÈ̇. ë̇˜‡Î‡ ÒÌflÚ¸ Üä-Ô‡ÌÂθ ò‡„ 1 ò‡„ 2 Ò ‚ÂıÌÂÈ ˜‡ÒÚË ëÌflÚ¸ Üä- Ô‡ÌÂθ. 1.
- Seite 38 • В случае противоречия перевода данного руководства с другими переводами одного и того же текста, английский вариант рассматривается как приоритетный. Завод-изготовитель оставляет за собой право изменять характеристики и конструкцию в любое • время без предварительного уведомления. OM-WCCH-0703-McQuay 11/21/05, 11:16 AM...
- Seite 39 VOÂd²Ã« VO²Â OM-WCCH-0703-McQuay A08019025508 ¡e'« rÁ— ∫ JULY 2003 a¹—Uð ∫ Æq³I² LKà lłdL tÐ ÿUH²Šô«Ë W¹UMFÐ «c¼ ULOKF²Ã« VO²Â …¡«dÁ vłd¹ ¨¡«uNë WHOJÄ ‰ULF²Ý« q³Á © 2003 McQuay International OM-WCCH-0703-McQuay_AR 11/28/05, 9:47 AM...
- Seite 40 qOGA²Ã« qOÃœ Æ√ qOGA²Ã« qOÃœ Æ√ qOGA²Ã« qOÃœ Æ√ qOGA²Ã« qOÃœ Æ√ qOGA²Ã« qOÃœ Æ√ ÆWO Ozdë WLzUIë WýUý WýUý ÷dFð ¨…bŠuKà WOzUÐdNJë WÁUDë qO uð bMŽ Ʊ 12:00am 01/01/2003 Status Cooling Mode 12.0 Set Temp [00] ©`O{u²Kà ‰U¦Ä jI «c¼ ∫WEŠöÄ® Æ...
- Seite 41 WO Ozdë WLzUIë Æ» WO Ozdë WLzUIë Æ» WO Ozdë WLzUIë Æ» WO Ozdë WLzUIë Æ» WO Ozdë WLzUIë Æ» WLzUIë vë »U¼cKà —eë jG{« ÆWO Ozdë WLzUIë qš«œ «c¼ qLŽ r²¹ ÆlMB*« j³{ d²Ä—U³Ã «dOOG²Ã« qLŽ sJ1 Ʊ ENTER ÆWO Ozdë...
- Seite 42 WO Ozdë WLzUIë WO Ozdë WLzUIë WO Ozdë WLzUIë WO Ozdë WLzUIë WO Ozdë WLzUIë ÆWLzUIë Ác¼ vë »U¼cKà —eë jG{« ENTER MAIN MENU Operation Menu Settings Menu Timer Menu Alarm Menu Display Menu ‰ušbKà —eë jG{« ¨WOŽdHë rz«uIë —UO²šô «...
- Seite 43 WŠuKë —UO²š« WŠuKë —UO²š« WŠuKë —UO²š« WŠuKë —UO²š« WŠuKë —UO²š« ÆWLzUIë Ác¼ vë »U¼cKà —eë jG{«Ë › ¤ qš«œ › ¤ d²š« ENTER Main Menu Timer Menu TIMER MENU —UO²šô« —UO²šô « Ë —eë jG{« Æj³Cë vë ‰ušbKà —eë jG{« ¨»uKD*« j³Cë —UO²šô «...
- Seite 44 —«c½ô« WLzUÁ —«c½ô« WLzUÁ —«c½ô« WLzUÁ —«c½ô« WLzUÁ —«c½ô« WLzUÁ ÆWLzUIë Ác¼ vë »U¼cKà —eë jG{«Ë › ¤ qš«œ › ¤ d²š« ENTER Main Menu Alarm Menu ALARM MENU Show Alarms Erase All Alarms ÆUIÐUÝ XKBŠ w²Ã« «—«c½ô«Ø‰UDŽô« lOLł ö− Ð kH²×¹ ÊUJ*« «c¼ UIÐUÝ...
- Seite 45 VOÂd²Ã« Æà VOÂd²Ã« Æà VOÂd²Ã« Æà VOÂd²Ã« Æà VOÂd²Ã« Æà ¨WOH²Jë lÄ WŠuKë XO³¦ð bMŽ lÄ WŠuKë XO³¦²Ã l œ« WOH²Jë ≤ …uD)« ≤ …uD)« ± …uD)« ± …uD)« ≤ …uD)« ≤ …uD)« ≤ …uD)« ± …uD)« ± …uD)« ± …uD)« sÄ...
- Seite 46 …dÂcÄ MEMO(AR) 4/2/04, 1:54 PM...
- Seite 47 …dÂcÄ MEMO(AR) 4/2/04, 1:54 PM...
- Seite 48 • Æ…bzU ë w¼ W¹eOKJ½ô« W Më ÊuJð ¨X½U WGà W¹QÐ UN H½ WLłd²Ã« w ·ö²š« Í«Ë VO²Jë «c¼ dO Hð w ÷—UFð Í« ÀbŠ «–« • Æo³ Ä —UFý≈ ÊËœ sÄ XÁË Í« w UM¼ …œułuÄ UH «uÄ W¹«Ë rOLB²Ã« q¹bFð o×Ð lMB*« kH²×¹ OM-G6W-0501-McQuay_AR 11/28/05, 3:25 PM...