Barazza FEEL 1FFYPPI Datenblatt

Verwandte Anleitungen für Barazza FEEL 1FFYPPI


Inhaltszusammenfassung für Barazza FEEL 1FFYPPI
- Seite 1 Specifiche tecniche Technical Specifications Hoja de Características Folha de Características Fiche de caractéristiques Datenblatt Gegevensblad FEEL 1FFYPPI...
-
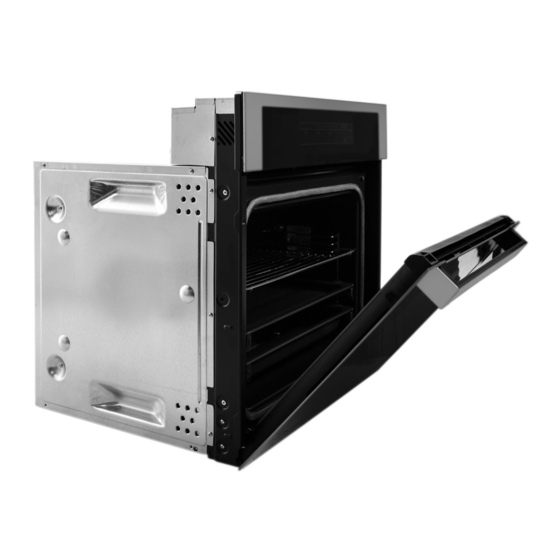
Seite 3: Pannello Di Comando
FEEL 1FFYPPI 1 Pannello di comando 2 Guarnizione 3 Resistenza del grill 4 Impugnatura per l’estrazione dei vassoi 5 Griglia 6 Guide di scorrimento 7 Vassoio per pasticce- 8 Vassoio profondo 9 Cerniera 10 Sportello 11 Uscita dell’aria di raffreddamento... -
Seite 4: Funzioni Del Forno
Funzioni del forno Attenzione Standard Durante l’uso della funzione Grill, Maxigrill o Si utilizza per dolci e torte in cui il calore MaxiGrill ventilata, lo sportello deve essere ricevuto deve essere uniforme al fine di tenuto chiuso. ottenere consistenza morbida spugnosa. - Seite 5 Raccomandazioni per scongelare gli alimenti La funzione di scongelamento è provvista di • La carne e il pesce non hanno bisogno di un sistema ad aria calda con 2 livelli, il livello essere completamente scongelati per ini- HI per la carne in generale e il livello LO per ziare la cottura.
- Seite 6 Comandi del forno Regolazione dell’orologio elettronico Attenzione Funzionamento manuale Una volta regolato l’orologio, il forno è pronto L’orologio elettronico dispone di tecnologia per essere utilizzato: Touch-Control. Per impostarlo basta toccare i simboli sul vetro con il dito. 1 Toccare il sensore di accensione La sensibilità...
- Seite 7 Illuminazione del forno 2 Selezionare il tempo dopo il quale si deside- ra che l’orologio emetta l’allarme acustico La lampadina interna del forno si accende: toccando i sensori oppure – Quando si apre la porta del forno. Dopo un 3 Saranno emessi due segnali acustici di tempo determinato in cui lo sportello del seguito, sarà...
- Seite 8 Programmazione dell’ora di fine cottura 15 Selezionare l’ora di fine cottura toccando i sensori oppure 1 Toccare più volte il sensore dell’orologio fino a quando si illumina il simbolo 16 Saranno emessi due segnali acustici di seguito, sarà visualizzata l’ora corrente e il 2 Selezionare l’ora di fine cottura toccando simbolo resterà...
- Seite 9 Per disattivare la funzione di sicurezza per Attenzione i bambini, toccare per un tempo prolungato In caso di interruzione dell’alimentazione elettri- il simbolo fino a quando viene emesso un ca, la programmazione dell’orologio elettronico segnale acustico lungo. sarà cancellata e sull’orologio sarà visualizzata l’indicazione 12:00.
- Seite 10 9 Al termine del ciclo di pulizia pirolitica, 12 Aprire lo sportello del forno e passare un sarà emesso un segnale acustico. panno umido all’interno del vano per rimuovere la cenere raccolta durante il 10 Toccare qualsiasi sensore del forno per ciclo di pulizia.
- Seite 11 PROBLEMI NEL FUNZIONAMENTO DELLA PIROLISI PROBLEMA CAUSA SOLUZIONE Gli accessori e i supporti Non sono stati rimossi prima È necessario sostituirlo dei vassoi sono danneggiati. del ciclo di pulizia pirolitica. e rimuoverli prima dei successivi cicli di pulizia. Il colore dello smalto è La composizione chimica di È...
- Seite 12 PROBLEMA CAUSA SOLUZIONE Sull’indicatore di temperatura Lo sportello non si è Toccare qualsiasi sensore (2) lampeggia il simbolo E:1 bloccato. Il blocco dello per silenziare il segnale e si sente un segnale sportello non funziona. acustico. Contattare il acustico. Il forno interrompe il Servizio di Assistenza riscaldamento.
- Seite 13 PROBLEMA CAUSA SOLUZIONE IMPORTANTE Se la temperatura interna del forno è molto alta (oltre 250 ºC), lampeggia il simbolo E4, ma senza conto alla rovescia del tempo. Occorre attendere che il forno si raffreddi perché possa iniziare il conto alla rovescia del tempo.
- Seite 14 Impugnatura per l'estrazione dei vassoi L'impugnatura per l'estrazione dei vassoi viene utilizzata quando serve spostare il vassoio per verificare lo stato della cottura. Fare riferimento ai disegni. Per maneggiare il vassoio fuori dal forno usare dei guanti protettivi. Gancio lungo Gancio corto Posizione per il vassoio per pasticceria.
- Seite 15 Sostituzione della lampadina del forno Attenzione • Sostituire la lampadina. Per sostituire la lampadina, verificare innanzi- • Rimontare la lente, verificando che si inseris- tutto che il forno sia scollegato dall’alimenta- ca nella posizione corretta. zione elettrica. • Smontare i supporti cromati allentando il dado (E).
-
Seite 16: Control Panel
FEEL 1FFYPPI 1 Control Panel 2 Oven Seal 3 Grill Element 4 Tray removing handle 5 Grid tray 6 Telescopic guides 7 Cake tray 8 Deep tray 9 Hinge 10 Triple glazed door 11 Door switch-lock 12 Air outlet 13 Cabinet Mounting... -
Seite 17: Oven Functions
Oven Functions Convencional Conventional with Fan This function is for use when baking cakes, Suitable for roasts and cakes. The fan spreads where the heat should be even to give a the heat evenly throughout the inside of the spongy texture. oven to reduce cooking time and temperature. - Seite 18 Recommendations for Defrosting Food The defrost function works by means of a • Meat and fish do not need to be completely 2-level system of hot air. HI is for meats in thawed before cooking. Condiments can be general and LO is for fish, cakes, pastries and added once the surface is soft.
- Seite 19 Oven Use Use of the electronic timer Caution Manual Operation The electronic clock features Touch-Control After setting the clock, the oven is ready for technology. To operate, simply touch the glass use: control symbols with your fingertip. 1 Press the On sensor The touch control sensitivity continuously 2 Press on the desired cooking function adapts to changing conditions.
- Seite 20 Oven Lighting 3 You will then hear two beeps, the display will show the time left before the alarm sounds The inside light will go on: and the symbol will flash slowly, – When the oven door is open. If the door is not indicating that the timer has been set.
- Seite 21 Programming the Cooking Stop Time 15 Select the cooking stop time by pressing sensors. 1 Press on the clock sensor several times until the symbol lights up. 16 This will be confirmed by two beeps. The current time will show on the display and 2 Select the cooking stop time by pressing symbol will remain lit.
- Seite 22 To turn off the child lock, keep the (16) Caution symbol pressed until a long beep sounds. In the event of power failure, your electronic clock timer settings will be erased and 12:00 will flash on the clock display. Reset the clock and programme again.
- Seite 23 9 When the pyrolytic cleaning cycle has fi - 12 Open the oven door and wipe the inside nished, you will hear an alarm. with a damp cloth, cleaning up the ash from the cleaning cycle. Areas in the oven 10 Touch any of the oven’s sensors to stop that are difficult to access will need to be the alarm.
- Seite 24 INCIDENTS WHEN OPERATING THE PYROLYTIC FUNCTION INCIDENT CAUSE SOLUCIÓN My accessories and shelf You have not removed the You must replace them and supports are damaged. accessories and supports remove them in later during the pyrolytic cleaning cleaning cycles. cycle. The enamel colour has The chemical composition This is normal and does not...
- Seite 25 INCIDENT CAUSE SOLUTION A flashing symbol E:1 The oven door has not been Touch any sensor to stop appears on the temperature locked. The door lock has the alarm. Call the Technical display (2) and an alarm not worked. Assistance Service. sounds.
- Seite 26 INCIDENT CAUSE SOLUTION IMPORTANT If the temperature inside the oven is very high (above 250 ºC), you will see that E4 flashes but the time does not start to count down. You should wait until the oven cools down, when the countdown will begin.
- Seite 27 Tray removing handle The handle for removing trays is used when you need to slide the shelf out and check what’s cooking. See drawings. To take the shelf out of the oven, use oven gloves. Position for cake tray. The short hook over the Position for deep tray.
-
Seite 28: Changing The Oven Light Bulb
Changing the oven light bulb Caution • Change the bulb. Make sure the oven is unplugged before • Reassemble the glass cover and ensure that changing the bulb. everything fits in the correct position. • Detach the chrome supports by loosening the screw (E). - Seite 29 FEEL 1FFYPPI 1 Frente de Mandos 2 Junta de Horno 3 Resistencia de Grill 4 Asa para la extracción de bandejas 5 Parrilla 6 Guías Telescópicas 7 Bandeja Pastelera 8 Bandeja Profunda 9 Bisagra 10 Puerta 11 Interruptor-bloqueo de puerta 12 Salida de aire de refrigeración...
-
Seite 30: Funciones Del Horno
Funciones del Horno Atención Convencional Durante el uso de la función Grill, Maxigrill o Se usa en bizcochos y tartas en los que el MaxiGrill Turbina puer ta debe calor recibido debe ser uniforme y para que mantenerse cerrada. consigan una textura esponjosa. Convencional con Turbina Solera Adecuado para asados y pastelería. - Seite 31 Recomendaciones para la Descongelación de Alimentos La descongelación se realiza mediante un sis- • Las carnes y pescados no necesitan estar tema de aire caliente en 2 niveles, el nivel HI totalmente descongelados para cocinarlos. para carnes en general y el nivel LO para pes- Es suficiente que la superficie esté...
- Seite 32 Manejo del Horno Manejo del reloj electrónico Atención Funcionamiento Manual Su reloj electrónico incorpora tecnología Tras poner el reloj en hora, su horno está listo Touch-Control. Para manejarlo es suficiente para cocinar: con tocar los símbolos del cristal con su dedo. 1 Toque en el sensor de Puesta en Marcha La sensibilidad del touch-control se adapta 2 Toque en el símbolo de la función de coci-...
- Seite 33 Iluminación del horno 2 Seleccione el tiempo tras el cual desea que el reloj avise, tocando los sensores ó La luz interior del horno se encenderá, 3 Posteriormente sonarán 2 beep seguidos, – Al abrir la puerta del horno. Transcurrido un se mostrará...
- Seite 34 Programación de la Hora de Finalización del 15 Seleccione la hora de finalización del coci- Cocinado nado, tocando los sensores ó 1 Toque varias veces el sensor del reloj 16 Posteriormente sonarán 2 beep seguidos, hasta que el símbolo se ilumine. se mostrará...
- Seite 35 Para desactivar la función de seguridad niños, Atención debe tocar de forma prolongada el símbolo En caso de un corte de suministro eléctrico, (16)sonando un beep prolongado. se borrará toda la programación de su reloj electrónico y aparecerá parpadeando la indi- cación 12:00 en el reloj.
- Seite 36 9 Cuando finalice el ciclo de limpieza pirolíti- 12 Abra la puerta del horno y pase un paño ca, escuchará una señal acústica. húmedo por el interior de la cavidad, reti- rando la ceniza obtenida durante el ciclo 10 Toque cualquier sensor del horno para de limpieza.
- Seite 37 INCIDENCIAS EN EL MANEJO DE LA FUNCIÓN PIRÓLISIS INCIDENCIA CAUSA SOLUCIÓN Mis accesorios y soportes No los ha retirado cuando Es necesario sustituirlos por fijación bandejas están ha realizado un proceso de otros nuevos y retirarlos en dañados. limpieza pirolítica. posteriores ciclos de limpieza.
- Seite 38 INCIDENCIA CAUSA SOLUCIÓN En el indicador de La puerta del horno no se Toque cualquier sensor para temperatura (2) se observa ha bloqueado. El bloqueo de detener la señal acústica. parpadeando E:1 y se oye puerta no ha funcionado. Por favor llame al Servicio una señal sonora.
- Seite 39 INCIDENCIA CAUSA SOLUCIÓN IMPORTANTE Si la temperatura interior del horno es muy alta (superior a 250ºC), verá que E4 parpadea pero no hay descuento de tiempo. Debe esperar a que el horno se enfríe, momento en el que comenzará la cuenta de tiempo.
- Seite 40 Asa para la Extracción de Bandejas El asa para la extracción de bandejas se emplea cuando usted necesita desplazar la bandeja en el momento de comprobar el estado del cocinado. Ver dibujos. Para manipular la bandeja fuera del horno es necesario el uso de guantes protectores. Posición para bandeja pastelera.
-
Seite 41: Cambio De La Lámpara Del Horno
Cambio de la lámpara del horno Atención • Sustituya la lámpara. Para cambiar la lámpara, asegure primero que • Monte de nuevo la lente, asegurando que el horno está desconectado de la red eléctrica. encaja en posición correcta. • Desmonte los soportes cromados, soltándo- los de la tuerca (E). -
Seite 42: Painel De Comandos
FEEL 1FFYPPI 1 Painel de Comandos 2 Junta de Forno 3 Resistência do Grill 4 Asa para a extracção de tabuleiros 5 Grelha 6 Guias Telescópicas 7 Tabuleiro de Pastelaria 8 Tabuleiro Profundo 9 Dobradiça 10 Porta 11 Saída de ar de refrigeração... -
Seite 43: Funções Do Forno
Funções do Forno Atenção Convencional Durante a utilização da função Grill, MaxiGrill Utiliza-se em bolos em que o calor recebido ou MaxiGrill com Turbina a por ta deve deve ser uniforme e para que obtenham uma manter-se fechada. textura esponjosa. Convencional com Turbina Resistência inferior Adequado para assados e pastelaria. - Seite 44 Recomendações para a Descongelação de Alimentos A descongelação realiza-se através de um • As carnes e peixes não necessitam de estar sistema de ar quente em 2 níveis, o nível HI totalmente descongelados para serem cozin- para carnes em geral e o nível LO para peixes, hados.
- Seite 45 Manuseamento do Forno Manuseamento do relógio electrónico Atenção Funcionamento Manual O seu relógio electrónico incorpora tecnologia Após colocar o relógio na hora certa, o seu Touch-Control. Para manuseá-lo é suficiente forno está pronto para cozinhar: tocar nos símbolos do vidro com o seu dedo. 1 Toque no sensor de Pôr em Funcionamento A sensibilidade do touch-control adapta-se continuamente às condições ambientais.
- Seite 46 Atenção Programação do Avisador Quando finalize o cozinhado, observará que 1 Toque várias vezes no sensor do relógio a refrigeração do seu forno continua a funcionar até que o símbolo se ilumine. até que o interior do forno reduza a sua 2 Seleccione o tempo após o qual deseja que o temperatura de forma apropriada.
- Seite 47 Programação da Hora de Finalização do 15 Seleccione a hora de finalização do Cozinhado cozinhado, tocando nos sensores 1 Toque várias vezes no sensor do relógio 16 Posteriormente soarão 2 beep seguidos, até que o símbolo se ilumine. mostrar-se-á a hora actual e o símbolo permanecerá...
- Seite 48 Para desactivar a função de segurança Atenção crianças, deve tocar de forma prolongada no Em caso de corte de fornecimento eléctrico, símbolo (16) soando um beep prolongado. apagar-se-á toda a programação do seu relógio electrónico e aparecerá a piscar a indicação 12:00 no relógio.
- Seite 49 9 Após finalizado o ciclo de limpeza pirolíti- 12 Abra a porta do forno e passe um pano ca, será emitido um sinal acústico. húmido pelo interior da cavidade, retirando a cinza obtida durante ciclo de limpeza. 10 Toque em qualquer sensor do forno para Em zonas de difícil acesso do interior do interromper o sinal acústico.
- Seite 50 INCIDÊNCIAS NO MANUSEAMENTO DA FUNÇÃO PIROLÍTICA INCIDÊNCIA CAUSA SOLUÇÃO Os meus acessórios e Não foram retirados quando É preciso substitui-los por suportes fixação de realizou o processo de outros novos e retirá-los em tabuleiros estão danificados. limpeza pirolítica. posteriores ciclos de limpeza.
- Seite 51 INCIDÊNCIA CAUSA SOLUÇÃO No indicador de temperatura A porta do forno não foi Toque em qualquer sensor (2) surge a piscar E:1 e é bloqueada. O bloqueio da para parar o sinal sonoro. emitido um sinal sonoro. porta não funcionou. Ligar para o Serviço de O forno pára o Assistência Técnica.
- Seite 52 INCIDÊNCIA CAUSA SOLUÇÃO IMPORTANTE Caso a temperatura interior do forno seja muito alta (superior a 250ºC), a indicação E4 pisca mas não há desconto de tempo. Aguarde até que o forno arrefeça, nesse momento irá iniciar-se a contagem de tempo. No indicador de temperatura É...
- Seite 53 Asa para a Extracção de Tabuleiros A asa para a extracção de tabuleiros utiliza-se quando necessita deslocar o tabuleiro no momento de comprovar o estado do cozinhado. Ver desenhos. Para manipular o tabuleiro fora do forno é necessário a utilização de luvas protectoras. Gancho longo Gancho curto Posição para tabuleiro de pastelaria.
- Seite 54 Troca da lâmpada do forno Atenção • Substitua a lâmpada. Para trocar a lâmpada, assegure-se primeiro • Monte de novo a lente, assegurando que a que o forno está desligado da rede eléctrica. encaixa na posição correcta. • Desmonte suportes cromados, soltando-os da porca (E).
- Seite 55 FEEL 1FFYPPI 1 Panneau de comman- 2 Joint de four 3 Résistance du grill 4 Poignée de retrait des plaques 5 Grille 6 Rails télescopiques 7 Plaque à pâtisserie 8 Plaque creuse 9 Charnière 10 Porte 11 Sortie de l’air...
-
Seite 56: Fonctions Du Four
Fonctions du four Attention Traditionnel Lors de l’utilisation de la fonction grill, On l’utilise pour faire des gâteaux ou des maxigrill ou maxigrill à turbine, la porte doit tartes pour lesquels la chaleur de cuisson doit rester fermée. être uniforme et pour obtenir une texture spongieuse. - Seite 57 Recommandations pour la décongélation des aliments La décongélation se réalise grâce à un • Les viandes et les poissons n'ont pas besoin système d'air chaud à 2 niveaux, le niveau HI d'être totalement décongelés pour être pour les viandes en général, et le niveau LO cuisinés.
-
Seite 58: Fonctionnement Du Four
Fonctionnement du four Utilisation de l’horloge électronique Attention ensuite deux bips consécutifs confirmant la modification effectuée. Cette horloge électronique est équipée de la technologie Touch-Control. Pour l’utiliser, il Fonctionnement manuel suffit d’appuyer sur les symboles représentés Une fois l'horloge réglée, votre four est prêt à sur la vitre. - Seite 59 Attention Programmation de l'avertisseur À la fin de la cuisson, vous verrez que le refroi- 1 Appuyez à plusieurs reprises sur le symbole dissement du four continue à fonctionner de l'horloge jusqu'à ce que le symbole jusqu'à ce que l'intérieur du four réduise sa s'allume.
- Seite 60 Programmation de l'heure de fin de cuisson 15 Sélectionnez l'heure de fin de la cuisson, en appuyant sur les symboles 1 Appuyez à plusieurs reprises sur le symbole de l'horloge jusqu'à ce que le symbole 16 Il y aura ensuite 2 bips consécutifs, l’heure s'allume.
- Seite 61 Pour désactiver la fonction de sécurité Attention enfants, il faut appuyer de manière prolongée En cas de coupure de courant, toute la sur le symbole et entendre un bip programmation de l’horloge électronique sera prolongé. effacée et l'indication 12:00 clignotera sur l’afficheur de l’horloge.
- Seite 62 9 Une fois le cycle de nettoyage pyrolytique 12 Ouvrez la porte du four et passez un achevé, vous entendrez un signal sonore. chiffon humide à l’intérieur de la cavité afin de retirer la cendre obtenue pendant 10 Appuyez sur n'importe quel symbole du le cycle de nettoyage.
- Seite 63 PROBLÈMES D’UTILISATION DE LA FONCTION PYROLYSE PROBLÈME CAUSE SOLUTION Mes accessoires et Vous ne les avez pas Il faut les remplacer par des supports de fixation des enlevés lorsque vous avez éléments neufs et les retirer plaques sont endommagés. lancé un processus de du four lors des prochains nettoyage pyrolytique.
- Seite 64 PROBLÈME CAUSE SOLUTION Le symbole E:1 clignote sur La porte du four ne s'est Appuyez sur n’importe quel l'indicateur de température pas verrouillée. Le symbole pour arrêter le (2) et un signal sonore verrouillage de la porte n'a signal sonore. Veuillez retentit.
- Seite 65 PROBLÈME CAUSE SOLUTION IMPORTANT Si la température intérieure du four est très élevée (supérieure à 250 ºC), E4 clignotera mais aucun décompte de temps n'interviendra. Vous devez attendre que le four refroidisse, moment où débutera le décompte de temps. Sur l'indicateur de L'horloge du four se met à...
- Seite 66 Poignée de retrait des plaques La poignée de retrait des plaques est utilisée lorsque vous avez besoin de déplacer la plaque afin de vérifier l’état de la cuisson. Voir dessins. Il est nécessaire d’utiliser des gants de protection lorsque vous manipulez la plaque hors du four. Pince longue Pince courte Position pour la plaque à...
- Seite 67 Remplacement de l'ampoule du four Attention • Remplacez l’ampoule. Avant de remplacer l’ampoule, vérifiez tout • Remontez la lentille, en vous assurant d’abord que le four est bien débranché. qu’elle est bien emboîtée. • Démontez les supports chromés, en retirant l'écrou (E).
- Seite 68 FEEL 1FFYPPI 1 Bedienfeld 2 Backofendichtung 3 Grillwiderstand 4 Griff für den Backblechauszug 5 Rost 6 Teleskopführung 7 Backblech 8 Backblech tief 9 Scharnier 10 Tür 11 Kühlluftaustritt 12 Blockierungsschalter der Tür 13 Befestigung am Einbauschrank 14 Grillblech 15 Abzug 16 Rückwand...
-
Seite 69: Backofen-Funktionen
Backofenfunktionen Achtung Normal Bei Benutzung der Funktionen Grill, MaxiGrill Empfohlen für Kuchen und Tor ten, die oder MaxiGrill Umluft muss gleichmäßige Hitze benötigen, um eine luftige Backofentür geschlossen gehalten werden. Konsistenz zu erhalten. Unterhitze Normal mit Umluft Hitze nur von der Unterseite. Geeignet zum Geeignet für Braten und Gebäck. -
Seite 70: Empfehlungen Für Das Auftauen Von Tiefkühlkost
Empfehlungen für das Auftauen von Tiefkühlkost Das Auftauen funktionier t mittels eines • Fleisch oder Fisch müssen vor der Garung Warmluftsystems in 2 Stufen: Stufe HI für nicht komplett aufgetaut werden. Es reicht Fleisch im Allgemeinen und Stufe LO für Fisch, aus, wenn die Oberfläche weich genug ist, Gebäck und Brot. -
Seite 71: Bedienung Des Backofens
Bedienung des Backofens Bedienung der Elektronikuhr Achtung Schließlich hören Sie zwei aufeinander fol- Ihre Elektronikuhr verfügt über eine Touch- gende Pieptöne zur Bestätigung der durchge- Control-Technologie. Zur Bedienung reicht es aus, führ ten Änderung. die Glas-Symbole mit dem Finger zu berühren. Manueller Betrieb Die Empfindlichkeit der Touch-Control passt sich Nachdem die Uhrzeit eingestellt wurde, ist der... - Seite 72 Achtung Programmierung des Weckers Nach Beenden des Garvorgangs werden Sie 1 Berühren Sie mehrmals den Uhrsensor feststellen, dass die Kühlung des Backofens wei- bis das Symbol aufleuchtet. terläuft, Temperatur 2 Wählen Sie die Zeitdauer, nach deren Ablauf Backofeninnenraums eine angemessene der Timer er tönen soll, indem Sie die Temperatur erreicht hat.
- Seite 73 Programmierung des Garzeit-Endes 15 Wählen Sie das Garzeit-Ende, indem Sie die Sensoren oder berühren. 1 Berühren Sie mehrmals den Uhrsensor bis das Symbol aufleuchtet. 16 Danach hören Sie 2 aufeinander folgende Pieptöne; die aktuelle Uhrzeit wird 2 Wählen Sie das Garzeit-Ende, indem Sie die angezeigt und das Symbol leuchtet.
- Seite 74 Deaktivierung Kindersicherung Achtung berühren Sie länger das Symbol (16; Sie Im Fall eines Stromausfalls wird die gesamte hören einen langen Piepton. Programmierung der Elektronikuhr gelöscht, und es erscheint die blinkende Anzeige 12:00:00 auf der Uhr. Sie müssen die Uhr wieder einstellen und erneut programmieren. PROGRAMMIERUNG UND BEDIENUNG DER PYROLYSE-FUNKTION Befolgen Sie die nachstehende Anleitung zur 6 Nach Anwahl des Pyrolyse-Programms...
- Seite 75 9 Nach Abschluss Pyrolyse- 12 Öffnen Sie die Backofentür und entfernen Reinigungsvorgangs er tönt Sie mit einem feuchten Tuch die Asche, akustisches Signal. die während des Reinigungsvorgangs erzeugt wurde. Die schwer zugänglichen 10 Berühren Sie irgendeinen Sensor des Stellen im Innenraum sind mit einem Backofens, um das akustische Signal nichtmetallischen Scheuerschwamm zu abzustellen.
- Seite 76 PROBLEME BEI DER BEDIENUNG DER PYROLYSE-FUNKTION PROBLEM URSACHE LÖSUNG Mein Zubehör und die Sie haben sie vor der Sie müssen durch neue Führungsschienen der Durchführung des Pyrolyse- Zubehörteile ersetzt werden, Backbleche sind beschädigt. Reinigungsvorgangs nicht welche bei zukünftigen entfernt. Reinigungsvorgängen unbedingt zu entfernen sind.
- Seite 77 PROBLEM URSACHE LÖSUNG Auf der Temperaturanzeige Die Backofentür ist nicht Berühren Sie irgendeinen (2) blinkt E:1 und ein Signal verriegelt. Die Sensor, um das akustische ertönt. Der Backofen stellt Türverriegelung hat nicht Signal abzustellen. die Aufheizung ein. funktioniert. Verständigen Sie den technischen Kundendienst.
- Seite 78 PROBLEM URSACHE LÖSUNG WICHTIG Wenn die Innentemperatur im Backofen sehr hoch ist (über 250 ºC), blinkt E4, aber die Zeit wird nicht zurückgezählt. Sie müssen abwarten, bis der Backofen abgekühlt ist. Zu diesem Zeitpunkt beginnt die Zeitzählung. Auf der Temperaturanzeige Die Backofenuhr wird Auf der Anzeige (4) erscheint (2) blinkt E:5.
-
Seite 79: Griff Für Den Backblechauszug
Griff für den Backblechauszug Diesen Griff benutzt man, wenn man das Backblech vorziehen muss, um z. B. den Zustand des Garguts zu überprüfen. Siehe Abbildungen. Zum Hantieren mit dem Backblech außerhalb des Backofens müssen Schutzhandschuhe getragen werden. Langer haken Position für flaches Backblech. Kurzer Haken Position für tiefes Bratblech. -
Seite 80: Austausch Der Backofenlampe
Austausch der Backofenlampe Achtung • Ersetzen Sie die Lampe. Bevor Sie die Lampe auswechseln, stellen Sie • Montieren Sie das Vorsatzglas erneut und sicher, dass der Backofen vom Stromnetz achten Sie darauf, dass es in der richtigen getrennt ist. Position sitzt. •... - Seite 81 FEEL 1FFYPPI 1 Bedieningspaneel 2 Ovenpakking 3 Grillweerstand 4 Handvat voor uitname van bakplaten 5 Rooster 6 Uitschuifbare rails 7 Bakplaat 8 Diepe bakplaat 9 Scharnier 10 Deur 11 Koelluchtuitlaat 12 Schakelaar- deurvergrendeling 13 Bevestiging aan meu- 14 Grillscherm 15 Rookuitlaat...
-
Seite 82: Functies Van De Oven
Functies van de oven Attentie Conventioneel Bij gebruik van de functies Grill, Maxigrill of Wordt gebruikt voor cakes en taarten waarbij MaxiGrill met turbine moet de deur gesloten de warmte gelijkmatig verdeeld moet worden blijven. om een luchtige textuur te verkrijgen. Conventioneel met Turbine Ovenvloer Geschikt voor braadgerechten en gebak. - Seite 83 Aanbevelingen voor het ontdooien van etenswaren Ontdooien gebeurt door middel van een war- • Vlees en vis hoeven niet helemaal te wor- meluchtsysteem op 2 niveaus: niveau HI voor den ontdooid om ze te bereiden. Het is vol- vlees en niveau LO voor vis, gebak en brood. doende als de buitenlaag zacht is zodat het Als u de ontdooifunctie selecteert, kunt u op vlees of de vis kan worden gekruid.
-
Seite 84: Bediening Van De Oven
Bediening van de oven Bediening van de elektronische klok Attentie Handmatige werking Uw elektronische klok is uitgerust met Touch- Wanneer de klok is gelijkgezet, is uw oven klaar voor gebruik: Control-technologie. Voor de bediening hoeft u de symbolen op het glas enkel met uw vinger 1 Raak op de sensor de Aan-knop aan. - Seite 85 Verlichting van de oven 2 Selecteer de tijdsduur waarna u wilt dat de kookwekker een signaal afgeeft, door de Het binnenlicht van de oven gaat branden: sensoren aan te raken. – Bij het openen van de ovendeur. Als de oven- 3 Ver volgens hoort u 2 pieptonen achter deur na een poosje niet wordt gesloten, gaat elkaar.
- Seite 86 De eindtijd van het bakproces programmeren 15 Selecteer de eindtijd van het bakproces door de sensoren aan te raken. 1 Raak de sensor van de kookwekker meerdere keren aan totdat het symbool 16 Vervolgens klinken er 2 pieptonen achter oplicht. elkaar.
- Seite 87 Raak, om de kinderbeveiliging uit te schake- Attentie len, het symbool een tijdje aan. Er klinkt Bij een stroomonderbreking wordt de hele pro- een langdurige pieptoon. grammering van de elektronische klok gewist en verschijnen de cijfers 12:00 op de klok. U moet de klok dan opnieuw gelijkzetten en program- meren.
- Seite 88 9 Aan het einde van de pyrolytische reini- 12 Doe de ovendeur open en maak de binnen- gingscyclus gaat er een alarm af. kant schoon met een vochtige doek om de tijdens de reinigingscyclus ontstane as te 10 Raak een willekeurige sensor van de oven verwijderen.
- Seite 89 INCIDENTEN BIJ DE BEDIENING VAN DE PYROLYSEFUNCTIE INCIDENT OORZAAK OPLOSSING Mijn accessoires en U hebt ze niet verwijderd U moet ze vervangen door bakplaatsteunen zijn tijdens een pyrolytisch nieuwe en deze bij beschadigd. reinigingsproces. toekomstige reinigingscycli verwijderen. De kleur van het email is De chemische samenstelling Dit is een normaal proces veranderd of vertoont...
- Seite 90 INCIDENT OORZAAK OPLOSSING Op de temperatuurindicator De ovendeur is niet Raak een willekeurige (2) knippert E:1 en er klinkt vergrendeld. De sensor aan om het alarm te een geluidssignaal. De oven deurvergrendeling werkte stoppen. Bel naar de verwarmt niet meer. niet.
- Seite 91 INCIDENT OORZAAK OPLOSSING BELANGRIJK Als de binnentemperatuur van de oven zeer hoog is (hoger dan 250 ºC), ziet u dat E4 knippert maar dat de tijd niet afloopt. U moet wachten tot de oven afgekoeld is. De tijd begint dan af te lopen. Op de temperatuurindicator De ovenklok wordt Op het scherm (4) verschijnt...
- Seite 92 Handvat voor uitname van bakplaten Het handvat voor de uitname van bakplaten wordt gebruikt als u de bakplaat moet verplaatsen om te kijken hoe het bakproces verloopt. Zie tekeningen. Om de bakplaat buiten de oven te han- teren is het gebruik van ovenwanten noodzakelijk. Lange haak Korte haak Positie voor de bakplaat.
- Seite 93 De ovenlamp verwisselen Attentie • Vervang de lamp. Om de ovenlamp te vervangen dient de oven • Monteer het glas weer in de juiste positie. van het lichtnet te worden afgesloten. • Demonteer de verchroomde steunen door ze los te maken van de moer (E). De te verwisselen lamp moet bestand zijn tegen temperaturen tot 300 °C.
- Seite 96 1FFYPPI 0.85 kWh/cycle* 0.79 kWh/cycle* 42 kg...
- Seite 97 Manual Genérico de Mantenimiento e Instalación HORNO Manual Genérico de Manutenção e Instalação FORNO Maintenance and Installation Generic Manual OVEN Manuel générique d’entretien et d’installation FOUR Allgemeine Wartungs- und Installationsanleitung BACKOFEN...
-
Seite 99: Instrucciones De Seguridad
INSTRUCCIONES DE SEGURIDAD Lea atentamente estas instrucciones para obtener el máximo rendimiento de su horno. Guarde este manual de cara a que pueda leerlo un nuevo propietario. Seguridad eléctrica • Para la conexión del horno a la red eléctrica, el instalador debe utilizar un cable de alimentación tipo H05RR-F, H05SS-F o H07RN-F. - Seite 100 • Desconecte su horno cuando esté averiado. • En hornos combinados con encimera, sólo se podrán montar las recomendadas por el fabricante. Seguridad para los niños • Impida que los niños se acerquen al horno durante el cocinado, ya que se alcanzan temperaturas elevadas. •...
- Seite 101 • Durante el uso el aparato se calienta, emplee guantes de protección cuando quiera maniobrar dentro de él y evite tocar los elementos de calentamiento. • Use sólo la sonda de medida de temperatura suministrada dentro del horno (modelos con esta prestación).
-
Seite 102: Antes Del Primer Uso
Antes del Primer Uso Otras Instrucciones Importantes • El horno siempre tiene que funcionar con la Por el proceso de fabricación, puede haber en puerta cerrada. el horno restos de grasas y otras impurezas, para eliminarlos proceda como sigue: • El fabricante no se responsabiliza de un uso que no sea para la preparación de alimen- •... -
Seite 103: Limpieza Y Mantenimiento
Limpieza y Mantenimiento Atención: Limpieza de los Paneles Catalíticos Debe desconectar el aparato de la red eléctrica para realizar cualquier intervención. Si los restos de alimentos en el esmalte se resisten a la limpieza normal (autolimpieza), entonces: Limpieza del Interior de Horno 1 Desmonte los paneles y déjelos en remojo el tiempo necesario para que se ablanden 1 Hornos con esmalte de fácil limpieza... - Seite 104 Limpieza de la Puerta del Horno Limpieza de la Puerta con Cristal Interior de gran Tamaño No use estropajos metálicos, cepillos de alam- bre ni polvos comerciales o abrasivos para lim- Instrucciones Desmontaje / Montaje del piar la puerta del horno, ya que podría arañar cristal interior la superficie y provocar la rotura del cristal.
-
Seite 105: Si Algo No Funciona
6 Una vez limpios, introduzca los cristales en Si Algo no Funciona el mismo orden de forma que se pueda leer la indicación TERMOGLASS que llevan impresa. El Horno no funciona 7 Coloque de nuevo el cierre superior de la puerta, asegurando que las pestañas latera- Compruebe la conexión a la red. -
Seite 106: Información Técnica
Información Técnica Conexión Eléctrica Si el aparato no funciona comunique al Servicio de Asistencia Técnica el tipo de ano- El instalador debe verificar que: malía que usted observa indicando: • La tensión y la frecuencia de la red se 1 Número de Serie (S-No) corresponde con lo indicado en la Placa de 2 Modelo de Aparato (Mod.) Características. -
Seite 107: Instruções De Segurança
INSTRUÇÕES DE SEGURANÇA Leia atentamente estas instruções para obter o máximo rendimento do seu forno. Guarde este manual de forma a que possa ser lido por um novo proprietário. Segurança eléctrica • Para a ligação do forno à rede eléctrica, o instalador deve utilizar um cabo de alimentação tipo H05RR-F, H05SS-F ou H07RN-F. - Seite 108 • Desligue o forno quando este estiver avariado. • Em fornos combinados com bancada, apenas se poderão montar as recomendadas pelo fabricante. Segurança para as crianças • Impeça que as crianças se aproximem do forno durante o cozinhado, visto que são atingidas temperaturas elevadas.
- Seite 109 • Durante a sua utilização o aparelho aquece. Utilize luvas de protecção quando pretender actuar no interior do mesmo e evite tocar nos elementos de aquecimento. • Dentro do forno, use apenas a sonda de medição de temperatura fornecida (modelos com este acessório). Limpeza e manutenção •...
-
Seite 110: Antes Da Primeira Utilização
Antes da Primeira Outras Instruções Utilização Importantes • O forno tem que funcionar sempre com a Devido ao processo de fabrico, podem existir porta fechada. no forno restos de gorduras e outras impure- zas. Para a sua eliminação proceda da seguin- •... -
Seite 111: Limpeza E Manutenção
Limpeza e Manutenção Atenção: Limpeza dos Painéis Catalíticos Deve desligar o aparelho da rede eléctrica para realizar qualquer intervenção. Se os restos de alimentos no esmalte resis- tem à limpeza normal (autolimpeza), então: 1 Desmonte os painéis e deixe-os de molho o Limpeza do Interior do Forno tempo necessário para que os restos de 1 Fornos com esmalte de fácil limpeza... - Seite 112 Limpeza da Porta do Forno Limpeza da Porta com Vidro Interior de grande Dimensão Não use esfregões metálicos, escovas de arame nem pós comuns ou abrasivos para Instruções de Desmontagem / Montagem do limpar a porta do forno, dado que poderia vidro interior arranhar a superfície e provocar a ruptura do 1 Abra a porta do forno.
- Seite 113 6 Uma vez limpos, introduza os vidros pela Se Algo Não Funciona mesma ordem, de forma que seja possível ler a indicação TERMOGLASS impressa nos mesmos. O Forno não funciona 7 Coloque novamente o fecho superior da porta, assegurando que as pestanas late- Verifique a ligação à...
-
Seite 114: Informação Técnica
Informação Técnica Ligação Eléctrica Se o aparelho não funciona comunique ao Serviço de Assistência Técnica o tipo de ano- O instalador deve verificar se: malia detectada, indicando: • A tensão e a frequência da rede correspon- 1 Número de Série (S-No) dem ao indicado na Placa de Características. -
Seite 115: Safety Instructions
SAFETY INSTRUCTIONS Read this Instruction Manual carefully to obtain the best performance from your oven. Keep this manual so that it can be read by a new owner. Electrical Safety • To connect the oven to the power supply, the technician should use an H05RR-F, H05SS-F or H07RN-F power cable. - Seite 116 Child Safety • Do not allow children to come near the oven while in use as it can reach very high temperatures. • Children under 8 years of age should be kept away from the appliance unless they are under permanent supervision.
- Seite 117 Cleaning and Maintenance • Disconnect the appliance from the mains power supply before any operation. • Do not use abrasive cleaning products, or steam or pressurised water cleaning equipment. • Cleaning and maintenance tasks to be carried out by the user should not be done by children without supervision.
-
Seite 118: Before First Use
Before First Use Other important instructions • The oven must always be operated with the There may be traces of grease and other sub- door closed. stances in the oven as a result of its manu- facturing process. These should be removed •... -
Seite 119: Cleaning And Maintenance
Cleaning and Maintenance Caution: Cleaning the Catalytic Panels Disconnect the appliance from mains power supply before any operation. If the remains of food on the enamel cannot be cleaned off using normal (self-cleaning) methods, then: Cleaning the Oven Interior 1 Dismantle the panels and leave them to 1 Easy-to-clean enamel ovens soak long enough to soften the remains. -
Seite 120: Cleaning The Oven Door
Cleaning the Oven Door Cleaning the Large Inner Glass Door Do not use metal scouring pads, wire brushes or commercially available abrasive powder Instructions for Removing / Replacing Inner cleansers to clean the oven door as they could Glass scratch the surface and cause the glass to 1 Open the oven door. -
Seite 121: If Something Goes Wrong
6 Once clean, return the glass panels in the If Something Goes Wrong same order so that the word TERMOGLASS can be read. 7 Replace the upper clasp of the door, making The oven stops working sure that the side tabs fit in point 1. Check the power connection. -
Seite 122: Technical Specifications
Technical Specifications Electrical Connection If the appliance does not work, inform Technical Service of the kind of problem you The installer must ensure that: are experiencing and give the: • The mains power voltage and frequency cor- 1 Serial Number (S-No) respond to what is marked on the identifi- 2 Model of Appliance (Mod.) cation plate. -
Seite 123: Consignes De Sécurité
CONSIGNES DE SÉCURITÉ Lisez attentivement ces consignes pour obtenir un rendement optimal de votre four. Conservez ce manuel de façon à ce qu’il puisse être consulté par tout nouveau propriétaire. Sécurité électrique • Pour le branchement du four au réseau électrique, l’installateur doit utiliser un câble d’alimentation de type H05RR-F, H05SS-F ou H07RN-F. - Seite 124 • Débranchez votre four lorsqu’il est en panne. • Pour les fours munis de plaques de cuisson, seules celles recommandées par le fabricant pourront être installées. Sécurité des enfants • Veillez à ce que les enfants ne s'approchent pas du four lorsque celui-ci est en marche car il atteint des températures très élevées.
- Seite 125 • Lorsqu’il est en marche, le four chauffe : utilisez des gants de protection lorsque vous souhaitez effectuer des manipulations à l’intérieur et évitez de toucher les éléments de chauffage. • Utilisez uniquement la sonde de température fournie à l’intérieur du four (pour les modèles dotés de cette fonctionnalité).
-
Seite 126: Avant La Première Utilisation
Avant la première Autres consignes utilisation importantes • Le four doit toujours fonctionner porte fermée. Suite au processus de fabrication, le four peut contenir des restes de graisses ou autres • Le fabricant décline toute responsabilité en impuretés. Afin de les éliminer, procédez cas d'utilisation autre que la préparation comme suit : d'aliments à... -
Seite 127: Nettoyage Et Entretien
Nettoyage et entretien Attention : Nettoyage des panneaux catalytiques Vous devez débrancher l’appareil du réseau électrique avant de réaliser toute intervention. Si les restes d’aliments sur l’émail résistent au nettoyage normal (auto-nettoyage), alors : 1 Démontez les panneaux et laisser les trem- Nettoyage de l’intérieur du four per le temps nécessaire pour ramollir les 1 Fours émaillé... - Seite 128 Nettoyage de la porte du four Nettoyage de la porte avec vitre intérieure de grande taille N’utilisez pas de tampons à récurer en métal, de brosses en fil de fer, ni de poudres com- Consignes de démontage / montage de la merciales ou abrasives pour nettoyer la porte vitre intérieure du four, car ceux-ci pourraient rayer la surface...
-
Seite 129: Changement De L'ampoule Du Four
6 Après avoir nettoyé les vitres, remettez-les Si quelque chose en place en suivant le même ordre de façon ne fonctionne pas à ce que l’inscription TERMOGLASS inscrite sur le verre soit lisible. Le four ne fonctionne pas 7 Placez de nouveau la fermeture en haut de Vérifiez le branchement au réseau. -
Seite 130: Informations Techniques
Informations techniques Branchement électrique Si l’appareil ne fonctionne pas, communiquez au Service d’assistance technique le type L’installateur doit vérifier que : d’anomalie observé en indiquant : • La tension et la fréquence du réseau cor- 1 Le numéro de série (S-No) respondent à... -
Seite 131: Sicherheitsanweisungen
SICHERHEITSANWEISUNGEN Lesen Sie diese Anweisungen aufmerksam durch, um eine optimale Leistung Ihres Backofens zu gewährleisten. Bewahren Sie das Handbuch so auf, dass auch ein neuer Besitzer es lesen kann. Elektrische Sicherheit • Für Anschluss Backofens Stromversorgung muss Installateur Stromversorgungskabel vom Typ H05RR-F, H05SS-F oder H07RN-F verwenden. -
Seite 132: Kinder - Sicherheit
• Trennen Sie den Backofen vom Stromnetz, wenn er defekt ist. • Bei mit Kochfeldern kombinierten Backöfen dürfen nur die vom Hersteller empfohlenen Kochfelder eingebaut werden. Kindersicherheit • Halten Sie Kinder während des Backofenbetriebs von diesem fern, da er sehr hohe Temperaturen erreicht. •... - Seite 133 • Während des Gebrauchs wird das Gerät heiß. Wenn Sie darin handhaben, ziehen Sie bitte Schutzhandschuhe an und vermeiden Sie die Berührung der Heizelemente. • Verwenden Sie nur die innerhalb des Backofens gelieferte Temperaturmesssonde (bei Modellen mit dieser Leistung). Reinigung und Wartung •...
-
Seite 134: Vor Dem Ersten Gebrauch
Vor dem ersten Gebrauch Weitere wichtige Anweisungen • Der Backofen darf nur bei geschlossener Bedingt durch den Herstellungsprozess kön- Backofentür betrieben werden. nen im Backofen noch Fettreste und andere Verunreinigungen vorhanden sein. Um diese • Der Hersteller übernimmt keinerlei Haftung zu entfernen, verfahren Sie bitte wie folgt: für eine Benutzung des Backofens, die nicht •... -
Seite 135: Reinigung Und Wartung
Reinigung und Wartung Achtung: die Backofenoberseite. Das Gerät muss vom Stromnetz getrennt • Bringen Sie die Heizspirale abschließend werden, bevor Wartungstätigkeiten daran wieder auf ihrer Ausgangsstellung an. ausgeführt werden. Reinigung der katalytischen Platten Reinigung des Backofeninnenraums Sollten nach der normalen (Selbst-) Reinigung hartnäckige Essensreste auf der Emaillierung 1 Backöfen mit pflegeleichter Emaille verbleiben:... -
Seite 136: Reinigung Der Backofenaußenfläche Und Des -Zubehörs
Achtung Reinigung der Backofenaußenfläche Entfernen Sie die Sicherheitsstifte niemals, und des -zubehörs da das Scharnier gespannt ist und Sie ver- letzten könnte. Außerdem ist es nicht möglich, Reinigen Sie die Backofenaußenfläche und die Tür einzubauen, ohne dass die Stifte ange- das -zubehör mit lauwarmem Seifenwasser bracht sind. -
Seite 137: Auswechseln Der Backofenlampe
5 Die inneren Glasteile der Tür sind lose, so Vorgehen bei dass leicht einem Funktionsstörungen Fensterputzmittel und einem weichen Tuch reinigen können. Der Backofen funktioniert nicht. Achtung: Überprüfen Sie den Stromanschluss. Wenn Sie den Drehmechanismus der Tür nicht Überprüfen Sie die Sicherungen und den mit den Sperrhaken (N) blockiert haben, Begrenzer Ihrer Installation. -
Seite 138: Vor Der Installation
Technische Information Stromanschluss Wenn das Gerät nicht funktioniert, müssen Der Monteur muss überprüfen, ob: Sie dem Kundendienst die Art der Störung mit folgenden Angaben mitteilen: • Netzspannung und -frequenz den Angaben auf dem Typenschild entsprechen. 1 Seriennummer (S-No) • Die Elektroinstallation 2 Gerätemodell (Mod.) Typenschild genannte Höchstleistung verk-... - Seite 139 Figuras / Figuras / Figures / Figures / Abbildungen Fig 1 Fig 2 Fig 3 Fig 4 Fig 5 Fig 6 Fig 7 Fig 8...
- Seite 140 Fig 9 Fig 10 Fig 11 Fig 12 Fig 13 Fig 14 Fig 15 Fig 16...
- Seite 141 Fig 17 Fig 18 Fig 19 A: 595-455 / B: 590-450 / C: 600-460 Fig 20 min. 40...
- Seite 142 Fig 21 Fig 22...
- Seite 143 Fig 23...
-
Seite 145: Духовой Шкаф
Manuale generale di installazione e manutenzione FORNO Algemene onderhouds- en installatiehandleiding OVEN Γενικό Εγχειρίδιο Συντήρησης και Εγκατάστασης ΦΟΥΡΝΟΣ Общее руководство по установке и уходу ДУХОВОЙ ШКАФ... -
Seite 147: Istruzioni Sulla Sicurezza
ISTRUZIONI SULLA SICUREZZA Leggere attentamente queste istruzioni per ottenere un funzionamento ottimale del forno. Conservare questo manuale in modo da poterlo rendere consultabile da parte di un eventuale nuovo proprietario. Sicurezza elettrica Per collegare il forno alla rete elettrica l'installatore deve •... - Seite 148 potrebbero danneggiare l’apparecchio o causarne un funzionamento scorretto con conseguenti pericoli per la sicurezza degli utenti. Scollegare il forno in caso di guasto. • Nei forni combinati dotati di ripiano sarà possibile • montare esclusivamente quelli raccomandati dal produttore. Sicurezza per i bambini Impedire ai bambini di avvicinarsi al forno durante le •...
- Seite 149 Il vassoio e la griglia dispongono di un sistema per • facilitarne l’estrazione parziale e consentire la manipolazione degli alimenti. Durante l'uso l'apparecchio si riscalda; usare guanti di • protezione per effettuare le manovre all'interno del forno ed evitare di toccare gli elementi riscaldanti. All'interno del forno usare esclusivamente l'apposita •...
-
Seite 150: Prima Del Primo Utilizzo
Prima del Primo Utilizzo Altre Istruzioni Importanti • Durante il processo di produzione all’interno del Il forno deve funzionare sempre con lo spor- forno potrebbero essersi accumulati grassi e tello chiuso. altre impurità. Per eliminarli procedere nel • Il produttore non si assume alcuna responsa- modo seguente: bilità... -
Seite 151: Pulizia E Manutenzione
Pulizia e Manutenzione Attenzione: Pulizia dei Pannelli Catalitici Scollegare l’apparecchio dall’alimentazione elettrica per effettuare qualsiasi intervento. Se i residui di alimenti presenti sullo smalto non vengono eliminati con la normale pulizia (fun- zione autopulente), procedere nel modo Pulizia dell’Interno del Forno seguente: 1 Smontare i pannelli e lasciarli in ammollo per 1 Forni con smalto di facile pulizia... - Seite 152 Pulizia dello Sportello del Forno Pulizia dello Sportello con Vetro Interno di Grandi Dimensioni Non utilizzare spugne o spazzole metalliche, né polveri pulenti o prodotti abrasivi per pulire lo Istruzioni di smontaggio / montaggio del vetro sportello del forno poiché la superficie potrebbe interno rigarsi e il vetro potrebbe rompersi.
-
Seite 153: Risoluzione Dei Problemi
6 Una volta puliti, inserire i vetri seguendo lo Risoluzione dei Problemi stesso ordine in modo tale che la dicitura TERMOGLASS stampigliata sulla superficie risulti leggibile. Il forno non funziona 7 Sistemare nuovamente la chiusura superiore Verificare la connessione alla rete. dello sportello verificando che le linguette Controllare i fusibili e il limitatore dell’impianto. -
Seite 154: Scheda Tecnica
Scheda Tecnica Collegamento Elettrico Se l’apparecchio non funziona, comunicare al Servizio di Assistenza Tecnica il tipo di anomalia L’installatore dovrà verificare quanto segue: riscontrata indicando: • La tensione e la frequenza di rete devono cor- 1 Numero di Serie (S-No) rispondere a quanto indicato nella targa delle 2 Modello (Mod.) caratteristiche. -
Seite 155: Veiligheidsinstructies
VEILIGHEIDSINSTRUCTIES Lees deze aanwijzingen aandachtig door om het maximale rendement uit uw oven te halen. Bewaar deze handleiding zodat een nieuwe eigenaar hem ook kan lezen. Elektrische veiligheid Voor de aansluiting van de oven op het lichtnet dient de • installateur een voedingskabel van het type H05RR-F, H05SS-F of H07RN-F te gebruiken. - Seite 156 Zet de oven uit wanneer hij kapot is. • Bij gecombineerde ovens met werkblad worden alleen • de door de fabrikant aanbevolen werkbladen gemonteerd. Veiligheid voor kinderen Laat kinderen tijdens het bakken of braden niet in de • buurt van de oven komen. Het apparaat kan namelijk zeer hoge temperaturen bereiken.
- Seite 157 Tijdens het gebruik wordt het apparaat heet. Gebruik • handschoenen wanneer u iets in de oven wilt bewerken en raak de verwarmingselementen niet aan. Gebruik alleen de meegeleverde temperatuursonde in • de oven (modellen met deze uitrusting). Reiniging en onderhoud Haal de stekker van het apparaat uit het stopcontact •...
-
Seite 158: Voor Het Eerste Gebruik
Voor Het Eerste Gebruik Overige Belangrijke Aanwijzingen • Door het productieproces kunnen er zich in de De oven mag alleen met gesloten ovendeur in oven vetresten of andere onzuiverheden bevin- werking zijn. den. Ga om deze te verwijderen als volgt te •... -
Seite 159: Reiniging En Onderhoud
Reiniging en Onderhoud Opgelet : Reiniging van de Katalytische Panelen Haal de stekker van het apparaat uit het stop- contact alvorens er een willekeurige handeling Als de voedingsresten op het email bij de nor- aan uit te voeren. male reiniging (zelfreiniging) niet loslaten: 1 Demonteer de panelen en laat ze net zolang in water ondergedompeld liggen totdat de Reiniging van de Oven... - Seite 160 Reiniging van de Ovendeur Reiniging van de Ovendeur met Groot Binnenglas Gebruik geen metalen schuursponzen, staalbor- stels of commerciële schuurpoeders om de Aanwijzingen voor het Demonteren / Monte- ovendeur schoon te maken, aangezien het ren van het Binnenglas oppervlak hiermee kan worden beschadigd of 1 Open de ovendeur.
-
Seite 161: Vervanging Van De Ovenlamp
6 Breng de glazen, nadat ze zijn schoonge- Als Iets niet Werkt maakt, weer in dezelfde volgorde aan zodat de aanduiding TERMOGLASS die erop is gedrukt te lezen is. De oven werkt niet 7 Breng bovenste deurvergrendeling Controleer de aansluiting op het lichtnet. opnieuw aan en zorg ervoor dat de zijranden Controleer de zekeringen en de begrenzer in punt 1 passen. -
Seite 162: Technische Gegevens
Technische Gegevens Elektrische Aansluiting Als het apparaat niet werkt, geef dan het soort storing dat u heeft waargenomen aan de De installateur dient te controleren of: Technische Dienst door met vermelding van: • De netspanning en frequentie overeenstem- 1 Serienummer (S-No) men met de op het gegevensplaatje aange- 2 Toestelmodel (Mod.) duide gegevens. -
Seite 163: Ηλεκτρική Ασφάλεια
Διαβάστε προσεκτικά αυτές τις οδηγίες ώστε να εκμεταλλευτείτε στο μέγιστο την απόδοση του φούρνου σας. Φυλάξτε αυτό το εγχειρίδιο ώστε να μπορεί να το διαβάσει στο μέλλον και κάποιος καινούριος ιδιοκτήτης. Ηλεκτρική ασφάλεια Για τη σύνδεση του φούρνου στο ηλεκτρικό ρεύμα, το •... - Seite 164 πραγματοποιούνται από άλλα άτομα μπορεί να προκαλέσουν βλάβες στη συσκευή ή δυσλειτουργία και να θέσουν σε κίνδυνο την ασφάλειά σας. Σε περίπτωση βλάβης, αποσυνδέστε το φούρνο σας. • Σε φούρνους που εγκαθίστανται σε συνδυασμό με • πλατώ εστιών, μπορούν μόνο να χρησιμοποιηθούν τα πλατώ...
- Seite 165 Το ταψί και η σχάρα διαθέτουν ειδικό σύστημα που • επιτρέπει τη μερική τους εξαγωγή ώστε να μπορείτε να επεξεργάζεστε τα τρόφιμα. Κατά τη χρήση, η συσκευή θερμαίνεται. Χρησιμοποιείτε • προστατευτικά γάντια όταν θέλετε να εισάγετε τα χέρια σας μέσα στο φούρνο και φροντίζετε ώστε να μην αγγίζετε...
- Seite 166 Πριν από την Πρώτη Χρήση Άλλες Σημαντικές Οδηγίες • Κατά τη διαδικασία κατασκευής, μπορεί να απέ- Ο φούρνος πρέπει να λειτουργεί πάντα με την μειναν στο φούρνο υπολείμματα από λιπαρές πόρτα κλειστή. ουσίες και άλλες ακαθαρσίες. Για να τις αφαιρέ- •...
-
Seite 167: Καθαρισμός Και Συντήρηση
Καθαρισμός και Συντήρηση Προσοχή: • Τέλος, τοποθετήστε ξανά την αντίσταση του γκριλ στην αρχική της θέση. Πρέπει να αποσυνδέσετε τη συσκευή από την παροχή ηλεκτρικού ρεύματος, προτού πραγμα- τοποιήσετε οποιαδήποτε εργασία. Καθαρισμός των Καταλυτικών Πάνελ Σε περίπτωση που τα υπολείμματα τροφίμων Καθαρισμός... - Seite 168 Καθαρισμός της Πόρτας Καθαρισμός της Πόρτας με Εσωτε- του Φούρνου ρικό Κρύσταλλο Πλήρους Κάλυψης Οδηγίες Αποσυναρμολόγησης και Συναρμολό- Μη χρησιμοποιείτε μεταλλικά σφουγγάρια, συρ- γησης του Εσωτερικού Κρύσταλλου μάτινες βούρτσες, καθαριστικά εμπορίου σε σκόνη ή διαβρωτικά για τον καθαρισμό της πόρ- 1 Ανοίξτε...
- Seite 169 6 Αφού καθαρίσετε τα κρύσταλλα, τοποθετήστε Αν Κάτι Δεν Λειτουργεί τα με την ίδια σειρά, έτσι ώστε να μπορείτε να διαβάζετε τη λέξη TERMOGLASS που είναι τυπωμένη πάνω τους. Ο φούρνος δεν λειτουργεί 7 Τοποθετήστε και πάλι στη θέση του το άνω Ελέγξτε...
-
Seite 170: Τεχνικές Πληροφορίες
Τεχνικές Πληροφορίες Ηλεκτρική Σύνδεση Αν η συσκευή δεν λειτουργεί, επικοινωνήστε με την Υπηρεσία Τεχνικής Εξυπηρέτησης και ενημε- Το εξειδικευμένο άτομο που εγκαθιστά τη ρώστε για το είδος του προβλήματος που διαπι- συσκευή πρέπει να βεβαιωθεί ότι: στώσατε, αναφέροντας τα παρακάτω στοιχεία: •... - Seite 171 Внимательно ознакомьтесь с инструкциями для того чтобы получить максимальную отдачу от Вашей духовки. Сохраните это руководство, таким образом новый владелец, также сможет ознакомиться с его содержанием. Электро безопасность При установке духовки следует использовать провода • типа H05RR-F, H05SS-F или H07RN-F. Схема соединения...
- Seite 172 В случае неисправности отключите Вашу духовку. • В духовках, комбинированных с варочными • панелями, эти последние должны быть рекомендованы производителем духовки. Безопасность детей Не позволяйте детям приближаться к духовке во • время ее работы из-за опасности ожoгов. Дети младше 8 лет не должны приближаться к духовке •...
- Seite 173 Во время работы аппарат нагревается, • пользуйтесь защитными варежками для проведения манипуляций внутри духовки и избегайте дотрагиваться до нагревающих элементов. Изпользуйте только прилагаемый к Вашему • духовому шкафу зонд для измерения температуры (для моделей имеющих такие возможности). Чистка и уход Для...
- Seite 174 Перед Первым Другие Важные Указания Использованием В процессе производства в Вашем духовом • Духовой шкаф всегда должен работать при шкафу могли остаться масла и другие закрытой дверце. загрязняющие вещества. Для их удаления • Производитель не несет ответственности за следуйте в указанном порядке: использование...
-
Seite 175: Чистка И Уход
Чистка и Уход Внимание: • Затем следует вновь установить решетку гриля в изначальное положение. Для проведения любых манипуляций следует отключить духовой шкаф от электросети. Чистка Каталитических Панелей Чистка Внутренней Поверхности Если остатки пищи на эмали не удаляются при Духового шкафа обычной... - Seite 176 Чистка Дверцы Духовки Чистка Дверцы с Внутренним Стеклом Большого Размера Не следует использовать металлические мочалки, проволочные щетки, Инструкции по Разборке/Сборке промышленные или абразивные порошки Внутреннего Стекла которые могут поцарапать поверхность и 1 Открыть дверцу духового шкафа. разбить стекло дверцы духовки. 2 Потянуть...
- Seite 177 6 После чистки вновь установите стекла Причины следуя вышеприведенной схеме в Неисправностей обратном порядке. На установленном стекле должно читаться отпечатанное слово TERMOGLASS. Духовой шкаф не работает 7 Вновь установить верхний кант дверцы убедившись в том, что боковые язычки Убедитесь, что он включен в сеть. попадают...
-
Seite 178: Техническая Информация
Техническая Информация Электрическое Подключение Если Ваш аппарат не работает сообщите в Службу Технической Поддержки о Монтажник должен убедиться в том что: наблюдаемых неполадках и укажите: • Напряжение и частота сети соответствует 1 Номер серии (S-No) указанным в Таблице Характеристик. 2 Модель аппарата (Mod.) •... - Seite 179 Figure / Afbeeldingen / Εικόνες / Схемы Fig 1 Fig 2 Fig 3 Fig 4 Fig 5 Fig 6 Fig 7 Fig 8...
- Seite 180 Fig 9 Fig 10 Fig 11 Fig 12 Fig 13 Fig 14 Fig 15 Fig 16...
- Seite 181 Fig 17 Fig 18 Fig 19 A: 595-455 / B: 590-450 / C: 600-460 Fig 20 min. 40...
- Seite 182 Fig 21 Fig 22...
- Seite 183 Fig 23...
- Seite 185 Tablas de Cocinado HORNO Tabelas de Cozinhado FORNO Cooking Tables OVEN Tableaux de Cuissons FOUR Kochtabellen BACKOFEN...
- Seite 186 Español Los tiempos y las temperaturas indicados en las Tablas son orientativos. Las funciones de cocinado dependen de cada modelo. En general es recomen- dable que realice un precalentamiento del horno en vacío y en función . El tiempo de precalentamiento finaliza cuando se apaga el piloto de calentamiento Portugues Os tempos e as temperaturas indicados nas tabelas são para orientação.
- Seite 187 Peso Altura Función Temperat. Tiempo Recipiente ENTRANTES Peso Posição Função Temperat. Tempo Recipiente ENTRADAS Cooking Weight Tray Position Temperat. Time Receptacle STARTERS Mode Poids Position Températ. Temps Récipient ENTRÉES Fonction Gewicht Stellung Temperat. Zeit Gefäß VORSPEISEN Funktion (Kg) (min) Arroz al horno Paellera Inferior 180-200...
- Seite 188 Peso Altura Función Temperat. Tiempo Recipiente ENTRANTES Peso Posição Função Temperat. Tempo Recipiente ENTRADAS Cooking Weight Tray Position Temperat. Time Receptacle STARTERS Mode Poids Position Températ. Temps Récipient ENTRÉES Fonction Gewicht Stellung Temperat. Zeit Gefäß VORSPEISEN Funktion (Kg) (min) Tomates rellenos Bandeja Media 170-190...
- Seite 189 Peso Altura Función Temperat. Tiempo Recipiente PESCADOS Peso Posição Função Temperat. Tempo Recipiente PEIXES Cooking Weight Tray Position Temperat. Time Receptacle FISH Mode Poids Position Températ. Temps Récipient POISSONS Fonction Gewicht Stellung Temperat. Zeit Gefäß FISCH Funktion (Kg) (min) Besugo Bandeja Media 180-200...
- Seite 190 Peso Altura Función Temperat. Tiempo Recipiente PESCADOS Peso Posição Função Temperat. Tempo Recipiente PEIXES Cooking Weight Tray Position Temperat. Time Receptacle FISH Mode Poids Position Températ. Temps Récipient POISSONS Fonction Gewicht Stellung Temperat. Zeit Gefäß FISCH Funktion (Kg) (min) Salmón en Papillote Media Bandeja 180-200...
- Seite 191 Peso Altura Función Temperat. Tiempo Recipiente CARNES Peso Posição Função Temperat. Tempo Recipiente CARNES Cooking Weight Tray Position Temperat. Time Receptacle MEAT Mode Poids Position Températ. Temps Récipient VIANDES Fonction Gewicht Stellung Temperat. Zeit Gefäß FLEISCHGERICHTE Funktion (Kg) (min) Cochinillo Bandeja Media 190-210...
- Seite 192 Peso Altura Función Temperat. Tiempo Recipiente CARNES Peso Posição Função Temperat. Tempo Recipiente CARNES Cooking Weight Tray Position Temperat. Time Receptacle MEAT Mode Poids Position Températ. Temps Récipient VIANDES Fonction Gewicht Stellung Temperat. Zeit Gefäß FLEISCHGERICHTE Funktion (Kg) (min) Solomillo en Hojaldre Bandeja Media 180-200...
- Seite 193 Peso Altura Función Temperat. Tiempo Recipiente REPOSTERÌA Peso Posição Função Temperat. Tempo Recipiente CONFEITARIA Cooking Weight Tray Position Temperat. Time Receptacle CAKES AND DESSERTS Mode Poids Position Températ. Temps Récipient PÂTISSERIE Fonction Gewicht Stellung Temperat. Zeit Gefäß NACHTISCH Funktion (Kg) (min) Bizcocho Esponjoso Molde...
- Seite 194 Peso Altura Función Temperat. Tiempo Recipiente REPOSTERÌA Peso Posição Função Temperat. Tempo Recipiente CONFEITARIA Cooking Weight Tray Position Temperat. Time Receptacle CAKES AND DESSERTS Mode Poids Position Températ. Temps Récipient PÂTISSERIE Fonction Gewicht Stellung Temperat. Zeit Gefäß NACHTISCH Funktion (Kg) (min) Manzanas Asadas Bandeja...
- Seite 195 Peso Altura Función Temperat. Tiempo Recipiente REPOSTERÌA Peso Posição Função Temperat. Tempo Recipiente CONFEITARIA Cooking Weight Tray Position Temperat. Time Receptacle CAKES AND DESSERTS Mode Poids Position Températ. Temps Récipient PÂTISSERIE Fonction Gewicht Stellung Temperat. Zeit Gefäß NACHTISCH Funktion (Kg) (min) Media Tarta de Queso...
- Seite 197 Tabelle di cottura FORNO Kooktabellen OVEN Πίνακες Μαγειρέματος ΦΟΥΡΝΟΣ Кулинарные таблицы ДУХОВОЙ ШКАФ...
- Seite 198 Italiano I tempi e le temperature riportati nelle tabelle sono indicativi. Le funzioni di cottura variano da modello a modello. In generale è raccomandabile preris- caldare il forno vuoto utilizzando la funzione . Il tempo di preris- caldamento termina quando si spegne la spia pilota di riscaldamento. Nederlands De in de tabellen aangegeven tijden en temperaturen zijn slechts richtlijnen.
- Seite 199 Peso Altezza Funzione Temp. Tempo Recipiente ANTIPASTI Gewicht Hoogte Functie Temperat. Tijdsduur Schaal VOORGERECHTEN π π (Kg) (min) Stampo/recipiente 180-200 45-50 per la cottura Inferiore Riso al forno del riso Laag Gebakken rijst Paellera 0,35 170-190 35-40 Ρηχό σκεύος Χαμηλότερο Ρύζι...
- Seite 200 Peso Altezza Funzione Temp. Tempo Recipiente ANTIPASTI Gewicht Hoogte Functie Temperat. Tijd Schaal VOORGERECHTEN π π (Kg) (min) Pomodori ripieni 170-190 10-15 Media Vassoio Gevulde tomaten Midden Plaat 0,75 160-180 10-15 Τομάτες γεμιστές Μεσαίο Ταψί Фаршированые Средний Противень помидоры 160-180 10-15 Melanzane gratinate Superiore...
- Seite 201 Peso Altezza Funzione Temp. Tempo Recipiente PESCE Gewicht Hoogte Functie Temperat. Tijd Schaal VISGERECHTEN π π (Kg) (min) 180-200 30-35 Media Vassoio Pagello Midden Plaat Zeebrasem 170-190 25-30 Μεσαίο Ταψί Φαγκρί Средний Противень Красноперый спар 170-190 25-30 Orata al sale 190-210 25-30 Media...
- Seite 202 Peso Altezza Funzione Temp. Tempo Recipiente PESCE Gewicht Hoogte Functie Temperat. Tijd Schaal VISGERECHTEN π π (Kg) (min) 180-200 20-25 Salmone al cartoccio Media Vassoio Midden Plaat Zalm in Papillot 170-190 15-20 Μεσαίο Ταψί Σολομός σε λαδόχαρτο Средний Противень Лосось папильот 170-190 15-20 190-210...
- Seite 203 Peso Altezza Funzione Temp. Tempo Recipiente CARNE Gewicht Hoogte Functie Temperat. Tijd Schaal VLEESGERECHTEN π π (Kg) (min) 190-210 75-85 Vassoio Media Lattonzolo Midden Plaat Speenvarken 170-190 65-75 Μεσαίο Ταψί Γουρουνόπουλο Средний Противень Поросенок 180-200 80-85 180-200 60-65 Vassoio Coniglio Media 160-180 45-50...
- Seite 204 Peso Altezza Funzione Temp. Tempo Recipiente CARNE Gewicht Hoogte Functie Temperat. Tijd Schaal VLEESGERECHTEN π π (Kg) (min) Filetto in pasta sfoglia 180-200 35-40 Media Vassoio Lendenstuk Midden Plaat in bladerdeeg 160-180 30-35 Μεσαίο Ταψί Φιλέτο σε σφολιάτα Средний Противень Филе...
- Seite 205 Peso Altezza Funzione Temp. Tempo Recipiente DOLCI Gewicht Hoogte Functie Temperat. Tijd Schaal NAGERECHTEN π π (Kg) (min) 170-190 35-40 Media Stampo Pandispagna Midden Vorm Luchtige cake 160-180 30-35 Μεσαίο Φόρμα Κέικ αφράτο Средний Форма Воздушный бисквит 160-180 30-35 Tronchetto del gitano 170-190 10-15 Media...
- Seite 206 Peso Altezza Funzione Temp. Tempo Recipiente DOLCI Gewicht Hoogte Functie Temperat. Tijd Schaal NAGERECHTEN π π (Kg) (min) 180-200 35-40 Media Vassoio Mele al forno Midden Plaat Gepofte appel 170-190 25-30 Μεσαίο Ταψί Μήλα ψητά Средний Противень Запеченые яблоки 170-190 30-35 100-120 70-75...
- Seite 207 Peso Altezza Funzione Temp. Tempo Recipiente DOLCI Gewicht Hoogte Functie Temperat. Tijd Schaal NAGERECHTEN π π (Kg) (min) 180-200 45-50 Stampo Media Cheese cake Vorm Midden Kwarktaart 170-190 40-45 Μεσαίο Φόρμα Τσιζκέικ Средний Форма Сырный торт 170-190 35-40 Torta di mele in sfoglia Media Stampo Appeltaart...