Zimmer DERMATOM II Gebrauchsanweisung
Verfügbare Sprachen
Verfügbare Sprachen
Quicklinks
ENGLISH
®
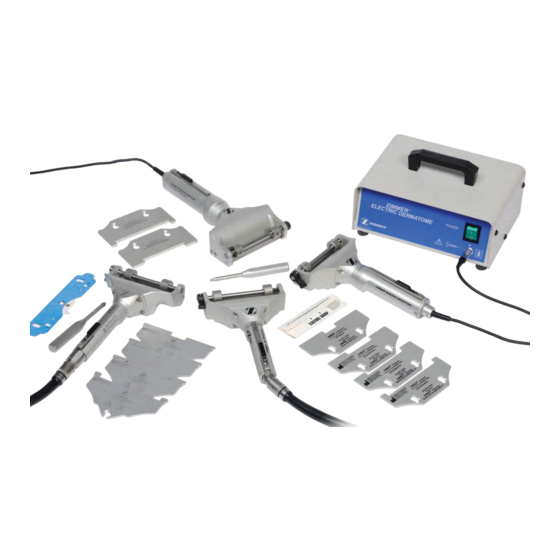
ZIMMER
DERMATOME II
BLADE INSTRUCTION MANUAL
INDICATIONS FOR USE
The Zimmer Dermatome II Blade, when used with the Zimmer
ness and width capabilities.
DESCRIPTION
The Zimmer Dermatome II Blade is a stainless steel blade attached to a molded mount.
WARNINGS AND PRECAUTIONS
•
For use only with the Zimmer Dermatome II.
•
Warning! Blade is sharp. Handle with care.
•
Reuse of a single use device that has come in contact with blood, bone, tissue or other body fl uids may lead to patient
or user injury. Possible risks associated with reuse of a single use device include, but are not limited to, mechanical
failure and transmission of infectious agents.
•
Sterile only if package is unopened and undamaged.
BLADE INSTALLATION
Lubrication of the blade is not necessary. Use a new, sterile blade for each procedure. Additional blades may be required
for extensive procedures.
•
Place the Zimmer Dermatome II handpiece throttle in the SAFE (O•) position. To place the handpiece in the SAFE
position, slide the safety lock on the throttle toward the blade end of the instrument to the SAFE (O•) position. Only the
SAFE symbol (O•) should be visible (see Figure 1).
•
Using the Zimmer Dermatome II screwdriver (REF 00-8851-205-00), loosen the handpiece width plate screw. Do not
remove the screw from the handpiece. If a width plate is already attached, remove by holding both sides and sliding/
lifting forward and up (Figure 2). Do not lift from the front as this will cause contact with the blade and possible injury.
•
If replacing a blade, remove the used blade before inserting a new one. Refer to BLADE REMOVAL section.
•
Place entire blade/cover assembly (see Figure 3) onto the handpiece such that the blade key fi ts into the notch of
the handpiece, and the handpiece drive pin mates with the hole in the blade (see Figure 4). Place your fi nger on the
blade assembly (white portion). While holding the blade assembly, lift one end of the blade cover (blue portion) and
remove blade cover from blade assembly (see Figure 5). Retain blade cover. The blade cover can be used for blade
removal from the device after use.
•
With the printing on the width plate facing out, place the width plate fl at on the face of the dermatome head (see Figure
6). Carefully slide back toward the screw, until the width plate hole is located under the mounting screw. Do not grasp
the front of the width plate as this will cause contact with the blade and possible injury. Using the screwdriver, gently
tighten the mounting screw. Do not over-tighten screw (see Figure 7).
•
NOTE: Choose the proper width plate to satisfy cutting requirements.
BLADE REMOVAL
•
Using the screwdriver, loosen the width plate screw. Do not remove the screw.
•
To remove the width plate, hold both sides of the width plate and slide forward and lift up. Do not lift from the front as
this will cause contact with the blade and possible injury (Figure 2).
•
Place the blade cover over one end of the blade assembly and snap it down onto other end of the blade assembly
(preferred, see Figure 8), or remove the blade assembly carefully by lifting up from under the blade assembly using the
fi nger access area (see Figure 9).
•
Dispose of used blade in a sharps container.
®
Dermatome II, is intended to provide variable graft thick-
1

Verwandte Anleitungen für Zimmer DERMATOM II


Inhaltszusammenfassung für Zimmer DERMATOM II
- Seite 6 Verfahren können zusätzliche Klingen erforderlich sein. • Stellen Sie an der Zimmer Dermatom II Handstückdrossel die Position SICHER (O•) ein. Um am Handstück die Position SICHER einzustellen, schieben Sie den Sicherheitsverschluss an der Drossel in Richtung Klingenende des Instruments in die Position SICHER (O•). Es sollte nur das Symbol SICHER (O•) sichtbar sein (siehe Abbildung 1).
- Seite 13 ENGLISH DEUTSCH A. Screw A. Schraube ΕΛΛΗΝΙΚΑ DANSK βίδα A. Skruen NEDERLANDS ITALIANO A. Schroef A. Vite SUOMI PORTUGUÊS A. Ruuvia A. Parafuso FRANÇAIS ESPAÑOL A. Vis A. Tornillo SVENSKA A. Skruven...
- Seite 14 ENGLISH DEUTSCH A. Drive pin hole A. Führungsstiftloch B. Blade key B. Klingenschlüssel ΕΛΛΗΝΙΚΑ DANSK A. Οπή ακίδας οδηγού A. Drevpindshul B. Πλήκτρο της λεπίδας B. Bladnøgle NEDERLANDS ITALIANO A. Gat voor stuurpin A. Foro perno guida B. Snijbladsleutel B. Chiave lama SUOMI PORTUGUÊS A.
- Seite 15 ENGLISH DEUTSCH A. Blade Cover Klingenabdeckung B. Drive pin hole B. Führungsstiftloch C. Blade key C. Klingenschlüssel D. Notch D. Nut ΕΛΛΗΝΙΚΑ DANSK Κάλυμμα της λεπίδας A. Bladdæksel B. Οπή ακίδας οδηγού B. Drevpind C. Πλήκτρο της λεπίδας C. Bladnøgle D εγκοπή...
- Seite 16 ENGLISH DEUTSCH A. Blade A. Klinge B. Blade Cover Klingenabdeckung ΕΛΛΗΝΙΚΑ DANSK Λεπίδα Blad Κάλυμμα της λεπίδας B. Bladdæksel NEDERLANDS ITALIANO A. Snijblad Lama B. Snijbladbeschermer B. Coprilama SUOMI PORTUGUÊS A. Terä A. Lâmina B. Teräsuoja B. Protecção da lâmina FRANÇAIS ESPAÑOL A.
- Seite 19 ENGLISH DEUTSCH A. Finger Indents A. Aussparungen für Finger ΕΛΛΗΝΙΚΑ DANSK A. Εσοχές δακτύλων A. Fordybninger til fi ngrene NEDERLANDS ITALIANO A. Vingeruitsparingen A. Rientranze per dita SUOMI PORTUGUÊS A. Sormiupotukset A. Recortes para os dedos FRANÇAIS ESPAÑOL A. Encoches pour les doigts A.
- Seite 20 Symbology Explication des symboles Símbolos Symbologi Symbologie Simbología Συμβολισμός Gebruikte symbolen Symbolik Symbolit Simboli 0086 ΠΡΟΣΟΧΗ: Ο ομοσπονδιακός CAUTION: Federal law (USA) Does not contain LATEX FREE νόμος (ΗΠΑ) περιορίζει την restricts this device to sale by or Latex ηση της ής αυτής μόνον από on the order of a physician ιατρούς...
- Seite 24 Zimmer Surgical, Inc. 200 West Ohio Avenue Dover, Ohio 44622 U.S.A. Issued: 08-11 Zimmer U.K. LTD. © 2011 Zimmer Surgical, Inc. 9 Lancaster Place Printed in U.S.A South Marston Park 06001810851 Swindon, Wiltshire SN3 4FP United Kingdom 0086...