Herunterladen Inhalt Inhalt Diese Seite drucken
Auriol HG00870A Bedienungs- Und Sicherheitshinweise

Auriol HG00870A Bedienungs- Und Sicherheitshinweise

Funkwecker
Inhaltsverzeichnis

Werbung

Verfügbare Sprachen
  • DE

Verfügbare Sprachen

  • DEUTSCH, seite 129
DESPERTADOR RADIOCONTROLADO /
SVEGLIA RADIOCONTROLLATA
DESPERTADOR
RADIOCONTROLADO
Instrucciones de utilización y de seguridad
RÁDIO DESPERTADOR
Instruções de utilização e de segurança
FUNKWECKER
Bedienungs- und Sicherheitshinweise
IAN 300076
SVEGLIA RADIOCONTROLLATA
Indicazioni per l'uso e per la sicurezza
RADIO-CONTROLLED
ALARM CLOCK
Operation and Safety Notes

Werbung

Inhaltsverzeichnis
loading

Inhaltszusammenfassung für Auriol HG00870A

  • Seite 1 DESPERTADOR RADIOCONTROLADO / SVEGLIA RADIOCONTROLLATA SVEGLIA RADIOCONTROLLATA DESPERTADOR Indicazioni per l’uso e per la sicurezza RADIOCONTROLADO Instrucciones de utilización y de seguridad RÁDIO DESPERTADOR RADIO-CONTROLLED ALARM CLOCK Instruções de utilização e de segurança Operation and Safety Notes FUNKWECKER Bedienungs- und Sicherheitshinweise IAN 300076...
  • Seite 2 Instrucciones de utilización y de seguridad Página IT / MT Indicazioni per l’uso e per la sicurezza Pagina 36 Instruções de utilização e de segurança Página 69 GB / MT Operation and Safety Notes Page DE / AT / CH Bedienungs- und Sicherheitshinweise Seite 127...
  • Seite 7: Inhaltsverzeichnis

    Introducción ..........Página Uso adecuado ............ Página Descripción de las piezas ........Página Características técnicas ........Página 10 Volumen de suministro ........Página 10 Indicaciones generales de seguridad ..........Página 11 Indicaciones de seguridad sobre las pilas / baterías ..........Página 14 Antes de la puesta en funcionamiento .........
  • Seite 8 Iluminar la pantalla LCD ........Página 31 Cambiar la unidad de temperatura ....Página 31 Cambiar las pilas ........Página 31 Solución de problemas ...... Página 32 Limpieza y conservación ....Página 32 Eliminación ............. Página 33 Declaración de conformidad ..
  • Seite 9: Introducción

    Despertador radiocontrolado Introducción Enhorabuena por la adquisición de su nuevo producto. Ha optado por un producto de alta calidad. El manual de instruc- ciones forma parte de este producto. Contiene importantes indicaciones sobre seguridad, uso y eliminación. Antes de usar el producto, familiarícese con todas las indicaciones de manejo y de seguridad.
  • Seite 10: Descripción De Las Piezas

    Descripción de las piezas Panel de control (ver Fig. A) 1 Botón ALARM: Pulse este botón para acceder al menú de configuración del reloj despertador. Aquí puede activar o desactivar la función de alarma y apagar la alarma. 2 Botón MODE: Pulse este botón para acceder al menú de configuración del producto.
  • Seite 11 encender también la iluminación de la pantalla LCD durante aprox. 5 segundos. La pantalla (ver Fig. B) 6 Campo de la hora: El campo de la hora indica la hora en el formato de 12 o 24 horas. En el formato de 12 horas, se muestra también la abreviatura AM (del latín “ante meridiem”...
  • Seite 12: Características Técnicas

    13 : Este símbolo le informa de que debe cambiar las pilas. 14 Campo del día de la semana: El campo del día de la semana indica en el modo reloj el día de la semana bajo la abreviatura DAY. Este dato se muestra en el idioma selec- cionado.
  • Seite 13: Indicaciones Generales De Seguridad

    Indicaciones generales de seguridad ¡Familiarícese con todas las ins- trucciones de uso y seguridad an- tes de utilizar este producto! Si entrega este producto a terceros, ¡no olvide adjuntar igualmente toda la documentación!
  • Seite 14 ¡PELIGRO DE MUERTE Y ACCIDENTE PARA BEBÉS Y NIÑOS PEQUEÑOS! Este producto puede ser utilizado por niños mayores de 8 años, así como por personas con capacida- des físicas, sensoriales o men- tales reducidas o que cuenten con poca experiencia y/o fal- ta de conocimientos, siempre y...
  • Seite 15 cuando se les haya enseñado cómo utilizar el producto de forma segura y hayan com- prendido los peligros que pue- den resultar de un mal uso del mismo. No permita que los ni- ños jueguen con el producto. La limpieza y el mantenimiento nunca deben llevarse a cabo por niños sin la vigilancia de un adulto.
  • Seite 16: Indicaciones De Seguridad Sobre Las Pilas / Baterías

    Indicaciones de seguridad sobre las pilas / baterías ¡PELIGRO DE MUERTE! Mantenga las pilas / baterías fuera del alcance de los niños. ¡En caso de ingestión, acuda inmediatamente a un médico! ¡PELIGRO DE EX- PLOSIÓN! No recargue nunca pilas no recargables.
  • Seite 17 pilas / baterías en cortocircuito ni tampoco las abra. Estas po- drían recalentarse, explotar o provocar un incendio. Nunca arroje pilas / baterías al fuego o al agua. No aplique cargas mecánicas sobre las pilas / baterías.
  • Seite 18 Riesgo de sulfatación de las pilas/baterías Evite condiciones y temperatu- ras extremas que puedan in- fluir en el funcionamiento de las pilas / baterías, por ejem- plo, acercarlas a un radiador o exponerlas directamente a la luz solar. ¡Si las pilas / baterías se sulfa- tan, evite el contacto de la piel, los ojos y las mucosas con los...
  • Seite 19 productos químicos! ¡En caso de entrar en contacto con el ácido, lave inmediatamente la zona afectada con abundan- te agua y busque atención médica! ¡UTILICE GUANTES DE SEGURIDAD! Las pilas / baterías sulfatadas o dañadas pueden provocar abrasiones al entrar en con- tacto con la piel.
  • Seite 20 imprescindible el uso de guantes de protección en estos casos. En caso de que las pilas se sulfaten, retírelas inmediata- mente del producto para evitar daños. Utilice únicamente pilas / baterías del mismo tipo. ¡No mezcle pilas / baterías usadas con nuevas!
  • Seite 21 Retire las pilas / baterías del producto si no va a utilizarlo durante un período de tiempo prolongado. Riesgo de daño del producto ¡Utilice exclusivamente el tipo de pila / batería indicado! Introduzca las pilas / baterías teniendo en cuenta la polaridad marcada con (+) y (-) tanto en...
  • Seite 22: Antes De La Puesta En Funcionamiento

    las pilas / baterías como en el producto. Limpie los contactos de la pila y del compartimento para pilas antes de colocarla. Retire inmediatamente las pilas / baterías agotadas del producto. Antes de la puesta en funcionamiento En primer lugar, retire la lámina protectora de la pantalla LCD del producto.
  • Seite 23 Nota: La pantalla LCD comprueba brevemente la funcionali- dad del aparato e inicia la recepción de la señal DCF (más información al respecto en el apartado “Activar la señal DCF manual o automáticamente). Este proceso puede durar algu- nos minutos y se indica mediante el parpadeo del símbolo DCF en el campo informativo 7 .
  • Seite 24: Puesta En Funcionamiento

    do controlado por la señal DCF, pero muestra una hora me- nos de la hora CET. Nota: Si el producto no recibe la señal en 7 minutos, el símbolo DCF se apaga. En este caso, cambie de sitio el pro- ducto e inicie la recepción de la señal de forma manual.
  • Seite 25 Meno. La recepción de la señal de radiofrecuencia dura por lo general entre 3 y 10 minutos aprox. La recepción puede verse considerablemente influenciada por ciertos impedimentos (por ej. por paredes de hormigón) o fuentes de interferencias (por ej. otros aparatos eléctricos). Cambie la ubicación del producto (por ej., cerca de una ventana), en caso de que haya problemas con la recepción.
  • Seite 26: Ajustes Básicos

    Ajustes básicos Mantenga pulsado el botón MODE 2 durante 3 segun- dos para pasar del modo reloj al modo de configuración general. Entonces, en cada paso pulse el botón + / RCC 3 o el botón - / ºC / ºF 4 para llevar a cabo una modificación. CONSEJO: Si mantiene pulsado el botón + / RCC o - / ºC / ºF, los números avanzan o retroceden más rápida- mente.
  • Seite 27 Los siguientes ajustes se pueden llevar a cabo de forma seguida: Paso Explicación de Configurar Descripción de la configuración zona horaria progra- mación Configurar Introduzca la di- zona horaria ferencia horaria con respecto a la zona horaria de Europa Central. Para ello, puede introducir una di- ferencia horaria...
  • Seite 28 Configurar La hora par- la hora padea en el campo de la hora 6 Configurar los Los minutos minutos parpadean en el campo de la hora 6 Configurar El año par- Los años pueden el año padea en el configurarse campo de la hasta 2099.
  • Seite 29 Configurar el El día de la día de la se- semana par- mana padea en el campo de la fecha 15 La siguiente configuración del idioma influye en la visuali- zación del día de la semana del campo 14 . Configurar el La abreviatu- El día de la sema-...
  • Seite 30: Ajuste De La Alarma

    Para confirmar el idioma, pulse el botón MODE 2 en el paso de configuración . El producto vuelve a indicar la hora. Ajuste de la alarma Mantenga pulsado el botón ALARM 1 durante 3 segun- dos para acceder del modo de la hora al modo de alarma. En la parte inferior izquierda aparece ahora la abreviatura ALM en el campo del día de la semana 14 .
  • Seite 31: Activar / Desactivar La Función De Alarma

    Pulse el botón + / RCC 3 o el botón - / °C / °F 4 para configurar la visualización de los minutos. CONSEJO: Si mantiene pulsado el botón + / RCC o el botón - / °C / °F, los números avanzan mucho más rápido hacia delante y hacia detrás.
  • Seite 32: Desconexión De La Señal De Alarma

    hora, la función de la alarma activada también se mues- tra con el símbolo de la alarma Desconexión de la señal de alarma Nota: Cuando la función de alarma está activada, la alar- ma suena a la hora indicada durante aprox. 2 minutos en un tono de volumen progresivo en 4 niveles.
  • Seite 33: Iluminar La Pantalla Lcd

    rece parpadeando el símbolo de la función de repetición de alarma Para apagar definitivamente la señal de alarma pulse el botón ALARM 1 . Ahora se apaga el símbolo de la función de repetición de alarma Iluminar la pantalla LCD Para iluminar la pantalla durante aprox.
  • Seite 34: Solución De Problemas

    Abra el compartimento de las pilas 17 tirando del asa de la tapa del compartimento de las pilas 16 . Saque las pilas usadas e inserte las nuevas pilas. Observe que la polaridad de las pilas es la correcta. Ésta se encuen- tra indicada en el compartimento de las pilas.
  • Seite 35: Eliminación

    Eliminación El embalaje está compuesto por materiales no contaminantes que pueden ser desechados en el centro de reciclaje local. Tenga en cuenta el distintivo del embalaje para la separación de residuos. Está compuesto por abre- viaturas (a) y números (b) que significan lo siguien- te: 1–7: plásticos / 20–22: papel y cartón / 80–98: materiales compuestos.
  • Seite 36 Para proteger el medio ambiente no tire el produc- to junto con la basura doméstica cuando ya no le sea útil. Deséchelo en un contenedor de reciclaje. Diríjase a la administración competente para obte- ner información sobre los puntos de recogida de residuos y sus horarios.
  • Seite 37: Declaración De Conformidad

    UE simplificada Nosotros, OWIM GmbH & Co. KG, Stiftsbergstraße 1, DE- 74167 Neckarsulm, ALEMANIA, declaramos que el producto (Despertador radiocontrolado HG00870A, HG00870B) cumple con las directivas 2014/53/UE, 2011/65/UE. Puede consultar la declaración de conformidad UE completa en la siguiente dirección web: www.owim.com...
  • Seite 38 Introduzione ..........Pagina 38 Utilizzo conforme ..........Pagina 38 Descrizione dei componenti ....... Pagina 39 Dati tecnici ............Pagina 41 Contenuto della confezione ....... Pagina 42 Avvertenze generali di sicurezza ........... Pagina 42 Avvertenze di sicurezza per batterie / accumulatori ............Pagina 45 Prima della messa in funzione ...
  • Seite 39 Illuminazione del display LC ......Pagina 63 Modifica dell‘unità di misura di visualizzazione della temperatura ..... Pagina 63 Sostituzione delle batterie ..... Pagina 63 Eliminazione dei guasti ..... Pagina 64 Pulizia e cura ..........Pagina 64 Smaltimento ..........Pagina 65 Dichiarazione di conformità...
  • Seite 40: Introduzione

    Sveglia radiocontrollata Introduzione Congratulazioni per l‘acquisto del vostro nuovo prodotto. Avete optato per un prodotto di alta qualità. Le istruzioni d‘u- so sono parte integrante di questo prodotto. Esse contengono importanti avvertenze sulla sicurezza, l‘impiego e lo smalti- mento. Prima dell‘utilizzo del prodotto, prendere conoscenza di tutte le istruzioni d‘uso e delle avvertenze di sicurezza.
  • Seite 41: Descrizione Dei Componenti

    Descrizione dei componenti Pannello comandi (v. fig. A) 1 Tasto ALARM: premere questo tasto per visualizzare le impostazioni della funzione allarme. La funzione allarme può essere attivata / disattivata e l‘allarme può essere spento. 2 Tasto MODE: premere questo tasto per accedere al menu delle impostazioni di base del prodotto.
  • Seite 42 sto è possibile anche accendere l‘illuminazione di sfondo del display LC per 5 secondi circa. Il display (v. fig. B) 6 Campo ora: nel campo dell‘ora viene visualizzato l‘orario con un formato 24 o 12 ore. Con il formato 12 ore viene visua- lizzato durante la mattina AM (lat.
  • Seite 43: Dati Tecnici

    13 : questo simbolo avverte quando le batterie devono essere cambiate. 14 Campo dei giorni della settimana: nel campo dei giorni della settimana viene visualizzato nella modalità orario sotto la dicitura DAY il giorno della settimana. Impostando la lingua è possibile visualizzare questa dicitura nella lingua scelta. Nella modalità...
  • Seite 44: Contenuto Della Confezione

    Contenuto della confezione 1 Sveglia 2 Batterie LR03 (già inserite) 1 Manuale di istruzioni Avvertenze generali di sicurezza In vista del primo utilizzo del pro- dotto, leggere attentamente tutte le istruzioni d‘uso e le avvertenze di sicurezza! In caso di cessione del prodotto a terzi, consegnare anche l‘intera documentazione! IT/MT...
  • Seite 45 PERICOLO LETALE E DI INCIDENTE PER BAM- BINI E INFANTI! Questo prodotto può essere usato da bambini a partire dagli 8 anni di età e da persone con capa- cità fisiche, sensoriali o mentali limitate, oppure senza espe- rienza e conoscenza in merito, qualora sorvegliati o istruiti IT/MT...
  • Seite 46 circa un uso sicuro del prodot- to, comprendendo i pericoli ad esso connessi. I bambini non possono giocare con questo prodotto. La pulizia e la manu- tenzione non devono essere eseguite da bambini senza la supervisione di un adulto. IT/MT...
  • Seite 47: Avvertenze Di Sicurezza Per Batterie / Accumulatori

    Avvertenze di sicu- rezza per batterie / accumulatori PERICOLO DI MORTE! Tenere le batterie / gli accu- mulatori fuori dalla portata dei bambini. In caso di ingeri- mento consultare subito un medico! PERICOLO DI ESPLOSIONE! Non IT/MT...
  • Seite 48 ricaricare mai batterie non ri- caricabili. Non cortocircuitare e / o aprire le batterie o gli ac- cumulatori. Ne conseguirebbe un rischio di incendio, surri- scaldamento o scoppio. Non gettare mai le batterie / gli accumulatori nel fuoco o in acqua.
  • Seite 49 Rischio di perdita di liquido dalle batterie / dagli accu- mulatori Evitare condizioni e tempera- ture estreme che possano ri- percuotersi sulle batterie/sugli accumulatori, quali ad esem- pio la vicinanza a termosifoni o l‘irraggiamento solare diretto. Evitare il contatto delle sostan- ze chimiche con la pelle, gli occhi e le mucose in caso di IT/MT...
  • Seite 50 fuoriuscita del liquido dalle batterie / dagli accumulatori! Sciacquare subito le aree col- pite con acqua pulita e con- sultare immediatamente un medico! INDOSSARE GUAN- TI PROTETTIVI! Batterie e accumulatori dan- neggiati o che presentano perdite possono corrodere la pelle in caso di contatto. Per- IT/MT...
  • Seite 51 tanto, in questo caso indossare sempre guanti di protezione adatti. Qualora si rilevassero perdite dalle batterie, rimuoverle im- mediatamente dal prodotto per evitare danni. Utilizzare solamente batterie / gli accumulatori dello stesso tipo. Non mischiare le batte- rie / gli accumulatori vecchi con quelli nuovi! IT/MT...
  • Seite 52 Rimuovere le batterie / gli ac- cumulatori, quando il prodotto non viene utilizzato a lungo. Rischio di danneggiamen- to del prodotto Utilizzare esclusivamente il tipo di batterie / di accumulatori indicato! Inserire le batterie / gli accumu- latori secondo il contrassegno della polarità...
  • Seite 53: Prima Della Messa In Funzione

    batteria / sull‘accumulatore del prodotto. Prima dell’inserimento, pulire i contatti della batteria e all’in- terno del vano portabatterie Rimuovere immediatamente le batterie / gli accumulatori esausti dal prodotto. Prima della messa in funzione Anzitutto rimuovere la pellicola protettiva dal display a cristalli liquidi del prodotto.
  • Seite 54 Nota: il display a cristalli liquidi eseguirà ora una breve verifica delle funzioni, e inizierà a ricevere il segnale radio DCF (per ulteriori chiarimenti si prega di leggere: attivazione manuale o automatica del segnale DCF). Questa procedura potrebbe durare alcuni minuti e viene visualizzata nel campo informativo 7 tramite il simbolo DCF lampeggiante.
  • Seite 55: Messa In Funzione

    di differenza in meno rispetto all’orario dell‘Europa centrale (CET), bisognerà impostare il fuso orario su + 01. Il prodotto ver- rà ora gestito sempre dal segnale DCF, ma l‘orario indicherà un‘ora prima del CET. Nota: qualora il prodotto non ricevesse alcun segnale dopo 7 minuti, il simbolo DCF scomparirà.
  • Seite 56 del mondo, situato nelle vicinanze di Francoforte sul Meno (Frankfurt / Main) in Germania – subisce una variazioni di 1 solo secondo nell’arco di 30.000 anni. In condizioni ottimali, il prodotto riceve questi segnali fino a una distanza di circa 1.500 km da Francoforte sul Meno.
  • Seite 57: Regolazione Delle Impostazioni Di Base

    manualmente: Tenere premuto il tasto + / RCC 3 per 3 secondi. Il lam- peggiamento del simbolo DCF nel campo informativo 7 indica che il prodotto prova a ricevere un segnale. Nota: è possibile fermare la ricezione del segnale radio premendo il tasto + / RCC 3 .
  • Seite 58 Nota: se non viene accettata alcuna impostazione entro 20 secondi, il prodotto torna automaticamente in modalità orario. Le seguenti impostazioni possono essere adottate una dopo l‘altra: IT/MT...
  • Seite 59 Fase Denominazio- Visualizza- Spiegazione di pro- ne dell'impo- zione stan- gram- stazione dard mazio- Impostazione Inserire lo sposta- zona di fuso mento di fuso orario orario sull'orario dell'Europa Cen- trale. E' possibile impostare lo spo- stamento di fuso orario dalle +12 fino a -12 ore.
  • Seite 60 Impostazione La visualizza- dell'ora zione ora nel campo ora 6 lampeg- Impostazione La visualizza- dei minuti zione dei mi- nuti nel cam- po ora 6 lampeggia Impostazione La visualizza- E' possibile impo- dell'anno zione dell'an- stare l'anno fino no nel capo al 2099.
  • Seite 61 Impostazione La visualizza- del mese zione del mese nel campo data 15 lampeg- Impostazione La visualizza- del giorno del zione del mese giorno del mese nel campo data 15 lampeg- La seguente impostazione della lingua ha effetto sulla vi- sualizzazione del giorno della settimana nel campo giorno della settimana 14 .
  • Seite 62: Impostazione Dell'allarme

    Impostazione L'abbrevia- Sono disponibili della lingua zione della le seguenti lingue: lingua attua- GER – Tedesco le lampeggia ITA = Italiano nel campo FRE = Francese del giorno NET = Olandese della settima- ESP = Spagnolo na 14 DAN = Danese ENG = Inglese Nella fase di programmazione premere il tasto...
  • Seite 63 po informativo 7 il simbolo dell‘allarme 11, il quale indica che la funzione di allarme è ora pronta al funzionamento. L‘indicatore dell’ora inizierà a lampeg- giare. Premere i tasti + / RCC 3 o ‒ / °C / °F 4 , per imposta- re la visualizzazione delle ore.
  • Seite 64: Accensione / Spegnimento Della Funzione Allarme

    Accensione / Spegnimento della funzione allarme Premere brevemente il tasto ALARM 1 . Il prodotto si trova in modalità di allarme e indica l‘orario di allarme impostato. Sul display viene visualizzato l‘indicatore ALM in basso a sinistra. Premere di nuovo il tasto ALARM, per spegnere o accen- dere la funzione allarme.
  • Seite 65: Utilizzo Della Funzione Dormiveglia

    simbolo di allarme fisso continuerà ad essere visualizzato nel campo informazioni 7 . Nota: se la funzione di allarme non viene spenta, il segnale di allarme suonerà anche il giorno seguente all‘orario impostato. Utilizzo della funzione dormiveglia Mentre il segnale acustico suona, premere il tasto SNOOZE / LIGHT 5 , per attivare la funzione snooze.
  • Seite 66: Sostituzione Delle Batterie

    Modifica dell‘unità di misura di visualizzazione della temperatura Premere il tasto ‒ / °C / °F 4 in modalità orario, per cambiare l‘unità di misura di visualizzazione tra Celsius (indicato con: °C) e Fahrenheit (indicato con: °F). Sostituzione delle batterie Nota: la batteria deve essere sostituita quando sul display LC compare il simbolo 13 .
  • Seite 67: Pulizia E Cura

    Eliminazione dei guasti Il prodotto contiene componenti elettronici sensibili. E‘ quindi possibile che apparecchi di trasmissione radio eventualmente posti nelle immediate vicinanze lo disturbino. Le scariche elet- trostatiche possono provocare disturbi di funzionamento. In presenza di tali disturbi, rimuovere le batterie per breve tem- po e poi reinserirle.
  • Seite 68 luoghi di raccolta e i loro orari di apertura presso l‘amministrazione competente. Osservare l‘identificazione dei materiali di imbal- laggio per lo smaltimento differenziato, i quali sono contrassegnati da abbreviazioni (a) e da numeri (b) con il seguente significato: 1–7: plastiche / 20–22: carta e cartone / 80–98: materiali compositi.
  • Seite 69 informazioni circa i siti di raccolta e i relativi orari di apertura. Le batterie / gli accumulatori difettosi o usati devono essere riciclati secondo la direttiva 2006/66/CE e relative modifiche. Smaltire le batterie / gli accumulatori e / o il prodotto presso i punti di raccolta indicati.
  • Seite 70: Dichiarazione Di Conformità Ue Semplificata

    UE semplificata Con la presente, OWIM GmbH & Co. KG, Stiftsbergstraße 1, DE-74167 Neckarsulm, GERMANIA, dichiara che il prodotto (Sveglia radiocontrollata HG00870A, HG00870B), è con- forme alle direttive 2014/53/UE, 2011/65/UE. Il testo completo della dichiarazione di conformità UE è disponibile al seguente indirizzo Internet: www.owim.com...
  • Seite 71 Introdução ..........Página Utilização correta ...........Página Descrição das peças ........Página Dados técnicos ..........Página Material fornecido ..........Página Indicações gerais de segurança ...........Página Indicações de segurança relativas às pilhas / baterias ..........Página Antes da colocação em funcionamento ........Página Colocação em funcionamento ........Página Configurar o sinal DCF automática ou manualmente ...........Página Efetuar as configurações de base ....Página Configurar a hora de alarme ......Página...
  • Seite 72 Utilizar a função de adormecer .....Página Iluminar o visor LC ..........Página Mudar a unidade da indicação de temperatura .............Página Substituir as pilhas ......Página Resolução de problemas .....Página Limpeza e cuidado ......Página Eliminação ..........Página Declaração de conformidade UE simplificada ........Página...
  • Seite 73: Introdução

    Rádio despertador Introdução Damos-lhe os parabéns pela aquisição do seu novo produto. Acabou de adquirir um produto de grande qualidade. O ma- nual de instruções é parte integrante deste produto. Contém indicações importantes referentes à segurança, utilização e eliminação. Familiarize-se com todas as indicações de utiliza- ção e de segurança do produto.
  • Seite 74: Descrição Das Peças

    Descrição das peças O painel de controlo (v. Fig. A) 1 Tecla ALARM: Prima esta tecla para entrar na configu- ração da função do alarme. Pode ativar / desativar a função do alarme, assim como desligar o alarme. 2 Tecla MODE: Prima esta tecla para entrar no menu da configuração de base do produto.
  • Seite 75 O visor (v. Fig. B) 6 Campo da hora: O campo de horas indica a hora em formato de 24 ou 12 horas. No formato 12 horas aí aparece de manhã a indicação AM (lat. „ante meridiem“ = de manhã) e à...
  • Seite 76: Dados Técnicos

    idioma selecionado. No modo de ativação do alarme e no modo alarme aparece aqui a indicação ALM. 15 Campo de data: O campo de data indica por baixo do título DATE o dia do mês e por cima do título MONTH o mês. Alternadamente também pode ser indicado neste campo o ano.
  • Seite 77: Indicações Gerais De Segurança

    Indicações gerais de segurança Familiarize-se com todas as indi- cações de utilização e de segu- rança do artigo! Se entregar o produto a terceiros, entregue tam- bém os respetivos documentos! PERI- GO DE MORTE E...
  • Seite 78 DE ACIDENTES PARA BE- BÉS E CRIANÇAS! Esse pro- duto pode ser utilizado por crianças a partir dos 8 anos, assim como por pessoas com capacidades físicas, sensoriais ou mentais reduzidas ou defi- ciências na experiência e co- nhecimento, se forem vigiadas ou instruídas em relação ao uso seguro do produto e se compreenderem os perigos...
  • Seite 79: Indicações De Segurança Relativas Às Pilhas / Baterias

    que daí possam resultar. As crianças não devem brincar com o produto. A limpeza e a manutenção pelo utilizador não devem ser realizadas por crianças sem vigilância. Indicações de segurança relativas às pilhas / baterias PERIGO DE MORTE! Man- tenha as pilhas e baterias fora...
  • Seite 80 do alcance das crianças. Se a pilha for ingerida, contacte imediatamente um médico! PERIGO DE EXPLO- SÃO! Nunca carre- gue pilhas não recarregáveis. Não faça ligação direta de pilhas ou baterias e / ou abra elas. As consequências pode- rão ser o sobreaquecimento, perigo de incêndio ou a explosão.
  • Seite 81 Nunca atire as pilhas ou bate- rias para chamas ou água. Não exponha as pilhas ou baterias a uma carga mecâni- ca demasiada elevada. Risco de derrame das pilhas / baterias Evite condições e temperatu- ras extremas que possam ter efeito sobre as pilhas ou bate-...
  • Seite 82 rias, por ex. elementos de batterie / gli solar direta. Se uma pilhas / baterias vazar, evite o contato com a pele, os olhos e tecidos e o material químico! Lave imediatamente a zona afetada com bastante água limpa abundante e con- sulte um médico logo que possível! UTILIZAR LUVAS...
  • Seite 83 pilhas ou baterias gastas ou danificadas podem provocar queimaduras ao entrarem em contacto com a pele. Por isso, nestes casos use sempre luvas adequadas. Caso as pilhas derramem, retire-as imediatamente do produto para evitar danos. Utilize apenas pilhas ou bate- rias do mesmo tipo.
  • Seite 84 misture pilhas novas com pilhas ou baterias antigas. Remova as pilhas ou baterias, se o produto não foi utilizado durante um longo período. Perigo de dano ao produto Utilize apenas o tipo de pilha ou bateria indicado! Insira as pilhas / baterias de acordo com a especificação...
  • Seite 85: Antes Da Colocação Em Funcionamento

    de polaridade (+) e (-) na pilha / bateria e produto. Antes de colocar as pilhas, limpe os contactos na pilha e no compartimento das pilhas. Retire de imediato as pilhas ou baterias gastas do produto. Antes da colocação em funcionamento Retire primeiro a película de proteção se se encontra no display LC do produto.
  • Seite 86 Nota: O display LC efetua agora um breve verificação fun- cional e inicia com a recepção do sinal rádio DCF (para uma explicação detalhada leia por favor: Ajuste automático ou manualmente o sinal DCF). Este processo pode durar alguns minutos e é indicado através da luz intermitente do símbolo DCF no campo Info 7 .
  • Seite 87: Colocação Em Funcionamento

    controlado pelo sinal DCF, mas o horário passa a apresentar mais uma hora antes do FCE. Nota: Se o produto não receber nenhum sinal após 7 minu- tos, o símbolo DCF apaga-se. Neste caso, mude, eventual- mente, o local de instalação do produto e inicie a recepção do sinal rádio manualmente.
  • Seite 88 mente, a recepção do sinal de rádio tem uma duração de aprox. 3–10 minutos. A recepção pode ser limitada de for- ma significativa por obstáculos (por ex. paredes em betão) ou fontes de interferência (por ex. outros aparelhos eléctri- cos). Se necessário, altere a localização do produto (por ex., aproximando-o de uma janela), caso se verifiquem dificulda- des de recepção.
  • Seite 89: Efetuar As Configurações De Base

    Efetuar as configurações de base Mantenha premida a tecla MODE 2 durante 3 segundos para ir do modo de relógio para o modo de funcionamento das definições básicas. Prima agora em cada dos seguintes passos de programa as teclas + / RCC 3 ou - / °C / °F 4 , para efetuar uma alteração.
  • Seite 90 As seguintes configurações podem ser efetuadas uma após a outra: Passo Designação Indicação Explicação de pro- da configura- padrão grama ção Configurar Indique a sua di- fuso horário ferença do fuso horário em rela- ção ao tempo da Europa Central. Pode configurar uma diferença do fuso horário...
  • Seite 91 Configurar as A indicação horas das horas pisca no campo de hora 6 Configurar os A indicação minutos dos minutos pisca no campo de hora 6 Configurar o A indicação Os anos podem do ano pisca ser definidos até no campo 2099.
  • Seite 92 Configurar o A indicação dia do mês do dia do mês pisca no campo de data 15 A seguinte configuração do idioma tem influência na indi- cação do dia de semana no campo do dia de semana 14 . Configurar A abreviatu- Estão disponíveis idioma...
  • Seite 93: Configurar A Hora De Alarme

    Prima no passo de programa a tecla MODE 2 para confirmar o idioma. O produto volta para a indica- ção da hora. Configurar a hora de alarme Mantenha premida a tecla ALARM 1 durante 3 segundos para ir do modo de relógio para o modo de funciona- mento do modo da hora de alarme.
  • Seite 94: Ligar / Desligar A Função Do Alarme

    CONSELHO: Se manter a tecla + / RCC ou - / °C / °F premida, surge um avanço ou retorno rápdio dos números. Prima novamente a tecla ALARM para confirmar a sua entrada. A indicação ALM volta a mudar para a indica- ção do dia de semana.
  • Seite 95: Desligar O Sinal De Alarme

    Desligar o sinal de alarme Nota: Com a função de alarme ativada soa no tempo de alarme configurado durante aprox. 2 minutos um sinal acústico que aumenta de volume em 4 estágios. O símbolo de alarme 11 pisca. Prima a tecla ALARM 1 para desligar o sinal acústico. O símbolo de alarme pára de piscar.
  • Seite 96: Iluminar O Visor Lc

    Iluminar o visor LC Prima a tecla SNOOZE / LIGHT 5 para iluminar o visor LC para cerca de 5 segundos. Mudar a unidade da indicação de temperatura Prima no modo de relógio a tecla - / °C / °F 4 para mu- dar a undidade da indicação de temperatura entre Celsius (indicação: °C) e Fahrenheit (indicação: °F).
  • Seite 97: Resolução De Problemas

    Volte a fechar o compartimento de pilhas. O seu produto está novamente pronto a ser utilizado. Resolução de problemas O produto contém componentes eletrónicos sensíveis. Por isso, é possível que aparelhos com radiotransmissão na proxi- midade imediata deste interfiram com o seu funcionamento. Cargas eletroestáticas podem causar interferências no funcio- namento.
  • Seite 98: Eliminação

    Eliminação A embalagem é feita de materiais não poluentes que podem ser eliminados nos contentores de reciclagem locais. Esteja atento à especificação dos materiais da em- balagem para a separação de lixo. Estas são iden- tificadas com abreviações (a) e números (b) com o seguinte significado: 1–7: Plásticos / 20–22: Papel e papelão / 80–98: Materiais compostos.
  • Seite 99 Não deposite o produto utilizado no lixo domésti- co, a favor da proteção do ambiente. Elimine-o de forma responsável. Pode informar-se no seu muni- cípio sobre os locais de recolha adequados e o seu período de funcionamento. As pilhas ou baterias avariadas ou gastas têm de ser recicladas de acordo com a diretiva 2006/66/CE e as suas alterações.
  • Seite 100: Declaração De Conformidade Ue Simplificada

    UE simplificada Através dessa, a OWIM GmbH & Co. KG, Stiftsbergstraße 1, DE-74167 Neckarsulm, ALEMANHA, declara que o produto (Rádio despertador HG00870A, HG00870B) corresponde às diretrizes 2014/53/UE, 2011/65/UE. O texto completo da declaração de conformidade UE está disponível no seguinte endereço da internet: www.owim.com...
  • Seite 101 Introduction ..........Page 101 Intended use ............Page 101 Parts description ..........Page 102 Technical data ............. Page 104 Scope of delivery ..........Page 104 General safety instructions ... Page 105 Safety instructions for batteries / rechargeable batteries ........Page 107 Before initial use ........
  • Seite 102 Replacing batteries ....... Page 122 Troubleshooting ........Page 123 Cleaning and care ........Page 123 Disposal ............Page 124 Simplified EU declaration of conformity ............Page 126 GB/MT...
  • Seite 103: Introduction

    Radio-controlled alarm clock Introduction We congratulate you on the purchase of your new product. You have chosen a high quality product. The instructions for use are part of the product. They contain important informa- tion concerning safety, use and disposal. Before using the product, please familiarise yourself with all of the safety information and instructions for use.
  • Seite 104: Parts Description

    Parts description The control panel (see Fig. A) 1 ALARM button: Press this button to access the alarm function. Use to activate / deactivate the alarm function and shut off the alarm. 2 MODE button: Press this button to access the general settings for the product.
  • Seite 105 The display (see Fig. B) 6 Time field: The time field indicates the time in 24 or 12 hour format. In 12 hour format it will also show AM (lat. „ante meridiem“ = before noon) and PM (lat. „post meridiem“ = after noon).
  • Seite 106: Technical Data

    15 Date field: The date field shows the day of the month under DATE and the month under MONTH. You may also set it to show the year. 16 Battery compartment cover (see Fig. C) 17 Battery compartment (see Fig. D) Technical data Operating voltage: (direct current)
  • Seite 107: General Safety Instructions

    General safety instructions Before using the product, please familiarise yourself with all of the safety information and instruc- tions for use! When passing this product on to others, please also include all the documents! DANGER TO LIFE GB/MT...
  • Seite 108 AND RISK OF ACCIDENTS FOR INFANTS AND CHIL- DREN! This product may be used by children age 8 years and up, as well as by persons with reduced physical, sensory or mental capacities, or lack- ing experience and / or knowl- edge, so long as they are su- pervised or instructed in the safe use of the product and un-...
  • Seite 109: Safety Instructions For Batteries / Rechargeable Batteries

    Children should not be allowed to play with the product. Clean- ing and user maintenance should not be performed by children without supervision. Safety instructions for batteries /re- chargeable batteries DANGER TO LIFE! Keep batteries/rechargeable batter- ies out of reach of children. If GB/MT...
  • Seite 110 accidentally swallowed seek immediate medical attention. DANGER OF EX- PLOSION! Never recharge non-rechargeable batteries. Do not short-circuit batteries/rechargeable batter- ies and/or open them. Over- heating, fire or bursting can be the result. Never throw batteries/recharge- able batteries into fire or water. GB/MT...
  • Seite 111 Do not exert mechanical loads to batteries/rechargeable batteries. Risk of leakage of batteries / rechargeable batteries Avoid extreme environmental conditions and temperatures, which could affect batteries/ rechargeable batteries, e.g. radiators/direct sunlight. GB/MT...
  • Seite 112 If batteries / rechargeable batteries have leaked, avoid contact with skin, eyes and mucous membranes with the chemicals! Flush immediately the affected areas with fresh water and seek medical attention! WEAR PROTECTIVE GLOVES! Leaked or damaged batteries/rechargea- ble batteries can cause burns on contact with the skin.
  • Seite 113 suitable protective gloves at all times if such an event occurs. In the event of a battery leak, immediately remove it from the product to prevent damage. Only use the same type of bat- teries/rechargeable batteries. Do not mix used and new bat- teries/rechargeable batteries.
  • Seite 114 product will not be used for a longer period. Risk of damage of the product Only use the specified type of battery/rechargeable battery! Insert batteries / rechargeable batteries according to polarity marks (+) and (-) on the battery / rechargeable battery and the product.
  • Seite 115: Before Initial Use

    Clean the contacts on the bat- tery and in the battery com- partment before inserting! Remove exhausted batteries/ rechargeable batteries from the product immediately. Before initial use First remove the protective film from the LC display of the product. Remove the plastic strip sticking out of the battery com- partment.
  • Seite 116 take a few minutes and is indicated by the DCF symbol flash- ing in the info field 7 . Upon successful reception of the radio signal the DCF symbol will stop flashing. The product is now in clock mode and indicates the current time (CET - Central European Time).
  • Seite 117: Initial Use

    radio signal manually. Please refer to chapter „Automatic or manual DCF signal activation“. Note: If a signal can‘t be received after changing the location the time must be set manually. Please refer to chapter „Chang- ing basic settings“. Initial use Automatic or manual DCF signal activation automatic:...
  • Seite 118: Changing Basic Settings

    dates its time once daily via DCF signal. The reception pro- cess is indicated with an animated DCF symbol 8 in the info field 7 . If reception is successful the DCF symbol will be stat- ic. If reception is unsuccessful the DCF symbol will disappear until the next successful reception.
  • Seite 119 Note: If no changes are made for 20 seconds the product will automatically return to clock mode. The following settings can be adjusted one after the other: Program- Setting Standard Explanation ming step display Setting the time Enter your time zone difference from Central Europe-...
  • Seite 120 Set hour The hour display in the clock field 6 flashes Set minutes The minute display in the clock field 6 flashes Set year The year The year can display in the be set up to date field 15 2099. flashes Set month The month...
  • Seite 121: Setting The Alarm

    The following language setting impacts the weekday display in the weekday field 14 . Set language The acronym Choose from for the current the following language languages: flashes in the GER – German weekday ITA - Italian field 14 FRE - French NET - Dutch ESP - Spanish DAN - Danish...
  • Seite 122: Turning The Alarm On / Off

    11 will appear in the info field 7 , indicating the alarm function is now ready for use. The hour display will flash. Press the + / RCC 3 or - / °C / °F 4 button to adjust the hour display. TIP: Press and hold the + / RCC or - / °C / °F button to quickly increase or decrease the numbers.
  • Seite 123: Switching Off The Alarm Signal

    Press the ALARM button again to turn the alarm on or off. The alarm symbol 11 indicates the alarm has been activated. Press the MODE button 2 again to leave alarm mode. The ALM display will disappear and the product returns to clock mode.
  • Seite 124: Lighting The Lc Display

    10 minute period the snooze symbol will flash next to the alarm symbol 11 . To actually shut the alarm off, press the ALARM 1 button. The snooze symbol will now turn off. Lighting the LC display Press the SNOOZE / LIGHT 5 button to light the LC display for approx.
  • Seite 125: Troubleshooting

    Open the battery compartment 17 by the handle of the battery compartment cover 16 . Remove the old batteries and insert new batteries. Check the polarity of the batteries. This is shown in the battery compartment. Close the battery compartment. Your product is now again ready for use.
  • Seite 126: Disposal

    Disposal The packaging is made entirely of recyclable materials, which you may dispose of at local recycling facilities. Observe the marking of the packaging materials for waste separation, which are marked with abbreviations (a) and numbers (b) with following meaning: 1–7: plastics / 20–22: paper and fibreboard / 80–98: composite materials.
  • Seite 127 To help protect the environment, please dispose of the product properly when it has reached the end of its useful life and not in the household waste. Information on collection points and their opening hours can be obtained from your local authority. Faulty or used batteries / rechargeable batteries must be recycled in accordance with Directive 2006/66/EC and its amendments.
  • Seite 128: Simplified Eu Declaration Of Conformity

    Hereby, OWIM GmbH & Co. KG, Stiftsbergstraße 1, DE-74167 Neckarsulm, GERMANY, declares that the roduct LCD Radio-controlled alarm clock, HG00870A, HG00870B, is in compliance with Directives 2014/53/EU and 2011/65/EU. The full text of the EU declaration of conformity is available at the following internet address: www.
  • Seite 129 Einleitung ............Seite 129 Bestimmungsgemäßer Gebrauch ...... Seite 129 Teilebeschreibung ..........Seite 130 Technische Daten ..........Seite 132 Lieferumfang ............Seite 133 Allgemeine Sicherheitshinweise ......Seite 133 Sicherheitshinweise für Batterien / Akkus ... Seite 136 Vor der Inbetriebnahme ....Seite 142 Inbetriebnahme ........
  • Seite 130: Konformitätserklärung

    Batterien wechseln ........ Seite 153 Fehlerbehebung ........Seite 154 Reinigung und Pflege ......Seite 154 Entsorgung ............. Seite 154 Vereinfachte EU- Konformitätserklärung ..... Seite 156 DE/AT/CH...
  • Seite 131: Einleitung

    Funkwecker Einleitung Wir beglückwünschen Sie zum Kauf Ihres neuen Produkts. Sie haben sich damit für ein hochwertiges Produkt entschieden. Die Bedienungsanleitung ist Teil dieses Produkts. Sie enthält wichtige Hinweise für Sicherheit, Gebrauch und Entsorgung. Machen Sie sich vor der Benutzung des Produkts mit allen Bedien- und Sicherheitshinweisen vertraut.
  • Seite 132: Teilebeschreibung

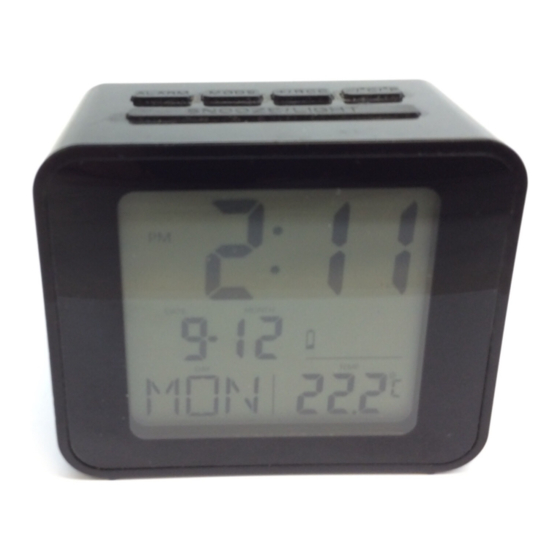
    Teilebeschreibung Das Bedienfeld (s. Abb. A) 1 ALARM-Taste: Drücken Sie diese Taste, um zur Einstel- lung der Alarmfunktion zu gelangen. Sie können die Alarm- funktion aktivieren / deaktivieren sowie den Alarm abschalten. 2 MODE-Taste: Drücken Sie diese Taste, um zum Grund- einstellungsmenü...
  • Seite 133 zuschalten. Ansonsten schalten Sie mit dieser Taste für ca. 5 Sekunden die Hintergrundbeleuchtung des LC-Displays ein. Das Display (s. Abb. B) 6 Uhrzeit-Feld: Das Uhrzeit-Feld zeigt die Uhrzeit im 24- oder im 12-Stunden-Format an. Im 12-Stunden-Format er- scheint dort vormittags auch die Anzeige AM (lat. „ante meri- diem“...
  • Seite 134: Technische Daten

    13 : Dieses Symbol informiert Sie darüber, dass die Batterien ausgetauscht werden müssen. 14 Wochentag-Feld: Das Wochentag-Feld zeigt im Uhrzeitmodus unter der Überschrift DAY den Wochentag an. Bei Einstellung der Sprache wird hier die gewählte Sprache angezeigt. Im Alarm-Aktivierungs-Modus und im Alarm-Mo- dus erscheint hier die Anzeige ALM.
  • Seite 135: Lieferumfang

    Lieferumfang 1 Funkwecker 2 Batterien LR03 (bereits eingesetzt) 1 Bedienungsanleitung Allgemeine Sicherheitshinweise Machen Sie sich vor der ersten Benutzung des Produkts mit allen Bedien- und Sicherheitshinweisen vertraut! Händigen Sie alle Unter- lagen bei Weitergabe des Pro- dukts an Dritte ebenfalls mit aus! DE/AT/CH...
  • Seite 136: Unfallgefahr Für Kleinkinder Und Kin

    LEBENS- UND UNFALLGEFAHR FÜR KLEINKINDER UND KIN- DER! Dieses Produkt kann von Kindern ab 8 Jahren und darü- ber sowie von Personen mit verringerten physischen, sensorischen oder mentalen Fähigkeiten oder Mangel an Erfahrung und Wissen benutzt werden, wenn sie beaufsichtigt DE/AT/CH...
  • Seite 137 oder bezüglich des sicheren Gebrauchs des Produkts unter- wiesen wurden und die daraus resultierenden Gefahren verste- hen. Kinder dürfen nicht mit dem Produkt spielen. Reinigung und Benutzerwartung dürfen nicht von Kindern ohne Beauf- sichtigung durchgeführt werden. DE/AT/CH...
  • Seite 138: Sicherheitshinweise Für Batterien / Akkus

    Sicherheitshinweise für Batterien / Akkus LEBENSGEFAHR! Halten Sie Batterien/Akkus außer Reich- weite von Kindern. Suchen Sie im Falle eines Verschluckens sofort einen Arzt auf! EXPLOSIONSGE- FAHR! Laden Sie nicht aufladbare Batterien niemals wieder auf. Schließen Sie Bat- terien/Akkus nicht kurz und/ DE/AT/CH...
  • Seite 139 oder öffnen Sie diese nicht. Überhitzung, Brandgefahr oder Platzen können die Folge sein. Werfen Sie Batterien/Akkus niemals in Feuer oder Wasser. Setzen Sie Batterien/Akkus keiner mechanischen Bela- stung aus. DE/AT/CH...
  • Seite 140: Risiko Des Auslaufens Von Batterien / Akkus

    Risiko des Auslaufens von Batterien / Akkus Vermeiden Sie extreme Bedin- gungen und Temperaturen, die auf Batterien/Akkus einwirken können z. B. auf Heizkörpern / direkte Sonneneinstrahlung. Wenn Batterien / Akkus ausge- laufen sind, vermeiden Sie den Kontakt von Haut, Augen und Schleimhäuten mit den Chemi- kalien! Spülen Sie die betrof- DE/AT/CH...
  • Seite 141 fenen Stellen sofort mit klarem Wasser und suchen Sie einen Arzt auf! SCHUTZHAND- SCHUHE TRAGEN! Ausgelaufene oder beschä- digte Batterien/Akkus können bei Berührung mit der Haut Verätzungen verursachen. Tra- gen Sie deshalb in diesem Fall geeignete Schutzhandschuhe. DE/AT/CH...
  • Seite 142 Im Falle eines Auslaufens der Batterien entfernen Sie diese sofort aus dem Produkt, um Be- schädigungen zu vermeiden. Verwenden Sie nur Batterien/ Akkus des gleichen Typs. Mischen Sie nicht alte Batte- rien/Akkus mit neuen! Entfernen Sie die Batterien/Ak- kus, wenn das Produkt längere Zeit nicht verwendet wird.
  • Seite 143: Risiko Der Beschädigung Des Produkts

    Risiko der Beschädigung des Produkts Verwenden Sie ausschließlich den angegebenen Batterie- typ/Akkutyp! Setzen Sie Batterien / Akkus gemäß der Polaritätskenn- zeichnung (+) und (-) an Batterie / Akku und des Produkts ein. DE/AT/CH...
  • Seite 144: Vor Der Inbetriebnahme

    Reinigen Sie Kontakte an der Batterie und im Batteriefach vor dem Einlegen! Entfernen Sie erschöpfte Batte- rien/Akkus umgehend aus dem Produkt. Vor der Inbetriebnahme Ziehen Sie zunächst die Schutzfolie auf dem LC-Display des Produkts ab. Ziehen Sie den Kunststoffstreifen, der aus dem Batteriefach ragt, heraus.
  • Seite 145 tisch oder manuell einstellen). Dieser Vorgang kann einige Mi- nuten dauern und wird durch Blinken des DCF-Symbols im In- fo-Feld 7 angezeigt. Bei erfolgreichem Empfang des Funkuhrsignals stoppt das Blinken des DCF-Symbols. Das Produkt befindet sich nun im Uhrzeit-Modus und zeigt die aktuelle Uhrzeit (MEZ - Mitteleuropäische Zeit) an.
  • Seite 146: Inbetriebnahme

    zwar jetzt noch von dem DCF-Signal gesteuert, zeigt aber die Uhrzeit als eine Stunde vor MEZ an. Hinweis: Sollte das Produkt nach 7 Minuten kein Signal empfangen haben, erlischt das DCF-Symbol. Wechseln Sie in diesem Fall ggf. den Standort des Produkts und starten Sie den Empfang des Funksignals manuell.
  • Seite 147 bis zu einer Distanz von ca. 1.500 km um Frankfurt / Main. Der Empfang des Funksignals dauert in der Regel ca. 3–10 Minuten. Der Empfang kann durch Hindernisse (z. B. Beton- wände) oder Störquellen (z. B. andere elektrische Geräte) er- heblich eingeschränkt werden.
  • Seite 148: Grundeinstellungen Vornehmen

    Hinweis: Sie können den Empfang unterbrechen, indem Sie erneut die Taste + / RCC 3 drücken. Das blinkende DCF-Si- gnal erlischt dann. Grundeinstellungen vornehmen Halten Sie die Taste MODE 2 3 Sekunden lang gedrückt, um aus dem Uhrzeit-Modus in die Betriebsart Grundein- stellungen zu gelangen.
  • Seite 149 Folgende Einstellungen können nacheinander vorgenommen werden: Pro- Bezeichnung Standard- Erläuterung gramm- der Einstellung anzeige schritt Zeitzone Geben Sie Ihre einstellen Zeitverschiebung zur mittel-europäi- schen Zeit ein. Sie können eine Zeitverschiebung von +12 Stunden bis -12 Stunden einstellen. Die Programmschritte sollten Sie nur vornehmen, wenn das DCF-Signal nicht empfangen wurde.
  • Seite 150 Stunden Die Stunden- einstellen anzeige im Uhrzeit-Feld 6 blinkt Minuten Die Minuten- einstellen anzeige im Uhrzeit-Feld 6 blinkt Jahr Die Jahres- Die Jahre können einstellen anzeige im bis 2099 einge- Datumsfeld stellt werden. 15 blinkt Monat Die Monats- einstellen anzeige im Datumsfeld 15 blinkt Monatstag...
  • Seite 151: Alarmzeit Einstellen

    Die folgende Spracheinstellung hat Auswirkung auf die Anzeige des Wochentags im Wochentag-Feld 14. Sprache Das Kürzel Folgende einstellen der aktuellen Sprachen sind Sprache verfügbar: blinkt im GER – Deutsch Wochen- ITA - Italienisch tag-Feld 14 FRE - Französisch NET - Niederlän- disch ESP - Spanisch DAN - Dänisch...
  • Seite 152 Alarmzeit-Modus zu gelangen. Unten links erscheint nun im Wochentag-Feld 14 die Anzeige ALM. Sie zeigt an, dass sich das Produkt im Alarm-Modus befindet. Gleich- zeitig erscheint im Info-Feld 7 das Alarmsymbol 11, welches anzeigt, dass die Alarmfunktion nun be- triebsbereit ist. Die Stundenanzeige blinkt. Drücken Sie die Taste + / RCC 3 bzw.
  • Seite 153: Alarmfunktion Ein- / Ausschalten

    Alarmfunktion ein- / ausschalten Drücken Sie kurz die ALARM-Taste 1 . Das Produkt befin- det sich im Alarm-Modus und zeigt die eingestellte Alarm- Zeit an. Unten links erscheint die Anzeige ALM. Drücken Sie erneut auf die ALARM-Taste, um die Alarm- funktion ein- bzw.
  • Seite 154: Schlummer-Funktion Verwenden

    Hinweis: Wenn Sie die Alarmfunktion nicht ausschalten, er- tönt das Alarm-Signal am nächsten Tag wieder zur eingestell- ten Zeit. Schlummer-Funktion verwenden Drücken Sie – während der Signalton des Produkts er- klingt - die Taste SNOOZE / LIGHT 5 , um die Schlum- merfunktion einzuschalten.
  • Seite 155: Einheit Der Temperaturanzeige Wechseln

    Einheit der Temperaturanzeige wechseln Drücken Sie im Uhrzeit-Modus die Taste - / °C / °F 4 , um die Einheit der Temperaturanzeige zwischen Celsius (Anzeige: °C) und Fahrenheit (Anzeige: °F) zu wechseln. Batterien wechseln Hinweis: Wenn die Anzeige 13 im LC-Display erscheint, müssen die Batterien gewechselt werden.
  • Seite 156: Reinigung Und Pflege

    Fehlerbehebung Das Produkt enthält empfindliche elektronische Bauteile. Da- her ist es möglich, dass es durch Funkübertragungsgeräte in unmittelbarer Nähe gestört wird. Elektrostatische Entladungen können zu Funktionsstörungen führen. Entfernen Sie bei solchen Funktionsstörungen kurzzeitig die Batterien und setzen Sie sie erneut ein. Reinigung und Pflege Reinigen Sie das Produkt nur äußerlich mit einem weichen, trockenen Tuch.
  • Seite 157 (b) mit folgender Bedeutung: 1–7: Kunststoffe / 20–22: Papier und Pappe / 80–98: Verbundstoffe. Das Produkt und die Verpackungsmaterialien sind recycelbar, entsorgen Sie diese getrennt für eine bessere Abfallbehandlung. Das Triman-Logo gilt nur für Frankreich. Möglichkeiten zur Entsorgung des ausgedienten Produkts erfahren Sie bei Ihrer Gemeinde- oder Stadtverwaltung.
  • Seite 158: Vereinfachte Eu-Konformitätserklärung

    Batterien / Akkus bei einer kommunalen Sammelstelle ab. Vereinfachte EU- Konformitätserklärung Hiermit erklärt OWIM GmbH & Co. KG, Stiftsbergstraße 1, DE-74167 Neckarsulm, DEUTSCHLAND, dass das Produkt (Funkwecker HG00870A/HG00870B) den Richtlinien 2014/53/EU und 2011/65/EU entspricht. Der vollständige Text der EU-Konformitätserklärung ist unter der folgenden Internetadresse verfügbar: www.owim.com DE/AT/CH...
  • Seite 159 DE/AT/CH...
  • Seite 160 OWIM GmbH & Co. KG Stiftsbergstraße 1 DE-74167 Neckarsulm GERMANY Model-No.: HG00870A / HG00870B Version: 03 / 2018 Estado de las informaciones Versione delle informazioni · Estado das informações · Last Information Update Stand der Informationen: 01 / 2018 Ident.-No.: HG00870A / B012018-5...

Diese Anleitung auch für:

Hg00870b

Inhaltsverzeichnis