National Geographic Colour Weather Center 5-in-1 Bedienungsanleitung

Verwandte Anleitungen für National Geographic Colour Weather Center 5-in-1


Inhaltszusammenfassung für National Geographic Colour Weather Center 5-in-1
- Seite 1 Wetterstation · Weather Station · Colour Weather Center 5-in-1 Bedienungsanleitung Instruction manual...
- Seite 2 Besuchen Sie unsere Website über den folgenden QR Code oder Weblink um weitere Informationen zu diesem Produkt oder die verfügbaren Übersetzungen dieser Anleitung zu finden. Visit our website via the following QR Code or web link to find further information on this product or the available translations of these instructions.
-
Seite 3: Inhaltsverzeichnis
Inhaltsverzeichnis 1 Impressum .............................. 5 2 Gültigkeitshinweis............................ 5 3 Eigenschaften .............................. 5 4 Zu dieser Anleitung ............................ 6 5 Allgemeine Sicherheitshinweise........................ 6 6 Teileübersicht Basisstation........................... 8 7 Teileübersicht Multisensor .......................... 9 8 Lieferumfang.............................. 9 9 Displayanzeigen ............................ 10 10 Vor der Inbetriebnahme .......................... 11 11 Stromversorgung herstellen ........................ 11 12 Gummibeläge anbringen .......................... 12 13 Multifunktions-Funksensor montieren und anbringen ................ 12 14 Signalübertragung............................ 13 15 Automatische Zeiteinstellung ........................ 13... - Seite 4 35 Hitzeindex.............................. 22 36 Taupunkt ............................... 22 37 Historie-Daten der letzten 24 Stunden...................... 22 38 MAX/MIN Wetterdaten .......................... 22 39 Helligkeit der Displayanzeige regulieren.................... 23 40 Technische Daten............................ 23 41 EG-Konformitätserklärung .......................... 23 42 Reinigung und Wartung.......................... 23 43 Entsorgung .............................. 24...
-
Seite 5: Impressum
Allgemeinen in Deutschland, der Europäischen Union und/oder weiteren Ländern waren-, mar- ken- und/oder patentrechtlich geschützt. © 2019 National Geographic Partners LLC. All rights reserved. NATIONAL GEOGRAPHIC and Yellow Border Design are trademarks of the National Geographic Society, used under license. -
Seite 6: Zu Dieser Anleitung
• Max-/Min-Werte Speicherung • Wettervorhersage (12~24 Stunden) • Mondphasen • Farbdisplay • Hintergrundbeleuchtung 4 Zu dieser Anleitung HINWEIS Diese Bedienungsanleitung ist als Teil des Gerätes zu betrachten! Lesen Sie vor der Benutzung des Geräts aufmerksam die Sicherheitshinweise und die Bedienungsan- leitung. - Seite 7 • Verpackungsmaterialien (Plastiktüten, Gummibänder, etc.) von Kindern fernhalten! Es besteht Er- stickungsgefahr! • Dieses Produkt beinhaltet Kleinteile, die von Kindern verschluckt werden können! Es besteht Ersti- ckungsgefahr! GEFAHR Explosionsgefahr! Bei unsachgemäßer Verwendung dieses Produkts besteht Explosionsgefahr. Beachten Sie unbedingt die nachfolgenden Sicherheitsinformationen, um eine Explosion zu vermeiden. •...
-
Seite 8: Teileübersicht Basisstation
6 Teileübersicht Basisstation Abb. 1: Alle Teile der Basisstation 1 ALARM/SNOOZE-Taste (Schlummerfunktion) 2 Farbdisplay 3 HISTORY-Taste (Messwerte der letzten 24 4 RAIN-Taste (Anzeige verschiedener Nieder- Stunden abrufen) schlagswerte) 5 BARO-Taste (Anzeige verschiedener Luft- 6 MAX/MIN-Taste (Wechsel zwischen Höchst-, druckwerte) Tiefst- oder aktueller Werteanzeige) 7 INDEX-Taste (Anzeigewechsel zwischen ge- 8 WIND-Taste (Wechsel zwischen durchschnitt- fühlter Temperatur, Taupunkt, Wärmeindex... -
Seite 9: Teileübersicht Multisensor
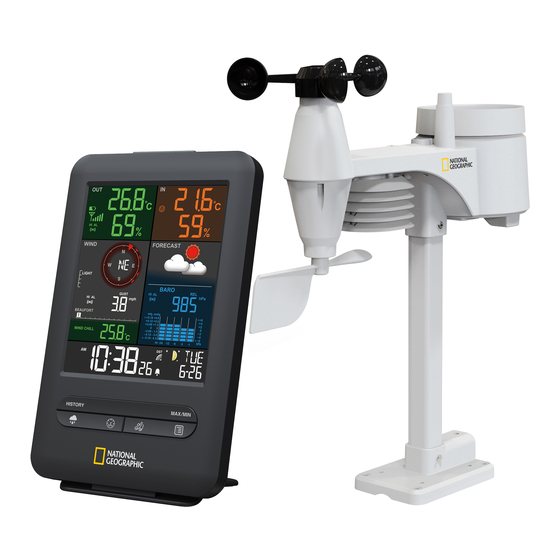
7 Teileübersicht Multisensor Abb. 2: Alle Teile des Multisensors 1 Regensammelbehälter 2 Antenne 3 Dosenlibelle 4 Windschalen (Windgeschwindigkeit) 5 Windfahne (Windrichtung) 6 Thermo-/Hygrometer 7 Rohrschelle 8 Montageschuh 9 Montagestange 10 Batteriefach(-abdeckung) 11 RESET-Knopf 12 LED-Funktionsleuchte 13 Montageschrauben mit -muttern 8 Lieferumfang Basisstation (A), Netzadapter (B), Standfuß... -
Seite 10: Displayanzeigen
9 Displayanzeigen Abb. 3: Displayanzeigen 1 Innentemperatur 2 Innenluftfeuchtigkeit 3 Komfortindikator (Klima) 4 Außentemperatur 5 Außenluftfeuchtigkeit 6 Batteriestandanzeige Außensensor 7 Empfangssignalstärke Außensensor 8 Temperaturalarm Außenbereich aktiv (HI/LO) 9 Windrichtung 10 Windrichtungsindikator 11 Windrichtungsindikator (der letzten Stunde) 12 Windgeschwindigkeitsstufen 13 Windalarm aktiv (HI/LO) 14 Windgeschwindigkeitswert: Mittelwert (AVERA- GE) oder letzte Böe (GUST) 15 Windgeschwindigkeitswert (mph, m/s, km/h,... -
Seite 11: Vor Der Inbetriebnahme
10 Vor der Inbetriebnahme HINWEIS Vermeidung von Verbindungsstörungen! Um Verbindungsstörungen zwischen den Geräten zu vermeiden, sind die folgenden Punkte bei der In- betriebnahme zu beachten. 1. Basisgerät (Empfänger) und Sensor (Sender) so nah wie möglich nebeneinander stellen/legen. 2. Stromversorgung für das Basisgerät herstellen und warten bis die Innentemperatur angezeigt wird. 3. -
Seite 12: Gummibeläge Anbringen
12 Gummibeläge anbringen Die mitgelieferten selbstklebenden Gummibeläge an den Rohrschellen wie abgebildet anbringen, um einen festeren Sitz der Montagestange zu gewährleisten. 13 Multifunktions-Funksensor montieren und anbringen Abhängig vom gewünschten Standort kann der Funksensor auf verschiedene Weise montiert werden. HINWEIS! Bei der Montage stets darauf achten, dass sich der obere Teile der Windfahne min- destens 1,5 Meter über dem Erdboden befindet. -
Seite 13: Signalübertragung
Montage an einem vertikal oder horizontal ausgerichteten Rohr 6. Die Schritte 1 bis 4 wie zuvor ausführen. 7. Die Unterseite des Montagefußes auf das Rohr aufsetzen und die Rohrschelle von der anderen Seite gegen das Rohr drücken. 8. Die 4 Schrauben durch die Bohrungen des Montagefußes und auf der anderen Seite durch die Bohrungen der Rohrschelle stecken. -
Seite 14: Zeitzone Einstellen
17 Zeitzone einstellen Um eine abweichende Zeitzone einzustellen, folgendermaßen vorgehen: 1. CLOCK-SET-Taste ca. 3 Sekunden drücken um in den Zeiteinstellungsmodus zu gelangen. 2. CLOCK-SET -Taste mehrmals drücken bis im Display die Einstellung für den Zeitversatz 00 Hr (Ti- me offset) angezeigt wird. 3. -
Seite 15: Automatische Messwerteübertragung
21 Automatische Messwerteübertragung Sobald die Stromversorgung hergestellt wurde, beginnt die Basisstation mit der Anzeige der Messwer- te für den Innenbereich. Die ersten vom Außensensor empfangenen Messwerte werden innerhalb von etwa 3 Minuten nach Inbetriebnahme angezeigt. Wird kein Signal empfangen, folgendermaßen vorgehen: SENSOR-Taste ca. -
Seite 16: Klimaindikator (Innen)
1. ALERT-Taste drücken bis der gewünschte Bereich angezeigt wird. 2. UP- oder DOWN-Taste drücken, um den Wert zu verändern. 3. ALERT-Taste drücken, um die Eingabe zu bestätigen und zur nächsten Einstellung zu wechseln. Höchst-Tiefstwert-Alarm ein-/ausschalten 4. ALERT-Taste drücken bis der gewünschte Bereich angezeigt wird. 5. -
Seite 17: Süd-Ausrichtung Des Sensors
26 Süd-Ausrichtung des Sensors Der Außensensor ist standardmäßig auf die Nord-Ausrichtung eingestellt. Manche Benutzer wü n - schen eine sü d liche Pfeilausrichtung, wenn Sie beispielsweise auf der sü d lichen Halbkugel leben (z.B. in Australien oder Neuseeland). 1 Nördliche Halbkugel 2 Südliche Halbkugel 1. -
Seite 18: Wettertrend
Abb. 4: (A) Nördliche Halbkugel, (B) Südliche Halbkugel 1 Neumond 2 Zunehmender Sichelmond 3 Erstes Viertel 4 Zunehmender Mond 5 Vollmond 6 Abnehmender Mond 7 Letztes Viertel 8 Abnehmender Sichelmond 28 Wettertrend Aus den gemessenen Werten wird ein Wettertrend für die nächsten 12-24 Stunden errechnet und fol- gendermaßen grafisch dargestellt: 1 Sonnig 2 Teilweise bewölkt... -
Seite 19: Barometrischer / Atmosphärischer Luftdruck
29 Barometrischer / Atmosphärischer Luftdruck Der atmosphärische Druck (nachfolgend „Luftdruck“ genannt) ist der Druck an jedem Ort der Erde, der durch das Gewicht der Luftschicht darüber begründet ist. Der Luftdruck steht im Verhältnis zum durch- schnittlichen Druck und fällt mit steigender Höhe allmählich ab. Meteorologen benutzen Barometer zur Messung des Luftdrucks. -
Seite 20: Beaufort-Skala
Anzeige-Modus wählen Drücken Sie die WIND-Taste mehrmals bis die gewünschte Rate auf dem Display angezeigt wird: • AVERAGE: Durchschnittliche Windgeschwindigkeit, errechnet aus allen Geschwindigkeiten der letzten 30 Sekunden • GUST: Stärkste Windböe seit der letzten Aufzeichnung Eine schnelle Übersicht über die gegenwärtigen Windbedingungen wird durch folgende Textinforma- tionen dargestellt: Windbedingung Leicht (LIGHT) -
Seite 21: Temperaturanzeige
1-3 knots | 0.3-1.5 m/s leichte Brise 5.6-11 km/h | 4-7 mph 1-3 knots | 0.3-1.5 m/s schwache Brise 12-19 km/h | 8-12 mph 7-10 knots | 3.5-5.4 m/s mäßige Brise 20-28 km/h | 13-17 mph 11-16 knots | 5.5-7.9 m/s frische Brise 29-38 km/h | 18-24 mph 17-21 knots | 8.0-10.7 m/s... -
Seite 22: Hitzeindex
35 Hitzeindex Drücken Sie die INDEX-Taste mehrmals bis HEAT INDEX (Hitzeindex) auf dem Display angezeigt wird. Hitzeindex Warnung Bedeutung > 55° C Extreme Gefahr Extremes Risiko einer Dehydra- tion/eines Hitzeschlags (> 130° F) 41° C – 54° C Gefahr Hitzekollaps wahrscheinlich (106°... -
Seite 23: Helligkeit Der Displayanzeige Regulieren
39 Helligkeit der Displayanzeige regulieren • Den [HI/LO/AUTO] Schalter verschieben, um die Helligkeit der Displayanzeige zu ändern. Die Helligkeit wird automatisch auf die nächste Stufe eingestellt. Reihenfolge der Helligkeitsstufen: hell [HI] > dunkel [LO] > automatisch [AUTO] • [AUTO] passt die Helligkeit je nach Umgebung automatisch an. 40 Technische Daten Basisstation Stromversorgung... -
Seite 24: Entsorgung
1. Drehen Sie den Auffangbehälter um etwa 30° gegen den Uhrzeigersinn. 2. Ziehen Sie den Trichter vorsichtig nach oben heraus. 3. Reinigen Sie ihn und entfernen Sie Schmutz und Insekten. 4. Setzen Sie den Trichter wieder ein, wenn er vollständig gereinigt und trocken ist. Thermo/Hygro-Sensor reinigen 5. - Seite 48 Service DE AT CH BE NL BE Fragen Produkt eventuellen Als u met betrekking tot het product vragen Reklamationen nehmen Sie bitte zunächst mit of eventuele klachten heeft kunt u contact dem Service-Center Kontakt auf, vorzugsweise opnemen met het service centrum (bij voorkeur per E-Mail.