FLORABEST HG02064 Bedienungs- Und Sicherheitshinweise
Funk-grillthermometer
Vorschau ausblenden
Andere Handbücher für HG02064:
- Bedienungsanleitung (53 Seiten) ,
- Bedienungs- und sicherheitshinweise (49 Seiten)
Inhaltsverzeichnis
Werbung
Verfügbare Sprachen
Verfügbare Sprachen
Quicklinks
FUNK-GRILLTHERMOMETER /
WIRELESS GRILL
THERMOMETER / THERMOMÈTRE
DE CUISSON ÉLECTRONIQUE
FUNK-GRILLTHERMOMETER
Bedienungs- und Sicherheitshinweise
WIRELESS GRILL THERMOMETER
Operation and Safety Notes
THERMOMÈTRE DE
CUISSON ÉLECTRONIQUE
Instructions d'utilisation et consignes de sécurité
DRAADLOZE BARBECUETHERMOMETER
Bedienings- en veiligheidsinstructies
BEZDRÁTOVÝ GRILOVACÍ TEPLOMĚR
Pokyny pro obsluhu a bezpečnostní pokyny
RADIOTERMÓMETRO DE COCINA
Instrucciones de utilización y de seguridad
RADIOTERMÓMETRO DE COZINHA
Instruções de utilização e de segurança
IAN 283328
®
Werbung
Kapitel
Inhaltsverzeichnis
Fehlerbehebung

Verwandte Anleitungen für FLORABEST HG02064


Inhaltszusammenfassung für FLORABEST HG02064
- Seite 1 ® FUNK-GRILLTHERMOMETER / WIRELESS GRILL THERMOMETER / THERMOMÈTRE DE CUISSON ÉLECTRONIQUE FUNK-GRILLTHERMOMETER Bedienungs- und Sicherheitshinweise WIRELESS GRILL THERMOMETER Operation and Safety Notes THERMOMÈTRE DE CUISSON ÉLECTRONIQUE Instructions d‘utilisation et consignes de sécurité DRAADLOZE BARBECUETHERMOMETER Bedienings- en veiligheidsinstructies BEZDRÁTOVÝ GRILOVACÍ TEPLOMĚR Pokyny pro obsluhu a bezpečnostní...
- Seite 2 DE / AT / CH Bedienungs- und Sicherheitshinweise Seite GB / IE Operation and Safety Notes Page FR / BE Instructions d‘utilisation et consignes de sécurité Page NL / BE Bedienings- en veiligheidsinstructies Pagina 51 Pokyny pro obsluhu a bezpečnostní pokyny Strana 66 Instrucciones de utilización y de seguridad...
-
Seite 5: Inhaltsverzeichnis
Legende der verwendeten Piktogramme ........Seite Einleitung ..........Seite Bestimmungsgemäße Verwendung ... Seite Teilebeschreibung ........Seite Technische Daten ........Seite Lieferumfang ..........Seite Sicherheitshinweise ....... Seite Sicherheitshinweise für Batterien / Akkus ... Seite 10 Vor der Inbetriebnahme ... Seite 11 Batterien einsetzen / wechseln (Sender) ... -
Seite 6: Legende Der Verwendeten Piktogramme
Legende der verwendeten Piktogramme Warn- und Sicherheits hinweise beachten! Produkt entspricht den produktspezifisch geltenden europäischen Richtlinien Gleichstrom LEBENSMITTELECHT! Geschmacks- und Geruchseigenschaften werden durch dieses Produkt nicht beeinträchtigt. °C Celsius °F Fahrenheit Funk-Grillthermometer Einleitung Wir beglückwünschen Sie zum Kauf Ihres neuen Produkts. -
Seite 7: Technische Daten
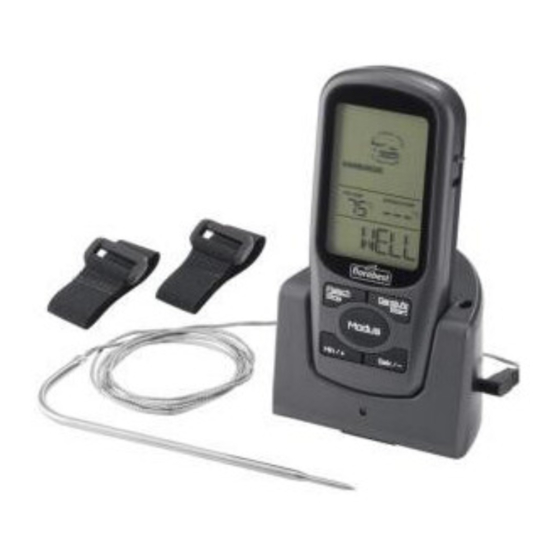
Sender Sender (mit Magnet) Temperaturfühler (mit Kabel) Stecker (Temperaturfühler) Buchse (Temperaturfühler) Rote LED-Anzeige Batteriefach EIN- / AUS-Schalter Batteriefachdeckel Klettverschluss LC-Display Fleischart Aktuelle Temperatur Garzustand Gartemperatur Technische Daten Empfänger: Batterie: 2 x 1,5 V Tempe ratur - messbereich: 0 °C–300 °C / 32 °F–572 °F Sendebereich: ca. - Seite 8 Halten Sie Kinder stets vom Pro- dukt fern. Dieses Produkt kann von Kindern ab 8 Jahren und darüber sowie von Personen mit verringerten physischen, sensorischen oder mentalen Fähigkeiten oder Mangel an Erfahrung und Wissen benutzt werden, wenn sie beaufsichtigt oder bezüglich des sicheren Ge- brauchs des Produkts unterwiesen wurden und die daraus resultieren- den Gefahren verstehen.
- Seite 9 dem Produkt kann zu Verletzungen führen. Stellen Sie sicher, dass sich weder andere Personen, insbesondere Kinder, noch Tiere am Produkt verbrennen können. Tragen Sie immer Schutzhand- schuhe, wenn Sie den Temperatur- fühler oder das Übertragungskabel während oder nach der Benutzung berühren.
-
Seite 10: Sicherheitshinweise Für Batterien / Akkus
Stellen Sie sicher, dass das Produkt ausgeschaltet ist, wenn Sie es nicht benutzen. Verwenden Sie das Produkt nicht, während es regnet. Das Produkt ist nicht wasserdicht. Sicherheitshinweise für Batterien / Akkus LEBENSGEFAHR! Halten Sie Batterien / Akkus außer Reichweite von Kindern. Suchen Sie im Falle eines Verschluckens sofort einen Arzt auf! EXPLOSIONSGE-... -
Seite 11: Risiko Der Beschädigung Des Produkts
SCHUTZHAND- SCHUHE TRAGEN! Ausgelaufene oder beschädigte Batterien / Akkus können bei Be- rührung mit der Haut Verätzungen verursachen. Tragen Sie deshalb in diesem Fall geeignete Schutz- handschuhe. Im Falle eines Auslaufens der Bat- terien entfernen Sie diese sofort aus dem Produkt, um Beschädi- gungen zu vermeiden. -
Seite 12: Batterien Einsetzen / Wechseln (Empfänger)
E ntfernen Sie den Klettverschluss hinter dem Batteriefachdeckel Ö ffnen Sie den Batteriefachdeckel , indem Sie den Verschluss in dessen Richtung ziehen. S etzen Sie zwei Batterien, 1,5 V AAA, in das Batteriefach ein. Achten Sie dabei auf die richtige Polarität (+ und –). Diese wird im Inneren des Batteriefachs angezeigt. -
Seite 13: Fleischart Und Garstufe Einstellen
rote LED-Anzeige wird während des Betriebs dauerhaft blinken. S chalten Sie den Empfänger ein, indem Sie den EIN- / AUS-Schalter am Boden des Empfängers auf „ON“ stellen. Ein Signal ertönt und das LC-Display leuchtet einmal kurz mit blauem und rotem Hintergrundlicht auf. Hinweis: Wenn der Temperaturfühler nicht mit dem Sender... -
Seite 14: Kerntemperatur Messen
LC-Display Bedeutung WELL Durchgebraten M WELL Fast durchgebraten MEDIUM Halb durchgebraten M RARE Rosa RARE Blutig D rücken und halten Sie die „Modus“-Taste etwa 3 Sekunden, um die Gartemperatur manuell einzustellen. Die Gartemperatur fängt an zu blinken. Sie können die Gartemperatur nun manuell über die „Min / +“... -
Seite 15: Timer-Funktion
Fleischstücke ebenso die gewünschte Garstufe erreicht haben. Weitere Teile Bratgut können nun entsprechend der gewünschten Garstufe zubereitet werden. Timer-Funktion S ollten Sie mit der erreichten Garstufe nicht zu- frieden sein und weiter braten wollen, so können Sie die Timer-Funktion des Empfängers ver- wenden. -
Seite 16: Position Während Des Betriebs
W ählen Sie die gewünschte Zeit, indem Sie die „Min / +“ -Taste oder „Sek / –“ -Taste drücken. Wenn Sie die Tasten länger drücken, wird die Zeiteinstellung beschleunigt. D rücken Sie die „Garstufe / Start“-Taste , um den Countdown zu beginnen. Das LC-Display zeigt die verbleibende Zeit an. -
Seite 17: Reinigung Und Pflege
mithilfe des mitgelieferten Klettverschlusses an einem Griff (zum Beispiel eines Grills) zu befestigen. Hinweis: Die Reichweite beträgt etwa 15 Meter. Stellen Sie sicher, dass die Entfernung zwischen Sen- und Empfänger nicht größer ist, sonst wird eine genaue Temperaturmessung unmöglich. Reinigung und Pflege Q Hinweis: Reinigen Sie das Produkt nach jedem Gebrauch. -
Seite 18: Entsorgung
Fehler Ursache / Lösung Die rote LED-An- Sind die Batterien verbraucht? zeige Setzen Sie neue Batterien ein. Sender leuchtet nicht. Die Anzeige des Setzen Sie die Batterien erneut LC-Displays in den Empfänger ein. des Empfängers ist nicht korrekt. Die aktuelle Tem- Sind die Batterien verbraucht? peratur zeigt... -
Seite 19: Konformitätserklärung
Wir OWIM GmbH & Co. KG, Stiftsbergstraße 1, DE-74167 Neckarsulm, DEUTSCHLAND, erklären in alleiniger Verantwortung, dass das Produkt: Funk- Grillthermometer · Model-Nr.: HG02064, Version: 12 / 2016, auf das sich diese Erklärung bezieht, mit den Normen / normativen Dokumenten der 1999 / 5 / EG übereinstimmt. - Seite 20 verfällt, wenn das Produkt beschädigt, nicht sachge- mäß benutzt oder gewartet wurde. Die Garantieleistung gilt für Material- oder Fabrikati- onsfehler. Diese Garantie erstreckt sich nicht auf Pro- duktteile, die normaler Abnutzung ausgesetzt sind (z. B. Batterien) und daher als Verschleißteile angesehen werden können oder für Beschädigungen an zerbrech- lichen Teilen, z.
- Seite 21 List of pictograms used ....Page 22 Introduction .......... Page 22 Intended Use ..........Page 22 Parts Description ......... Page 22 Technical Data ........... Page 23 Scope of delivery ........Page 23 Safety Notices ........Page 23 Safety instructions for batteries / rechargeable batteries.......
-
Seite 22: List Of Pictograms Used
List of pictograms used Observe the warnings and safety notices! Product meets the applicable European product-specific directives Direct current FOOD SAFE! This product has no adverse effect on taste or smell. °C Celsius °F Fahrenheit Wireless grill thermometer Introduction We congratulate you on the purchase of your new product. -
Seite 23: Technical Data
Red LED indicator Battery compartment ON / OFF switch Battery compartment cover Hook-and-loop fastener LC display Meat type Current temperature Doneness Cooking temperature Technical Data Receiver: Battery: 2 x 1.5 V Temperature measurement range: 0 °C–300 °C / 32 °F–572 °F Transmission Range: approx. - Seite 24 as by persons with reduced physical, sensory or mental capacities, or those lacking experience and / or knowledge, as long as they are supervised or instructed in the safe use of the product and they under- stand the associated risks. Do not allow children to play with the product.
-
Seite 25: Safety Instructions For Batteries / Rechargeable Batteries
women and people with weak immune systems. RISK OF PROPERTY DAMAGE! Never use the receiver or the trans- mitter in a microwave or an oven. Keep the product and its parts away from open flames and hot surfaces. Never expose the receiver or the transmitter to direct sunlight. - Seite 26 Never throw batteries / recharge- able batteries into fire or water. Do not exert mechanical loads to batteries / rechargeable batteries. Risk of batteries / rechargeable batteries leakage Avoid extreme environmental con- ditions and temperatures, which could affect batteries / rechargeable batteries, e.g.
-
Seite 27: Before Use
When inserting ensure the correct polarity! This is shown inside the battery compartment! Clean the contacts on the battery and in the battery compartment before inserting! Remove exhausted batteries / rechargeable batteries from the product immediately. Before use R emove all packaging material. Inserting / replacing batteries (Transmitter) E nsure that the product is switched off before... -
Seite 28: Handling And Use
Handling and use Note: Before using the product for the first time you should clean the temperature sensor with a soft, slightly dampened cloth and a mild detergent. Note: The temperature sensor is a sharp metal object which becomes hot during use. Therefore, be careful when using it! Selecting the temperature unit Y ou can select the temperature unit displayed by... -
Seite 29: Measuring The Core Temperature
Turkey Chicken Hamburgers Fish P ress the “Garstufe / Start“ button to change the degree of doneness. Each time you press the button, you change the degree of doneness se- lected in the order depicted in the following table. The current default temperature will now be dis- played as the cooking temperature on the LC display... - Seite 30 A fter a short amount of time, the temperature measurement and the core temperature of the meat will be displayed as the current tempera- ture on the LC display Over time, the current temperature will increase until the cooking temperature is reached.
-
Seite 31: Timer Function
Timer function I f you have reached the cooking temperature, are not satisfied and wish to continue cooking you can use the receiver‘s timer function. P ress the “Modus“ button once to activate the timer function. The LC display will now change to the timer function as depicted in the following illustration. -
Seite 32: Cleaning And Care
Transmitter position You can attach the transmitter to a magnetic sur- face using the two magnets on the bottom. It is also possible to attach the transmitter to a handle (i.e. on the grill) using the hook-and-loop fasteners supplied Note: The range amounts to 15 metres. Ensure that the distance between the transmitter and the receiver is no greater than this, as otherwise, a precise tem-... -
Seite 33: Disposal
Error Cause / solution The red LED indi- Are the batteries drained? cator on the Insert new batteries. transmitter does not light up. The display on the Reinsert the batteries in the LC display receiver the receiver incorrect. The current tempe- Are the batteries drained? rature displays... -
Seite 34: Declaration Of Conformity
We, OWIM GmbH & Co. KG, Stiftsbergstraße 1, DE-74167 Neckarsulm, GERMANY, hereby declare under our sole responsibility that the product: Wireless Grill Thermometer, Model No.: HG02064, Version: 12 / 2016, to which this declaration refers, complies with the standards / normative documents of 1999 / 5 / EC. - Seite 35 Légende des pictogrammes utilisés ....Page 36 Introduction .......... Page 36 Utilisation conforme ........Page 36 Descriptif des pièces ........Page 36 Caractéristiques techniques ....... Page 37 Contenu de la livraison ......Page 37 Consignes de sécurité ....Page 37 Consignes de sécurité...
-
Seite 36: Pictogrammes Utilisés
Légende des pictogrammes utilisés Respecter les avertissements et consignes de sécurité ! Le produit répond aux directives euro- péennes appliquées spécifiquement pour ce type de produit Courant continu UTILISATION ALIMENTAIRE ! Les propriétés de goût et d'odeur ne sont pas influencées par ce produit. °C Celsius °F... -
Seite 37: Caractéristiques Techniques
Émetteur Émetteur (avec aimant) Capteur de température (avec câble) Fiche (capteur de température) Prise (capteur de température) Voyant LED rouge Compartiment à piles Interrupteur MARCHE / ARRÊT Couvercle du compartiment à piles Fermeture auto-agrippante Écran à cristaux liquides Type de viande Température actuelle État de la cuisson Température de cuisson... - Seite 38 le matériel d'emballage. Risque d'asphyxie. Les enfants sous-estiment souvent le danger. Toujours tenir le produit à l'écart des enfants. Ce produit peut être utilisé par des enfants de 8 ans et plus ainsi que par des personnes avec des capacités physiques, sensorielles ou psychiques réduites ou man- quant d'expérience et de connais- sance, s'ils sont surveillés ou s'ils...
- Seite 39 problème au niveau du produit, adressez-vous à un électricien. ATTENTION ! RISQUE DE BRÛLURES ! Une manipulation inappropriée du produit peut en- traîner des blessures. Assurez-vous qu'aucune autre per- sonne, notamment un enfant, ou encore un animal, ne puisse se brûler au contact du produit. Toujours porter des gants de pro- tection, lorsque vous touchez le capteur de température ou le câble...
-
Seite 40: Consignes De Sécurité Relatives Aux Piles / Aux Piles Rechargeables
Ne pas exposer le récepteur ou l'émetteur à l'humidité. Assurez-vous que le produit est éteint, lorsque vous ne l'utilisez pas. Ne pas utiliser le produit lorsqu'il pleut. Le produit n'est pas étanche. Consignes de sécurité relatives aux piles / aux piles rechargeables DANGER DE MORT ! Rangez les piles / piles rechargeables hors de la portée des enfants. -
Seite 41: Risque D'endommagement Du Produit
cas de contact avec l’acide d’une pile, rincez la zone touchée à l’eau claire et consultez immédiatement un médecin ! PORTER DES GANTS DE PROTECTION ! Les piles / piles rechargeables endom- magées ou sujettes à des fuites peuvent provoquer des brûlures au contact de la peau. -
Seite 42: Avant La Mise En Service
Avant la mise en service Retirez entièrement les matériaux composant l'emballage. Mise en place / remplacement des piles (émetteur) Assurez-vous que le produit est éteint, avant de mettre en place / de remplacer les piles. Retirez la fermeture auto-agrippante derrière le couvercle du compartiment à... -
Seite 43: Choisir L'unité De Température
Choisir l'unité de température Vous pouvez sélectionner l'unité de température affichée, en déplaçant dans la position souhaitée (°C ou °F) le sélecteur de mode dans le com- partiment à piles Mise en service Allumez l'émetteur , en basculant sur ON l'in- terrupteur ON / OFF situé... -
Seite 44: Mesurer La Température À Cœur
Hamburger Poisson A ppuyez sur la touche «Garstufe / Start» , afin de paramétrer le niveau de cuisson. Chaque pres- sion de touche modifie la sélection dans l'ordre affiché, selon l'illustration suivante. La température actuellement préréglée s'affiche désormais comme température de cuisson sur l'écran à... - Seite 45 Peu de temps après, la prise de température et la température à cœur de la viande s'affichent sur l'écran à cristaux liquides comme température actuelle Au fil de la cuisson, la température actuelle augmente, jusqu'à atteindre la température de cuisson Dès que la température de cuisson est atteinte, l'écran à...
-
Seite 46: Fonction Minuteur
Fonction minuteur Si vous n'êtes pas satisfait du niveau de cuisson atteint, et si vous souhaitez poursuivre la cuisson, vous pouvez alors utiliser la fonction minuteur du récepteur Appuyez une fois sur la touche «Modus» , afin d'activer la fonction minuteur. L'écran à cristaux liquides bascule désormais sur la fonction mi- nuteur, comme indiqué... -
Seite 47: Nettoyage Et Entretien
de cuisson ou sur vos vêtements (ceinture, poche de pantalon, de chemise ou de tablier). Le clip de fixation contient deux aimants, qui per- mettent de fixer le récepteur à une surface aimantée. Position de l'émetteur Au moyen des deux aimants situés au dessous de l'émetteur , vous pouvez le placer sur une surface magnétique. -
Seite 48: Solution Aux Problèmes
Solution aux problèmes Q Dysfonctionne- Cause / solution ment Le produit ne fonc- Les piles sont-elles usagées ? tionne pas. Insérez des piles neuves. L'écran à cristaux Les piles sont-elles usagées ? liquides Insérez des piles neuves. faiblement éclairé sur le récepteur Le voyant LED Les piles sont-elles usagées ? rouge... -
Seite 49: Déclaration De Conformité
: Thermomètre de cuisson électronique réf. de modèle : HG02064, version : 12 / 2016, faisant l'objet de cette déclaration, est en conformité avec les normes / documents normatifs de la directive 1999 / 5 / CE. - Seite 50 Ce produit bénéficie d‘une garantie de 3 ans à comp- ter de sa date d’achat. La durée de garantie débute à la date d’achat. Veuillez conserver le ticket de caisse original. Il fera office de preuve d’achat. Si un problème matériel ou de fabrication devait sur- venir dans 3 ans suivant la date d‘achat de ce produit, nous assurons à...
- Seite 51 Legenda van de gebruikte pictogrammen .........Pagina 52 Inleiding ..........Pagina 52 Correct gebruik ........Pagina 52 Beschrijving van de onderdelen .....Pagina 52 Technische gegevens ......Pagina 53 Omvang van de levering ......Pagina 53 Veiligheidsinstructies ....Pagina 53 Veiligheidsinstructies voor batterijen / accu‘s ........Pagina 56 Voor de ingebruikname ..Pagina 57 Batterijen plaatsen / vervangen...
-
Seite 52: Legenda Van De Gebruikte Pictogrammen
Legenda van de gebruikte pictogrammen Waarschuwingen en veiligheidsinstructies in acht nemen! Product voldoet aan de productspecifiek geldende Europese richtlijnen Gelijkstroom GESCHIKT VOOR LEVENSMIDDE- LEN! Smaak- en geureigenschappen worden door dit product niet beïnvloed. °C Celsius °F Fahrenheit Draadloze barbecuethermometer Inleiding Hartelijk gefeliciteerd met de aankoop van uw nieuwe product. -
Seite 53: Technische Gegevens
Zender Zender (met magneet) Temperatuursensor (met kabel) Stekker (temperatuursensor) Bus (temperatuursensor) Rood LED-display Batterijvak AAN- / UIT-schakelaar Deksel batterijvak Klittenbandsluiting LC-display Soort vlees Actuele temperatuur Gaarstatus Gaartemperatuur Technische gegevens Ontvanger: Batterij: 2 x 1,5 V Temperatuurmeetbereik: 0 °C–300 °C / 32 °F–572 °F Zendbereik: ca. - Seite 54 bestaat verstikkingsgevaar. Kinde- ren onderschatten vaak de gevaren. Houd het product altijd buiten be- reik van kinderen. Dit product kan door kinderen vanaf 8 alsook personen met ver- minderde fysieke, sensorische of mentale vaardigheden of een gebrek aan ervaring en kennis worden gebruikt, als zij onder toe- zicht staan of geïnstrueerd werden met betrekking tot het veilige ge-...
- Seite 55 omgang met het product kan leiden tot letsel. Zorg ervoor dat andere personen, in het bijzonder kinderen, en dieren zich niet aan het product kunnen verbranden. Draag altijd beschermende hand- schoenen als u de temperatuursen- sor of de overbrengingskabel tijdens of na het gebruik aanraakt. Houd er rekening mee dat de con- sumptie van niet volledig gare dierlijke producten een gezond-...
-
Seite 56: Veiligheidsinstructies Voor Batterijen / Accu's
Veiligheidsinstructies voor batterijen / accu‘s LEVENSGEVAAR! Houd batte- rijen / accu‘s buiten het bereik van kinderen. Raadpleeg bij inslikken onmiddellijk een arts! EXPLOSIEGEVAAR! Laad niet oplaadbare batterijen nooit op. Sluit de batte- rijen / accu‘s niet kort en / of open deze niet. -
Seite 57: Voor De Ingebruikname
Als de batterijen lekken dient u deze direct uit het product te halen om beschadigingen te voorkomen. Gebruik alleen batterijen / accu‘s van hetzelfde type. Gebruik nooit nieuwe en oude batterijen / accu‘s door elkaar! Verwijder de batterijen / accu‘s, als u het product gedurende een langere periode niet gebruikt. -
Seite 58: Temperatuursensor Verbinden
P laats de ontvanger op de voorzijde hiervan en verwijder de bevestigingsclip door deze naar links te schuiven. S chuif het deksel van het batterijvak vervolgens weer met lichte druk naar onder. P laats twee batterijen, 1,5 V AAA, in het batterij- . -
Seite 59: Soort Vlees En Gaarniveau Instellen
vervolgens weer in. De huidige temperatuur wordt nu op het LC-display weergegeven. Soort vlees en gaarniveau instellen D ruk op de „Fleisch / Stop“ -toets om het soort vlees in te stellen. Het LC-display geeft het soort vlees weer. Elke druk op de toets verandert de keuze van de weergegeven volgorde over- eenkomstig de onderstaande opsomming. -
Seite 60: Kerntemperatuur Meten
Als de temperatuursensor de maximale tem- peratuur overschrijdt, knippert het LC-display met een rood achtergrondlicht en geeft het 'HI' weer. Bovendien is een akoestische waarschuwing hoorbaar. D ruk op de „Fleisch / Stop“ -toets om de waar- schuwing uit te schakelen en het meten van de temperatuur te beëindigen. -
Seite 61: Timer-Functie
Timer-functie A ls u niet met het bereikte gaarniveau tevreden bent en het vlees verder wilt garen, kunt u de ti- mer-functie van de ontvanger gebruiken. D ruk één keer op de „Modus“ -toets om de timer-functie te activeren. Het LC-display scha- kelt nu over naar de timer-functie, zoals op onder- staande afbeelding wordt weergegeven. -
Seite 62: Positie Tijdens Het Gebruik
Selecteer de gewenste tijd door de „Min / +“ -toets of de „Sek / –“ -toets in te drukken. Als u de toetsen langer ingedrukt houdt, wordt de tijdsin- stelling versneld. D ruk op de „Garstufe / Start“ -toets om de countdown te starten. -
Seite 63: Reiniging En Onderhoud
Reiniging en onderhoud Q Opmerking: reinig het product na elk gebruik. Gebruik geen agressieve reinigingsmiddelen, borstels met metalen of nylonharen alsmede scherpe of metalen voorwerpen zoals reinigings- middelen en messen, spachtels en dergelijke. Dit kan het product beschadigen. Het product is niet vaatwasserbestendig. Dompel de temperatuursensor of andere on- derdelen van het product nooit onder in water. -
Seite 64: Afvoer
Storing Oorzaak / oplossing De huidige tempe- Zijn de batterijen leeg? ratuur geeft Plaats nieuwe batterijen. '- - -' op de ontvan- Waarborg dat u de stekker weer. van de temperatuursensor correct in de bus aan de zijkant van de zender heeft gestoken. -
Seite 65: Conformiteitsverklaring
Wij, OWIM GmbH & Co. KG, Stiftsbergstraße 1, DE-74167 Neckarsulm, Duitsland, verklaren alleen verantwoordelijk te zijn, dat het product: Draadloze barbecuethermometer modelnr.: HG02064, versie: 12 / 2016, waarvoor deze verklaring geldt, voldoet aan de normen / normatieve documenten van 1999 / 5 / EG. - Seite 66 Vysvětlení použitých piktogramů ........Strana 67 Úvod ............Strana 67 Použití ke stanovenému účelu....Strana 67 Popis dílů ..........Strana 67 Technické údaje ........Strana 68 Obsah dodávky ........Strana 68 Bezpečnostní pokyny ....Strana 68 Bezpečnostní pokyny pro baterie a akumulátory .........
-
Seite 67: Vysvětlení Použitých Piktogramů
Vysvětlení použitých piktogramů Dbejte na výstrahy a bezpečnostní upozornění! Výrobek odpovídá specificky platným evropským směrnicím Stejnosměrný proud VHODNÉ PRO POTRAVINY! Výrobek neovlivňuje chuťové a aroma- tické vlastnosti potravin. °C Celsia °F Fahrenheita Bezdrátový grilovací teploměr Úvod Blahopřejeme Vám ke koupi nového výrobku. Rozhodli jste se pro kvalitní... -
Seite 68: Technické Údaje
Vypínač Víčko přihrádky na baterie Suchý zip LC-displej Druh masa Aktuální teplota Stav pečení Teplota pečení Technické údaje Přijímač: Baterie: 2 x 1,5 V Rozsah měření teploty: 0 °C–300 °C / 32 °F–572 °F Dosah signálu: cca 15 m Vysílač: Baterie: 2 x 1,5 V Obsah dodávky... - Seite 69 nebo byly poučeny o bezpečném používání výrobku a chápou ne- bezpečí, která z jeho používání vyplývají. Děti si nesmí s výrobkem hrát. Děti nesmějí bez dohledu provádět čištění ani uživatelskou údržbu. Tento výrobek není hračka. Děti často podceňují nebezpečí při za- cházení...
-
Seite 70: Bezpečnostní Pokyny Pro Baterie A Akumulátory
NEBEZPEČÍ POŠKOZENÍ VĚCÍ! Nikdy nepoužívejte přijímač nebo vysílač přímo v mikrovlnné troubě nebo v troubě na pečení. Chraňte výrobek a jeho příslušenství před otevřeným ohněm a horkými povrchy. Nevystavujte přijímač nebo vysílač přímému slunci. Nepoužívejte k obsluze výrobku žádné externí časové spínače nebo separátní... - Seite 71 Nebezpečí vytečení baterií / akumulátorů Zabraňte extrémním podmínkám a teplotám, např. na topení anebo na slunci, které mohou negativně ovlivnit funkci baterií nebo akumu- látorů. Vyhýbejte se kontaktu s pokožkou, očima a sliznicemi! Po kontaktu s kyselinou baterií ihned omyjte po- stižená...
-
Seite 72: Před Uvedením Do Provozu
Před uvedením do provozu O dstraňte úplně obalový materiál. Vložení a výměna baterií (vysílač) P řed vkládáním nebo výměnou baterií výrobek vypněte. O dstraňte suchý zip za víčkem přihrádky na baterie O tevřete víčko přihrádky na baterie vytažením uzávěru směrem k němu. V ložte dvě... -
Seite 73: Nastavení Druhu Masa A Stupně Pečení
červená LED kontrolka bude během provozu stále blikat. Z apněte přijímač nastavením vypínače dně přijímače do polohy „ON“. Zazní signál a LC-displej se krátce osvítí modrým a červe- ným světlem. Poznámka: Jestliže není teplotní čidlo spojené s vysílačem nebo bylo přerušeno spojení mezi přijí- mačem a vysílačem , pak ukazuje LC-displej... -
Seite 74: Měření Teploty Jádra
LC-displej Význam M RARE Růžové RARE Krvavé Přidržte na cca 3 vteřiny „Modus“ -tlačítko manuální nastavení teploty pečení . Teplota pe- čení začne blikat. Nyní můžete měnit teplotu pečení manuálně, pomocí „Min / +“ -tlačítka nebo „Sek / –“ -tlačítka . -
Seite 75: Funkce Časovače
Funkce časovače J estliže nejste s dosaženým stupněm propečení spokojeni a chcete dále péct, můžete použít funkci časovače v přijímači S tiskněte jednou „Modus“ -tlačítko pro aktivaci časovače. LC displej přejde na funkci časovače, jak ukazuje následující zobrazení. -
Seite 76: Umístění Za Provozu
Z volte požadovanou dobu, stisknutím „Min / +“ - tlačítka nebo „Sek / –“ -tlačítka . Přidržením tlačítka můžete nastavení urychlit. S tiskněte „Garstufe / Start“ -tlačítko pro start Countdownu. LC-displej ukazuje zbývající dobu. S tiskněte „Fleisch / Stop“ -tlačítko k přerušení... -
Seite 77: Skladování
K abel teplotního čidla čistěte vlhkým hadrem a jestliže je to zapotřebí s trochou prostředku na mytí nádobí. P o vyčištění nechejte všechny díly úplně uschnout. Skladování Q P řed skladováním výrobek vyčistěte (viz „Čištění a ošetřování”). J estliže nebudete výrobek delší dobu používat, vyjměte baterie z přijímače a vysílače S kladujte výrobek na suchém místě... -
Seite 78: Prohlášení O Shodě
DE-74167 Neckarsulm, NĚMECKO prohlašujeme na vlastní zodpovědnost, že je výrobek: Bezdrátový grilovací teploměr · model č.: HG02064, verze: 12 / 2016, na který se toto prohlášení vztahuje, vy- roben v souladu s normami a dokumenty 1999 / 5 / ES. -
Seite 79: Záruka
Záruka Výrobek byl vyroben s nejvyšší pečlivostí podle přís- ných kvalitativních směrnic a před odesláním prošel výstupní kontrolou. V případě závad máte možnost uplatnění zákonných práv vůči prodejci. Vaše práva ze zákona nejsou omezena naší níže uvedenou zárukou. Na tento artikl platí 3 záruka od data zakoupení. Zá- ruční... - Seite 80 Leyenda de pictogramas utilizados ..........Página 81 Introducción ........Página 81 Uso adecuado ........Página 81 Descripción de los componentes ...Página 81 Características técnicas ......Página 82 Contenido ..........Página 82 Indicaciones de seguridad ..Página 82 Indicaciones de seguridad sobre las pilas / baterías ........Página 85 Antes de la puesta en marcha ...........Página 86...
-
Seite 81: Leyenda De Pictogramas Utilizados
Leyenda de pictogramas utilizados ¡Tenga en cuenta las advertencias e indicaciones de seguridad! El producto cumple con las directivas europeas vigentes específicas sobre el producto. Corriente continua ¡APTO PARA ALIMENTOS! Este pro- ducto no modifica el sabor ni el olor de los alimentos. -
Seite 82: Características Técnicas
Enchufe (sensor de temperatura) Clavija (sensor de temperatura) Indicador LED rojo Compartimento para pilas Interruptor ENCENDIDO / APAGADO Tapa del compartimento para pilas Cierre adhesivo Pantalla LCD Tipo de carne Temperatura actual Estado de cocción Temperatura de cocción Características técnicas Receptor: Pilas: 2 x 1,5 V... - Seite 83 producto fuera del alcance de los niños. Este producto puede ser utilizado por niños mayores de 8 años, así como por personas con capacida- des físicas, sensoriales o mentales reducidas o que cuenten con poca experiencia y / o falta de conoci- mientos, siempre y cuando se les haya enseñado cómo utilizar el producto de forma segura y hayan...
- Seite 84 inadecuado del producto puede provocar lesiones. Asegúrese de que nadie, especial- mente los niños o animales, pueda quemarse con el producto. Utilice siempre guantes protectores cuando toque el sensor de tempe- ratura o el cable durante y tras su utilización. Por favor, tenga en cuenta que el consumo de alimentos de origen animal que no hayan sido comple-...
-
Seite 85: Indicaciones De Seguridad Sobre Las Pilas / Baterías
No utilice el producto al aire libre si está lloviendo. El producto no es resistente al agua. Indicaciones de seguri- dad sobre las pilas / baterías ¡PELIGRO DE MUERTE! Man- tenga las pilas / baterías fuera del alcance de los niños. ¡En caso de ingestión, acuda inmediatamente a un médico! ¡PELIGRO DE EXPLO-... -
Seite 86: Antes De La Puesta En Marcha
baterías sulfatadas o dañadas pueden provocar abrasiones al entrar en contacto con la piel. Por tanto, es imprescindible el uso de guantes de protección en estos casos. En caso de que las pilas se sulfa- ten, retírelas inmediatamente del producto para evitar daños. Utilice únicamente pilas / baterías del mismo tipo. -
Seite 87: Colocar / Cambiar Las Pilas (Receptor)
aparece indicada en el interior de la tapa del compartimento de las pilas Vuelva a colocar la tapa del compartimento de las pilas en su sitio . Asegúrese de que escucha cómo encaja. Colocar / cambiar las pilas (receptor) A segúrese de que el producto esté apagado an- tes de colocar o cambiar las pilas. -
Seite 88: Ajustar Tipo De Carne Y Nivel De Cocción
parpadeará de manera permanente durante el funcionamiento. Para conectar el receptor coloque el interrup- tor ENCENDIDO / APAGADO que se encuen- tra en la base del mismo en la posición “ON“. Al hacerlo, sonará una señal y la pantalla LCD se iluminará... -
Seite 89: Medir Temperatura Interior
Pantalla LCD Significado WELL Muy hecha M WELL Hecha MEDIUM En su punto M RARE Poco hecha RARE Muy poco hecha Pulse durante unos 3 segundos la tecla „Modus“ para ajustar manualmente la temperatura de coc- ción . La temperatura de cocción comenzará... -
Seite 90: Temporizador
Podrá preparar las demás piezas según el nivel de cocción deseado. Temporizador S i no queda satisfecho con el nivel de cocción alcanzado y desear seguir cocinando el alimento, podrá utilizar la función de temporizador del re- ceptor Pulse la tecla „Modus“ una vez para activar el temporizador. -
Seite 91: Posición Durante El Funcionamiento
Seleccione el tiempo deseado pulsando la tecla „Min / +“ o la tecla „Sek / –“ . Si pulsa las teclas durante más tiempo se acelerará el ajuste del tiempo. P ulse la tecla „Garstufe / Start“ para iniciar la cuenta atrás. La pantalla LCD mostrará... -
Seite 92: Limpieza Y Cuidado
Nota: El alcance asciende a unos 15 metros. Ase- gúrese de que la distancia entre el transmisor y el receptor no sea superior ya que de lo contrario será imposible realizar una medición exacta de la temperatura. Limpieza y cuidado Q Nota: Limpie el producto después de cada uso. -
Seite 93: Desecho Del Producto
El indicador de la Vuelva a colocar las pilas en pantalla LCD el receptor del receptor falla. ¿Se han gastado las pilas? El receptor Coloque pilas nuevas. estra la tempera- Asegúrese de que el enchufe tura actual del sensor de tempera- „- - -“. -
Seite 94: Declaración De Conformidad
Radiotermómetro de cocina, n.º de modelo: HG02064, versión: 12 / 2016, al que se refiere esta declaración, se ajusta a las normas y documentos normativos de la directiva 1999 / 5 / CE. - Seite 95 producto resulta dañado o es utilizado o mantenido de forma inadecuada. La garantía cubre defectos de materiales o de fabri- cación. Esta garantía no cubre aquellos componentes del producto sometidos a un desgaste normal y que, por ello, puedan considerarse piezas de desgaste (por ej.
- Seite 96 Legenda dos pictogramas utilizados ...........Página 97 Introdução ........Página 97 Utilização adequada ......Página 97 Descrição das peças ......Página 97 Dados técnicos ........Página 98 Material fornecido ........Página 98 Indicações de segurança ..Página 98 Indicações de segurança relativas às pilhas / baterias ....Página 101 Antes da utilização ....Página 102 Colocar / substituir as pilhas (Emissor) ...Página 102...
-
Seite 97: Legenda Dos Pictogramas Utilizados
Legenda dos pictogramas utilizados Esteja atento aos avisos de segurança e alertas! O produto corresponde às diretrizes europeias específicas do produto Corrente contínua SEGURO PARA ALIMENTOS! O sabor e o odor natural dos alimentos não são afetados por este produto. °C Celsius °F... -
Seite 98: Dados Técnicos
Ficha (Termostato) Conexão (Termostato) Indicação LED vermelha Compartimento das pilhas Interruptor LIGAR / DESLIGAR Tampa do compartimento das pilhas Fecho adesivo Visor LC Tipo de carne Temperatura atual Estado de cozimento Temperatura de cozedura Dados técnicos Receptor: Pilha: 2 x 1,5 V Amplitude de medição da temperatura: 0 °C–300 °C / 32 °F–572 °F... - Seite 99 Este produto pode ser utilizado por crianças a partir dos 8 anos, assim como por pessoas com capacida- des físicas, sensoriais ou mentais reduzidas ou deficiências na expe- riência e conhecimento, se forem vigiadas ou instruídas em relação ao uso seguro do produto e se compreenderem os perigos que possam resultar disto.
- Seite 100 Sempre utilize luvas de proteção quando tocar no termostato ou cabo de transmissão antes ou após a utilização. Por favor, esteja atento para o fato de que alimentos animais não com- pletamente cozidos podem ser perigosos para bebés, crianças, grávidas ou pessoas com sistema imunológico fraco.
-
Seite 101: Indicações De Segurança Relativas Às Pilhas / Baterias
Indicações de segurança relativas às pilhas / baterias PERIGO DE MORTE! Mantenha as pilhas e baterias fora do alcance das crianças. Se a pilha for inge- rida, contacte imediatamente um médico! PERIGO DE EXPLO- SÃO! Nunca carregue pilhas não recarregáveis. Não faça ligação direta de pilhas ou baterias e / ou abra elas. -
Seite 102: Antes Da Utilização
Por isso, nestes casos use sempre luvas adequadas. Caso as pilhas derramem, retire-as imediatamente do produto para evitar danos. Utilize apenas pilhas ou baterias do mesmo tipo. Não misture pilhas novas com pilhas ou baterias antigas. Remova as pilhas ou baterias, se o produto não foi utilizado durante um longo período. -
Seite 103: Colocar / Substituir As Pilhas (Recetor)
Colocar / substituir as pilhas (Recetor) C ertifique-se de que o produto esteja desligado antes de inserir / trocar as baterias. C oloque o recetor no lado frontal e remova o clip de fixação empurrando ele para a es- querda. E mpurre posteriormente a tampa do compartimento de pilhas com leve pressão para baixo. -
Seite 104: Selecionar Tipo De Carne E Grau De Cozimento
Desligue o recetor através do interruptor de LIGAR / DESLIGAR por cerca de 3 segundos e ligue nova- mente. A temperatura atual é mostrada no visor Selecionar tipo de carne e grau de cozimento P rima a „Fleisch / Stop“ -Tecla , para selecio- nar o tipo de carne. -
Seite 105: Medir Temperatura Interna
Nota: A temperatura máxima para o termostato é de 300 °C / 572 °F. Quando o termostato ultrapassar a temperatura máxima, o visor LC pisca com luz traseira vermelha e mostra „HI“. Adicionalmente, um aviso sonoro é emitido. P rima a „Fleisch / Stop“ -Tecla , para desligar o sinal de aviso e encerrar a medição da tempe- ratura. -
Seite 106: Função Temporizador
Função temporizador C aso não estejas satisfeito com o grau de cozimento e queres cozinhar mais, podes usar a função de temporizador P rima a „Modus“ -Tecla uma vez para ativar a função de temporizador. O visor LC muda para a função de temporizador, como mostrado na seguinte figura. -
Seite 107: Posição Durante A Operação
E scolha o tempo desejado primando a „Min / +“ -Tecla ou „Sek / –“ -Tecla . Se primar a tecla por mais tempo, o ajuste de tempo é acelerado. P rima a „Garstufe / Start“ -Tecla , para iniciar a contagem. -
Seite 108: Limpeza E Conservação
Nota: O alcance corresponde à 15 metros. Certifi- que-se de que a distância entre emissor e recetor não é maior, pois senão uma medição exata da temperatura não é possível. Limpeza e conservação Q Nota: Limpe o produto após cada utilização. Não utilize detergentes agressivos, escovas com metal ou nylon como também objetos afiados ou metálicos como facas, colheres e similares. -
Seite 109: Eliminação
Erro Causa / Solução A temperatura As pilhas estão gastas? atual mostra Insira pilhas novas. “- - -“ no recetor Certifique-se de que a ficha do termostato esta correta- mente inserida na tomada no lado do emissor Nota: O produto contém componentes eletrónicos sensíveis. -
Seite 110: Declaração De Conformidade
Stiftsbergstraße 1, DE-74167 Neckarsulm, ALEMANHA, declaramos, sob a nossa inteira responsabilidade que o produto: Radiotermómetro de cozinha · Modelo-Nr.: HG02064, Versão: 12 / 2016, relacionado a essa declaração, corresponde às normas / aos documen- tos normativos da diretiva 1999 / 5 / CE. - Seite 111 Com a troca do aparelho, de acordo com DL 67 / 2003, o tempo de garantia se inicia novamente.
- Seite 112 OWIM GmbH & Co. KG Stiftsbergstraße 1 DE-74167 Neckarsulm GERMANY Model-No.: HG02064 Version: 12 / 2016 Stand der Informationen · Last Information Update · Version des informations · Stand van de informatie · Stav informací · Estado de las informaciones · Estado das informações: 01 / 2017 ·...