Herunterladen Inhalt Inhalt Diese Seite drucken
Inhaltsverzeichnis

Werbung

Verfügbare Sprachen

Verfügbare Sprachen

Radio Controlled Quadcopter RTF
D
Betriebsanleitung
G
Instruction Manual
F
Avertissement de sécurité
I
Avvertenze di sicurezza
Seite
2 - 21
Page
22 - 41
Page
42 - 44
Pagina 45 - 47
500507065 // Stand: Juli 2015

Werbung

Kapitel

Inhaltsverzeichnis
loading

Inhaltszusammenfassung für Carson X4 Micro 500507065

  • Seite 1 Radio Controlled Quadcopter RTF Betriebsanleitung Seite 2 - 21 Instruction Manual Page 22 - 41 Avertissement de sécurité Page 42 - 44 Avvertenze di sicurezza Pagina 45 - 47 500507065 // Stand: Juli 2015...
  • Seite 2: Garantiebedingungen

    Ansprüche abgeleitet werden. Garantiebedingungen Von der Garantie ausgeschlossen sind: Für dieses Produkt leistet CARSON eine Garantie von 24 Monaten • Beschädigung oder Ausfall durch Nichtbeachten der Sicherheits- betreffend Fehler bei der Herstellung in Bezug auf Material und anweisungen oder der Bedienungsanleitung, höhere Gewalt, Fertigung bei normalem Gebrauch ab dem Kauf beim autorisier- Unfall, fehlerhafte oder außergewöhnliche Beanspruchung,...
  • Seite 3: Inhaltsverzeichnis

    Inhalt Vorwort ........................2 Uhrzeit einstellen ....................11 Lieferumfang ......................3 Mikro SD-Speicherkarte formatieren ............12 Sicherheitsanweisungen ..................4 Laden des Flugakkus ..................12 Der Quadcopter mit mehr Funktionen ............8 Videoaufnahme ....................13 Technische Daten ....................8 Fertig zum Abheben! ..................13 Ihr 4-Kanal FPV-Fernsteuersender ..............9 Einstellungen für fortgeschrittene Piloten ..........16 Funktion der Eingabetaste ................10 Montage des Propellerschutzes ..............19...
  • Seite 4: Sicherheitsanweisungen

    Sicherheitsanweisungen Allgemein • Lesen Sie die Bedienungsanleitung sorgfältig durch und bewahren Sie sie zum Nachlesen auf. • Machen Sie sich insbesondere mit den Hinweisen zum Flugbetrieb vertraut. Dieses Produkt ist kein Spielzeug! Vergewissern Sie sich bei Ihrer Versicherung, ob Sie beim Ausüben • Ferngesteuerte Flugmodelle sind kein Spielzeug, Ihre Ihres Hobbys versichert sind, bzw. schließen Sie eine spezielle Bedienung muss schrittweise erlernt werden.
  • Seite 5: Fliegen Sie Am Besten Nur In Geschlossenen Räumen

    Fliegen Sie am besten nur in geschlossenen • Wenn Sie übermüdet oder anderweitig in Ihrer Reaktionsfähig- keit beeinträchtigt sind. Räumen • Bei Windstärke 1 oder höher. • Bei ausreichend Freiraum in alle Richtungen • In der Nähe von Hochspannungsleitungen oder Funkmasten, • Auf glattem Untergrund oder bei Gewitter! Atmosphärische Störungen können die Sig- • Ohne stehende (Möbel) oder bewegte Hindernisse (Personen, nale Ihres Fernsteuersenders beeinflussen. Tiere) • In der Nähe von Hindernissen wie Gebäuden, Möbeln, Personen • In Räumen ohne Zugluft und Tieren.
  • Seite 6: Lithium-Polymer Akku

    Setzen Sie den Sender, die Akkus und das Lassen Sie das Ladegerät zwischen den Lade- Modell niemals widrigen Umgebungsbedin- vorgängen abkühlen. Trennen Sie das Ladege- gungen aus! rät vom Netz, wenn der Ladevorgang beendet ist. Diese sind z. B.: Ein defektes Ladegerät darf nicht mehr verwendet werden. Wenn • Nässe, zu hohe Luftfeuchtigkeit (> 75 % rel., kondensierend).
  • Seite 7: Sicherheitshinweise Für Lithium-Polymer-Akkumulatoren

    Sicherheitshinweise für Lithium-Polymer-Akkumulatoren Der Akku darf weder auseinandergebaut noch umgebaut wer- 18. Setzen Sie den Akku keiner direkten Sonneneinstrahlung aus den. oder verwenden ihn unter dieser (oder im erhitzten Auto). Verwenden Sie den Akku nicht in der Nähe von Feuer, Öfen 19.
  • Seite 8: Der Quadcopter Mit Mehr Funktionen

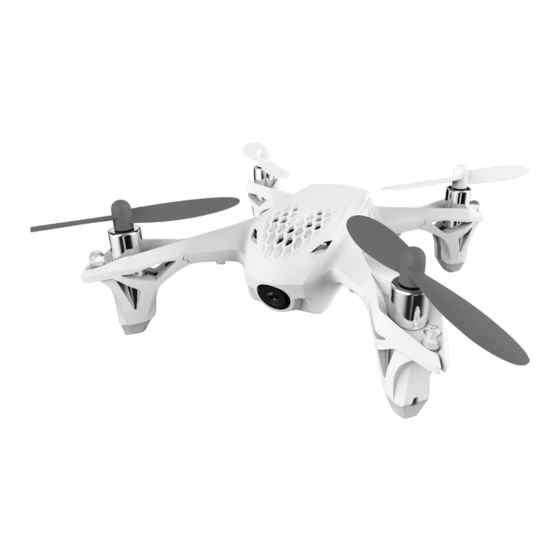
    Der Quadcopter mit mehr Funktionen Features: Kein Schrauben und Basteln mehr!!! Der Spaß beginnt sofort aus der Packung. • Stabile Flugeigenschaften Steuere Deinen Quadcopter über alle 4 Funktionen. • Komplett flugfertig aufgebaut • Mit professioneller 4-Kanal 2,4 GHz Fernsteueranlage • Inkl. Gyro (Stabilisations-Funktion) • Inkl. LiPo Akku 3,7 V/380 mAh und LiPo Ladegerät • 5,8 GHz FPV System inkl. • Videos am Sender abspielen Hinterer Propeller Elektromotor Rumpf...
  • Seite 9: Ihr 4-Kanal Fpv-Fernsteuersender

    Ihr 4-Kanal FPV-Fernsteuersender LC-Display Akkuspannung Modell Einschaltzeit Akkuspannung Sender Aufnahme Trimmung Gaskanal Trimmung Nick Trimmung Drehen Trimmung Roll Erklärung Sender Video-Ausgang Micro-SD Karte USB-Anschluss Audio-Ausgang Programm-Knopf Aufnahmeknopf Trimmung Nick Trimmung Gas Steuerknüppel Nick/Roll Steuerknüppel Gas/Drehen ON/OFF Trimmung Drehen Trimmung Roll...
  • Seite 10: Funktion Der Eingabetaste

    Funktion der Eingabetaste Identifikation Funktion Gashebel/Hebel für Drehen Durch eine Vorwärts- und Rückwärtsbewegung des Steuerhebels steigt der Copter auf bzw. ab. Durch eine Bewegung des Steuerhebels nach links oder rechts, dreht sich der Copter nach links bzw. rechts. Nick/Roll-Steuerhebel Durch eine Vorwärts- und Rückwärtsbewegung des Steuerhebels bewegt sich der Copter nach vorne bzw.
  • Seite 11: Frequenzbereich 5.8 Ghz Auswahl

    Frequenzbereich 5.8 GHz Auswahl knüppels können Sie 5.8 G FREQUENCE (Frequenz 5,8) auswählen. Ihre Fernsteuerung findet automatisch immer die optimale Frequenz für die Livebildübertragung(FPV-System). Falls trotzdem mal Funkstö- Bewegen Sie den Steuerhebel nach rechts oder drücken Sie diesen um rungen oder Interferenzen auftreten sollten, so können Sie die Fre- die eingestellte Frequenz zu wählen.
  • Seite 12: Mikro Sd-Speicherkarte Formatieren

    Mikro SD-Speicherkarte formatieren Die Mikro SD-Speicherkarte muss im Sender eingelegt sein. Sie Bewegen Sie anschließend den Steuerknüppel nach rechts, bewegen können die Speicherkarte mit Ihrem Sender formatieren. Drücken Sie Sie zur Auswahl der Option auf/ab und zum Bestätigen der Eingabe. den rechten Steuerhebel 1 Sekunde lang, um in das Einstellmenü...
  • Seite 13: Videoaufnahme

    Videoaufnahme Hinweis: Bevor Sie die Speicherkarte einlegen oder entnehmen, muss der Sender immer vorher ausgeschaltet werden. Beenden Sie zuerst die Aufnahme und schliessen den Flugakku vom Modell ab bevor Sie die SD-Karte entnehmen. Drücken Sie die Aufnahme- Taste, um die Aufzeichnung ein- oder aus- zuschalten.
  • Seite 14: Erklärung Steuerung Des X4 Quadcopters

    Schieben Sie den Flugakku auf der Unterseite Ihres Modells in den Bitte drücken Sie die Kabel ebenfalls in die dafür vorgesehene Ausspa- Akkuschacht ein. Achten Sie darauf, dass der Akku bis zum Anschlag rung (siehe Abb.), um Vibrationen während des Fluges zu unterdrü- ins Akkufach hineingeschoben wird, sodass der Schwerpunkt (COG) cken.
  • Seite 15 Rechts drehen Links drehen Mit dem Steuerhebel für Drehen wird der Quadcopters nach links/ rechts gedreht. Vorwärts Rückwärts Der Steuerhebel für Nick bewegt Ihren Quadcopter vorwärts/rückwärts Links Rechts Der Steuerhebel für Roll bewegt Ihren Quadcopter „seitlich” nach links/rechts. Vorsicht: Die Steuerhebel verhalten sich umgekehrt, wenn das Modell auf Sie zu fliegt! Der Steuerhebel für Roll bewegt Ihren Quadcopter „seitwärts“ nach links/rechts.
  • Seite 16: Einstellungen Für Fortgeschrittene Piloten

    Einstellungen für fortgeschrittene Piloten Umkehren der Kanaleinstellung Falls Sie eine der Steuerrichtungen umkehren möchten, können Sie Zur Auswahl drücken Sie den rechten Steuerhebel nach rechts und dies wie folgt tun. Drücken Sie den rechten Steuerhebel 1 Sekunde anschließend auf- und ab um die Einstellung zu bestätigen oder um lang, um in das Einstellmenü...
  • Seite 17: Tipps Zum Fliegen Von Loopings/Flips

    Tipps zum Fliegen von Loopings/Flips Loopings können nur im EXPERT-MODUS und mit deaktivierter ANTI- FLIP Einstellung geflogen werden. Drücken Sie den rechten Steuerhebel 1 Sekunde lang, um in den EXPERT-MODUS zu wechseln. Zur Auswahl der Loopingsperre, drücken Sie kurz den linken Steuer- hebel: Anti-Flip (Keine Loopingfunktion) = ein Piepton Flip (Looping-Funktion aktiv) = zwei Pieptöne.
  • Seite 18: Flip Rückwärts

    Flip nach vorne Um einen Flip nach vorne zu fliegen, bewegen Sie den rechten Steuer- hebel schnell nach hinten und wieder nach vorne. Nach dem Looping Steuerhebel wieder in Mittelposition bringen. Flip rückwärts Um einen Rückwärts-Flip zu fliegen, bewegen Sie den rechten Steuer- hebel schnell nach vorne und wieder nach hinten.
  • Seite 19: Montage Des Propellerschutzes

    Montage des Propellerschutzes In den nachfolgenden Schritten wird die korrekte Montage des Propellerschutzes beschrieben. Abnehmen der Propeller Montage des Propellerschutz Schieben Sie das Montagewerkzeug wie im Bild gezeigt unter den Positionieren Sie den Propellerschutz mit den Löchern über den Propeller und hebeln Sie den Propeller nach oben weg. vier Motoren.
  • Seite 20: Fehlersuche

    Fehlersuche Problem Lösung Der 2.4 GHz Bindevorgang zwischen Fern- Der Gashebel(Linker Steuerhebel) muss ganz in die unterste Position geschoben werden. steuerung und dem Modell funktioniert Bitte während des ersten Bindevorgangs weder Steuerknüppel noch Trimmtaster betätigen. nicht Die LED am Sender schaltet an und wieder Bitte wechseln Sie die Senderbatterien Das Einstellmenü...
  • Seite 21 Problem Lösung Wiederherstellen der Werkseinstellungen Drücken Sie beide Steuerhebel nach oben links. Halten Sie die Steuerhebel in dieser Position und schalten Sie den Sender gleichzeitig ein. Im LC-Display erscheint , „CALIBRATE STICK” (Abb. 6) (STEUERHEBEL KALIBRIEREN). Bewegen Sie die Steuerhebel 3-mal kreisförmig in alle Rich- tungen.
  • Seite 22: Declaration Of Conformity

    • Transportation, shipping or insurance costs; or All replacement parts and products, and products on which a • Costs of product removal, installation, set-up service adjustment refund is made, become the property of CARSON. New or recon- or reinstallation ditioned parts and products may be used in the performance of This warranty gives you specific legal rights, and you may also have warranty services.
  • Seite 23: Included Items

    Contents Preface ........................22 Set Real Time ......................31 Included Items .......................23 Format SD Card .....................32 Safety Precautions ....................24 LiPo Battery Charging ..................32 The Quadcopter with More Functions ............28 Video Recording ....................33 Technical Data .......................28 Start to fly ........................33 Four Channel Remote Control Transmitter ..........29 Advanced performance setup ................36 Input Key Function ....................30 Mounting the Cage .....................39...
  • Seite 24: Safety Precautions

    Safety Precautions General • Read the Operating Manual carefully and keep it for future refe- rence. • Familiarise yourself with all the instructions for flight operation. This model is not a toy! Make sure that you have sufficient insurance cover when practising • This radio-controlled model aircraft not a toy. Learning how to your hobby or take out a special insurance for model aircraft. The control it correctly is a gradual process. contact address for this is Deutscher Modellfliegerverband e.V.
  • Seite 25 It is best to fly only in closed rooms Do not fly • With sufficient free space in all directions • If you are exhausted or your reaction is impaired in any way. • On flat ground • At wind-force 1 or greater. • Without standing (furniture) or moving obstacles (persons, ani- • Keep your model away from high-voltage cables or radio masts. mals) Never use the model in lightning storms. Atmospheric disturban- ces can affect the signals of your remote controlling transmitter. • In rooms without air draught • Near any obstacles such as buildings, furniture, persons and ani- If you want to fly outdoors, do this...
  • Seite 26 Never subject the transmitter, the Permit the battery charger to cool down rechargeable batteries and the model to between charging operations. Disconnect the adverse ambient conditions! battery charger from the mains when charging is completed. These are, for instance: A defective battery charger must no longer be opeated. If it is • Wetness, too-high humidity (> 75% rel., condensing). Do not assumed that the device is defective, i.e.
  • Seite 27 Lithium-polymer battery safety instruction Do not disassemble or convert the rechargeable battery. 17. Do not use a leaked battery near fire. Do not use the rechargeable battery near fire, stoves or other 18. Do not expose the rechargeable battery to direct sunlight or use heated places. it in it (or in the heated car). 3. Do not immerse the rechargeable battery in water or expose it 19.
  • Seite 28: The Quadcopter With More Functions

    The Quadcopter with More Functions Features: Completely preassembled, no construction required! Fun straight out of the box! • Stable flight behaviour Control your quadcopter using all four functions. • Completely assembled Ready To Fly • Including professional 4-channel 2,4 GHz radio control • + Gyro (stabilizing function) • With LiPo battery 3.7 V/380 mAh and “LiPo balance” charger • 5.8 GHz FPV System • Playing Videos via transmitter Back Propeller Electric motor Body Front Propeller...
  • Seite 29: Four Channel Remote Control Transmitter

    Four Channel Remote Control Transmitter LC display Heli Battery voltage On time TX Battery voltage Recording Throttle trim Elevator trim Rudder trim Aileron trim Explanation transmitter Video glasses socket SD Card USB socket Earphone socket No use now Recording Elevator trim Throttle trim Elevator/Aileron Stick Throttle/Rudder Stick...
  • Seite 30: Input Key Function

    Input Key Function Identifikation Funktion Throttle/tail rotor stick Forward and backward movement of the stick makes the quadcopter ascend and descend respectively. When the control lever is moved left or right, the copter will turn left or right. Nick/roll stick Forward and backward movement of the stick makes the quadcopter move for- ward and backward respectively.
  • Seite 31: Frequency Selectable 5.8Ghz

    Frequency selectable 5.8Ghz Your transmitter will automatically nd the best frequency to ensure frequency set, set what frequency you need by pushing the stick left/ the quality live video transmission. in case there is any interference right, exit this setting as the displayed arrows show. Or hold down the in your location, you can change the setting from the range 5.725 to ELEVATOR stick for 2 seconds to exit.
  • Seite 32: Format Sd Card

    Format SD Card Insert your SD card into the transmitter. The transmitter can format and push right to conrm or exit. Hold down the ELEVATOR stick for 2 your SD card. Press down the ELEVATOR stick for 1 second to enter seconds to exit. setting status, move the stick up/down to choose FORMAT SD CARD, WARNING! ALWAYS FORMAT AND ACTIVATE CAMERA RECOR- push the ELEVATOR stick to the right, move it up/down to choose DING BEFORE FLIGHT!
  • Seite 33: Video Recording

    Video Recording Note Always turn OFF the power of the transmitter before inserting or removing the SD card. Always stop the video recording function and power o the battery rstly, and then you can take out the SD card. WARNING! ALWAYS FORMAT AND ACTIVATE CAMERA RECORDING BEFORE FLIGHT! Press the but- ton to switch ON/OFF video...
  • Seite 34 unstable ight. Please twist the wires and squeeze them into the Insert the battery into the bottom of your X4. Make sure the battery notched holder as the picture shows, to prevent inight shaking or and wires are pushed into the end of the battery compartment, so they will not negatively aect the center of gravity(COG) and cause oscillations.
  • Seite 35 Right rotation Left rotation Rudder (Collective Torque Yaw) rotates your quadcopter’s fuselage Left / Right Forwards Backwards Elevator (Cyclic Pitch) moves your quadcopter Forwards/Backwards Left Right movement movement Aileron (Cyclic Roll) moves your quadcopter ‘sideways’ Left/Right Caution: Controls will appear reversed when the model is flying towards you...
  • Seite 36: Advanced Performance Setup

    Advanced performance setup Reversing channel setup If you would like to reverse any of the stick functions due to personal SET REVERSE, push the ELEVATOR stick to the right, move it up/down preference then follow the instructions below. Be aware that this will to choose and push right to conrm or exit. Hold down the ELEVATOR change the controls back to front.
  • Seite 37 Aerial Flip Tips The ip maneuver will only work in the the EXPERT MODE when anti-ip is not selected. You need to press the elevator stick one time to switch into the expert mode. To select anti-ip momentarily press the throttle stick in: anti-ip=one beep. ip=two beeps. Your X4 can do 360° flips by pushing the joysticks as described below. For proper ip execution, make certain that the X4 is close to level, within a 30° angle with the ground, and add some climb throttle before you move the pitch and roll sticks.
  • Seite 38 Forward flip Pull the joystick to the back and then quickly push the joystick to the front and release the stick to the center after the flip. Backward flip Push the joystick to the front and then quickly pull the joystick to the back and release the stick to the center after the flip.
  • Seite 39: Mounting The Cage

    Mounting the Cage In the subsequent steps, the correct assembly of the propeller safety cage. Removing Props Mounting the Cage Hold the prop, insert the U wrench under the prop, press down and Remove the props. Position the cover’s four holes with the motors. the prop will easily come o the motor shaft.
  • Seite 40: Trouble Shooting

    Trouble Shooting Problem Correction Transmitter and X4 will not bind Throttle position needs to be fully minimized. Please do not move the transmitter sticks or trims during initial power-on binding. Transmitter LED light came on and then Replace new AA batteries suddenly went o LCD transmitter not showing the setting The throttle stick is not in the lowest position...
  • Seite 41 Problem Correction How to recover the factory set Push the two joysticks to the top on the left and keep them in this position, and then turn on the transmitter, the LCD screen will show “CALIBERATE STICK”, Move the joysticks in a circling (fig.
  • Seite 42: Consignes De Sécurité

    Consignes de sécurité Généralités • Lisez attentivement la notice d’utilisation complète et conser- vez-la pour la consulter ultérieurement. • Familiarisez-vous particulièrement aux consignes de vol. Ce produit n’est pas un jouet ! • Les aéromodèles télécommandés ne sont pas des jouets et leur Assurez-vous auprès de votre assurance que vous êtes assuré pour la utilisation doit être apprise pas à pas. pratique de votre loisir ou contactez une assurance aéromodélisme spéciale. A cet effet, l’adresse à contacter est la suivante : Deutscher • Les enfants de moins de 14 ans ne doivent mettre le modèle en Modellfliegerverband e.V.
  • Seite 43 Volez de préférence dans des lieux fermés Ne volez pas • avec suffisamment d’espace libre dans toutes les directions • si vous êtes épuisé ou influencé d’une quelconque autre manière dans vos réactions. • sur un support lisse • en cas de force de vent 1 ou supérieure. • sans meubles (debout), ni obstacles mobiles (personnes, animaux) • à proximité de lignes à haute tension, de mâts radio ou pendant un orage ! Les perturbations atmosphériques peuvent influencer • dans des pièces sans courant d’air les signaux de votre émetteur de télécommande. Si vous souhaitez voler à l’extérieur, faites-le • à proximité d’obstacles comme des immeubles, des meubles, des personnes et des animaux.
  • Seite 44 Accu lithium-polymère Les accus ne doivent pas Utilisez l’accu fourni uniquement pour ce modèle. • être plongés dans un liquide, Utilisez également uniquement une pièce d’origine comme accu de • jetés dans le feu ou exposés à des températures élevées, rechange. • des charges mécaniques ou • Ne pas surcharger l’accu, ni le décharger profondément ! Les • être démontés/endommagés deux peuvent conduire à une fuite d’électrolytes et à une auto- • ou encore court-circuités. inflammation. Si vous sentez une odeur pendant l’utilisation, le chargement ou le • Ne mélangez jamais des accus/batteries pleins et à moitié vides stockage de l’accu, remarquez une coloration, une surchauffe, une de capacité...
  • Seite 45: Istruzioni Di Sicurezza

    Istruzioni di sicurezza Informazioni generali • Leggere attentamente le presenti istruzioni per l‘uso e conser- varle per ulteriori consultazioni. • In particolare, si raccomanda di acquisire familiarità con le indi- cazioni di funzionamento in volo. Questo prodotto non è un giocattolo! • Gli aeromodelli telecomandati non sono giocattoli. Pertanto, si consiglia di accertarsi presso la propria assicurazione L‘apprendimento del loro corretto utilizzo è graduale. che la copertura stipulata includa anche la pratica di quest‘hobby. Se necessario, sottoscrivere un‘assicurazione speciale per gli • I bambini di età inferiore ai 14 anni possono usare il modello solo aeromobili.
  • Seite 46 Si consiglia di utilizzare l‘aeromodello solo in Non utilizzare il modello ambienti chiusi • Quando si è molto stanchi o quando la propria capacità di reazi- one è in qualche modo compromessa. • Se lo spazio libero è sufficiente in tutte le direzioni • Con vento forza 1 o superiore. • Su un fondo regolare • In prossimità di linee ad alta tensione, pali radio o durante • In luoghi privi di ostacoli verticali (mobili) o in movimento (per- temporali. Le perturbazioni meteorologiche possono disturbare i sone, animali) segnali del trasmettitore. • In spazi privi di correnti d‘aria • In prossimità di ostacoli come edifici, mobili, persone e animali.
  • Seite 47: In Caso Di Fuoriuscita Dell'elettrolito

    Accumulatore ai polimeri di litio Gli accumulatori non devono essere Utilizzare l‘accumulatore fornito in dotazione esclusivamente con • immersi in liquidi questo modello. • gettati nel fuoco, esposti ad alte temperature In caso di sostituzione, utilizzare sempre un accumulatore originale. • sottoposti a sollecitazioni meccaniche • Non sovraccaricare o lasciar scaricare eccessivamente • smontati o danneggiati l‘accumulatore! In entrambi i casi può verificarsi una fuoriuscita • cortocircuitati.
  • Seite 48: Ersatzteile

    Ersatzteile / Spare Parts 500608131 LiPo-Akkupack 3,7V/380mAh 500508618 Motorset (4) 500508621 Propeller Schutzring LiPo-battery 3.7V/380mAh Motorset (4) Prop-saferring 500508612 Propellerset (4) Propeller set (4) 2x weiß / white 2x schwarz / black...
  • Seite 49 Notizen / Notes...
  • Seite 50 Notizen / Notes...
  • Seite 52 CARSON-MODEL SPORT For Germany: Abt. Service Service-Hotline: Mittlere Motsch 9 Mo - Do 8.00 – 17.00 Uhr 96515 Sonneberg 8.00 – 14.30 Uhr 01805–73 33 00 * 14 ct/min aus dem deutschen Festnetz CARSON-MODEL SPORT Werkstraße 1 • D-90765 Fürth/Germany...

Inhaltsverzeichnis