Herunterladen Inhalt Inhalt Diese Seite drucken
HP 9200c Kurzanleitung
Vorschau ausblenden Andere Handbücher für 9200c:
Inhaltsverzeichnis

Werbung

Verfügbare Sprachen
  • DE

Verfügbare Sprachen

  • DEUTSCH, seite 74
HP 9200c Digital Sender
Getting Started Guide
Guide de mise en route
Kurzanleitung
Guida introduttiva
Guía de instalación inicial
Beknopte handleiding
Guia de primeiros passos

Werbung

Inhaltsverzeichnis
loading

Inhaltszusammenfassung für HP 9200c

  • Seite 1 HP 9200c Digital Sender Getting Started Guide Guide de mise en route Kurzanleitung Guida introduttiva Guía de instalación inicial Beknopte handleiding Guia de primeiros passos...
  • Seite 3 HP 9200C Digital Sender Getting Started Guide...
  • Seite 4 States and other countries/regions. The information contained in this document is subject to change without notice. The only warranties for HP products and services are set forth in the express warranty statements accompanying such products and services. Nothing herein should be construed as constituting an additional warranty.
  • Seite 5: Inhaltsverzeichnis

    Table of contents 1 Introduction Where to look for information ....................2 Installation checklist ........................2 Before you begin ........................3 2 Setup Step 1. Unpack and check package contents ................6 Step 2. Installation requirements and product parts ..............7 Environmental requirements ....................7 System requirements ......................7 Identifying the product parts ....................9 Step 3.
  • Seite 6 ENWW...
  • Seite 7: Introduction

    Introduction Congratulations on your purchase of the HP 9200C Digital Sender, a valuable addition to your content-management processes. The digital sender scans all kinds of documents and then sends them to e-mail addresses, fax destinations, or network folders. The digital sender can also be set up to send documents to workflow destinations, along with metadata files containing workflow information that is captured at the device control panel.
  • Seite 8: Where To Look For Information

    Where to look for information Explore the following documentation sources to learn how to use the HP 9200C Digital Sender. Getting started guide (this document)—Provides step-by-step instructions for installing and setting up the digital sender. User guide and support guide—The HP 9200C Digital Sender User Guide (part number Q5916-90910) contains information about using the digital sender and troubleshooting problems.
  • Seite 9: Before You Begin

    Step 8: Assign the device IP address. Step 9: Install and configure the software. Step 10: Verify the product installation. Before you begin During the software installation procedure, you are prompted to configure the digital-send options. In order to complete this configuration, you need the following information: ●...
  • Seite 10 Chapter 1 Introduction ENWW...
  • Seite 11: Setup

    Follow these steps to set up and configure the digital sender. If you need more detailed information about how to use or configure the device, see the HP 9200C Digital Sender User Guide or the HP 9200C Digital Sender Support Guide.
  • Seite 12: Step 1. Unpack And Check Package Contents

    Step 1. Unpack and check package contents The following items ship in the box with the digital sender.
  • Seite 13: Step 2. Installation Requirements And Product Parts

    The following system specifications are required for this product. Hardware requirements The digital sending software has the following hardware requirements for a server supporting less than 50 digital sending devices (MFPs or 9200C digital senders): ● A PC with a Pentium® 3 or higher processor ●...
  • Seite 14 The digital sending software has the following hardware requirements for a server supporting 50 to 250 digital sending devices: ● A PC with a 2 GHz Pentium® 4 or higher processor ● 1 GB of RAM You must have Administrative privileges on the server in order to install the software. NOTE Network system requirements The digital sending software has the following network requirements:...
  • Seite 15: Identifying The Product Parts

    Identifying the product parts The following illustrations show the location and names of the primary product parts. Jam release button Control panel On/off switch Output bin ADF input bin ADF cable Control-panel cable 10/100Base-T network port EIO port 10 Power connector 11 Scanner lock 12 Serial number ENWW...
  • Seite 16: Step 3. Change The Control-Panel Overlays

    Step 3. Change the control-panel overlays The device comes with overlays installed on the control panel, and overlays for different languages might be included in the box. If necessary, use the following procedure to change the control-panel overlays to support your preferred language. 1.
  • Seite 17 5. Snap the overlay firmly onto the control panel. Ensure that the overlay is flat against the control panel. 6. Repeat steps 2 through 5 to change the second overlay. ENWW Step 3. Change the control-panel overlays...
  • Seite 18: Step 4. Unlock The Scanner Head

    Step 4. Unlock the scanner head The scanner head is locked to prevent damage during shipping. Follow these instructions to unlock it. 1. Open the top of the digital sender. 2. Unlock the scanner head. 3. Close the top of the digital sender. Chapter 2 Setup ENWW...
  • Seite 19: Step 5. Connect The Network Cable

    Step 5. Connect the network cable Use the RJ-45 connector on the back of the device to connect the product to a Fast Ethernet 100Base-TX or Ethernet 10Base-T network. ENWW Step 5. Connect the network cable...
  • Seite 20: Step 6. Connect The Power Cord

    Step 6. Connect the power cord 1. Connect the power cord to the product power cord connector. Then connect the power cord to an adequate alternating current (ac) outlet. This product can operate using either 110/120 volts (V), 60 hertz (Hz) power or 220/240 V, NOTE 50 Hz power.
  • Seite 21: Step 7. Configure The Control-Panel Settings

    Step 7. Configure the control-panel settings When the device is turned on for the first time, the control-panel display presents prompts for setting the language, date, and time. Configuring the control-panel language By default, the control panel on the product shows messages in English. You can use the control panel menus to configure the product to show messages in another supported language.
  • Seite 22: Step 8. Assign The Ip Address

    Step 8. Assign the IP address In order to function properly, the device must be assigned a valid IP address on your network. If your network uses dynamic host configuration protocol (DHCP), this IP address can be assigned automatically. DHCP is the default setting in the digital sender. If you are not using DHCP, you will need to manually assign an IP address.
  • Seite 23: Step 9. Install And Configure The Software

    Step 9. Install and configure the software Install the software on the server that will be supporting the HP Digital Sending Software (HP DSS) service. After installation, the HP DSS runs in the background as a service. It starts automatically whenever the server is restarted.
  • Seite 24 The configuration of Secondary E-mail is not included in this procedure. If you are planning to enable Secondary E-mail, see the HP 9200C Digital Sender Support Guide for instructions.
  • Seite 25 16. Click Next to continue to the Workflow Settings screen. Workflow configuration is not included in this procedure. If you are planning to enable NOTE sending to workflows, see the HP 9200C Digital Sender Support Guide for instructions. 17. Click Next to continue to the Addressing Settings screen. ENWW...
  • Seite 26 This is an optional feature which requires authentication to be enabled and set to Microsoft NOTE Windows. The Microsoft Messaging API (MAPI) is also required. See the HP 9200C Digital Sender Support Guide for more information. 19. Click Next to continue to the Preferences Settings page.
  • Seite 27: Step 10. Verify The Product Installation

    See the HP 9200C Digital Sender User Guide for detailed instructions about how to use all of the send-to options, and see the HP 9200C Digital Sender Support Guide for information about configuring all of the digital-sending features.
  • Seite 28 Chapter 2 Setup ENWW...
  • Seite 29: Troubleshooting And Customer Support

    Use the information in this section if you are having any problems with the initial setup of the device. For more advanced troubleshooting, see the HP 9200C Digital Sender User Guide or the HP 9200C Digital Sender Support Guide.
  • Seite 30 ● If you have any other digital senders or MFPs that are using the HP DSS service, you can use the Copy Settings button on the MFP Configuration tab of the HP MFP DSS Configuration Utility to copy the settings...
  • Seite 31 If the original was previously stapled or three- hole-punched, verify that the pages are not stuck together. ● The type of media that is being loaded might not meet the required specifications. See the HP 9200C Digital Sender User Guide for media specifications. ENWW Troubleshooting...
  • Seite 32 Problem Action to take An e-mail transmission did not arrive at the ● If you typed the e-mail address at the control destination e-mail address. panel, resend the e-mail message, making sure that you type the address correctly and that it is in the correct format (has no spaces, contains the required @ sign, and contains the required period).
  • Seite 33: Customer Support

    For additional information about the product, see the HP 9200C Digital Sender User Guide or the HP 9200C Digital Sender Support Guide on the CD-ROM. For HP Customer Care information, see the support flyer that came with the product. You can also visit http://www.hp.com/support/9200c...
  • Seite 34: Fcc Regulations

    ● Consult your dealer or an experienced radio/television technician. Any changes or modifications to the device that are not expressly approved by HP could NOTE void the user’s authority to operate this equipment. Chapter 3 Troubleshooting and customer support...
  • Seite 35 8 output bin 9 hard disk 1 overlays, control panel 10 hardware requirements 7 help, online 2 HP DSS, installing 17 package contents 6 HP Jetdirect Inside 1 parts, locating 9 humidity requirements 7 ports, locating 9...
  • Seite 36 power cord, connecting 14 system requirements 7 power switch 9 temperature requirements 7 quality, troubleshooting 25 testing installation 21 time, setting 15 troubleshooting regulatory statements ADF 25 FCC 28 blank pages 25 release button, jam 9 cut-off pages 26 digital sending 25 e-mail 26 Scan Failure errors 24 Find Servers 24...
  • Seite 37 HP 9200C Digital Sender Guide de mise en route...
  • Seite 38 Les informations contenues dans ce document sont sujettes à modification sans préavis. Les seules garanties concernant les produits et services HP sont énoncées dans la garantie qui accompagne ces produits et services. Rien en ceci ne devra être interprété comme constituant une garantie supplémentaire.
  • Seite 39 Sommaire 1 Introduction Localisation des informations ....................2 Liste des étapes d'installation ....................2 Avant de commencer ........................3 2 Installation Etape 1. Retirez le produit de son emballage et vérifiez-en le contenu ........6 Etape 2. Conditions d'installation et éléments du produit ............7 Environnement ........................7 Configuration du système ....................7 Identification des éléments du produit ................9...
  • Seite 40 FRWW...
  • Seite 41: Introduction

    Introduction Félicitations pour l'achat de l'expéditeur numérique HP 9200C Digital Sender, qui vient compléter idéalement vos processus de gestion de contenu. Cet outil révolutionnaire est capable de numériser toutes sortes de documents et de les envoyer vers des adresses électroniques, des numéros de télécopie ou vers des dossiers sur un réseau. L'expéditeur numérique peut également être configuré...
  • Seite 42: Localisation Des Informations

    CD-ROM de documentation qui accompagne l'expéditeur numérique. Ils sont également disponibles sur Internet à l'adresse suivante : http://www.hp.com/support/9200c. Aide en ligne — L'utilitaire de configuration HP MFP DSS comprend une aide en ligne qui informe sur les options d'envoi numérique.
  • Seite 43: Avant De Commencer

    Etape 7 : Configurez les paramètres du panneau de commande. Etape 8 : Affectez une adresse IP au périphérique. Etape 9 : Installez et configurez le logiciel. Etape 10 : Vérifiez l'installation du produit. Avant de commencer Pendant l'installation du logiciel, vous allez être invité à configurer les options d'envoi numérique.
  • Seite 44 Chapitre 1 Introduction FRWW...
  • Seite 45: Installation

    Pour installer et configurer l'expéditeur numérique, suivez les étapes ci-après. Pour plus d'informations sur l'utilisation et la configuration du périphérique, reportez-vous au Guide de l'utilisateur du HP 9200C Digital Sender ou au Guide d'assistance du HP 9200C Digital Sender. FRWW...
  • Seite 46: Etape 1. Retirez Le Produit De Son Emballage Et Vérifiez-En Le Contenu

    Etape 1. Retirez le produit de son emballage et vérifiez-en le contenu Les éléments suivants doivent se trouver dans le carton de l'expéditeur numérique.
  • Seite 47: Etape 2. Conditions D'installation Et Éléments Du Produit

    La configuration matérielle suivante est requise pour le logiciel d'envoi numérique, pour un serveur prenant en charge moins de 50 périphériques d'envoi numérique (MFP ou HP 9200C Digital Sender) : ● Un PC équipé d'un processeur Pentium® 3 ou supérieur ●...
  • Seite 48 La configuration matérielle suivante est requise pour le logiciel d'envoi numérique, pour un serveur prenant en charge de 50 à 250 périphériques d'envoi numérique : ● Un PC équipé d'un processeur Pentium® 4 à 2 GHz ou supérieur ● 1 Go de mémoire vive Pour installer le logiciel, vous devez disposer des droits d'administrateur sur le serveur.
  • Seite 49: Identification Des Éléments Du Produit

    Identification des éléments du produit Les illustrations suivantes indiquent l'emplacement et le nom des principaux éléments du produit. Bouton de dégagement du bourrage Panneau de commande Interrupteur Bac de sortie Bac d'entrée du BAA Câble du BAA Câble du panneau de commande Port réseau 10/100Base-T Port EIO 10 Prise d'alimentation...
  • Seite 50: Etape 3. Changez Les Caches Du Panneau De Commande

    Etape 3. Changez les caches du panneau de commande Des caches sont déjà préinstallés sur le panneau de commande du périphérique, mais des caches dans d'autres langues peuvent également se trouver dans le carton. Suivez la procédure suivante, si nécessaire, pour installer sur le panneau de commande des caches dans votre langue.
  • Seite 51 5. Mettez en place fermement le cache sur le panneau de commande. Vérifiez que le cache est bien à plat sur le panneau de commande. 6. Répétez les opérations des étapes 2 à 5 pour changer l'autre cache. FRWW Etape 3. Changez les caches du panneau de commande...
  • Seite 52: Etape 4. Déverrouillez La Tête Du Scanner

    Etape 4. Déverrouillez la tête du scanner La tête du scanner est verrouillée pour éviter tout dommage lors du transport. Suivez les instructions suivantes pour la déverrouiller. 1. Ouvrez le capot de l'expéditeur numérique. 2. Déverrouillez la tête du scanner. 3.
  • Seite 53: Etape 5. Connectez Le Câble Réseau

    Etape 5. Connectez le câble réseau Utilisez le connecteur RJ-45 à l'arrière de l'appareil pour connecter le périphérique à un réseau Fast Ethernet 100Base-TX ou Ethernet 10Base-T. FRWW Etape 5. Connectez le câble réseau...
  • Seite 54: Etape 6. Connectez Le Cordon D'alimentation

    Etape 6. Connectez le cordon d'alimentation 1. Connectez le cordon d'alimentation à la prise du cordon d'alimentation du produit. Branchez ensuite le cordon d'alimentation sur la prise CA (courant alternatif) adéquate. Ce produit fonctionne aussi bien sur une alimentation 110/120 volts (V), 60 hertz (Hz) que Remarque sur une alimentation 220/240 V, 50 Hz.
  • Seite 55: Etape 7. Configurez Les Paramètres Du Panneau De Commande

    Etape 7. Configurez les paramètres du panneau de commande Lorsque l'appareil est mis sous tension pour la première fois, vous êtes invité à régler la langue, la date et l'heure. Configuration de la langue d'affichage du panneau de commande Par défaut, les messages du panneau de commande s'affichent en anglais. Utilisez les menus du panneau de commande pour configurer le périphérique de sorte qu'il affiche les messages dans l'une des langues prises en charge.
  • Seite 56: Etape 8. Affectez Une Adresse Ip

    Etape 8. Affectez une adresse IP Pour que le périphérique fonctionne correctement, vous devez lui affecter une adresse IP valide sur le réseau. Si votre réseau utilise le protocole de configuration dynamique d'hôte (DHCP), cette adresse IP peut être affectée automatiquement. Par défaut, l'expéditeur numérique est défini sur DHCP.
  • Seite 57: Etape 9. Installez Et Configurez Le Logiciel

    Etape 9. Installez et configurez le logiciel Installez le logiciel sur le serveur qui prendra en charge le service HP DSS (HP Digital Sending Software). Après l'installation, HP DSS s'exécute en arrière-plan en tant que service. Il démarre automatiquement lorsque le serveur redémarre.
  • Seite 58 6. Une fois les fichiers du logiciel installés, l'Assistant de configuration du logiciel HP MFP Digital Sending Software apparaît. Lorsque le logiciel HP Digital Sending Software est installé pour la première fois, il peut fonctionner en mode d'évaluation pendant une période donnée. La section Licences du premier écran de l'Assistant de configuration affiche une entrée «...
  • Seite 59 La configuration du télécopieur n'est pas présentée dans cette procédure. Si vous envisagez Remarque d'activer l'envoi vers des télécopieurs, reportez-vous au Guide d'assistance du HP 9200C Digital Sender pour obtenir des instructions. 14. Cliquez sur Suivant pour accéder à l'écran Paramètres de dossier.
  • Seite 60 La configuration du Workflow n'est pas présentée dans cette procédure. Si vous envisagez Remarque d'activer l'envoi vers le Workflow, reportez-vous au Guide d'assistance du HP 9200C Digital Sender pour obtenir des instructions. 17. Cliquez sur Suivant pour accéder à l'écran Paramètres Adressage.
  • Seite 61 Sélectionnez les fonctions pour lesquelles vous souhaitez activer l'authentification. Dans la liste déroulante Domaine par défaut sélectionnez le domaine du réseau. Si vous souhaitez que HP DSS récupère des adresses électroniques directement à partir d'un serveur LDAP, activez la case à cocher Permettre au MFP d'accéder directement à...
  • Seite 62: Etape 10. Vérifiez L'installation Du Produit

    électronique ou dans un dossier. Reportez-vous au Guide de l'utilisateur du HP 9200C Digital Sender pour plus d'informations sur l'utilisation des options Envoyer vers, ou au Guide d'assistance du HP 9200C Digital Sender pour en savoir plus sur la configuration des fonctions d'envoi numérique.
  • Seite 63: Dépannage Et Assistance Clientèle

    Si vous rencontrez des problèmes lors de l'installation du périphérique, reportez-vous à cette section. Pour obtenir des informations de dépannage avancé, reportez-vous au Guide de l'utilisateur du HP 9200C Digital Sender ou au Guide d'assistance du HP 9200C Digital Sender.
  • Seite 64: Dépannage

    ● Si vous utilisez d'autres expéditeurs numériques ou MFP faisant appel au service HP DSS, dans l'utilitaire de configuration HP MFP DSS, cliquez sur le bouton Paramètres de copie de l'onglet Configuration MFP pour copier les paramètres d'un périphérique fonctionnant correctement et les appliquer à...
  • Seite 65 ● Si vous utilisez d'autres expéditeurs numériques ou MFP faisant appel au service HP DSS, dans l'utilitaire de configuration HP MFP DSS, cliquez sur le bouton Paramètres de copie de l'onglet Configuration MFP pour copier les paramètres d'un périphérique fonctionnant correctement et les appliquer à...
  • Seite 66 Pour plus d'informations sur les spécifications relatives aux supports, reportez-vous au Guide de l'utilisateur du HP 9200C Digital Sender. Une transmission par courrier électronique n'est ● Si vous avez entré l'adresse électronique à partir du panneau de commande, pas parvenue à...
  • Seite 67 Problème Action à entreprendre Le panneau de commande n'utilise pas la Utilisez le menu du panneau de commande pour langue d'affichage voulue. définir la langue souhaitée. Appuyez sur le bouton Dans l'écran du panneau de commande, appuyez sur CONFIGURE DEVICE (troisième élément de menu).
  • Seite 68: Assistance Clientèle

    Assistance clientèle Pour plus d'informations sur le produit, reportez-vous au Guide de l'utilisateur du HP 9200C Digital Sender ou au Guide d'assistance du HP 9200C Digital Sender du CD-ROM. Pour obtenir des informations sur le service clientèle HP, reportez-vous au dépliant d'assistance fourni avec votre produit.
  • Seite 69: Réglementations De La Fcc

    Branchez l'appareil sur une prise murale dont le circuit est différent de celui du récepteur. ● Contactez votre revendeur ou un technicien expérimenté spécialisé dans les radios et les téléviseurs. Tout changement ou toute modification non expressément approuvé par HP apporté à Remarque l'appareil annule le droit de faire fonctionner ledit appareil. FRWW...
  • Seite 70 Chapitre 3 Dépannage et assistance clientèle FRWW...
  • Seite 71 Caches, panneau de commande 10 Caractéristiques 1 Carte réseau, incluse 1 Heure, configuration 15 Configuration du système 7 HP DSS, installation 17 Configuration matérielle 7 HP Jetdirect Inside 1 Configuration réseau requise 8 Humidité 7 Connexion du câble réseau 13...
  • Seite 72 Marges, numérisation 1 Qualité de l'image, dépannage 25 Mémoire 1 Rechercher les serveurs, dépannage 24 Numéro de série, emplacement 9 Réglementation FCC 29 Pages coupées, dépannage 26 Pages vierges, dépannage 25 Serveurs SMTP, dépannage 24 Panneau de commande Sites Web, assistance 2 Caches 10 Spécification, caractéristiques 1 Emplacement 9...
  • Seite 73 HP 9200C Digital Sender Kurzanleitung...
  • Seite 74 Tochtergesellschaften in den USA und anderen Ländern/Regionen. Die Informationen in diesem Dokument können sich ohne Vorankündigung ändern. Die einzigen Gewährleistungen für HP Produkte und Dienstleistungen werden in den ausdrücklichen Gewährleistungserklärungen der entsprechenden Produkte und Dienstleistungen aufgeführt. In diesem Dokument werden keine zusätzlichen Gewährleistungen gegeben.
  • Seite 75 Inhaltsverzeichnis 1 Einführung Informationsquellen ........................2 Installationskontrollliste ......................2 Voraussetzungen ........................3 2 Einrichtung Schritt 1. Entfernen der Umverpackung und Überprüfen des Inhalts ........6 Schritt 2. Installationsanforderungen und Produktkomponenten ..........7 Umgebungsanforderungen ....................7 Systemanforderungen ......................7 Erläuterung der Produktkomponenten ................9 Schritt 3. Ändern der Bedienfeldschablonen ................10 Schritt 4.
  • Seite 76 DEWW...
  • Seite 77: Einführung

    Einführung Wir beglückwünschen Sie zum Kauf des HP 9200C Digital Sender, der eine wertvolle Ergänzung für Ihr Content-Management darstellt. Der Digital Sender scannt alle Dokumentenarten und sendet sie an E-Mail-Adressen, Faxnummern und Netzwerkordner. Der Digital Sender kann auch so eingerichtet werden, dass er Dokumente an Workflow-Ziele und Metadateien mit Workflow-Informationen vom Bedienfeld des Geräts versenden kann.
  • Seite 78: Informationsquellen

    Informationsquellen In den folgenden Dokumenten wird die Verwendung des HP 9200C Digital Sender erläutert. Kurzanleitung (dieses Dokument) – bietet Schritt-für-Schritt-Anweisungen zum Installieren und Einrichten des Digital Sender. Handbücher „Verwendung“ und „Unterstützung“ – Das Handbuch „Verwendung“ für den HP 9200C Digital Sender (Teilenummer Q5916-90913) enthält Informationen über die Verwendung des Digital Sender und über Probleme bei der Fehlerbehebung.
  • Seite 79: Voraussetzungen

    Schritt 8: Zuweisen der IP-Adresse für das Gerät Schritt 9: Installieren und Konfigurieren der Software Schritt 10: Überprüfen der Produktinstallation Voraussetzungen Während der Softwareinstallation werden Sie dazu aufgefordert, die Digital Sending- Optionen zu konfigurieren. Um diese Konfiguration abzuschließen, benötigen Sie die folgenden Informationen: ●...
  • Seite 80 Kapitel 1 Einführung DEWW...
  • Seite 81: Einrichtung

    Führen Sie die folgenden Schritte durch, um den Digital Sender einzurichten und zu konfigurieren. Detaillierte Informationen über die Verwendung und Konfiguration des Geräts finden Sie im Handbuch „Verwendung“ für den HP 9200C Digital Sender und im Handbuch „Unterstützung“ für den HP 9200C Digital Sender.
  • Seite 82: Schritt 1. Entfernen Der Umverpackung Und Überprüfen Des Inhalts

    Schritt 1. Entfernen der Umverpackung und Überprüfen des Inhalts Die folgenden Komponenten sind im Lieferumfang des Digital Sender enthalten.
  • Seite 83: Schritt 2. Installationsanforderungen Und Produktkomponenten

    Für dieses Produkt sind die folgenden Systemanforderungen zu beachten. Hardware-Anforderungen Die Digital Sending-Software benötigt für einen Server, der weniger als 50 Digital Sending- Geräte (MFP-Geräte oder 9200C Digital Sender) unterstützt, folgende Hardware: ● Einen PC mit einem Pentium® 3-Prozessor oder höher ●...
  • Seite 84 Die Digital Sending-Software benötigt für einen Server, der 50 bis 250 Digital Sending- Geräte (MFP-Geräte oder 9200C Digital Sender) unterstützt, folgende Hardware: ● Einen PC mit einem 2 GHz-Pentium® 4-Prozessor oder höher ● RAM: 1 GB Um die Software zu installieren, müssen Sie über Administratorrechte verfügen.
  • Seite 85: Erläuterung Der Produktkomponenten

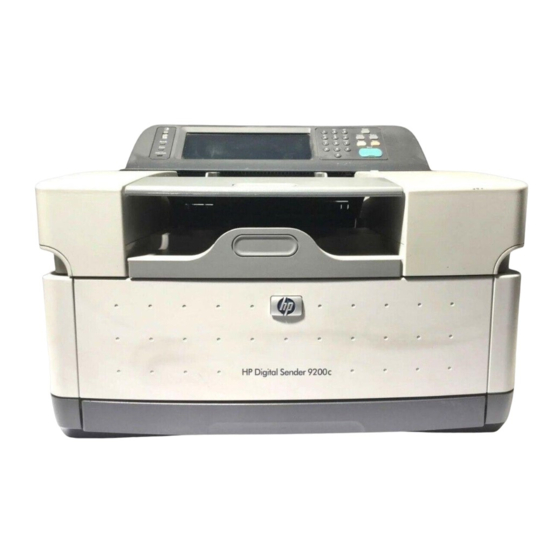
    Erläuterung der Produktkomponenten Die folgenden Abbildungen zeigen die Position und die Bezeichnungen der wichtigsten Produktkomponenten. Taste zur Papierstaubehebung Bedienfeld Ein/Aus-Schalter Ausgabefach ADF-Zufuhr ADF-Kabel Bedienfeldkabel 10/100Base-T-Netzwerkanschluss EIO-Anschluss 10 Netzanschlussstecker 11 Scannersperre DEWW Schritt 2. Installationsanforderungen und Produktkomponenten 12 Seriennummer...
  • Seite 86: Schritt 3. Ändern Der Bedienfeldschablonen

    Schritt 3. Ändern der Bedienfeldschablonen Das Gerät wird mit auf dem Bedienfeld angebrachten Schablonen geliefert. Schablonen für verschiedene Sprachen befinden sich ggf. im Karton. Führen Sie ggf. das folgende Verfahren durch, um die Bedienfeldschablonen für Ihre bevorzugte Sprache zu ändern. 1.
  • Seite 87 5. Befestigen Sie die Schablone auf dem Bedienfeld, so dass sie einschnappt. Vergewissern Sie sich, dass die Schablone flach auf dem Bedienfeld liegt. 6. Wiederholen Sie die Schritte 2 bis 5, um die zweite Schablone zu ändern. DEWW Schritt 3. Ändern der Bedienfeldschablonen...
  • Seite 88: Schritt 4. Entsperren Des Scannerkopfes

    Schritt 4. Entsperren des Scannerkopfes Der Scannerkopf ist gesperrt, um Beschädigungen während des Transports zu vermeiden. Führen Sie das folgende Verfahren durch, um den Scannerkopf zu entsperren. 1. Öffnen Sie die obere Klappe des Digital Sender. 2. Entsperren Sie den Scannerkopf. 3.
  • Seite 89: Schritt 5. Anschließen Des Netzwerkkabels

    Schritt 5. Anschließen des Netzwerkkabels Verwenden Sie den RJ-45-Anschluss auf der Rückseite des Geräts, um es mit einem Fast Ethernet 100Base-TX- oder Ethernet 10Base-T-Netzwerk zu verbinden. DEWW Schritt 5. Anschließen des Netzwerkkabels...
  • Seite 90: Schritt 6. Anschließen Des Netzkabels

    Schritt 6. Anschließen des Netzkabels 1. Verbinden Sie das Netzkabel mit dem Netzkabelanschluss des Geräts. Schließen Sie dann das Netzkabel an eine Steckdose (Wechselstrom) an. Dieses Gerät kann mit 110/120 Volt (V) und 60 Hertz (Hz) oder mit 220/240 V und 50 Hz Hinweis betrieben werden.
  • Seite 91: Schritt 7. Konfigurieren Der Bedienfeldeinstellungen

    Schritt 7. Konfigurieren der Bedienfeldeinstellungen Wenn Sie das Gerät zum ersten Mal einschalten, werden Sie auf dem Bedienfeld dazu aufgefordert, Sprache, Datum und Uhrzeit einzustellen. Konfigurieren der Bedienfeldsprache Standardmäßig werden auf dem Bedienfeld Meldungen in Englisch angezeigt. Sie können die Bedienfeldmenüs verwenden, um andere Spracheinstellungen auszuwählen. Wenn Sie das Gerät zum ersten Mal einschalten, wird das Menü...
  • Seite 92: Schritt 8. Zuweisen Der Ip-Adresse

    Schritt 8. Zuweisen der IP-Adresse Damit das Gerät ordnungsgemäß funktioniert, muss ihm eine gültige IP-Adresse in Ihrem Netzwerk zugewiesen werden. Wenn Ihr Netzwerk DHCP verwendet, kann diese IP-Adresse automatisch zugewiesen werden. DHCP ist die Standardeinstellung des Digital Sender. Wenn Sie DHCP nicht verwenden, müssen Sie die IP-Adresse manuell zuweisen. Suchen der DHCP-IP-Adresse Verwenden Sie eine der folgenden Methoden, um nach der IP-Adresse zu suchen, die DHCP automatisch zugewiesen hat.
  • Seite 93: Schritt 9. Installieren Und Konfigurieren Der Software

    HP 9200C Digital Sender. So installieren Sie die Software 1. Legen Sie die CD-ROM der HP DSS in das CD-ROM-Laufwerk ein. Wählen Sie auf dem Bildschirm des Setup-Programms die Option Jetzt installieren. Das Setup-Programm startet automatisch. Wenn es nicht automatisch startet, navigieren Sie Hinweis zum CD-ROM-Laufwerk, und starten Sie die Datei SETUP.EXE.
  • Seite 94 6. Nachdem die Softwaredateien installiert wurden, wird der Konfigurationsassistent für die HP MFP Digital Sending-Software angezeigt. Wenn die HP Digital Sending-Software zum ersten Mal installiert wird, kann die Software für einen bestimmten Zeitraum im Testmodus genutzt werden. Der Abschnitt Lizenzen auf diesem ersten Bildschirm des Konfigurationsassistenten zeigt den Eintrag „Testlizenz“.
  • Seite 95 Hinweis über das Versenden von Dokumenten an Faxgeräte finden Sie im Handbuch „Unterstützung“ für den HP 9200C Digital Sender. 14. Klicken Sie auf Weiter, um zum Bildschirm Ordnereinstellungen zu gelangen. 15. Wenn Sie die Funktion „An Ordner senden“ zur Verfügung stellen möchten, aktivieren Sie das Kontrollkästchen „An Ordner senden“...
  • Seite 96 Die Workflow-Konfiguration ist in dieser Anleitung nicht eingeschlossen. Weitere Informationen über das Senden an Workflows finden Sie im Handbuch „Unterstützung“ für den HP 9200C Digital Sender. 17. Klicken Sie auf Weiter, um zum Bildschirm Adressierungseinstellungen zu gelangen. 18. Wenn Ihr Netzwerk persönliche Adressbücher (PAB) unterstützt, aktivieren Sie das Kontrollkästchen PAB aktivieren, so dass die Benutzer ihre Microsoft Outlook-...
  • Seite 97 Dropdown-Liste die Option Standarddomäne aus. Aktivieren Sie auf der Registerkarte Adressierung das Kontrollkästchen Direkten Zugriff auf LDAP-Adressbuch für MFP-Gerät zulassen, wenn HP DSS E-Mail- Adressen direkt von einem LDAP-Server abrufen soll. Wählen Sie aus der Dropdown-Liste LDAP-Server den zuvor konfigurierten LDAP-Server aus.
  • Seite 98: Schritt 10. Überprüfen Der Produktinstallation

    Datei an den richtigen Ordner gesendet wird. Wenn dies nicht der Fall ist, müssen Sie Installation und Konfiguration des Geräts überprüfen. Weitere Informationen finden Sie im Handbuch „Verwendung“ für den HP 9200C Digital Sender oder im Handbuch „Unterstützung“ für den HP 9200C Digital Sender.
  • Seite 99: Fehlerbehebung Und Kundenunterstützung

    Verwenden Sie die Informationen aus diesem Abschnitt, wenn Sie Probleme mit der grundlegenden Einrichtung des Geräts haben. Detaillierte Informationen über die Fehlerbehebung finden Sie im Handbuch „Verwendung“ für den HP 9200C Digital Sender oder im Handbuch Unterstützung“ für den HP 9200C Digital Sender.
  • Seite 100: Fehlerbehebung

    Sie sich mit Ihrem Netzwerkadministrator in Verbindung. ● Wenn Sie noch andere Digital Sender oder MFP-Geräte für den HP DSS-Dienst verwenden, können Sie im HP MFP DSS Configuration Utility auf der Registerkarte MFP-Konfiguration die Schaltfläche Einstellungen kopieren verwenden, um die Einstellungen eines ordnungsgemäß...
  • Seite 101 Sie sich mit Ihrem Netzwerkadministrator in Verbindung. ● Wenn Sie noch andere Digital Sender oder MFP-Geräte für den HP DSS-Dienst verwenden, können Sie im HP MFP DSS Configuration Utility auf der Registerkarte MFP-Konfiguration die Schaltfläche Einstellungen kopieren verwenden, um die Einstellungen eines ordnungsgemäß...
  • Seite 102 Der geladene Medientyp stimmt möglicherweise nicht mit den Anforderungen überein. Weitere Informationen über die Medienanforderungen finden Sie im Handbuch „Verwendung“ für den HP 9200C Digital Sender. Eine gesendete E-Mail ist nicht an der ● Wenn Sie die E-Mail-Adresse am Bedienfeld eingeben haben, können Sie die Nachricht...
  • Seite 103 Problem Maßnahme Auf dem Bedienfeld wird die falsche Sprache Verwenden Sie das Bedienfeldmenü, um die angezeigt. richtige Sprache einzustellen. Drücken Sie die Taste ENÜ Wählen Sie auf der Bedienfeldanzeige die Option CONFIGURE DEVICE (die dritte Menüoption) aus. Berühren Sie SYSTEM SETUP (die vierte Menüoption).
  • Seite 104: Kundenunterstützung

    Kundenunterstützung Weitere Informationen über das Gerät finden Sie auf der CD-ROM im Handbuch „Verwendung“ für den HP 9200C Digital Sender oder im Handbuch „Unterstützung“ für den HP 9200C Digital Sender. Informationen über die HP Kundenbetreuung finden Sie in der Support-Broschüre, die mit dem Gerät geliefert wurde. Sie können auch unter http://www.hp.com/support/9200c...
  • Seite 105: Fcc-Regelungen

    Schließen Sie das Gerät an einer Steckdose an, die vom Stromkreislauf des Empfängers getrennt ist. ● Setzen Sie sich mit Ihrem Händler oder einem Radio-/Fernsehtechniker in Verbindung. Jegliche Änderungen am Gerät, die nicht ausdrücklich von HP genehmigt sind, können die Hinweis Berechtigung des Benutzers, das Gerät zu betreiben, ungültig machen. DEWW...
  • Seite 106 Kapitel 3 Fehlerbehebung und Kundenunterstützung DEWW...
  • Seite 107 Auspacken des Digital Sender 6 Handbuch „Unterstützung“ 2 Handbuch „Verwendung“ 2 Hardware-Anforderungen 7 Bedienfeld Hilfe, Online 2 Position 9 HP DSS, installieren 17 Schablonen 10 HP Jetdirect, integriert 1 Spracheinstellungen 15 Betriebssystem, Anforderungen 8 Betriebsumgebung, Anforderungen 7 Installation Bildqualität, Fehlerbehebung 25...
  • Seite 108 Spezifikationen, Funktionen 1 Online-Hilfe 2 Sprache, Bedienfeld Ordner, Fehlerbehebung 26 ändern 15 Schablonen, anbringen 10 Systemanforderungen 7 Papierstaubehebung, Taste 9 Taste zur Papierstaubehebung 9 Qualität, Fehlerbehebung 25 Temperatur, Anforderungen 7 Testen der Installation 22 Ränder, scannen 1 Rechtliche Informationen Überprüfen der Installation 22 FCC 29 Uhrzeit, einstellen 15 Umgebungsanforderungen 7...
  • Seite 109 HP 9200C Digital Sender Guida introduttiva...
  • Seite 110 Le informazioni contenute nel presente documento non costituiscono in alcun caso una garanzia aggiuntiva. HP non è responsabile per omissioni o errori tecnici ed editoriali contenuti nel presente documento. Numero parte: Q5916-90902...
  • Seite 111 Sommario 1 Introduzione Materiale informativo .........................2 Elenco di controllo per l'installazione ..................2 Operazioni preliminari .......................3 2 Configurazione 1. Disimballaggio e verifica del contenuto della confezione .............6 2. Requisiti di installazione e parti del prodotto ................7 Requisiti ambientali ......................7 Requisiti di sistema ......................7 Identificazione delle parti del prodotto ................9 3.
  • Seite 112 ITWW...
  • Seite 113: Introduzione

    Introduzione Grazie per aver acquistato HP 9200C Digital Sender (Unità di invio digitale HP 9200C), un prezioso complemento per i processi di gestione dei contenuti. L'unità di invio digitale consente di effettuare la scansione di tutti i tipi di documento ed inviarli a indirizzi di posta elettronica, destinazioni fax o cartelle di rete.
  • Seite 114: Materiale Informativo

    Guida introduttiva (il presente documento) - Fornisce istruzioni dettagliate per l'installazione e la configurazione dell'unità di invio digitale. Guida per l'utente e Manuale di assistenza - La Guida per l'utente di HP 9200C Digital Sender (numero parte Q5916-90912) contiene informazioni sull'uso dell'unità di invio digitale e sulla risoluzione dei problemi.
  • Seite 115: Operazioni Preliminari

    Passo 8: Assegnare l'indirizzo IP della periferica. Passo 9: Installare e configurare il software. Passo 10: Verificare l'installazione del prodotto. Operazioni preliminari Durante la procedura di installazione del software, viene richiesto di configurare le opzioni di invio digitale. Per completare la procedura di configurazione, è necessario disporre delle seguenti informazioni: ●...
  • Seite 116 Capitolo 1 Introduzione ITWW...
  • Seite 117: Configurazione

    Per installare e configurare l'unità di invio digitale, attenersi alla procedura riportata di seguito. Per ulteriori informazioni su come utilizzare o configurare l'unità, consultare la Guida per l'utente di HP 9200C Digital Sender o il Manuale di assistenza di HP 9200C Digital Sender.
  • Seite 118: Disimballaggio E Verifica Del Contenuto Della Confezione

    1. Disimballaggio e verifica del contenuto della confezione Insieme all'unità di invio digitale, nella confezione sono contenuti i seguenti elementi.
  • Seite 119: Requisiti Di Installazione E Parti Del Prodotto

    Requisiti hardware Il software di invio digitale dispone dei seguenti requisiti hardware per un server in grado di supportare meno di 50 unità di invio digitale (MFP o unità di invio digitale serie 9200C): ● Un PC con processore Pentium® 3 o superiore ●...
  • Seite 120 Il software di invio digitale dispone dei seguenti requisiti hardware per un server in grado di supportare tra 50 e 250 unità di invio digitale: ● Un PC con processore Pentium® 4 da 2 GHz o superiore ● 1 GB di RAM Per l'installazione del software, è...
  • Seite 121: Identificazione Delle Parti Del Prodotto

    Identificazione delle parti del prodotto Nelle figure riportate di seguito vengono indicati i nomi delle parti principali del prodotto e la relativa posizione. Pulsante di rilascio inceppamenti Pannello di controllo Interruttore di alimentazione Scomparto di uscita Scomparto di alimentazione dell'ADF Cavo dell'ADF Cavo del pannello di controllo Porta di rete 10/100Base-T...
  • Seite 122: Sostituzione Delle Mascherine Del Pannello Di Controllo

    3. Sostituzione delle mascherine del pannello di controllo L'unità viene fornita con delle mascherine installate sul pannello di controllo ed è possibile che nella stessa confezione siano disponibili mascherine per lingue differenti. Se necessario, attenersi alla procedura riportata di seguito per sostituire la mascherina del pannello di controllo in base alla lingua desiderata.
  • Seite 123 5. Applicare saldamente la mascherina sul pannello di controllo. Verificare che la mascherina aderisca completamente al pannello di controllo. 6. Ripetere i passi da 2 a 5 per sostituire anche la seconda mascherina. ITWW 3. Sostituzione delle mascherine del pannello di controllo...
  • Seite 124: Sblocco Della Testina Dello Scanner

    4. Sblocco della testina dello scanner La testina dello scanner è bloccata per evitare danni durante la spedizione. Per sbloccarla, attenersi alle seguenti istruzioni. 1. Sollevare il coperchio superiore dell'unità di invio digitale. 2. Sbloccare la testina dello scanner. 3. Abbassare il coperchio superiore dell'unità di invio digitale. Capitolo 2 Configurazione ITWW...
  • Seite 125: Collegamento Del Cavo Di Rete

    5. Collegamento del cavo di rete Utilizzare il connettore RJ-45 posto sul retro dell'unità per collegare l'unità di invio digitale a una rete Fast Ethernet 100Base-TX o a una rete Ethernet 10Base-T. ITWW 5. Collegamento del cavo di rete...
  • Seite 126: Collegamento Del Cavo Di Alimentazione

    6. Collegamento del cavo di alimentazione 1. Collegare il cavo di alimentazione al connettore del cavo di alimentazione del prodotto. Quindi, collegare il cavo di alimentazione a una presa CA (a corrente alternata) adeguata. Questo prodotto funziona con tensioni da 110/120 volt (V), 60 hertz (Hz) o da 220/240 volt Nota (V), 50 Hz.
  • Seite 127: Configurazione Delle Impostazioni Del Pannello Di Controllo

    7. Configurazione delle impostazioni del pannello di controllo Quando si accende l'unità per la prima volta, sul display del pannello di controllo viene richiesto di impostare la lingua, la data e l'ora. Configurazione della lingua del pannello di controllo Per impostazione predefinita, sul pannello di controllo dell'unità di invio digitale vengono visualizzati i messaggi in lingua inglese.
  • Seite 128: Assegnazione Dell'indirizzo Ip

    8. Assegnazione dell'indirizzo IP Per garantire il corretto funzionamento dell'unità di invio digitale, è necessario assegnare all'unità un indirizzo IP valido sulla rete. Se la rete utilizza un protocollo DHCP (Dynamic Host Configuration Protocol), è possibile assegnare automaticamente l'indirizzo IP. Nell'unità di invio digitale, DHCP è...
  • Seite 129: Installazione E Configurazione Del Software

    9. Installazione e configurazione del software Installare il software sul server che ci desidera utilizzare per il supporto del servizio HP DSS (HP Digital Sending Software). Al termine dell'installazione, HP DSS viene eseguito in background come un servizio e si avvia automaticamente ad ogni riavvio del server.
  • Seite 130 6. Al termine dell'installazione dei file del software, viene visualizzata la Configurazione Wizard di HP MFP Digital Sending Software. Se si installa HP Digital Sending Software per la prima volta, è possibile eseguire il programma solo in modalità di prova per un periodo di tempo predefinito. Nella sezione Licenze della schermata iniziale della procedura di configurazione guidata viene visualizzata la voce “Licenza di prova”.
  • Seite 131 La presente procedura non fornisce informazioni sulla configurazione del fax. Per istruzioni Nota sull'attivazione della funzione di invio al fax, consultare il Manuale di assistenza di HP 9200C Digital Sender. 14. Fare clic su Avanti per passare alla schermata Impostazioni cartella.
  • Seite 132 La presente procedura non fornisce informazioni sulla configurazione del flusso di lavoro. Per istruzioni sull'attivazione della funzione di invio a flussi di lavoro, consultare il Manuale di assistenza di HP 9200C Digital Sender. 17. Fare clic su Avanti per passare alla schermata Impostazioni di invio.
  • Seite 133 Dominio predefinito. Passare alla scheda Invio e selezionare la casella di controllo Consenti all'MFP di accedere direttamente a una rubrica LDAP se si desidera che il software HP DSS recuperi gli indirizzi direttamente da un server LDAP. Nell'elenco a discesa Server LDAP, selezionare il server LDAP precedentemente configurato.
  • Seite 134: 10. Verifica Dell'installazione Del Prodotto

    Consultare la Guida per l'utente di HP 9200C Digital Sender per istruzioni dettagliate sull'uso delle opzioni di invio e il Manuale di assistenza di HP 9200C Digital Sender per informazioni sulla configurazione di tutte le funzioni di invio digitale.
  • Seite 135: Risoluzione Dei Problemi E Assistenza Clienti

    Consultare questa sezione se si verificano dei problemi durante la procedura di installazione iniziale della periferica. Per ulteriori informazioni sulla risoluzione dei problemi, consultare la Guida per l'utente di HP 9200C Digital Sender o il Manuale di assistenza di HP 9200C Digital Sender.
  • Seite 136: Risoluzione Dei Problemi

    ● Se sono presenti altre unità di invio digitale o MFP che utilizzano il servizio HP DSS, tramite il pulsante Copia impostazioni nella scheda Configurazione MFP di HP MFP DSS Configuration Utility è possibile copiare le impostazioni da un'unità...
  • Seite 137 ● Se sono presenti altre unità di invio digitale o MFP che utilizzano il servizio HP DSS, tramite il pulsante Copia impostazioni nella scheda Configurazione MFP di HP MFP DSS Configuration Utility è possibile copiare le impostazioni da un'unità...
  • Seite 138 ● È possibile che il tipo di supporto caricato nel vassoio non soddisfi le specifiche richieste. Per le specifiche sui supporti, consultare la Guida per l'utente di HP 9200C Digital Sender. Un messaggio di posta elettronica non è stato ●...
  • Seite 139 Problema Soluzione La lingua visualizzata sul pannello di controllo è Utilizzare il menu del pannello di controllo per errata. impostare la lingua corretta. Premere il pulsante Selezionare CONFIGURE DEVICE sul display del pannello di controllo (la terza voce di menu). Toccare SYSTEM SETUP (la quarta voce di menu).
  • Seite 140: Assistenza Clienti

    Per ulteriori informazioni sul prodotto, consultare la Guida per l'utente di HP 9200C Digital Sender o il Manuale di assistenza di HP 9200C Digital Sender contenuto nel CD-ROM. Per informazioni sull'Assistenza clienti HP, consultare l'opuscolo di assistenza fornito con il prodotto oppure visitare il sito Web all'indirizzo http://www.hp.com/support/9200c.
  • Seite 141: Normative Fcc

    Collegare l'unità a una presa di un circuito diverso da quello a cui è collegato il ricevitore. ● Rivolgersi al rivenditore o a un tecnico dell'assistenza. Eventuali modifiche o alterazioni non espressamente autorizzate da HP possono invalidare il Nota diritto all'utilizzo dell'apparecchiatura.
  • Seite 142 Capitolo 3 Risoluzione dei problemi e assistenza clienti ITWW...
  • Seite 143: Indice Analitico

    10 posizione 9 requisiti 3 sblocco 12 software 17 verifica 22 installazione di HP DSS 17 caratteristiche 1 installazione, verifica 22 cartelle, risoluzione dei problemi 26 interruttore di alimentazione 9 cavi, collegamento 13 cavo di alimentazione, collegamento 14...
  • Seite 144 pannello di controllo invio digitale 25 impostazioni della lingua 15 pagine incomplete 26 mascherine 10 pagine vuote 25 posizione 9 posta elettronica 26 parti, posizione 9 qualità dell'immagine 25 porta di rete 9 porta EIO 9 porte, posizione 9 sblocco della testina dello scanner 12 posta elettronica scheda di rete incorporata 1 invio 22...
  • Seite 145 HP 9200C Digital Sender Guía de instalación inicial...
  • Seite 146 Ninguna parte de este documento debe interpretarse como constituyente de garantía adicional alguna. HP no será responsable de los errores u omisiones técnicos o editoriales que pueda contener este documento. Nº de referencia: Q5916-90902...
  • Seite 147 Tabla de contenido 1 Introducción Dónde buscar información ......................2 Lista de comprobación de la instalación ...................2 Antes de comenzar ........................3 2 Instalación Paso 1. Saque el producto del paquete y compruebe el contenido .........6 Paso 2. Requisitos de instalación y componentes del producto ..........7 Requisitos de entorno ......................7 Requisitos del sistema ......................7 Identificación de los componentes del producto ..............9...
  • Seite 148 ESWW...
  • Seite 149: Introducción

    Envío digital: envía archivos escaneados a direcciones de correo electrónico, destinatarios de fax, carpetas de red y carpetas de flujos de trabajo. El software HP Digital Sending Software (HP DSS) que se incluye con Digital Sender lleva a cabo las funciones de envío digital.
  • Seite 150: Dónde Buscar Información

    Guía de instalación inicial (este documento): proporciona instrucciones paso a paso para la instalación y configuración de Digital Sender. Guía del usuario y Guía de asistencia técnica: la Guía del usuario de HP 9200C Digital Sender (nº de referencia Q5916-90914) contiene información acerca del uso de Digital Sender y sobre cómo solucionar problemas.
  • Seite 151: Antes De Comenzar

    Paso 7: Configure los valores del panel de control. Paso 8: Asigne la dirección IP del dispositivo. Paso 9: Instale y configure el software. Paso 10: Compruebe la instalación del producto. Antes de comenzar Durante el procedimiento de instalación del software se le solicitará que configure las opciones de envío digital.
  • Seite 152 Capítulo 1 Introducción ESWW...
  • Seite 153: Instalación

    Siga estos pasos para instalar y configurar Digital Sender. Si necesita información más detallada sobre cómo utilizar o configurar el dispositivo, consulte la Guía del usuario de HP 9200C Digital Sender o la Guía de asistencia técnica de HP 9200C Digital Sender. ESWW...
  • Seite 154: Paso 1. Saque El Producto Del Paquete Y Compruebe El Contenido

    Paso 1. Saque el producto del paquete y compruebe el contenido En la caja de Digital Sender se incluyen estos elementos.
  • Seite 155: Paso 2. Requisitos De Instalación Y Componentes Del Producto

    Requisitos de hardware El software de envío digital presenta los siguientes requisitos de hardware para su instalación en un servidor con menos de 50 dispositivos de envío digital (equipos MFP o 9200C Digital Sender): ● PC con procesador Pentium® 3 o superior ●...
  • Seite 156 El software de envío digital presenta los siguientes requisitos de hardware para su instalación en un servidor con entre 50 y 250 dispositivos de envío digital: ● PC con procesador Pentium® 4 a 2 GHz o superior ● 1 GB de RAM Para poder instalar el software, es necesario tener privilegios de administrador en el servidor.
  • Seite 157: Identificación De Los Componentes Del Producto

    Identificación de los componentes del producto En las siguientes ilustraciones se muestran la ubicación y los nombres de los principales componentes del producto. Botón de recuperación de atascos Panel de control Interruptor de encendido/apagado Bandeja de salida Bandeja de entrada del ADF Cable del ADF Cable del panel de control Puerto de red 10/100Base-T...
  • Seite 158: Paso 3. Cambie Las Plantillas Del Panel De Control

    Paso 3. Cambie las plantillas del panel de control El dispositivo ya incorpora plantillas en el panel de control. Puede que en la caja se incluyan plantillas en otros idiomas. Si es necesario, siga este procedimiento para cambiar las plantillas del panel de control y utilizar el idioma preferido. 1.
  • Seite 159 5. Ajuste la plantilla sobre el panel de control. Asegúrese de que la plantilla está plana sobre el panel de control. 6. Repita los pasos del 2 al 5 para cambiar la segunda plantilla. ESWW Paso 3. Cambie las plantillas del panel de control...
  • Seite 160: Paso 4. Desbloquee El Cabezal Del Escáner

    Paso 4. Desbloquee el cabezal del escáner El cabezal del escáner está bloqueado para evitar que se estropee durante el transporte. Siga estas instrucciones para desbloquearlo. 1. Abra la parte superior de Digital Sender. 2. Desbloquee el cabezal del escáner. 3.
  • Seite 161: Paso 5. Conecte El Cable De Red

    Paso 5. Conecte el cable de red Utilice el conector RJ-45 situado en la parte posterior del dispositivo para conectar el producto a una red Fast Ethernet 100Base-TX o Ethernet 10Base-T. ESWW Paso 5. Conecte el cable de red...
  • Seite 162: Paso 6. Conecte El Cable De Alimentación

    Paso 6. Conecte el cable de alimentación 1. Conecte el cable de alimentación al conector de alimentación del producto. Seguidamente, conecte el cable de alimentación a una toma de corriente alterna (CA) adecuada. Este producto puede funcionar con dos opciones de tensión diferentes: 110/120 voltios (V) y Nota 60 hercios (Hz) o 220/240 V y 50 Hz.
  • Seite 163: Paso 7. Configure Los Valores Del Panel De Control

    Paso 7. Configure los valores del panel de control Cuando se enciende el dispositivo por primera vez, la pantalla del panel de control muestra mensajes para configurar el idioma, la fecha y la hora. Configuración del idioma del panel de control De forma predeterminada, el panel de control del producto muestra los mensajes en inglés.
  • Seite 164: Paso 8. Asigne La Dirección Ip

    Paso 8. Asigne la dirección IP Para que el dispositivo funcione correctamente, es necesario asignarle una dirección IP válida de la red. Si la red utiliza el protocolo DHCP (Protocolo de configuración dinámica de host), esta dirección IP se puede asignar de forma automática. DHCP es el valor predeterminado de Digital Sender.
  • Seite 165: Paso 9. Instalación Y Configuración Del Software

    Guía de asistencia técnica de HP 9200C Digital Sender. Para instalar el software 1. Introduzca el CD-ROM de HP DSS en la unidad de CD-ROM. Cuando se inicie el programa de instalación, seleccione Instalar ahora en la pantalla inicial. El programa de instalación debería iniciarse de forma automática. En caso contrario, acceda Nota a la unidad de CD-ROM y ejecute el archivo SETUP.EXE.
  • Seite 166 La configuración de Correo electrónico secundario no se incluye en este procedimiento. Si tiene pensado activar Correo electrónico secundario, consulte la Guía de asistencia técnica de HP 9200C Digital Sender para obtener instrucciones.
  • Seite 167 La configuración de fax no se incluye en este procedimiento. Si tiene pensado activar los Nota envíos a fax, consulte la Guía de asistencia técnica de HP 9200C Digital Sender para obtener instrucciones. 14. Haga clic en Siguiente para continuar con la pantalla Configuración de carpeta.
  • Seite 168 La Configuración de flujo de trabajo no se incluye en este procedimiento. Si tiene pensado Nota activar los envíos a flujos de trabajo, consulte la Guía de asistencia técnica de HP 9200C Digital Sender para obtener instrucciones. 17. Haga clic en Siguiente para continuar con la pantalla Configuración de direcciones.
  • Seite 169 Vaya a la ficha Direccionamiento y active la casilla de verificación Permitir a MFP el acceso directo a la libreta de direcciones de LDAP si desea que HP DSS recupere direcciones de correo electrónico directamente de un servidor LDAP.
  • Seite 170: Paso 10. Compruebe La Instalación Del Producto

    Para obtener más información, consulte la Guía del usuario de HP 9200C Digital Sender o la Guía de asistencia técnica de HP 9200C Digital Sender. Si la prueba es correcta, ya puede escanear documentos y enviarlos a una dirección de correo electrónico o a una carpeta.
  • Seite 171: Solución De Problemas Y Asistencia Al Cliente

    Utilice la información de esta sección si tiene algún problema con la instalación inicial del dispositivo. Para solucionar problemas más avanzados, consulte la Guía del usuario de HP 9200C Digital Sender o la Guía de asistencia técnica de HP 9200C Digital Sender. ESWW...
  • Seite 172: Solución De Problemas

    ● Si hay otros equipos Digital Sender o MFP que emplean el servicio HP DSS, puede utilizar el botón Copiar configuración de la ficha Configuración de MFP de HP MFP DSS Configuration Utility para copiar los valores de un dispositivo que funcione correctamente y utilizar después el botón...
  • Seite 173 ● Si hay otros equipos Digital Sender o MFP que emplean el servicio HP DSS, puede utilizar el botón Copiar configuración de la ficha Configuración de MFP de HP MFP DSS Configuration Utility para copiar los valores de un dispositivo que funcione correctamente y utilizar después el botón...
  • Seite 174 ● Puede que el tipo de soporte cargado no cumpla las especificaciones necesarias. Consulte la Guía del usuario de HP 9200C Digital Sender para conocer las especificaciones de los soportes. Una transmisión de correo electrónico no ha ●...
  • Seite 175 Problema Acción El panel de control emplea un idioma Utilice el menú del panel de control para definir el equivocado. idioma correcto. Pulse el botón Seleccione CONFIGURE DEVICE en la pantalla del panel de control (tercer elemento del menú). Toque SYSTEM SETUP (cuarto elemento del menú).
  • Seite 176: Asistencia Al Cliente

    Asistencia al cliente Para obtener más información sobre el producto, consulte la Guía del usuario de HP 9200C Digital Sender o la Guía de asistencia técnica de HP 9200C Digital Sender del CD-ROM. Para obtener información sobre el Centro de atención al cliente de HP, consulte el prospecto de ayuda que se suministra con el producto.
  • Seite 177: Normativas De La Fcc

    Consulte al distribuidor o a un técnico experimentado en radio y televisión. Cualquier cambio o modificación efectuada en el dispositivo sin la previa aprobación Nota expresa de HP podría anular la autoridad del usuario para manejar este equipo. ESWW Normativas de la FCC...
  • Seite 178 Capítulo 3 Solución de problemas y asistencia al cliente ESWW...
  • Seite 179 Buscar servidores, solución de problemas 24 hardware, requisitos 7 cables, conexión 13 hora, configuración 15 caja, contenido 6 HP DSS, instalación 17 calidad, solución de problemas 25 HP Jetdirect Inside 1 características 1 humedad, requisitos 7 carpetas, solución de problemas 26 cliente, asistencia 28 componentes, ubicación 9...
  • Seite 180 servidores, solución de problemas 24 normativas, declaraciones sistema, requisitos 7 FCC 29 sistema operativo, requisitos 8 número de serie, ubicación 9 SMTP, solución de problemas del servidor 24 software, instalación 17 solución de problemas páginas cortadas, solución de problemas 26 ADF 26 páginas en blanco, solución de problemas 25 Buscar servidores 24...
  • Seite 181 HP 9200C Digital Sender Beknopte handleiding...
  • Seite 182 De enige garanties voor producten en services van HP worden uiteengezet in de garantieverklaringen die bij dergelijke producten en services worden geleverd. Niets in dit document mag worden opgevat als een aanvullende garantie.
  • Seite 183 Inhoudsopgave 1 Inleiding Waar kunt u informatie vinden ....................2 Controlelijst voor installatie .......................2 Voordat u begint ........................3 2 Installatie Stap 1. Het apparaat uitpakken en de inhoud van de verpakking controleren ......6 Stap 2. Installatievereisten en productonderdelen ..............7 Omgevingsvereisten ......................7 Systeemvereisten .......................7 De productonderdelen herkennen ..................9 Stap 3.
  • Seite 184 NLWW...
  • Seite 185: Inleiding

    Inleiding Gefeliciteerd met uw aanschaf van de HP 9200C Digital Sender (digitaal verzendapparaat), een waardevolle aanvulling op uw content-managementprocessen. Het digitale verzendapparaat kan allerlei soorten documenten scannen en deze naar e-mailadressen, faxbestemmingen of netwerkmappen verzenden. Het digitale verzendapparaat kan ook ingesteld worden om documenten naar workflow-bestemmingen te verzenden samen met metagegevensbestanden.
  • Seite 186: Waar Kunt U Informatie Vinden

    Beide handleidingen zijn beschikbaar op de cd-rom met documentatie die bij het digitale verzendapparaat is geleverd. De handleidingen zijn ook beschikbaar op Internet op http://www.hp.com/support/9200c. On line Help - De HP MFP DSS Configuration Utility bevat on line Help met informatie over digitale verzendopties. Controlelijst voor installatie Deze handleiding helpt u bij het instellen en installeren van uw nieuwe product.
  • Seite 187: Voordat U Begint

    Stap 7: De instellingen van het bedieningspaneel configureren Stap 8: Het IP-adres van het apparaat toewijzen Stap 9: De software installeren en configureren Stap 10: De installatie van het product controleren Voordat u begint Tijdens de installatie van de software wordt u gevraagd om de digitale verzendopties te configureren.
  • Seite 188 Hoofdstuk 1 Inleiding NLWW...
  • Seite 189: Installatie

    Volg de hierna beschreven stappen voor het installeren en configureren van het digitale verzendapparaat. Raadpleeg de HP 9200C Digital Sender Gebruikershandleiding of de HP 9200C Digital Sender Ondersteuningshandleiding voor meer informatie over het gebruik of de configuratie van het apparaat.
  • Seite 190: Stap 1. Het Apparaat Uitpakken En De Inhoud Van De Verpakking Controleren

    Stap 1. Het apparaat uitpakken en de inhoud van de verpakking controleren In de doos van het digitale verzendapparaat worden de volgende onderdelen meegeleverd:...
  • Seite 191: Stap 2. Installatievereisten En Productonderdelen

    Voor dit product gelden de volgende systeemvereisten. Hardwarevereisten Wanneer de digitale verzendsoftware op een server wordt geïnstalleerd die minder dan 50 digitale verzendapparaten (MFP's of 9200C digitale verzendapparaten) ondersteunt, gelden de volgende hardwarevereisten: ● Een pc met Pentium® 3-processor of hoger ●...
  • Seite 192 Wanneer de digitale verzendsoftware op een server wordt geïnstalleerd die 50 tot 250 digitale verzendapparaten ondersteunt, gelden de volgende hardwarevereisten: ● Een pc met 2-GHz Pentium® 4-processor of hoger ● 1 GB RAM U moet beheerdersrechten op de server hebben om de software te kunnen installeren. Opmerking Netwerksysteemvereisten Voor de digitale verzendsoftware gelden de volgende netwerkvereisten:...
  • Seite 193: De Productonderdelen Herkennen

    De productonderdelen herkennen In de volgende afbeeldingen worden de plaats en namen van de belangrijkste onderdelen van het apparaat aangegeven. Ontgrendelingsknop voor papierstoringen Bedieningspaneel Aan/uit-schakelaar Uitvoerlade ADF-invoerlade ADF-kabel Kabel van bedieningspaneel 10/100Base-T-netwerkpoort EIO-poort 10 Aansluiting voor voedingskabel 11 Scannervergrendeling NLWW Stap 2.
  • Seite 194: Stap 3. De Overlays Voor Het Bedieningspaneel Vervangen

    Stap 3. De overlays voor het bedieningspaneel vervangen Het apparaat wordt geleverd met overlays die op het bedieningspaneel zijn bevestigd. De doos kan mogelijk overlays voor verschillende talen bevatten. Indien nodig kunt u de hieronder beschreven procedure volgen om de overlays van het bedieningspaneel te vervangen door overlays in de gewenste taal.
  • Seite 195 5. Druk de overlay stevig op het bedieningspaneel. Zorg dat de overlay plat op het bedieningspaneel ligt. 6. Herhaal stap 2 t/m 5 om de tweede overlay te wijzigen. NLWW Stap 3. De overlays voor het bedieningspaneel vervangen...
  • Seite 196: Stap 4. De Scannerklep Ontgrendelen

    Stap 4. De scannerklep ontgrendelen De scannerklep is vergrendeld om schade tijdens het verzenden te voorkomen. Volg deze instructies om de scannerklep te ontgrendelen. 1. Open de bovenkant van het digitale verzendapparaat. 2. Ontgrendel de scannerklep. 3. Sluit de bovenkant van het digitale verzendapparaat. Hoofdstuk 2 Installatie NLWW...
  • Seite 197: Stap 5. De Netwerkkabel Aansluiten

    Stap 5. De netwerkkabel aansluiten Gebruik de RJ-45-aansluiting aan de achterkant van het apparaat om het apparaat aan te sluiten op een Fast Ethernet 100Base-TX- of Ethernet 10Base-T-netwerk. NLWW Stap 5. De netwerkkabel aansluiten...
  • Seite 198: Stap 6. De Voedingskabel Aansluiten

    Stap 6. De voedingskabel aansluiten 1. Sluit de voedingskabel aan op de hiervoor bestemde aansluiting van het apparaat. Sluit vervolgens de voedingskabel aan op een geschikt stopcontact met wisselstroom. Opmerking Voor dit apparaat is voeding van 110/120 volt (V), 60 hertz (Hz) of 220/240 V, 50 Hz geschikt. 2.
  • Seite 199: Stap 7. De Instellingen Van Het Bedieningspaneel Configureren

    Stap 7. De instellingen van het bedieningspaneel configureren Wanneer het apparaat voor de eerste keer wordt aangezet, verschijnen op het display van het bedieningspaneel berichten voor het instellen van de taal, datum en tijd. De taal op het bedieningspaneel configureren Het bedieningspaneel op het apparaat toont standaard de berichten in het Engels.
  • Seite 200: Stap 8. Het Ip-Adres Toewijzen

    Stap 8. Het IP-adres toewijzen Om het apparaat goed te laten werken, dient een geldig IP-adres op uw netwerk aan het apparaat te worden toegewezen. Als uw netwerk gebruikmaakt van DHCP (Dynamic Host Configuration Protocol), kan dit IP-adres automatisch worden toegewezen. DHCP is de standaardinstelling in het digitale verzendapparaat.
  • Seite 201: Stap 9. De Software Installeren En Configureren

    Stap 9. De software installeren en configureren Installeer de software op de server die de HP Digital Sending Software-service (HP DSS) ondersteunt. Na installatie is de HP DSS als een service actief op de achtergrond. De service start automatisch weer wanneer de server opnieuw wordt opgestart.
  • Seite 202 De configuratie van de Secundaire e-mail is niet in deze procedure opgenomen. Als u van plan bent om Secundaire e-mail in te schakelen, raadpleegt u de HP 9200C Digital Sender Ondersteuningshandleiding voor instructies.
  • Seite 203 De configuratie van de fax is niet in deze procedure opgenomen. Als u van plan bent om het Opmerking verzenden naar fax in te schakelen, raadpleegt u de HP 9200C Digital Sender Ondersteuningshandleiding voor instructies. 14. Klik op Volgende om verder te gaan naar het scherm Mapinstellingen.
  • Seite 204 De configuratie van workflow is niet in deze procedure opgenomen. Als u van plan bent om Opmerking het verzenden naar workflow in te schakelen, raadpleegt u de HP 9200C Digital Sender Ondersteuningshandleiding voor instructies. 17. Klik op Volgende om verder te gaan naar het scherm Adressering.
  • Seite 205 Ga naar het tabblad Adressering en schakel het selectievakje MFP directe toegang tot LDAP-adreslijst toestaan in als u wilt dat HP DSS e-mailadressen rechtstreeks vanaf een LDAP-server ophaalt. Selecteer de eerder geconfigureerde LDAP-server in de vervolgkeuzelijst LDAP-server. g. Klik op OK om de configuratie-instellingen van de MFP op te slaan.
  • Seite 206: Stap 10. De Installatie Van Het Product Controleren

    Als de test is gelukt, kunt u nu documenten scannen en ze naar een e-mailadres of een map verzenden. Raadpleeg de HP 9200C Digital Sender Gebruikershandleiding voor instructies over het gebruik van alle opties voor verzenden naar. Raadpleeg de HP 9200C Digital Sender Ondersteuningshandleiding voor informatie over de configuratie van alle digitale verzendfuncties.
  • Seite 207: Problemen Oplossen En Klantondersteuning

    Problemen oplossen en klantondersteuning Gebruik de informatie in dit hoofdstuk wanneer u problemen ondervindt met de basisinstallatie van het apparaat. Raadpleeg de HP 9200C Digital Sender Gebruikershandleiding of de HP 9200C Digital Sender Ondersteuningshandleiding voor het oplossen van meer geavanceerde problemen.
  • Seite 208: Problemen Oplossen

    ● Wanneer u andere digitale verzendapparaten of MFP's hebt die de HP DSS-service gebruiken, kunt u de knop Instellingen kopiëren op het tabblad MFP- configuratie gebruiken of de HP MFP DSS Configuration Utility om de instelling van een goedwerkend apparaat te kopiëren en...
  • Seite 209 ● Wanneer u andere digitale verzendapparaten of MFP's hebt die de HP DSS-service gebruiken, kunt u de knop Instellingen kopiëren op het tabblad MFP- configuratie gebruiken of de HP MFP DSS Configuration Utility om de instelling van een goedwerkend apparaat te kopiëren en...
  • Seite 210 ● Het kan zijn dat het type afdrukmateriaal dat wordt geplaatst, niet aan de vereiste specificaties voldoet. Raadpleeg de HP 9200C Digital Sender Gebruikershandleiding voor specificaties over afdrukmateriaal. Een e-mail is niet op het bestemde e-mailadres ●...
  • Seite 211 Probleem Oplossing Het bedieningspaneel gebruikt de verkeerde taal. Gebruik het menu van het bedieningspaneel om de juiste taal te selecteren. Druk op de knop Selecteer CONFIGURE DEVICE (het derde menu-item) op het display van het bedieningspaneel. Raak SYSTEM SETUP (het vierde menu- item) aan.
  • Seite 212: Klantenondersteuning

    Klantenondersteuning Raadpleeg de HP 9200C Digital Sender Gebruikershandleiding of de HP 9200C Digital Sender Ondersteuningshandleiding op de cd-rom voor extra informatie over het product. Zie de ondersteuningsbrochure die bij het product is geleverd voor informatie over de klantenondersteuning van HP. U kunt ook naar http://www.hp.com/support/9200c...
  • Seite 213: Fcc-Voorschriften

    Sluit de apparatuur aan op een stopcontact van een andere stroomkring dan die waarop het ontvangstapparaat is aangesloten. ● Raadpleeg uw dealer of een ervaren radio-/televisietechnicus. Eventuele wijzigingen aan het apparaat die niet uitdrukkelijk door HP zijn goedgekeurd, Opmerking kunnen de bevoegdheid van de gebruiker om dit apparaat te gebruiken nietig verklaren. NLWW...
  • Seite 214 Hoofdstuk 3 Problemen oplossen en klantondersteuning NLWW...
  • Seite 215 8 handleidingen 2 harde schijf 1 omgevingsvereisten 7 hardwarevereisten 7 onderdelen, locatie 9 help, on line 2 ondersteuning 28 HP DSS, installeren 17 ondersteuningshandleiding 2 HP Jetdirect Inside 1 on line Help 2 ontgrendelen van scannerklep 12 NLWW Index...
  • Seite 216 ontgrendelingsknop, papierstoring 9 stroomschakelaar 9 overlays, bedieningspaneel 10 systeemvereisten 7 papierstoring, ontgrendelingsknop 9 taal, bedieningspaneel poorten, locatie 9 overlays, installeren 10 problemen oplossen wijzigen 15 ADF 26 temperatuurvereisten 7 afgesneden pagina's 26 testen van installatie 22 beeldkwaliteit 25 tijd, instelling 15 digitaal verzenden 25 e-mail 26 lege pagina's 25...
  • Seite 217 HP 9200C Digital Sender Guia de primeiros passos...
  • Seite 218 HP são fornecidas nas declarações de garantia expressa que acompanham esses produtos e serviços. Nada aqui mencionado deverá ser interpretado como sendo garantia adicional. A HP não se responsabiliza por erros técnicos, editoriais ou por omissões. Número de peça: Q5916-90902 Edition 1, 11/2004...
  • Seite 219 Conteúdo 1 Introdução Onde encontrar informações ....................2 Lista de verificação para instalação ..................2 Antes de começar ........................3 2 Configuração Etapa 1. Desembale e confira o conteúdo da embalagem ............6 Etapa 2. Requisitos de instalação e componentes do produto ..........7 Requisitos ambientais ......................7 Requisitos de sistema ......................7 Identificação dos componentes do produto ...............9 Etapa 3.
  • Seite 220 PTWW...
  • Seite 221: Introdução

    Introdução Parabéns! Você acaba de adquirir o HP 9200C Digital Sender, uma valiosa adição aos seus processos de gerenciamento de conteúdo. O dispositivo de envio digital digitaliza todos os tipos de documentos e os envia a endereços de e-mail, destinos de fax ou pastas de redes.
  • Seite 222: Onde Encontrar Informações

    Guia de primeiros passos (este documento) — Oferece instruções passo a passo para instalar e configurar o dispositivo de envio digital. Guia do usuário e Guia de suporte — O Guia do usuário do HP 9200C Digital Sender (número de peça Q5916-90918) contém informações sobre como usar o dispositivo de envio digital e sobre solução de problemas.
  • Seite 223: Antes De Começar

    Etapa 7: Configure as definições do painel de controle. Etapa 8: Atribua o endereço IP do dispositivo. Etapa 9: Instale e configure o software. Etapa 10: Verifique a instalação do produto. Antes de começar Durante os procedimentos de instalação, é solicitado que você configure as opções de envio digital.
  • Seite 224 Capítulo 1 Introdução PTWW...
  • Seite 225: Configuração

    Siga essas etapas para configurar e definir o dispositivo de envio digital. Se precisar de informações mais detalhadas sobre como usar ou configurar o dispositivo, consulte o Guia do usuário do HP 9200C Digital Sender ou o Guia de suporte do HP 9200C Digital Sender. PTWW...
  • Seite 226: Etapa 1. Desembale E Confira O Conteúdo Da Embalagem

    Etapa 1. Desembale e confira o conteúdo da embalagem Os itens a seguir são despachados na caixa junto com o dispositivo de envio digital.
  • Seite 227: Etapa 2. Requisitos De Instalação E Componentes Do Produto

    As especificações de sistema a seguir são necessárias para este produto. Requisitos de hardware O software de envio digital possui os requisitos de hardware para um servidor que suporte menos de 50 dispositivos (MFPs ou dispositivos de envio digital 9200C): ● Um PC com processador Pentium® 3 ou superior ●...
  • Seite 228 O software de envio digital possui os requisitos de hardware para um servidor que suporte de 50 a 250 dispositivos de envio digital: ● Um PC com processador Pentium® 4 de 2 GHz ou superior ● 1 GB de RAM Você...
  • Seite 229: Identificação Dos Componentes Do Produto

    Identificação dos componentes do produto As ilustrações a seguir mostram a localização e os nomes dos componentes principais. Botão de liberação de congestionamento Painel de controle interruptor lig/desl Compartimento de saída Compartimento de entrada do AAD Cabo AAD Cabo do painel de controle Porta de rede 10/100Base-T Porta EIO 10 Conector de força...
  • Seite 230: Etapa 3. Mude As Capas Do Painel De Controle

    Etapa 3. Mude as capas do painel de controle O dispositivo vem com capas no painel de controle; na caixa, pode haver capas para diferentes idiomas. Se necessário, adote o seguinte procedimento para mudar as capas do painel de controle para o idioma de sua preferência. 1.
  • Seite 231 5. Pressione a capa firmemente no painel de controle. Certifique-se de que a capa esteja uniformemente colocada no painel de controle. 6. Repita as etapas 2 até 5 para mudar a segunda capa. PTWW Etapa 3. Mude as capas do painel de controle...
  • Seite 232: Etapa 4. Destrave O Cabeçote Do Scanner

    Etapa 4. Destrave o cabeçote do scanner O cabeçote do scanner está travado para evitar danos durante o transporte. Siga as instruções para destravá-lo. 1. Abra a parte superior do dispositivo de envio digital. 2. Destrave o cabeçote do scanner. 3.
  • Seite 233: Etapa 5. Conecte O Cabo De Rede

    Etapa 5. Conecte o cabo de rede Use o conector RJ-45 na parte traseira do dispositivo para conectar o produto a uma rede Fast Ethernet 100Base-TX ou Ethernet 10Base-T. PTWW Etapa 5. Conecte o cabo de rede...
  • Seite 234: Etapa 6. Conecte O Cabo De Alimentação

    Etapa 6. Conecte o cabo de alimentação 1. Conecte o cabo de alimentação ao conector de cabo de alimentação do produto. Em seguida, conecte o cabo de alimentação a uma saída de corrente alternada (ac) adequada. O produto funciona com alimentação de 110/120 volts (V), 60 hertz (Hz), ou de 220/240 V, Nota 50 Hz.
  • Seite 235: Etapa 7. Configure O Painel De Controle

    Etapa 7. Configure o painel de controle Quando o aparelho é ligado pela primeira vez, o visor do painel de controle exibe avisos para configuração de idioma, data e hora. Configuração do idioma do painel de controle Por padrão, o painel de controle do produto exibe mensagens em inglês. Você pode usar os menus do painel de controle para configurar a opção de exibição de mensagens em outro idioma suportado.
  • Seite 236: Etapa 8. Atribua O Endereço Ip

    Etapa 8. Atribua o endereço IP Para funcionar corretamente, um endereço IP deve ser designado para seu dispositivo na rede. Se sua rede usar DHCP, esse endereço IP pode ser automaticamente atribuído. DHCP é a configuração padrão do dispositivo de envio digital. Se você não estiver usando o DHCP, precisará...
  • Seite 237: Etapa 9. Instale E Configure O Software

    Instale o software no servidor que estará suportando o serviço do HP Digital Sending Software (HP DSS). Após a instalação, o HP DSS é executado em segundo plano como um serviço. Ele é iniciado automaticamente sempre que o servidor é reiniciado.
  • Seite 238 A configuração da opção de e-mail secundário não está incluída neste procedimento. Se você planeja ativar esta opção, consulte o Guia de suporte do HP 9200C Digital Sender para obter mais instruções.
  • Seite 239 A configuração de fax não está incluída neste procedimento. Se você planeja ativar esta Nota opção, consulte o Guia de suporte do HP 9200C Digital Sender para obter mais instruções. 14. Clique em Avançar para prosseguir para a tela Configurações de pasta.
  • Seite 240 A configuração de fluxo de trabalho não está incluída neste procedimento. Se você planeja Nota ativar esta opção, consulte o Guia de suporte do HP 9200C Digital Sender para obter mais instruções. 17. Clique em Avançar para prosseguir para a tela Configurações de endereçamento.
  • Seite 241 Vá para a guia Endereçamento e marque a caixa de seleção Permitir acesso direto da MFP a um catálogo de endereços LDAP se desejar que o HP DSS recupere endereços de e-mail diretamente de um servidor LDAP. Selecione na lista suspensa Servidor LDAP o servidor LDAP previamente configurado.
  • Seite 242: Etapa 10. Verifique A Instalação Do Produto

    Se o teste for bem-sucedido, você poderá digitalizar documentos e enviá-los para um endereço de e-mail ou para uma pasta. Consulte o Guia do usuário do HP 9200C Digital Sender para instruções mais detalhadas sobre como usar todas as opções "enviar para", e o Guia de suporte do HP 9200C Digital Sender para obter informações sobre como...
  • Seite 243: Solução De Problemas E Suporte Ao Cliente

    Use as informações nesta seção se estiver tendo problemas com a instalação inicial do dispositivo. Para informações avançadas de solução de problemas, consulte o Guia do usuário do HP 9200C Digital Sender ou o Guia de suporte do HP 9200C Digital Sender. PTWW...
  • Seite 244: Solução De Problemas

    ● Se possuir outros dispositivos de envio digital ou MFPs que usem o serviço do HP DSS, você pode usar o botão Copiar configurações na guia Configuração da MFP do HP MFP DSS Configuration Utility, de forma a copiar as configurações de um...
  • Seite 245 ● Se possuir outros dispositivos de envio digital ou MFPs que usem o serviço do HP DSS, você pode usar o botão Copiar configurações na guia Configuração da MFP do HP MFP DSS Configuration Utility, de forma a copiar as configurações de um...
  • Seite 246 ● O tipo de mídia que está sendo carregado não se adapta às especificações necessárias. Consulte o Guia do usuário do HP 9200C Digital Sender para especificações de mídia. Uma transmissão de e-mail não chegou ao ● Se você digitou o endereço de e-mail no painel de controle, reenvie a mensagem, endereço de e-mail de destino.
  • Seite 247 Problema Medida a tomar O painel de controle está usando o idioma Use o menu do painel de controle para definir o incorreto. idioma adequado. Pressione o botão Selecione CONFIGURE DEVICE no visor (o terceiro item de menu). Toque em SYSTEM SETUP (o quarto item de menu).
  • Seite 248: Assistência Ao Cliente

    Assistência ao cliente Para obter mais informações sobre o produto, consulte o Guia do usuário do HP 9200C Digital Sender ou o Guia de suporte do HP 9200C Digital Sender no CD-ROM. Para informações sobre o Atendimento a clientes HP, consulte o folheto de suporte fornecido com o produto.
  • Seite 249: Regulamentações Da Fcc

    ● Consulte o seu revendedor ou um técnico experiente de rádio ou televisão. Quaisquer alterações ou modificações no dispositivo que não sejam expressamente Nota aprovadas pela HP poderão anular a autoridade do usuário a operá-lo. PTWW Regulamentações da FCC...
  • Seite 250 Capítulo 3 Solução de problemas e suporte ao cliente PTWW...
  • Seite 251 2 guia do usuário 2 assistência 28 assistência ao cliente 28 hora, configuração 15 HP DSS, instalação 17 botão de liberação, congestionamento 9 HP Jetdirect Inside 1 botão de liberação de congestionamento 9 idioma, painel de controle cabo de alimentação, conexão 14 alteração 15...
  • Seite 252 painel de controle servidores SMTP, solução de problemas 24 capas 10 sites na Web, suporte 2 configurações de idioma 15 software, instalação 17 localização 9 solução de problemas pastas, solução de problemas 26 AAD 26 placa de rede, incluído 1 e-mail 26 porta de rede envio digital 25...
  • Seite 254 © 2004 Hewlett-Packard Development Company, L.P. www.hp.com *Q5916-90902* *Q5916-90902* Q5916-90902...

Inhaltsverzeichnis