Werbung
Verfügbare Sprachen
Verfügbare Sprachen
Quicklinks
Instructions for Use
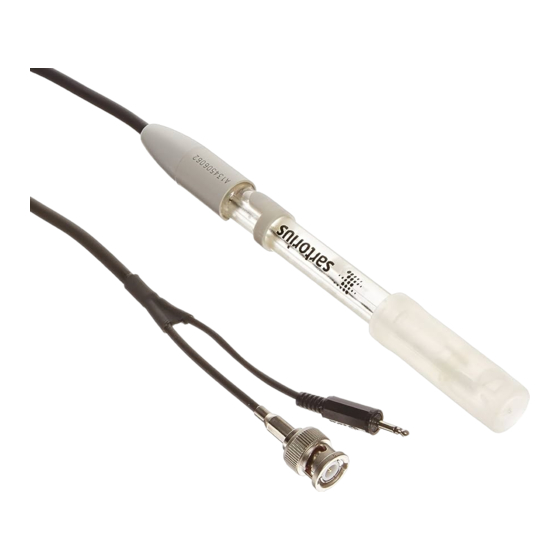
Sartorius PY-P10, PY-P11, PY-P12, PY-P20 to PY-P24 pH
ATC Combination Electrode
Specifications
Type
Glass membrane electrode
Ideal pH for samples
0...14, 2...13 at PY-P23, 1...13 at PY-P12
Temperature range
See label on the electrode
Reference electrode
Ag|AgCI
Reference junction
Platinum: PY-P11, PY-P21, PY-P22
Fiber: PY-P10, PY-P20
Annular gap junction: PY-P23
Adjustable sleeve junction: PY-P24
Filling solution
KCl solution, 3 M*: PY-P10
PY-P11, PY-P21, PY-P22, PY-P24
Gel
PY-P12, PY-P20, PY-P23
Cable length
1 meter
Connector type
BNC
Response time
95% in 15 seconds
Range of Use
$ Electrodes are expendables whose lifetime depends on the
conditions of use.
$ Electrodes that are used under extreme conditions or at the limits of their
specified ranges of use have a shorter lifetime.
§ Transportation and storage conditions: 0°...40°C (32°F... 104°F)
Extreme conditions include, for example, high or frequently fluctuating
temperatures, strong acids, hydrofluoric acid, strong bases, organic sol-
vents, oils, fats, known reference electrode toxins, such as sulfide, bro-
mide, iodide, proteins and highly contaminated solutions.
Electrode Preparation
§ Remove the wetting cap from the electrode.
§ Clean any salt deposits from the electrode body by rinsing with deionized
(Dl) or distilled water.
$ Verify that the electrode filling solution is at least 1" (25 mm) high.
If not, slide the electrode fill gate up to uncover the fill hole. Insert the
plastic nozzle of the filling solution bottle firmly into the fill hole and
squeeze to fill the electrode.
$ During use, leave the fill gate in the open position.
$ Connect the electrode to the meter as described in the meter's manual.
Measuring Techniques
$ Standardize at least daily for the most accurate readings.
$ Always use fresh buffers.
$ Stir all buffers and samples.
$ During standardization, allow time for the electrode to stabilize before
entering the buffer into the meter. Allowing time for the electrode to
completely equilibrate before pressing the Standardize key on the meter
helps provide more accurate measurements.
$ Rinse the electrode with Dl water between samples.
! Blot the electrode dry (do not rub or wipe).
Storage
Place the wetting cap containing electrode filling solution on the elec-
trode. Electrode filling solution (3 mol/l KCI) can be purchased or made.
Make 3 mol/l KCI solution by dissolving 22.37 grams of potassium chlo-
ride into 100 ml of Dl or distilled water.
! Do not store the electrode in deionized water. The fill gate must always
be kept closed during storage.
*
mol/l =M
In cases involving questions of interpretation, the German-language
version shall prevail.
Cleaning Procedures
If the electrode becomes sluggish, or has been determined to be bad,
clean the electrode by following the directions below.
General
Soak in 0.1 mol/l HCI or 0.1 mol/l HNO
the filling solution. Soak the electrode in filling or storage solution for
1 hour.
Inorganic
Soak in 0.1 mol/l tetrasodium EDTA solution 15 minutes. Drain and refill
the filling solution. Soak the electrode in filling or storage solution for 1
hour.
Protein
Soak in 1% pepsin in 0.1 mol/l HCI for 15 minutes. Drain and refill the fill-
ing solution. Soak the electrode in filling or storage solution for 1 hour.
Grease and Oil
Rinse with mild detergent or methanol solution. Drain and refill the
electrode filling solution (fresh potassium chloride solution).
Soak the electrode in KCl or storage solution for 1 hour.
! Important for Electrodes with a Platinum Junction
Never mechanically clean platinum junctions (on Sartorius PY-P11, PY-P21
and PY-P22 combination electrodes). After chemical cleaning, you can
flush out the cleaning solution as follows: apply vacuum to suction off
the solution or slide up the wetting cap to dislodge air bubbles from the
filling solution.
! Note on Electrodes with Plastic Body
Electrodes with a plastic body (models PY-P10, PY-P12 and PY-P20)
must not come into contact with organic solvents or alcohol. Solvents
will damage the electrode body.
Troubleshooting
Connect the pH electrode to the BNC connector. Place the meter into
absolute (not relative) mV mode. Rinse and place the clean electrode into
a pH 7 buffer: The mV reading should be 0 ± 30 mV. Outside of this
range indicates a problem. See below for solutions.**
Rinse and place the clean electrode into a pH 4 buffer:
The mV reading should be 159 to 186 mV more than value in pH 7.
Example: pH 7 buffer is 10 mV; pH 4 buffer should read 169 to 196 mV.
Outside of this range indicates a problem. See below for solutions.**
Optionally, rinse and place the clean electrode into a pH 10 buffer:
The mV reading should be –159 to –186 mV less than value in pH 7.
Example: pH 7 buffer is 10 mV; pH 10 buffer should read –149 to –176
mV. Outside of this range indicates a problem.
** Solutions:
$ Ensure that buffers are fresh and not contaminated.
$ If an air bubble is lodged inside the electrode, dislodge it by shaking the
electrode as you would a thermometer to measure fever.
$ If readings are still outside of this range, clean the electrode as described
above and repeat test.
Warranty
§ Warranty claims due to defects shall be time-barred by the statute
of limitations 12 months from the date of delivery.
§ This shall also apply to electrodes, insofar as these claims are due to
manufacturing defects.
§ Product- and application-specific aging processes and/or reduced
product- and application-specific durability and function times shall not
constitute any defect in this context.
Sartorius AG
Weender Landstrasse 94–108, Goettingen, Germany
Phone: +49.(0)551.308.0, Fax: +49.(0)551.308.3289
www.sartorius-mechatronics.com
Printed in Germany on paper that has been bleached without any use of chlorine · W1A000 · KT
98648-009-76
Publication No.: WPY6009-n08024
for half an hour. Drain and refill
3
Werbung

Verwandte Anleitungen für Sartorius PY-P12


Inhaltszusammenfassung für Sartorius PY-P12
- Seite 1 ! Note on Electrodes with Plastic Body vents, oils, fats, known reference electrode toxins, such as sulfide, bro- Electrodes with a plastic body (models PY-P10, PY-P12 and PY-P20) mide, iodide, proteins and highly contaminated solutions. must not come into contact with organic solvents or alcohol. Solvents will damage the electrode body.
- Seite 2 Elektrolyten aufsteigen. ! Hinweis zu Elektroden mit Kunststoffkörper Vorbereitung der Elektrode Elektroden mit Kunststoffkörper (Modelltypen PY-P10, PY-P12 und PY- § Bei Elektroden mit flüssigem Innenelektrolyt Nachfüllöffnung öffnen. P20) dürfen nicht in Kontakt mit organischen Lösemitteln oder Alkohol § Die Wässerungskappe von der Elektrode entfernen. Eventuell vorhandene kommen.
- Seite 3 ! Remarque concernant les électrodes avec tige en plastique remplissage. Les électrodes avec une tige en plastique (modèles PY-P10, PY-P12 et § Enlevez le capuchon d’humidification de l’électrode. PY-P20) ne doivent pas être en contact avec des solvants organiques ou $ Rincez les éventuels dépôts salins avec de l’eau distillée.
- Seite 4 ! Indicación para los electrodos con vástago de plástico Preparación del electrodo Los electrodos con vástago de plástico (tipos de modelo PY-P10, PY-P12 § Abrir el orificio de llenado en los electrodos con electrólito interno líquido. y PY-P20) no deben entrar en contacto con solventes orgánicos o alco- §...