Herunterladen Inhalt Inhalt Diese Seite drucken

Werbung

Verfügbare Sprachen

Verfügbare Sprachen

BEDIENUNGSANLEITUNG
MANUAL DEL USUARIO
DJ-Battle-Mixer
Classic-Edition
Jam-Edition
Silver-Edition
©
COPYRIGHT
Nachdruck verboten!
All rights reserved!
Réproduction interdite!
Prohibida toda reproducción!
USER'S MANUAL
MODE D' ' E MPLOI
DJ-24
DJ-24
DJ-24
DJ-24
Für weiteren Gebrauch aufbewahren!
Keep this manual for further needs!
Gardez ces instructions pour des utilisations ultérieurs!
Guarde este manual para posteriores usos.
®

Werbung

Inhaltsverzeichnis
loading

Inhaltszusammenfassung für Omnitronic Battle-Mixer DJ-24

  • Seite 1 ® BEDIENUNGSANLEITUNG USER'S MANUAL MODE D' ’ E MPLOI MANUAL DEL USUARIO DJ-24 DJ-24 DJ-24 DJ-24 DJ-Battle-Mixer Classic-Edition Jam-Edition Silver-Edition © COPYRIGHT Für weiteren Gebrauch aufbewahren! Nachdruck verboten! Keep this manual for further needs! All rights reserved! Gardez ces instructions pour des utilisations ultérieurs! Réproduction interdite! Prohibida toda reproducción! Guarde este manual para posteriores usos.
  • Seite 3: Inhaltsverzeichnis

    MULTI-LANGUAGE-INSTRUCTIONS Inhaltsverzeichnis Table of contents Sommaire Contenido 1. EINFÜHRUNG ............................... 5 1.2 Features ..............................5 2. SICHERHEITSHINWEISE ..........................5 3. BESTIMMUNGSGEMÄSSE VERWENDUNG ....................6 4. ANSCHLÜSSE .............................. 6 5. GERÄTEÜBERSICHT ........................... 8 5.1 Frontplatte ..............................8 5.2 Rückseite..............................9 6. PROBLEMBEHEBUNG..........................9 7.
  • Seite 4 1. INTRODUCCIÓN ............................23 1.1. Features ..............................23 2. INSTRUCCIONES DE SEGURIDAD......................23 3. INSTRUCCIONES DE MANEJO......................... 24 4. CONEXIONES ............................. 24 5. VISTA GENERAL DEL APARATO......................26 5.1 Panel frontal ............................26 5.2 Panel trasero ............................27 6. SOLUCIÓN DE PROBLEMAS ........................27 7.
  • Seite 5: Einführung

    - diese Betriebsanleitung genau beachten. 1. EINFÜHRUNG Wir freuen uns, daß Sie sich für ein OMNITRONIC DJ-24 Mischpult entschieden haben. Wenn Sie nachfolgende Hinweise beachten, sind wir sicher, dass Sie lange Zeit Freude an Ihrem Kauf haben werden. Nehmen Sie das OMNITRONIC DJ-24 aus der Verpackung.
  • Seite 6: Bestimmungsgemässe Verwendung

    Unbedingt lesen: Bei Schäden, die durch Nichtbeachtung dieser Bedienungsanleitung verursacht werden, erlischt der Garantieanspruch. Für daraus resultierende Folgeschäden übernimmt der Hersteller keine Haftung. Das Netzteil immer als letztes einstecken. Vergewissern Sie sich, dass der Netzschalter auf „OFF“ steht, wenn Sie das Gerät ans Netz anschließen. Halten Sie das Gerät von Hitzequellen wie Heizkörpern oder Heizlüftern fern.
  • Seite 7: Anschlüsse

    Soll das Gerät transportiert werden, verwenden Sie bitte die Originalverpackung, um Transportschäden zu vermeiden. Beachten Sie bitte, dass eigenmächtige Veränderungen an dem Gerät aus Sicherheitsgründen verboten sind. Der Serienbarcode darf niemals vom Gerät entfernt werden, da ansonsten der Garantieanspruch erlischt. Wird das Gerät anders verwendet als in dieser Bedienungsanleitung beschrieben, kann dies zu Schäden am Produkt führen und der Garantieanspruch erlischt.
  • Seite 8: Geräteübersicht

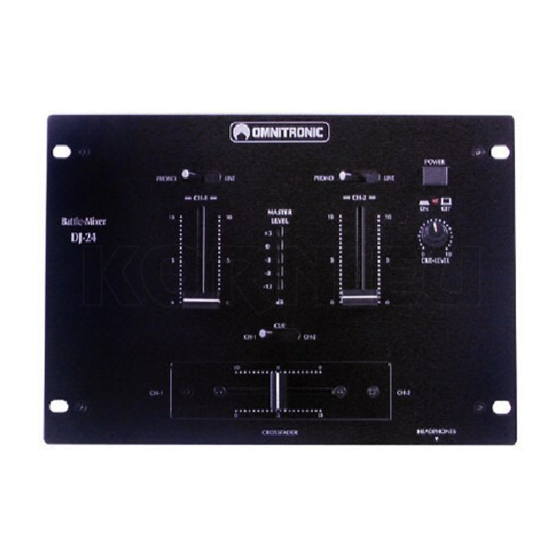
    5. GERÄTEÜBERSICHT 5.1 Frontplatte (1) NETZSCHALTER (2) MASTER LEVEL-DISPLAY Auf der Anzeige erscheint die Signalstärke des Master-Ausgangssignals. (3) PHONO/LINE-SCHALTER Über den PHONO/LINE-Schalter wählen Sie die jeweilige Signalquelle. (4) KANALFADER Zum Einpegeln des jeweiligen Kanals. (5) CUE-SCHALTER Mit dem CUE-Schalter bestimmen Sie, welcher Kanal vorgehört wird. (6) CROSSFADER Mit dem CROSSFADER wird ein Kanal mit dem anderen gemischt.
  • Seite 9: Rückseite

    5.2 Rückseite (9) GND (Erdungsklemme) Zur Vermeidung von Brummen und anderen Störgeräuschen verbinden Sie die Erdungsklemme mit dem Erdungskabel des Plattenspielers. (10), (11) LINE / PHONO-EINGANGSBUCHSEN Eingangsbuchsen für Kanäle CH-1 und CH-2. An die LINE Buchsen können Sie CD-Player und Cassettendecks anschließen. An die PHONO Buchsen können Sie den/die Plattenspieler anschließen.
  • Seite 10: Austauschen Des Crossfaders

    7. AUSTAUSCHEN DES CROSSFADERS Wenn Sie einen kompletten Ersatz-Crossfader gekauft haben, gehen Sie wie folgt vor: • Ziehen Sie den Faderknopf ab. • Entfernen Sie die 2 äußeren Schrauben an der Faderplatte. • Heben Sie den Crossfader mit Faderplatte heraus und ziehen Sie den Anschlussstecker ab. •...
  • Seite 11: Introduction

    - follow the instructions of this manual 1. INTRODUCTION Thank you for having chosen an OMNITRONIC DJ-24. If you follow the instructions given in this manual, we can assure you that you will enjoy this device for many years. Unpack your OMNITRONIC DJ-24.
  • Seite 12: Operating Determinations

    Important: Damages caused by the disregard of this user manual are not subject to warranty. The dealer will not accept liability for any resulting defects or problems. Always plug in the power plug least. Make sure that the power-switch is set to OFF position before you connect the device to the mains.
  • Seite 13: Connections

    Never remove the serial barcode from the device as this would make the guarantee void. If this device will be operated in any way different to the one described in this manual, the product may suffer damages and the guarantee becomes void. Furthermore, any other operation may lead to dangers like short- circuit, burns, electric shock, etc.
  • Seite 14: Description Of The Device

    5. DESCRIPTION OF THE DEVICE 5.1 Frontpanel (1) POWER SWITCH (2) MASTER LEVEL-DISPLAY The display shows the level of the master output. (3) PHONO/LINE-SWITCH Used to select the input to be sent to the individual channel. (4) CHANNEL-FADER Used to adjust the level of each channel. (5) CUE-SWITCH Use the CUE-switch in order to select the channel to be monitored.
  • Seite 15: Rearpanel

    5.2 Rearpanel (9) GND (Ground terminal) Connect the ground lead of the turntable with this terminal. This helps to reduce humming and pop noise. (10), (11) LINE / PHONO INPUT-SOCKETS Input socket for CH-1 and CH-2. Connect your turntable(s) with the PHONO input-sockets. CD-players or Tape Decks should be connected with the LINE input-sockets.
  • Seite 16: Cleaning And Maintenance

    • Connect the new fader and fix it in the device. The fader-panel of the replacement-crossfader cannot be used for the Design-version. In order to exchange the fader-panels, additionally unscrew the 2 inner screws and exchange the two fader-panels. 8. CLEANING AND MAINTENANCE We recommend a frequent cleaning of the device.
  • Seite 17: Introduction

    - est priée de suivre strictement les instructions de service suivantes. 1. INTRODUCTION Nous vous remercions d'avoir choisi un OMNITRONIC DJ-24. Si vous respectez les instructions de service suivantes, vous allez profiter longtemps de votre achat. Sortez le OMNITRONIC DJ-24 de son emballage.
  • Seite 18: Emploi Selon Les Prescriptions

    Attention: Tout dommage occasionné par la non observation des instructions de montage ou d'utilisation n'est pas couvert par la garantie. Le bloc d'alimentation doit toujours être branché en dernier lieu. Assurez-vous que l'interrupteur ON/OFF de l'appareil est en position OFF avant d'effectuer ce branchement. Tenez l'appareil éloigné...
  • Seite 19: Connexions

    Notez que pour des raisons de sécurité, il est interdit d'entreprendre toutes modifications sur l'appareil. Il est interdit de retirer le code barre de l'appareil. Ceci annulerait toute garantie. Si l'appareil est utilisé autrement que décrit dans ce mode d'emploi, ceci peut causer des dommages au produit et la garantie cesse alors.
  • Seite 20: Description De L'appareil

    5. DESCRIPTION DE L'APPAREIL 5.1 Panneau avant (1) INTERRUPTEUR ON/OFF (POWER) (2) L’AFFICHAGE MASTER LEVEL L’affichage indique le niveau de la douille master. (3) SÉLECTEUR PHONO/LINE Pour niveler le niveau d’entrée de chaque canal. (4) FADER CANAUX Pour niveler le niveau d’entrée de chaque canal. (5) SELECTEUR CUE Avec le sélecteur CUE vous pouvez choisir le canal à...
  • Seite 21: Dos De L'appareil

    5.2 Dos de l'appareil (9) BORNE GND Brancher le fil de mise à la terre à la borne GND. Le fait de raccorder le fil de masse réduit le ronronnement. (10), (11) ENTRÉES LINE/ PHONO Prise d'entrée pour les canaux CH-1 et CH-2. Raccordez le lecteur de disque audionumérique et la platine à cassette aux prises LINE.
  • Seite 22: Nettoyage Et Maintenance

    • Retirez les deux vis extérieurs à la plaque du fader. • Retirez maintenant le crossfader et débranchez. • Connectez le crossfader de rechange et fixez-le à la table de mixage. La plaque du crossfader de remplacement ne peut être utilisée pour l'édition de dessin. Pour remplaçer la plaque du fader, retirez les deux vis intérieurs et échanchez les plaques.
  • Seite 23: Introducción

    -estar cualificada -seguir las instrucciones de este manual 1. INTRODUCCIÓN Gracias por haber elegido un OMNITRONIC DJ-24. Desembale su DJ-24. Antes de la puesta en marcha inicial, por favor asegúrese de que no hay daños causados durante el transporte. Si los hubiese, consulte a su proveedor y no use el aparato.
  • Seite 24: Instrucciones De Manejo

    Importante: Los daños causados por no hacer caso de las instrucciones de este manual del usuario no están sujetos a garantía. El proveedor no aceptará responsabilidad por ningún defecto o problema resultante. Siempre conectar la unidad de alimentación al final. Asegúrese de que el conmutador de alimentación está en la posición “OFF”...
  • Seite 25: Conexiones

    No utilice disolventes o detergentes agresivos para limpiar el aparato. Utilice mejor un paño suave y húmedo. ¡Por favor tenga en cuenta que por razones de seguridad las modificaciones no autorizadas del aparato están prohibidas! El código de barras de serie no debe ser quitado del aparato, en caso de que esto ocurra la garantía ya no es válida.
  • Seite 26: Vista General Del Aparato

    5. VISTA GENERAL DEL APARATO 5.1 Panel frontal (1) Conmutador de alimentación (2) Pantalla del nivel Master La pantalla muestra el nivel de salida del master. (3) Interruptor PHONO/LINE Se usa para seleccionar el input que se envia a cada uno de los canales individuales. (4) Fader de vía Se usa para ajustar el nivel de cada canal.
  • Seite 27: Panel Trasero

    5.2 Panel trasero (9) GND (Terminal de tierra) Conecte el cable de tierra del tocadiscos a este terminal. Esto ayuda a reducir ruidos. (10), (11) Casquillos de entrada LINE/PHONO Casquillo de entrada para CH-1 y CH-2. Conecte los tocadiscos a la entrada PHONO. Los CD-players o cassettes deben ser conectados a la entrada LINE.
  • Seite 28: Limpieza Y Mantenimiento

    • Retirar los 2 tornillos exteriores del panel del fader • Sacar el fader y desconectar el cable de conexión • Conectar el nuevo fader y fijarlo en el aparato. Para la versión de diseño, Vd. no puede utilizar el panel de fader del crossfader de recambio. Para sustituir el panel de fader, también tiene que retirar los 2 tornillos interiores.

Inhaltsverzeichnis