nomad Source IV Bedienungsanleitung
SOURCE IV
Inhoud Contents – Inhalt – Contenu
NL
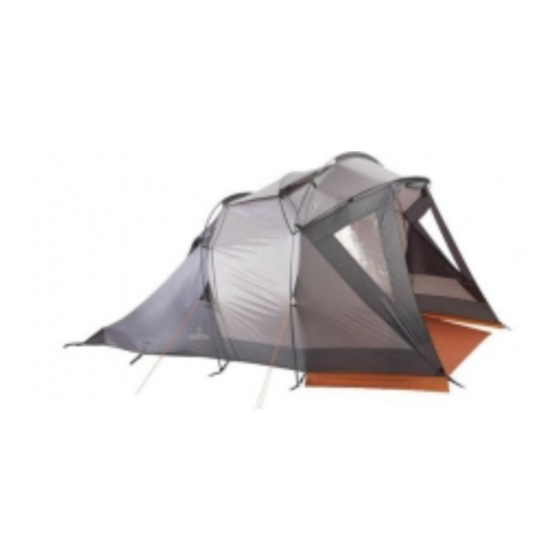
1 Buitentent - 1 Binnentent - 5 Stokken - Haringen - Scheerlijnen
EN
1 Outer tent - 1 Inner tent - 5 Poles - Pegs - Guy lines
DE
1 Außenzelt - 1 Innenzelt - 5 Stangen - Heringe - Spannschnüre
FR
1 Tente extérieure - 1 Tente intérieure - 5 Tiges - Sardines - Cordelettes
Opzetinstructie Pitching the tent – Das Aufstellen des Zeltes – Monter la tente
1
2
3
4
NL
Zoek een zo vlak mogelijke plaats voor je tent waar bij regen de kans op plassen
minimaal is. Verwijder stenen, takken of andere scherpe objecten om te voorkomen
dat het grondzeil beschadigd wordt.
EN
Find a spot as flat as possible where no puddles are likely to form if it rains. Remove
any stones, twigs or other sharp objects to prevent the ground sheet from getting
damaged.
DE
Suchen Sie einen möglichst ebenen Platz, sodass bei Regen das Entstehen von Pfützen
am geringsten ist. Steine, Zweige oder andere scharfe Gegenstände entfernen, um
Beschädigungen des Zeltbodens zu vermeiden.
FR
Cherchez un emplacement aussi plat que possible limitant ainsi le risque de flaques en
cas de pluie. Eliminez tout objet tranchant tel que des pierres ou des brindilles, sinon
on risque d'endommager le tapis de sol.
NL
Schuif de stokken in elkaar.
Let op: Zorg ervoor dat het smalle deel volledig in het andere deel verdwijnt.
EN
Fit the poles together.
Note: make sure that the narrow section of the pole is completely inserted into the
other section.
DE
Die Stangen ineinanderschieben.
Achtung: Das schmälere Teil muss vollständig in das andere Teil geschoben werden.
FR
Insérez les tiges l' une dans l'autre.
Attention : Veillez à ce que la partie étroite disparaisse entièrement dans l'autre partie.
NL
Leg de buitentent plat neer.
Let op: Zorg ervoor dat de ritsen dicht zitten.
EN
Lay the outer tent flat on the ground.
Note: make sure that the zippers are closed.
DE
Das Außenzelt glatt hinlegen. Darauf achten, dass die Stangenaussparungen gerade liegen.
Achtung: darauf achten, dass die Reißverschlüsse geschlossen sind.
FR
Posez le double toit à plat. Veillez à ce que les fentes soient droites.
Attention : Veillez à ce que les fermetures éclair soient fermées.
NL
Pak de langste stok met daaraan 2 zwarte verdelers. Steek deze stok in het voorste
oogje aan de onderkant van de tent. Buig vervolgens de stok zodat deze in het voorste
oogje aan de andere zijde van de tent gestoken kan worden.
EN
Insert the longest pole with the 2 black distributors in the foremost ring at the bottom
of the tent. Then bend the pole so that it can be inserted in the foremost ring on the
other side of the tent.
DE
Die längste Stange mit daran 2 schwarzen Verteilern nehmen. Diese Stange in die
vorderste Öse an der Zeltunterseite stecken. Dann die Stange so biegen, dass sie in den
vordersten Ring auf der anderen Seite des Zeltes gesteckt werden kann.
FR
Prenez la tige la plus longue dotée de 2 répartiteurs noirs. Insérez cette tige dans
l'œillet avant du dessous de la tente. Pliez ensuite la tige pour qu'elle puisse se loger
dans l'anneau avant de l'autre côté de la tente.

Verwandte Anleitungen für nomad Source IV


Inhaltszusammenfassung für nomad Source IV
- Seite 1 SOURCE IV Inhoud Contents – Inhalt – Contenu 1 Buitentent - 1 Binnentent - 5 Stokken - Haringen - Scheerlijnen 1 Outer tent - 1 Inner tent - 5 Poles - Pegs - Guy lines 1 Außenzelt - 1 Innenzelt - 5 Stangen - Heringe - Spannschnüre 1 Tente extérieure - 1 Tente intérieure - 5 Tiges - Sardines - Cordelettes...
- Seite 2 Klik de haakjes vast aan de stok. Zorg ervoor dat er aan de voor- en achterzijde van deze stok nog een reeks haakjes overblijft. Attach the hooks to this pole. Make sure there are a number of hooks remaining on the front and back of this pole.
- Seite 3 Span de tent nu strak door hem eerst bij de stokken [1] vast te zetten met haringen. Span de tent nu strak naar achteren en zet hem achtereenvolgens bij punt [2], [3] en [4] vast. Span de tent daarna aan de voorzijde strak [5]. Pull the tent taut through first securing the poles [1] with pegs.
- Seite 4 Maak de haakjes van de voorste [1] en achterste [2] korte stok los en haal de stokken uit de verdeler [3]. Haal daarna de voorste stok uit de oogjes op de grond [4]. Let op: Zorg ervoor dat de ritsen van de tent open zijn. Let op: Mocht het lastig zijn de stok uit de verdeler te halen kan je eerst 2 stokdelen van de korte stok uit elkaar halen.
- Seite 5 • Secure the tent well with guys always. • Ventilation is extremely important with tents. All Nomad tents have sufficient means of ventilation. Air the tent regularly to prevent the tent cloth from suffocating and condensation forming inside the tent.
- Seite 6 • Fixez solidement la tente toujours. • La ventilation est capitale pour les tentes. Toutes les tentes Nomad sont pourvues d’un nombre suffisant de points de ventilation. Aérez régulièrement la tente pour éviter l’étouffement de la toile et pour lutter contre la condensation à l’intérieur.
- Seite 7 Zips are also excluded from the guarantee. We have taken every possible care while making and transporting this product. If you also take every possible care when using it, you will be able to enjoy your Nomad product for longer. Damage due to anything other than manufacturing or material faults will not be covered by any form of warranty, but can be repaired at a reasonable charge.