Vortice VORT HRW 20 MONO Betriebsanleitung
Vorschau ausblenden
Andere Handbücher für VORT HRW 20 MONO:
- Installationsanleitung: parametereinstellung (8 Seiten) ,
- Betriebsanleitung (32 Seiten) ,
- Installationsanleitung: parametereinstellung (20 Seiten)
Inhaltsverzeichnis
Werbung
Verfügbare Sprachen
Verfügbare Sprachen
Quicklinks
Libretto istruzioni
Instructions Booklet
Livret d'istructions
Betriebsanleitung
Manual de instrucciones
Brugervejledning
说明手册
Használati utasítás
VORT HRW 20 MONO HCS
COD. 5.471.084.648
VORTICE LIMITED
Beeches House - Eastern Avenue
Burton on Trent
DE13 0BB
Tel. (+44) 1283-492949
Fax (+44) 1283-544121
UNITED KINGDOM
VORT HRW 20 MONO
VORT HRW 20 MONO RC
VORTICE FRANCE
15-33, Rue Le Corbusier Europarc
CS 30007
90046 CRETEIL CEDEX
FRANCE
28/03/2017
VORTICE ELETTROSOCIALI S.p.A.
Strada Cerca, 2 - frazione di Zoate
20067 TRIBIANO (MI)
Tel. (+39) 02-90.69.91
Fax (+39) 02-90.64.625
ITALIA
Werbung
Inhaltsverzeichnis

Verwandte Anleitungen für Vortice VORT HRW 20 MONO


Inhaltszusammenfassung für Vortice VORT HRW 20 MONO
- Seite 1 Libretto istruzioni Instructions Booklet Livret d’istructions Betriebsanleitung Manual de instrucciones Brugervejledning 说明手册 Használati utasítás VORT HRW 20 MONO VORT HRW 20 MONO RC VORT HRW 20 MONO HCS COD. 5.471.084.648 28/03/2017 VORTICE FRANCE VORTICE LIMITED VORTICE ELETTROSOCIALI S.p.A. 15-33, Rue Le Corbusier Europarc Beeches House - Eastern Avenue Strada Cerca, 2 - frazione di Zoate CS 30007 Burton on Trent 20067 TRIBIANO (MI) 90046 CRETEIL CEDEX DE13 0BB...
-
Seite 2: Inhaltsverzeichnis
请妥善保存本说明手册 。 保养与清洁 . . . . . . . . . . . . . . . . . . . . . . . . . . . . . . . . . 92 A termék használata el ő tt gondosan olvassa el a kézikönyvben Tartalomjegyzék Leírás és működés . . . . . . . . . . . . . . . . . . . . . . . . . . . 94 tartalmazott utasításokat. A Vortice nem vonható felel ő sségre Biztonság . . . . . . . . . . . . . . . . . . . . . . . . . . . . . . . . . . 94 Szerkezet és berendezések . . . . . . . . . . . . . . . . . . . . 95 olyan esetleges személyi sérülésekért vagy anyagi károkért, Telepítés . . . . . . . . . . . . . . . . . . . . . . . . . . . . . . . . . . . 96 amelyeket az alábbiakban felsorolt utasítások be nem tartása... -
Seite 3: Descrizione Ed Impiego
• Le istruzioni per la manutenzione devono essere seguite per prevenire danni e/o usura eccessiva dell’apparecchio. • Non lasciare l'apparecchio esposto ad agenti atmosferici (pioggia, sole, ecc.). • Non appoggiare oggetti sull’apparecchio. • La pulizia interna del prodotto deve essere eseguita soltanto da personale qualificato. • Verificare periodicamente l'integrità dell'apparecchio. In caso di imperfezioni, non utilizzare l'apparecchio e contattare subito un Centro di Assistenza Tecnica autorizzato Vortice. • In caso di cattivo funzionamento e/o guasto dell'apparecchio, rivolgersi subito ad un Centro Assistenza Tecnica autorizzato Vortice e richiedere, per l’eventuale riparazione, l'uso di ricambi originali Vortice. • Se il prodotto cade o riceve forti colpi farlo verificare subito presso un Centro di Assistenza Tecnica autorizzato Vortice. • L’apparecchio deve essere montato in modo da garantire che, in condizioni normali di funzionamento, nessuno possa venirsi a trovare in prossimità di parti in movimento o sotto tensione. • Nel caso di: smontaggio dell’apparecchio, con strumenti appropriati; estrazione dello scambiatore di calore; estrazione del modulo dei motori; l’apparecchio dovrà essere preventivamente spento e disconnesso dalla rete di alimentazione elettrica. • L'impianto elettrico a cui è collegato il prodotto deve essere conforme alle norme vigenti. • Collegare l'apparecchio alla rete di alimentazione /presa elettrica solo se la portata dell'impianto /presa è adeguata alla... -
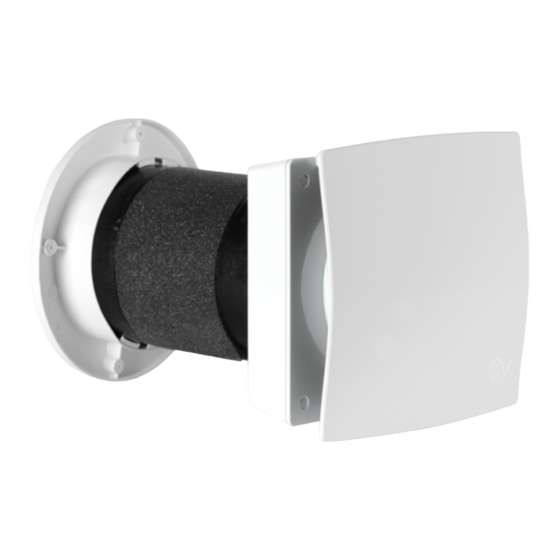
Seite 4: Struttura E Dotazione
ITALIANO sua potenza massima. In caso contrario rivolgersi subito a personale professionalmente qualificato. • Spegnere l’interruttore generale dell’impianto quando: si rileva un’anomalia di funzionamento; si decide di eseguire una manutenzione di pulizia esterna; si decide di non utilizzare per brevi o lunghi periodi l’apparecchio. • Il flusso d’aria estratto deve essere pulito, (cioè privo di elementi grassi, fuliggine, agenti chimici e corrosivi o miscele esplosive ed infiammabili). • Non coprire e non ostruire l’aspirazione e la mandata dell’apparecchio, in modo da assicurare l'ottimale passaggio dell'aria. • Temperatura massima di esercizio: 45°C. • I dati elettrici della rete devono corrispondere a quelli riportati in targa A (fig.A). • L’installazione dell’apparecchio deve essere effettuata da parte di personale professionalmente qualificato. -
Seite 5: Installazione
ITALIANO Installazione Fig 1 ÷ 38 N.B. Prima di procedere con l’installazione rimuovere l’imballo interno di protezione presente nel prodotto. N.B. Prima di procedere con l’installazione rimuovere i distanziali presenti all’interno del tubo di installazione in PVC, e tagliare lo stesso nella misura adatta allo spessore del muro. L’installazione deve essere realizzata seguendo le norme di sicurezza in vigore nel paese di destinazione, e le istruzioni del presente libretto. - Seite 6 ITALIANO...
- Seite 7 ITALIANO 11 11...
- Seite 8 ITALIANO FROM ELECTRONIC MOTOR BOARD 20 mm...
- Seite 9 ITALIANO VORT HRW 20 RC ø mm 162...
- Seite 10 ITALIANO 150 mm...
- Seite 11 ITALIANO FROM ELECTRONIC MOTOR BOARD 20 mm...
-
Seite 12: Utilizzo
ITALIANO Utilizzo Vort HRW 20 L’apparecchio viene controllato tramite i comandi a bordo (fig.39): • A: selettore a 6 posizioni: ESTR 0: stand by, apparecchio spento MAND 1-5: velocità/portata da min a max • B: selettore a 3 posizioni: REC: recupero calore (il sistema opera come un recuperatore, con inversione ciclica del senso di rotazione ogni 50-80- 100 s circa) ESTR: estrazione (il sistema opera come un ventilatore, con estrazione aria dal locale) MAND: mandata (il sistema opera come un ventilatore, con immissione aria del locale) Un led (C ) indica lo stato dei filtri:... -
Seite 13: Schemi Di Collegamento
VORT HRW 20 MONO ~230V Morsetto femmina del ventilatore FAN header terminal block Morsetto maschio dalla scheda elettr. FAN plug terminal block Ventola VORT HRW 20 MONO RC FAN 16-24 AWG 0.35-1mm VORT HRW 20 MONO RC TO REMOTE CONTROL (HRW) -
Seite 14: Manutenzione E Pulizia
ITALIANO TO VORT HRW 20 MONO RC FAN 16-24 AWG Morsetti 1 ÷ 4 dalla ventola VORT HRW 20 MONO RC 0.5-1mm FAN #1 to #4 PCB terminal block Morsetti alimentazione 12 V 12V Power Supply PCB terminal block Morsetti ingresso remoto... -
Seite 15: Informazione Importante Per Lo Smaltimento Ambientalmente Compatibile
ITALIANO Su tutti i modelli è necessario resettare la situazione di filtro saturo (led acceso) dopo la pulizia/sostituzione del filtro stesso, eseguendo la seguente azione: posizionare il selettore di velocità A su “0” / Azionare il selettore B modalità di funzionamento 3 volte consecutive entro un tempo massimo di 2s. A conferma del reset avvenuto il led lampeggerà 3 volte e poi si spegnerà. (fig.47,48) Si suggerisce inoltre, una volta all’anno, una pulizia accurata della macchina e dei filtri interni, attività che deve essere richiesta ad un centro assistenza. N.B. La mancata pulizia o sostituzione dei filtri comporta inconvenienti per l’efficienza dell’impianto, con: - aumento delle perdite di carico nel circuito aria e riduzione di portata aria; - conseguente diminuzione della resa della macchina e peggioramento del confort in ambiente. Informazione importante per lo smaltimento ambientalmente compatibile IN ALCUNI PAESI DELL'UNIONE EUROPEA QUESTO PRODOTTO NON RICADE NEL CAMPO DI APPLICAZIONE DELLA LEGGE NAZIONALE DI RECEPIMENTO DELLA DIRETTIVA RAEE E QUINDI NON È... -
Seite 16: Description And Use
• Do not make modifications of any kind to this appliance. • The maintenance instructions must be followed to ensure the appliance does not suffer damage and/or excessive wear. • Do not expose this appliance to the elements (rain, sun, etc.). • Do not stand objects on the appliance. • The inside of the appliance must be cleaned only by a skilled professional. • Inspect the appliance periodically for visible defects. If the appliance is defective in any way, do not use it; contact a Vortice authorized Technical Support Centre without delay. • If the appliance does not function correctly or develops a fault, contact a Vortice authorized Technical Support Centre without delay. Ensure that only genuine original Vortice spares are used for any repairs. • Should the appliance be dropped or suffer heavy impact, have it checked without delay by a Vortice authorized Technical Support Centre. • The appliance must be installed in such a way as to ensure that under normal operating conditions, no one can come into contact with any moving parts or live electrical components. • In the event of: dismantling the appliance with the appropriate tools, removing the heat exchanger or removing the motor module, the appliance must first be switched off and disconnected from the electrical power supply. • The electrical system to which the appliance is connected must comply with current regulations. • Connect the appliance to the electrical power supply/socket only if the rated power of the supply is compatible with the maximum rated power of the appliance. If not, contact a professional electrician without delay. ... -
Seite 17: Items Supplied
ENGLISH • Turn off the appliance at the main switch: if the appliance does not function correctly, before cleaning the outside of the appliance, or if the appliance is not going to be used for any length of time. • The flow of extracted air must be clean (i.e. free of grease, soot, chemical and corrosive agents and explosive or flammable mixtures). • Keep the air intake and outlet ports of the appliance free of obstructions, to ensure optimum air flow. • Maximum operating temperature: 45°C. • Specifications for the power supply must correspond to the electrical data on ID plate A (Fig. A). The appliance must be installed by a professionally qualified technician. • The appliance must be wired to the power supply by way of a multi-pole isolating switch with a gap • of at least 3 mm between contacts. HRW 20 / HRW 20 HCS HRW 20 RC HRW 20 HRW 20 RC Items supplied... -
Seite 18: Installation
ENGLISH Installation Fig 1 ÷ 38 NOTE: before proceeding with the installation, remove the internal protective packaging in the appliance. NOTE: before carrying out installation, remove the spacers inside the PVC installation pipe and cut the pipe according to the wall thickness. Installation must be performed in accordance with current safety regulations in the destination country, and with the instructions in this booklet. - Seite 19 ENGLISH...
- Seite 20 ENGLISH 11 11...
- Seite 21 ENGLISH FROM ELECTRONIC MOTOR BOARD 20 mm...
- Seite 22 ENGLISH VORT HRW 20 RC ø mm 162...
- Seite 23 ENGLISH 150 mm...
- Seite 24 ENGLISH FROM ELECTRONIC MOTOR BOARD 20 mm...
-
Seite 25: Use
ENGLISH Vort HRW 20 The appliance is controlled via the controls (Fig. 39): • A: 6-position selector: ESTR 0: stand by, appliance off MAND 1-5: speed/airflow from min to max • B: 3-position selector: REC: heat recovery (the system operates as a recovery unit, with cyclic reversal of the direction of rotation approximately every 50-80-100 s) ESTR: extraction (the system operates as a fan, extracting air from the room) MAND: delivery (the system operates as a fan, introducing air into the room) A LED (C) indicates the status of the filters:... -
Seite 26: Wiring Diagrams
Mains 2 poles switch Dry contact (remote switch / relay) Mains VORT HRW 20 MONO ~230V FAN header terminal block FAN plug terminal block VORT HRW 20 MONO RC FAN 16-24 AWG 0.35-1mm VORT HRW 20 MONO RC TO REMOTE CONTROL (HRW) -
Seite 27: Maintenance And Cleaning
ENGLISH TO VORT HRW 20 MONO RC FAN 16-24 AWG VORT HRW 20 MONO RC 0.5-1mm FAN #1 to #4 PCB terminal block 12V Power Supply PCB terminal block Remote input PCB terminal block Mains 2 poles switch Dry contact (remote switch / relay ) -
Seite 28: Important Information Regarding Eco-Compatible Disposal
ENGLISH On all models it is necessary to reset the saturated filter status (LED on) after cleaning/replacing the filter, by taking the following action: set the speed selector A onto "0" / Actuate the operating mode selector B 3 consecutive times within a maximum time of 2s. To confirm the reset, the LED will flash 3 times and then turn off. (fig. 47,48) We also recommend calling a Technical Support Centre once a year to have the appliance and its internal filters cleaned. N.B. Failure to clean or replace filters can affect system efficiency, causing: - increased loss of pressure in the air circulation system and reduced airflow; - subsequent drop in system performance and in comfort levels. Important information concerning the environmentally compatible disposal IN CERTAIN EUROPEAN UNION COUNTRIES THIS PRODUCT DOES NOT FALL WITHIN THE REQUIREMENTS OF THE NATIONAL LAWS IMPLEMENTING DIRECTIVE WEEE, AND IN THESE COUNTRIES THE PRODUCT IS NOT SUBJECT TO SEPARATE DISPOSAL OPERATIONS AT THE END OF ITS WORKING LIFE. -
Seite 29: Description Et Mode D'emploi
Vort HRW 20 HCS: modèle avec carte électronique, commandes et led de diagnostic intégrées, capteur d'humidité relative incorporé. Ces appareils ont été conçus pour un usage domestique et commercial. Sécurité Attention: ce symbole indique la nécessité de prendre quelques précautions pour la sécurité de l‘utilisateur • Suivre les consignes de sécurité afin d'éviter tout risque pour l'utilisateur. • Ne pas utiliser l'appareil pour une autre fonction que celle qui est exposée dans ce livret. • Après avoir sorti l'appareil de son emballage, vérifier son intégrité : dans le doute, s'adresser à un professionnel qualifié ou à un service après-vente agréé Vortice. • Ne pas laisser les composants de l'emballage à la portée des enfants ou de personnes inexpérimentées. • L’utilisation d'un appareil électrique suppose le respect de quelques règles fondamentales : notamment, ne pas toucher l'appareil avec les mains mouillées ou humides ni pieds nus. • Ne pas utiliser l'appareil près de substances ou de vapeurs inflammables (alcool, insecticide, essence, etc). • Conserver l'appareil hors de portée des enfants et des personnes inexpérimentées s'il est débranché du réseau électri- que et qu'on ne souhaite plus l'utiliser. • Prendre les précautions nécessaires pour qu'il n'y ait pas de reflux de gaz dans la pièce provenant du tuyau d'évacua- tion ou d'autres appareils de combustion non étanches. • Cet appareil peut être utilisé par des enfants de plus de 8 ans et par des personnes aux capacités physiques, sensorielles ou mentales réduites ou sans expérience ni connaissance à condition qu'ils... -
Seite 30: Structure Et Équipement De Série
FRANÇAIS • Avant toute opération de démontage de l'appareil au moyen d'outils appropriés ; d'extraction de l'échangeur de chaleur ; d'extraction du module des moteurs ; éteindre l'appareil et le débrancher du secteur. • L'installation électrique à laquelle l'appareil est branché doit être conforme aux normes en vigueur. • Ne brancher l'appareil au secteur/à la prise électrique que si les caractéristiques du circuit ou de la prise sont adaptées à sa puissance maximale. Dans le cas contraire, s'adresser immédiatement à un technicien qualifié. • Couper l'interrupteur général de l'installation dans les cas suivants : dysfonctionnement ; nettoyage extérieur ; non utilisation de l'appareil pendant une courte ou une longue période. • Le débit d'air extrait doit être propre (sans graisse, suie, agents chimiques ou corrosifs, mélanges explosifs ou inflammables). ... -
Seite 31: Installation
FRANÇAIS Installation Fig 1 ÷ 38 N.B: avant de procéder à l'installation, retirer l'emballage de protection à l'intérieur de l'appareil. N.B: avant de procéder avec l’installation, enlever les entretoises présentes à l’intérieur du tuyau d’installation en PVC, et couper le tuyau dans la mesure correspondant à l’épaisseur du mur. L'installation ... - Seite 32 FRANÇAIS...
- Seite 33 FRANÇAIS 11 11...
- Seite 34 FRANÇAIS FROM ELECTRONIC MOTOR BOARD 20 mm...
- Seite 35 FRANÇAIS VORT HRW 20 RC ø mm 162...
- Seite 36 FRANÇAIS 150 mm...
- Seite 37 FRANÇAIS FROM ELECTRONIC MOTOR BOARD 20 mm...
-
Seite 38: Mode D'emploi
FRANÇAIS Mode d’emploi Vort HRW 20 L'appareil est contrôlé à travers les commandes embarquées (fig.39) : • A : sélecteur à 6 positions : ESTR 0 : veille, appareil éteint MAND 1-5 : vitesse/débit de mini à maxi • B : sélecteur à 3 positions : REC : récupération de chaleur (le système intervient comme un récupérateur, avec inversion cyclique du sens de rotation toutes les 50-80-100 secondes environ) ESTR : extraction (le système fait office de ventilateur, avec extraction de l'air de la pièce) MAND : refoulement (le système fait office de ventilateur, avec distribution de l'air de la... -
Seite 39: Schémas De Branchement
Mains 2 poles switch Dry contact (remote switch / relay) Mains VORT HRW 20 MONO ~230V FAN header terminal block FAN plug terminal block VORT HRW 20 MONO RC FAN 16-24 AWG 0.35-1mm VORT HRW 20 MONO RC TO REMOTE CONTROL (HRW) -
Seite 40: Entretien Et Nettoyage
FRANÇAIS TO VORT HRW 20 MONO RC FAN 16-24 AWG VORT HRW 20 MONO RC 0.5-1mm FAN #1 to #4 PCB terminal block 12V Power Supply PCB terminal block Remote input PCB terminal block Mains 2 poles switch Dry contact (remote switch / relay ) -
Seite 41: Information Importante Pour Éliminer L'appareil En Respectant L'environnement
FRANÇAIS Nécessité de réinitialiser la situation de filtre colmaté (led allumée) sur tous les modèles après avoir nettoyé/remplacé le filtre, en procédant de la façon suivante : mettre le sélecteur de vitesse A sur « 0 » / Actionner le sélecteur B du mode de fonctionnement, 3 fois de suite dans les 2 secondes qui suivent. La led clignotera 3 fois puis s'éteindra pour confirmer la réinitialisation. (fig.47,48) Nous conseillons de nettoyer à fond l'appareil et les filtres internes une fois par an. Cette opération doit être confiée à un centre d'assistance. N.B. Le défaut de nettoyage ou de remplacement des filtres peut nuire gravement à l'efficacité de l'installation : - augmentation des pertes de charge dans le circuit d'air et réduction du débit d'air ; - diminution du rendement de l'appareil et détérioration du confort et de la qualité de l'air ambiant. Information importante pour éliminer l'appareil en respectant l'environnement DANS CERTAINS PAYS DE L’UNION EUROPÉENNE, CET APPAREIL N’ENTRE PAS DANS LE CHAMP DE TRANSPOSITION DE LA DIRECTIVE DEEE, IL N’EXISTE DONC AUCUNE OBLIGATION DE COLLECTE DIFFÉRENCIÉE À... -
Seite 42: Betriebsanleitung Beschreibung Und Gebrauch
Die Reinigungs- und Wartungsarbeiten, die vom Benutzer selbst vorgenommen werden können, dürfen nicht von unbeaufsichtigten Kindern durchgeführt werden Hinweis: dieses Symbol zeigt Vorsichtsmaßnahmen an um Schäden am Gerät zu vermeiden • Keine Änderungen am Gerät vornehmen. • Um Schäden am Gerät und/oder vorzeitigen Verschleiß zu vermeiden, sind die Wartungsanleitungen zu befolgen. • Das Gerät keinen Witterungseinflüssen (Regen, Sonneneinstrahlung usw.) aussetzen. • Keine Gegenstände auf dem Gerät abstellen. • Das Geräteinnere darf nur von Fachpersonal gereinigt werden. • Das Gerät regelmäßig auf seinen einwandfreien Zustand überprüfen. Bei festgestellten Mängeln das Gerät nicht mehr benutzen und sofort den Vortice-Vertragskundendienst verständigen. • Bei Betriebsstörungen und/oder defektem Gerät sofort den Vortice-Vertragskundendienst aufsuchen und für eine eventuelle Reparatur die Verwendung von Vortice-Originalersatzteilen verlangen. • Fällt das Gerät herunter oder wurde es starken Stößen ausgesetzt, muss es sofort vom Vortice-Vertragskundendienst überprüft werden. • Das Gerät muss so montiert werden, dass unter normalen Betriebsbedingungen niemand in die Nähe von beweglichen... -
Seite 43: Aufbau Und Ausstattung
DEUTSCH oder spannungsführenden Teilen kommen kann. • Vor: dem Zerlegen des Geräts mit geeignetem Werkzeug; dem Herausziehen des Wärmetauschers; dem Herausziehen des Motormoduls; muss das Gerät abgeschaltet und vom Stromnetz getrennt werden. • Die Elektroanlage, an die das Gerät angeschlossen wird, muss den geltenden Vorschriften entsprechen. • Das Gerät nur dann an das Stromnetz anschließen, wenn die Stromfestigkeit der Anlage/Steckdose für die maximale Leistung geeignet ist. Wenden Sie sich andernfalls umgehend an einen Elektrofachmann. • Den Hauptschalter der Anlage in folgenden Fällen ausschalten: Auftreten einer Betriebsstörung; vor der Durchführung der Außenreinigung des Gerätes; wenn das Gerät über einen kurzen oder längeren Zeitraum nicht benutzt wird. • Die Abluft muss sauber (d. h. frei von Fettpartikeln, Ruß, chemischen oder korrosiven Substanzen, explosiven bzw. brennbaren Mischungen) sein. • Die Ansaug- und Ausblasöffnungen am Gerät dürfen weder abgedeckt noch verstopft sein, damit ein optimaler Luftdurchlass gewährleistet ist. ... -
Seite 44: Installation
DEUTSCH Installation Abb 1 ÷ 38 Hinweis: Vor der Installation die innere Verpackung im Gerät entfernen. Hinweis: bevor Sie mit der Installation beginnen, entfernen Sie die Abstandsstücke in dem Installationsrohr aus PVC und schneiden Sie es auf Maß entsprechend der Dicke der Wand. Die Installation muss unter Befolgung aller im Bestimmungsland geltenden gesetzlichen Auflagen sowie der Anleitungen und Hinweise in diesem Handbuch erfolgen. - Seite 45 DEUTSCH...
- Seite 46 DEUTSCH 11 11...
- Seite 47 DEUTSCH FROM ELECTRONIC MOTOR BOARD 20 mm...
- Seite 48 DEUTSCH VORT HRW 20 RC ø mm 162...
- Seite 49 DEUTSCH 150 mm...
- Seite 50 DEUTSCH FROM ELECTRONIC MOTOR BOARD 20 mm...
-
Seite 51: Gebrauch
DEUTSCH Gebrauch Vort HRW 20 Das Gerät wird mit den Bedienelementen am Gerät gesteuert (Abb.39): • A: Wahlschalter mit 6 Stellungen: ESTR 0: Standby, Gerät ausgeschaltet MAND 1-5: Drehzahl/Leistungsstufe min bis max • B: Wahlschalter mit 3 Stellungen: REC: Wärmerückgewinnung (das System wird als Wärmerückgewinner betrieben, mit zyklischer Umkehr der Drehrichtung ca. alle 50-80-100 s) ESTR: Abluft (das System wird als Ventilator betrieben, mit Entlüftung des Raumes) MAND: Zuluft (das System wird als Ventilator betrieben, mit Belüftung des Raumes) Eine LED (C) zeigt den Zustand der Filter an: • LED aus: Filter sauber... -
Seite 52: Anchlusspläne
Mains 2 poles switch Dry contact (remote switch / relay) Mains VORT HRW 20 MONO ~230V FAN header terminal block FAN plug terminal block VORT HRW 20 MONO RC FAN 16-24 AWG 0.35-1mm VORT HRW 20 MONO RC TO REMOTE CONTROL (HRW) -
Seite 53: Wartung Und Reinigung
DEUTSCH TO VORT HRW 20 MONO RC FAN 16-24 AWG VORT HRW 20 MONO RC 0.5-1mm FAN #1 to #4 PCB terminal block 12V Power Supply PCB terminal block Remote input PCB terminal block Mains 2 poles switch Dry contact (remote switch / relay ) -
Seite 54: Wichtige Information Für Eine Umweltgerechte Entsorgung
DEUTSCH An beiden Modellen muss die Filtersättigung (aufleuchtende LED) nach Reinigung/Auswechseln des Filters wie folgt zurückgesetzt werden: Den Drehzahl-Wahlschalter A auf “0” / Den Betriebsartenschalter B innerhalb max. 2 Sekunden 3 Mal nacheinander betätigen. Zur Bestätigung des erfolgten Reset blinkt die LED 3 Mal und erlischt dann. (Abb.47,48) Einmal jährlich sollten außerdem das Gerät und die Innenfilter sorgfältig gereinigt werden. Dieser Eingriff kann von einer Kundendienststelle vorgenommen werden. Hinweis: Verschmutzte bzw. nicht ausgewechselte Filter wirken sich negativ auf die Leistung der Anlage aus und führen - höheren Druckverlusten im Luftkreislauf und Reduzierung des Volumenstroms; - in der Folge zu einer schlechteren Leistung der Anlage und einer schlechteren Qualität der Raumluft Wichtige Information für eine umweltgerechte Entsorgung IN EINIGEN EU-LÄNDERN GELTEN FÜR DIESES PRODUKT NICHT DIE VORGABEN DER EUROPÄISCHEN RICHTLINIE ÜBER ELEKTRO- UND ELEKTRONIK-ALTGERÄTE (WEEE-RICHTLINIE) UND DEMNACH BESTEHT IN DIESEN LÄNDERN AUCH KEINE PFLICHT FÜR DIE MÜLLTRENNUNG BEI DER ENTSORGUNG DES GERÄTES. -
Seite 55: Descripción Y Uso
Atención: este símbolo indica precauciones que sirven para evitar daños al usuario • Seguir las instrucciones de seguridad para evitar lesiones. • No emplear el aparato con fines distintos de aquellos previstos por este manual. • Una vez extraído el aparato de su embalaje, comprobar su integridad: en caso de duda, contactar con personal cualificado o con un Centro de Asistencia Técnica autorizado por Vortice. • No dejar partes del embalaje al alcance de niños o de personas discapacitadas. • El empleo de cualquier aparato eléctrico implica el cumplimiento de algunas reglas fundamentales, entre las que desta- camos: no tocarlo con las manos mojadas o húmedas; no tocarlo con los pies descalzos. • No utilizar el aparato cerca de sustancias o vapores inflamables como alcohol, insecticidas, gasolina, etc. • Guardar el aparato lejos de niños y de personas discapacitadas en el momento en que se decida desconectarlo de la red eléctrica y no utilizarlo más. ... -
Seite 56: Estructura Y Dotación
ESPAÑOL inmediatamente con personal cualificado. • Apagar el interruptor general de la instalación: en caso de funcionamiento anómalo; antes de limpiar el aparato por fuera; si el aparato no se va a utilizar durante cierto tiempo. • El flujo de aire que se ha de canalizar no debe transportar elementos grasos, hollín, agentes químicos o corrosivos o mezclas explosivas e inflamables. • Evitar tapar u obstruir las bocas de aspiración y expulsión del aparato, para garantizar el correcto paso del aire. • Temperatura máxima de funcionamiento: 45°C. • Los datos eléctricos de la red deben coincidir con aquellos indicados en la placa A (fig.A). El aparato debe ser instalado por personal profesional cualificado. • Para realizar la instalación es necesario disponer de un interruptor omnipolar con distancia de • ... -
Seite 57: Instalación
ESPAÑOL Instalación Fig 1 ÷ 38 NOTA: antes de realizar la instalación, quitar del producto el embalaje de protección interno. NOTA: antes de proceder con la instalación, retirar los espaciadores presentes al interior del tubo de instalación de PVC, y cortar el tubo a la medida adecuada al espesor del muro. La instalación debe realizarse según las normas de seguridad vigentes en el país de destino y las instrucciones de este manual. - Seite 58 ESPAÑOL...
- Seite 59 ESPAÑOL 11 11...
- Seite 60 ESPAÑOL FROM ELECTRONIC MOTOR BOARD 20 mm...
- Seite 61 ESPAÑOL VORT HRW 20 RC ø mm 162...
- Seite 62 ESPAÑOL 150 mm...
- Seite 63 ESPAÑOL FROM ELECTRONIC MOTOR BOARD 20 mm...
-
Seite 64: Uso
ESPAÑOL Vort HRW 20 El aparato se controla con los mandos a bordo (fig.39): • A: selector de 6 posiciones: ESTR 0: stand by, aparato apagado MAND 1-5: velocidad/caudal de mín. a máx. • B: selector de 3 posiciones: REC: recuperación de calor (el sistema funciona como recuperador, con inversión cíclica del sentido de rotación cada aproximadamente 50-80-100 segundos). ESTR: extracción (el sistema funciona como un ventilador, con extracción de aire del local). -
Seite 65: Esquemas De Conexión
VORT HRW 20 MONO ~230V Borne hembra del ventilador FAN header terminal block Borne macho de la tarjeta electr. FAN plug terminal block Ventilador VORT HRW 20 MONO RC FAN 16-24 AWG 0.35-1mm VORT HRW 20 MONO RC TO REMOTE CONTROL (HRW) -
Seite 66: Mantenimiento Y Limpieza
ESPAÑOL TO VORT HRW 20 MONO RC FAN 16-24 AWG Bornes 1 ÷ 4 del ventilador VORT HRW 20 MONO RC 0.5-1mm FAN #1 to #4 PCB terminal block Bornes alimentación 12 V 12V Power Supply PCB terminal block Bornes entrada remota Remote input PCB terminal block Interruptor de línea de 2 polos... -
Seite 67: Información Importante Sobre Eliminación Compatible Con El Medio Ambiente
ESPAÑOL En todos modelos es necesario restablecer la señal de filtro saturado (led encendido) después de la limpieza/sustitución del filtro, de la siguiente manera: poner el selector de velocidad A en “0” / Accionar el selector B de modo de funcionamiento 3 veces seguidas en un plazo máximo de 2s. El led parpadea 3 veces para confirmar el restablecimiento y luego se apaga. (fig. 47, 48) Además, se recomienda hacer realizar a un centro de asistencia una limpieza a fondo de la máquina y de los filtros internos una vez al año. NOTA: La falta de limpieza o de sustitución de los filtros puede repercutir en la eficacia de la instalación y provocar: - un aumento de las pérdidas de carga en el circuito y una reducción del caudal de aire; - una disminución del rendimiento de la máquina y del confort en el ambiente. Información importante sobre la eliminación compatible con el medio ambiente EN ALGUNOS PAÍSES DE LA UNIÓN EUROPEA ESTE PRODUCTO NO ESTÁ... -
Seite 68: Beskrivelse Og Brug
• Udsæt ikke apparatet for vind og vejr (regn, sol osv.). • Sæt ikke genstande på apparatet. • Den indvendige rengøring af apparatet må kun udføres af sagkyndigt personale. • Kontrollér regelmæssigt apparatets tilstand. Hvis der findes defekter, må apparatet ikke bruges, og der skal rettes henvendelse til et autoriseret Vortice servicecenter. • I tilfælde af funktionsfejl og/eller defekter, skal der straks rettes henvendelse til et autoriseret Vortice servicecenter. Bed altid om originale reservedele fra Vortice, hvis apparatet skal repareres. • Hvis apparatet falder ned eller bliver stødt, skal det straks kontrolleres på et autoriseret Vortice servicecenter. • Apparatet skal være monteret på en måde, der garanterer, at der ikke under normale driftsbetingelser kan befinde sig mennesker i nærheden af bevægelige dele eller dele under spænding. • I tilfælde af: afmontering af apparatet med dertil egnet værktøj, udtagning af varmeveksleren og udtagning af motorenheden, skal apparatet afbrydes og kobles fra strømforsyningen. ... -
Seite 69: Struktur Og Tilbehør
DANSK • Sluk hovedafbryderen til anlægget, når: Der registreres en funktionsfejl. Det besluttes at foretage udvendig vedligeholdelse. Det besluttes ikke at anvende apparatet i kortere eller længere perioder. • Den udsugede luft skal være ren (altså uden fedtstoffer, sod, kemiske og korrosive stoffer eller brændbare og eksplosive blandinger). • Apparatets ind- og udsugningsåbninger må aldrig tildækkes eller tilstoppes, og luften skal altid kunne strømme frit. • Maksimal driftstemperatur: 45°C. • Forsyningsnettets elektriske specifikationer skal svare til specifikationerne på typepladen A (fig. A). • Installation af apparatet skal udføres af sagkyndigt personale. • Til installationen skal der anvendes en enkeltpolet afbryder med en kontaktåbning på mindst 3 mm. HRW 20 / HRW 20 HCS HRW 20 RC HRW 20 HRW 20 RC Struktur og tilbehør Apparatet består primært af følgende dele: ... -
Seite 70: Installation
DANSK Installation Fig. 1 ÷ 38 ADVARSEL: før man går videre med installationen, skal man fjerne den interne beskyttelsesemballage fra produktet. ADVARSEL: fjern afstandsstykkerne indvendigt i installationsrøret i PVC, og skær røret til, så det passer til murens tykkelse, før det monteres. Installationen skal udføres i henhold til gældende sikkerhedsregler i anvendelseslandet samt til anvisningerne i denne brugervejledning. - Seite 71 DANSK...
- Seite 72 DANSK 11 11...
- Seite 73 DANSK FROM ELECTRONIC MOTOR BOARD 20 mm...
- Seite 74 DANSK VORT HRW 20 RC ø mm 162...
- Seite 75 DANSK 150 mm...
- Seite 76 DANSK FROM ELECTRONIC MOTOR BOARD 20 mm...
-
Seite 77: Anvendelse
DANSK Anvendelse Vort HRW 20 Apparatet styres af betjeningerne på apparatet selv (fig. 39): • A: vælger med 6 positioner: ESTR 0: standby, apparatet er slukket MAND 1-5: hastighed/flow fra min. til maks. • B: vælger med 3 positioner: REC: indvinding af varme (systemet fungerer som indvindingsapparat med cyklisk inversion i omdrejningsretningen ca. for hver 50-80-100 sek.) ESTR: aftræk (systemet fungerer som ventilator med aftræk af luften i rummet) MAND: indsugning (systemet fungerer som en ventilator med indsugning af luft til rummet) En lysdiode (C ) angiver filtrenes tilstand: •... -
Seite 78: Forbindelsesdiagram
VORT HRW 20 MONO ~230V Hunklemme på ventilatoren FAN header terminal block Hanklemme på det elektriske kort FAN plug terminal block Ventilator VORT HRW 20 MONO RC FAN 16-24 AWG 0.35-1mm VORT HRW 20 MONO RC TO REMOTE CONTROL (HRW) -
Seite 79: Vedligeholdelse Og Rengøring
DANSK TO VORT HRW 20 MONO RC FAN 16-24 AWG Klemmerne 1 ÷ 4 på ventilatoren VORT HRW 20 MONO RC 0.5-1mm FAN #1 to #4 PCB terminal block Klemmer med 12 V forsyning 12V Power Supply PCB terminal block... -
Seite 80: Vigtige Oplysninger Om Miljørigtig Bortskaffelse
DANSK På modeller er det nødvendigt at nulstille tilstanden tilstopning af filter (tændt lysdiode) efter rengøringen/udskiftningen af selve filteret, og det gøres som følger: placer hastighedsvælgeren A på “0” / Aktiver vælgeren B for funktionsmåde 3 gange efter hinanden inden for maksimalt 2 sek. Som bekræftelse på nulstillingen blinker lysdioden 3 gange og slukker derefter. (fig. 47,48) Det anbefales desuden at foretage en omhyggelig rengøring en gang årligt af maskinen og de interne filtre, en handling der skal udføres på anmodning af et servicecenter. NB: Manglende rengøring eller udskiftning af filtrene medfører problemer for anlæggets effektivitet, og: - et øget fald i belastningen i luftkredsløbet og en reduktion af luftflowet. - en faldende maskinydelse med deraf følgende forværret luftkvalitet i omgivelserne. Vigtige oplysninger om miljørigtig bortskaffelse I NOGLE EU-LANDE HøRER DETTE PRODUKT IKKE IND UNDER ANVENDELSESOMRåDET FOR DEN NATIONALE LOVGIVNING, DER HAR INDARBEJDET DIREKTIVET WEEE, OG DET ER DERFOR IKKE OBLIGATORISK AT BORTSKAFFE PRODUKTET På EN GENBRUGSSTATION Dette produkt er i overensstemmelse med EU-direktivet 2002/96/EF. -
Seite 81: 使用说明
中国 使用说明 Vort HRW 20 MONO (下文简称该设备)是一款分散型的热回收通风系统,可安装于墙壁内,墙厚要求285mm~700mm之间。 该设备有2种版本: Vort HRW 20:该版本嵌入电路板、控制装置以及LED提示灯; Vort HRW 20 RC:该版本外接控制开关,其包含电路板、控制装置以及LED提示灯。一个开关可同时管理4台设备。 (各个部件与功能描述请参阅“组成与配备”以及“使用方法”章节)。 该设备尤其适合连续不间断运行。 该设备也可联接至传感器(可任意选择)运行,如温度传感器(C TEMP)、湿度感应器(C HCS)等。 这款设备为专门设计适用于家用或商用环境下. Vort HRW 20 HCS:有电子卡、控制器和集成诊断指示灯、集成相对湿度传感器的型号. 安全 • 遵循安全规范,防止用户受到伤害。 Achtung: 用户 dieses Symbol zeigt Vorsichtsmaßnahmen an um Schäden am Bediener zu vermeiden • 请勿把本指示手册中指出的用途以外来使用。... -
Seite 82: 组成与配备
中国 HRW 20 / HRW 20 HCS HRW 20 RC HRW 20 HRW 20 RC 组成与配备 本设备的主要部件有: • 发泡聚丙烯外壳; • 内置面板,自熄型聚合塑料材质,热绝缘涂层; • 橡胶外置格栅,使用尼龙膨胀管即可安装在墙壁外,或直接从墙壁孔内嵌入安装,无需使用脚手架; • 防虫网,与外置格栅一起嵌入管道内; • EC风扇电机,低电压供电; • 陶瓷蓄热交换芯; • G3过滤网,可水洗; • 前置滤网,可水洗; 墙内安装套管(可选部件,适用于墙厚285mm~700mm之间) •... - Seite 83 中国 安装 图 1 ÷ 38 备注:安装本产品前请务必取下产品内所有包装 备注:在安装之前,先除去PVC材质的安装管内的隔断,并将安装管按照墙壁厚度切割好. 请按照相关国家约束的安全标准以及本说明手册安装本设备。 本设备必须安装在厚度至少300mm的墙壁内。 备注:为确保设备正常运行,请将设备安装在可连接电源之处,如图16所示 VORT HRW 20 / VORT HRW 20 HCS ø mm 162...
- Seite 84 中国...
- Seite 85 中国 11 11...
- Seite 86 中国 FROM ELECTRONIC MOTOR BOARD 20 mm...
- Seite 87 中国 VORT HRW 20 RC ø mm 162...
- Seite 88 中国 150 mm...
- Seite 89 中国 FROM ELECTRONIC MOTOR BOARD 20 mm...
-
Seite 90: 使用方法
中国 使用方法 Vort HRW 20 该设备通过内置开关控制其运行(图 39) • A:6档调谐旋钮: ESTR 0:设备关闭 MAND 1-5档:风量从小到大 • B:3档调谐旋钮: REC:热回收模式(系统以热回收方式运行 ,约每50,80,100秒旋转方向为逆向循环) ESTR:排风模式(系统以通风模式运行, 提取室内污浊空气) MAND: 新风模式(系统以通风模式运行, 将新鲜空气注入室内) LED提示灯 C(显示滤网堵塞状态): • LED灯关闭:表示滤网是干净的; • LED灯亮启:表示滤网需清洁或更换 Vort HRW 20 RC 该设备通过接线遥控开关控制其运行,可接4台设备(图40) • A:6档调谐旋钮: 0:设备关闭 1-5档:风量从小到大 • B:2档调谐旋钮: REC:热回收模式(系统以热回收方式运行,约每50,80,100 秒旋转方向为逆向循环)... -
Seite 91: 接线图
Mains VORT HRW 20 MONO ~230V 风扇头接线端子 FAN header terminal block 风扇插头接线端子 FAN plug terminal block 风扇VORT HRW 20 VORT HRW 20 MONO RC FAN MONO RC 16-24 AWG 0.35-1mm VORT HRW 20 MONO RC 连接至HRW遥控开关 TO REMOTE CONTROL (HRW) -
Seite 92: 保养与清洁
中国 TO VORT HRW 20 MONO RC FAN 风扇VORT HRW 20 MONO RC VORT HRW 20 MONO RC 16-24 AWG VORT HRW 20 MONO RC 排风扇1~4档-PCB接线端子 0.5-1mm FAN #1 to #4 PCB terminal block 12V电源-PCB接线端子 12V Power Supply PCB terminal block 远程输入-PCB接线端子... - Seite 93 中国 待清洁/更换过滤网后,该设备两款型号都必须重新设定滤网堵塞状态(此时LED灯亮启),请按照以下操作方法执行: 将A调速开关旋至0档; 在最多2秒时间内连续3次拨动B调速开关,LED灯闪烁3次后熄灭,确认重置。(图 47,48) 此外,我们建议每年至少一次应当对机器以及滤网内部进行彻底地清洁维护,清洁维护工作需联系Vortice®授权的技术服 务中心来完成 备注 若未清洁或更换过滤网将给设备带来严重不便: - 增加空气回路的排放损耗,减少风量; - 降低设备性能以及环境舒适度。...
-
Seite 94: Leírás És Működés
• Ne támassza le a készüléket. • A termék belső tisztítását csak képzett személy végezze. • Időszakosan ellenőrizze a berendezés épségét. Hibák esetén ne használja a berendezést és keresse fel azonnal a Vortice kijelölt Műszaki Ügyfélszolgálati Központját. • Hibás működés és/vagy a berendezés üzemzavara esetén keresse fel azonnal a Vortice Műszaki Ügyfélszolgálati Központját és kérje az esetleges javítást eredeti Vortice alkatrészekkel. -
Seite 95: Szerkezet És Berendezések
MAGYAR • Kapcsolja ki a berendezés főkapcsolóját, amikor: működési rendellenességet észlel; úgy dönt, hogy külső karbantartást végez; úgy dönt, hogy rövidebb vagy hosszabb ideig nem használja a berendezést. • A kivont levegőáramlat legyen tiszta (tehát zsírmaradványoktól, koromtól, vegyi anyagoktól valamint korrozív és robbanásveszélyes vagy gyúlékony anyagoktól mentes). -
Seite 96: Telepítés
MAGYAR Telepítés 1 ÷ 38 ábra Jól jegyezze meg: A telepítés folytatása előtt távolítsa el a termékben lévő védőcsomagolást. Jól jegyezze meg: A telepítés előtt a beüzemeléshez szükséges PVC csövet vágja a fal vastagságához alkalmas méretre. A telepítést a célországban érvényben lévő biztonsági szabványok és a jelen kézikönyvben olvasható utasítások betartásával végezze. - Seite 97 MAGYAR...
- Seite 98 MAGYAR 11 11...
- Seite 99 MAGYAR FROM ELECTRONIC MOTOR BOARD 20 mm...
- Seite 100 MAGYAR VORT HRW 20 RC ø mm 162...
- Seite 101 MAGYAR 150 mm...
- Seite 102 MAGYAR FROM ELECTRONIC MOTOR BOARD 20 mm...
-
Seite 103: Használat
MAGYAR Használat Vort HRW 20 A berendezést beépített kapcsolókkal lehet vezérelni (39. ábra): • A: 6 állású kiválasztó: 0: készenlét, ESTR 1-5: sebesség/min. és max. közötti MAND teljesítmény • B: 3 állású kiválasztó: REC: hővisszanyerés (a rendszer visszanyerőként működik, kb. 50-80-100 mp-enként a forgásirány ciklikus fordulásával) ESTR: kinyerés (a rendszer ventilátorként... -
Seite 104: Kapcsolási Rajzok
Mains VORT HRW 20 MONO ~230V Ventilátor hüvelyes kapocs FAN header terminal block Elektromos kártya dugós kapocs FAN plug terminal block Lapát VORT HRW 20 MONO RC FAN 16-24 AWG 0.35-1mm VORT HRW 20 MONO RC TO REMOTE CONTROL (HRW) -
Seite 105: Karbantartás/Tisztítás
MAGYAR TO VORT HRW 20 MONO RC FAN 16-24 AWG A lapát 1 ÷ 4 kapcsai VORT HRW 20 MONO RC 0.5-1mm FAN #1 to #4 PCB terminal block 12 V-os tápellátó kapcsok 12V Power Supply PCB terminal block Bemeneti távirányítású kapcsok Remote input PCB terminal block 2-pólusú... -
Seite 106: A Kompatibilis Környezetvédelmi Ártalmatlanításhoz
MAGYAR Mindkét modellen vissza kell állítani a tele szűrő helyzetét (bekapcsolt LED) a szűrő tisztítása/cseréje után, az alábbi folyamattal: állítsa az „A” sebességkiválasztót „0” állásba / nyomja meg a B működési üzemmód kiválasztót 3-szor egymás után, legfeljebb 2 másodpercen belül. A sikeresen végrehajtott beállítás után a LED 3-szer villog, majd kialszik. - Seite 108 La Vortice S.p.A. si riserva il diritto di apportare tutte le varianti migliorative ai prodotti in corso di vendita. Vortice S.p.A. reserves the right to make improvements to products at any time and without prior notice. La société Vortice S.p.A. se réserve le droit d'apporter toutes les variations afin d'améliorer ses produits en cours de commercialisation. Die Firma Vortice S.p.A. behält sich vor, alle eventuellen Verbesserungsänderungen an den Produkten des Verkaufsangebots vorzunehmen. Vortice se reserva el derecho de incorporar todas las mejoras necesarias a los productos en fase de venta.
- Seite 110 TAGLIANDO INTERVENTO IN GARANZIA CERTIFICATE OF WORK PERFORMED UNDER GUARANTEE COUPON INTERVENTION SOUS GARANTIE DATA INTERVENTO TIMBRO CENTRO ASSISTENZA DATE OF WORK - DATE INTERVENTION STAMP OF TECHNICAL ASSISTANCE CENTRE - CACHET SERVICE APRES-VENTE TAGLIANDO INTERVENTO IN GARANZIA CERTIFICATE OF WORK PERFORMED UNDER GUARANTEE COUPON INTERVENTION SOUS GARANTIE DATA INTERVENTO TIMBRO CENTRO ASSISTENZA...
- Seite 111 CONDIZIONI DI GARANZIA CONDITIONS OF WAR- CONDITIONS DE GARANTIE RANTY VORTICE SPA garantisce i suoi prodotti per Votre appareil est couvert par notre garantie à 24 mesi dalla data dell’acquisto che deve condition qu’il ne soit pas utilisé à des ns autres...
- Seite 112 Per poter usufruire della garanzia il cliente deve compilare e rispedire alla VORTICE GARANZIA - GUARANTEE - GARANTIE SPA, entro 8 giorni dall’acquisto, la “Parte 2” del tagliando di garanzia, all’indirizzo e con le modalità in tale parte riportate. La “Parte 1” del tagliando di garanzia deve essere conservata e presentata,...