Herunterladen Inhalt Inhalt Diese Seite drucken
Inhaltsverzeichnis

Werbung

Verfügbare Sprachen
  • DE

Verfügbare Sprachen

  • DEUTSCH, seite 16
USER´S MANUAL
BEDIENUNGSANLEITUNG
MANUEL D`UTILISATION
MANUAL DE USUARIO
INSTRUKCJA OBSŁUGI
MANUALE D' USO
PIXBAR DTW PRO
12 X 10 W DYNAMIC WHITE LED BAR WITH DIM-TO-WARM CONTROL
CLPIXBARDTWPRO

Werbung

Inhaltsverzeichnis
loading

Inhaltszusammenfassung für Cameo PIXBAR DTW PRO

  • Seite 1 USER´S MANUAL BEDIENUNGSANLEITUNG MANUEL D`UTILISATION MANUAL DE USUARIO INSTRUKCJA OBSŁUGI MANUALE D‘ USO PIXBAR DTW PRO 12 X 10 W DYNAMIC WHITE LED BAR WITH DIM-TO-WARM CONTROL CLPIXBARDTWPRO...
  • Seite 2: Inhaltsverzeichnis

    CONTENTS / INHALTSVERZEICHNIS / CONTENU / CONTENIDO / TREŚĆ / CONTENUTO ENGLISH ESPAÑOL PREVENTIVE MEASURES MEDIDAS DE SEGURIDAD 42-43 INTRODUCTION INTRODUCCIÓN CONNECTIONS, OPERATING AND DISPLAY ELEMENTS CONEXIONES, ELEMENTOS DE MANEJO Y ELEMENTOS OPERATION 6-11 DE VISUALIZACIÓN INSTALLATION FUNCIONAMIENTO 45-50 DIFFUSER INSTALACIÓN Y MONTAJE OPTIONAL ACCESSORIES DIFUSOR...
  • Seite 3: English

    We have designed this product to operate reliably over many years. Please read this User‘s Manual carefully, so that you can begin making optimum use of your Cameo Light product quickly. Learn more about Cameo Light on our website WWW.CAMEOLIGHT.COM.
  • Seite 4: Introduction

    CAUTION: To reduce the risk of electric shock, do not remove cover (or back). There are no user serviceable parts inside. Maintenance and repairs should be exclusively carried out by qualified service personnel. The warning triangle with lightning symbol indicates dangerous uninsulated voltage inside the unit, which may cause an electrical shock.
  • Seite 5: Connections, Operating And Display Elements

    Neutrik powerCON power input socket for power supply to the device. A suitable power cable is included. POWER OUT Neutrik powerCON power output socket for the power supply of additional CAMEO spotlights. Ensure that the total current consumption of all connected devices does not exceed the value specified on the device in amperes (A).
  • Seite 6: Operation

    • As soon as the spotlight is correctly is connected to the power supply, the following will be displayed in succession: “Update Wait...” (only for service purposes), “Welcome to Cameo”, the model name and the software version. After this process, the lamp is ready for operation and starts in the previously selected mode.
  • Seite 7 STANDALONE AUTOMATIC CONTROL MODE (Auto) Select “Auto” as previously described in STANDALONE MODES and confirm with ENTER. Using the UP and DOWN keys, under “Program” you can now configure the Pattern Level Meter, Meteor, Random Raindrops, Las Vegas Style, Barce full, Barce single, Night Rider, Tetris, Bounce Double, Fire, Bounce Fillrun, Bounce Inverse, Chaser Inverse, Snow.
  • Seite 8 STANDALONE MODE STATIC (Static) Select the mode “Static” as previously described in STANDALONE MODES and confirm with ENTER. Overall brightness, strobe, amber, cool white (C White) and warm white (W White) of pixels 1 to 12 can now be configured separately to create an individual scene. Menu structure StaAlone ENTER...
  • Seite 9 Settings Display Backlight Display lighting Deactivation after approximately 1 minute of inactivity DMX Fail operating status Hold Last command is retained with DMX signal Blackout Activates blackout fault Dimmer Curve dimmer curve Linear Light intensity increases linearly with DMX value Exponential Light intensity can be finely adjusted at lower DMX values and broadly adjusted at higher DMX values...
  • Seite 10: Menu Structure

    Menu structure Menu ENTER Settings ENTER Backligh Backligh Settings UP/DOWN Display UP/DOWN ENTER ENTER Settings ENTER DMX Fail DMX Fail DMX Fail UP/DOWN Hold Blackout ENTER ENTER Settings ENTER DimCurve DimCurve DimCurve DimCurve DimCurve UP/DOWN Linear S-Curve ENTER ENTER ENTER ENTER Settings ENTER...
  • Seite 11: Installation

    SYSTEM INFORMATION (System) Press the MODE button repeatedly until "Menu" is displayed on the top line of the display. Use the UP and DOWN keys to select the menu item "System" and press ENTER. Use the UP and DOWN controls to select the desired submenu item, and press ENTER to display the corresponding information.
  • Seite 12: Diffuser

    DIFFUSER If required, the supplied diffuser is attached to the housing in front of the focusing lenses with the three knurled screws (see image below). OPTIONAL ACCESSORIES CLPIXBAR600IP65BSET quick-lock system for tool-free installation. The conversion kit comprises 2 x Omega brackets, 4 x camlocks and 8 x nuts and bolts.
  • Seite 13: Dmx Technology

    DMX TECHNOLOGY DMX-512 DMX (Digital Multiplex) is the designation for a universal transmission protocol for communications between corresponding devices and controllers. A DMX controller sends DMX data to the connected DMX device(s). The DMX data is always transmitted as a serial data stream that is forwarded from one connected device to the next via the "DMX IN"...
  • Seite 14: Technical Data

    TECHNICAL DATA Product number: CLPIXBARDTWPRO Product type: LED spotlight Type: Pixel Bar DTW Colour spectrum LED: cool white/warm white/amber Number of LEDs: LED type: TRI LED 10 W LED colour temperature: 1600–6800 K PWM frequency: 3000 Hz Beam angle: 18° Beam, 30° Field DMX input: Male 3-pin and 5-pin XLR DMX output:...
  • Seite 15: Manufacturer's Declarations

    MANUFACTURER´S DECLARATIONS MANUFACTURER‘S WARRANTY & LIMITATIONS OF LIABILITY You can find our current warranty conditions and limitations of liability at: https://cdn-shop.adamhall.com/media/pdf/Manufacturers-Decla- rations-CAMEO_DE_EN_ES_FR.pdf. To request warranty service for a product, please contact Adam Hall GmbH, Adam-Hall-Str. 1, 61267 Neu Anspach / Email: Info@adamhall.com / +49 (0)6081 / 9419-0. CORRECT DISPOSAL OF THIS PRODUCT (valid in the European Union and other European countries with a differentiated waste collection system) This symbol on the product, or on its documents indicates that the device may not be treated as household waste.
  • Seite 16: Deutsch

    Dieses Gerät wurde unter hohen Qualitätsanforderungen entwickelt und gefertigt, um viele Jahre einen reibungslosen Betrieb zu gewähr- leisten. Bitte lesen Sie diese Bedienungsanleitung sorgfältig, damit Sie Ihr neues Produkt von Cameo Light schnell und optimal einsetzen können. Weitere Informationen über Cameo Light erhalten Sie auf unserer Website WWW.CAMEOLIGHT.COM.
  • Seite 17: Einführung

    35. Netzleitungen zur Spannungsversorgung mehrerer Geräte müssen mindestens 1,5 mm² Aderquerschnitt aufweisen. In der EU müssen die Leitungen H05VV-F, oder gleichartig, entsprechen. Geeignete Leitungen werden von Adam Hall angeboten. Mit diesen Leitungen können Sie mehrere Geräte über den Power out Anschluss mit dem Power IN Anschluss eines weiteren Gerätes verbinden. Beachten Sie, dass die gesamte Stromaufnahme aller angeschlossenen Geräte den vorgegebenen Wert nicht überschreitet (Aufdruck auf dem Gerät).
  • Seite 18: Anschlüsse, Bedien- U8Nd Anzeigeelemente

    Neutrik powerCON Netzeingangsbuchse für die Spannungsversorgung des Geräts. Ein geeignetes Netzkabel befindet sich im Lieferumfang. POWER OUT Neutrik powerCON Netzausgangsbuchse für die Netzversorgung weiterer CAMEO Scheinwerfer. Achten Sie darauf, dass die gesamte Stromaufnahme aller angeschlossenen Geräte den auf dem Gerät in Ampere (A) angegebenen Wert nicht überschreitet.
  • Seite 19: Bedienung

    • Sobald der Scheinwerfer korrekt am Stromnetz angeschlossen ist, werden während des Startvorgangs nacheinander „Update Wait...“ (nur für Servicezwecke), "Welcome to Cameo", die Modellbezeichnung und die Software Version im Display angezeigt. Nach diesem Vorgang ist der Scheinwerfer betriebsbereit und startet in der Betriebsart, die zuvor angewählt war.
  • Seite 20 STANDALONE-BETRIEBSART AUTOMATISCHE STEUERUNG (Auto) Wählen Sie, wie unter STANDALONE BETRIEBSARTEN beschrieben, die Betriebsart "Auto" aus und bestätigen mit ENTER. Sie können nun unter "Program" mit Hilfe der Tasten UP und DOWN die Pattern Level Meter, Meteor, Random Raindrops, Las Vegas Style, Barce full, Barce single, night rider, tetris, Bounce doubble, fire, Bounce fillrun, Bounce inverse, Chaser inverse, snow auswählen, unter "Speed"...
  • Seite 21: Menüstruktur

    STANDALONE-BETRIEBSART STATIC (Static) Wählen Sie, wie unter STANDALONE BETRIEBSARTEN beschrieben, die Betriebsart Static aus und bestätigen mit ENTER. Gesamthelligkeit, Stroboskop, Amber, Kaltweiß (C White) und Warmweiß (W White) der Pixel 1 bis 12 können nun zum Erzeugen einer individuellen Szene separat eingestellt werden.
  • Seite 22 SYSTEMEINSTELLUNGEN (Settings) Drücken Sie die MODE-Taste so oft, bis in der oberen Zeile des Displays „Menu“ angezeigt wird, wählen den Menüpunkt „Settings“ mit Hilfe der Tasten UP und DOWN aus und drücken auf ENTER. Zum Bearbeiten wählen Sie nun den gewünschten Untermenüpunkt abermals mit Hilfe der Tasten UP und DOWN aus und bestätigen mit ENTER (siehe Tabelle, Untermenüs beachten).
  • Seite 23 Menüstruktur Menu ENTER Settings ENTER Backligh Backligh Settings UP/DOWN Display UP/DOWN ENTER ENTER Settings ENTER DMX Fail DMX Fail DMX Fail UP/DOWN Hold Blackout ENTER ENTER Settings ENTER DimCurve DimCurve DimCurve DimCurve DimCurve UP/DOWN Linear S-Curve ENTER ENTER ENTER ENTER Settings ENTER DimResp.
  • Seite 24: Aufstellung Und Montage

    SYSTEMINFORMATIONEN (System) Drücken Sie die MODE-Taste so oft, bis in der oberen Zeile des Displays „Menu“ angezeigt wird, wählen den Menüpunkt „System“ mit Hilfe der Tasten UP und DOWN aus und drücken auf ENTER. Den gewünschten Untermenüpunkt wählen Sie jetzt abermals mit Hilfe von UP und DOWN aus und lassen die entsprechende Information durch Drücken auf ENTER anzeigen.
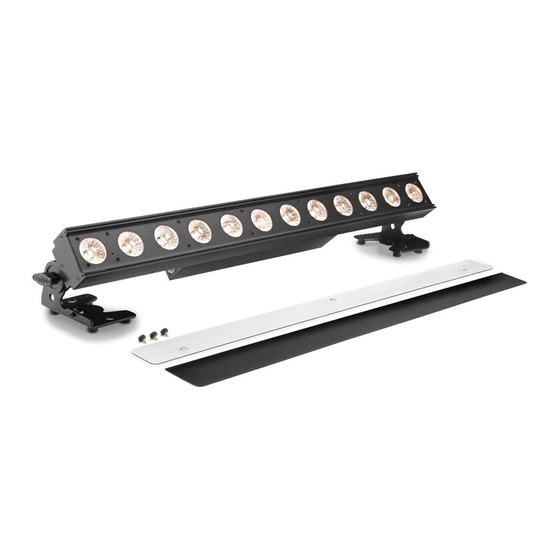
  • Seite 25: Streuscheibe

    STREUSCHEIBE Die beiliegende Streuscheibe wird bei Bedarf mit Hilfe der drei Rändelschrauben vor den Bündelungslinsen am Gehäuse befestigt (siehe Bild unten). OPTIONALES ZUBEHÖR CLPIXBAR600IP65BSET Schnellverschlusssystem für die werkzeuglose Montage. Der Umbausatz besteht aus 2x Omega Bracket, 4x Camlocks und 8x Schrauben plus Muttern.
  • Seite 26: Dmx Technik

    DMX TECHNIK DMX-512 DMX (Digital Multiplex) ist die Bezeichnung für ein universelles Übertragungsprotokoll für die Kommunikation zwischen entsprechenden Geräten und Controllern. Ein DMX-Controller sendet DMX-Daten an das/die angeschlossene(n) DMX-Gerät(e). Die DMX-Datenübertragung erfolgt stets als serieller Datenstrom, der über die an jedem DMX-fähigen Gerät vorhandenen DMX IN- und DMX OUT-Anschlüsse (XLR-Steckverbinder) von einem angeschlossenen Gerät an das nächste weitergeleitet wird, wobei die maximale Anzahl der Geräte 32 nicht überschreiten darf.
  • Seite 27: Technische Daten

    TECHNISCHE DATEN Artikelnummer: CLPIXBARDTWPRO Produktart: LED Scheinwerfer Typ: Pixel Bar DTW Farbspektrum LED: Kaltweiß / Warmweiß / Amber LED Anzahl: LED Typ: TRI LED 10W LED Farbtemperatur: 1600K - 6800K PWM Frequenz: 3000 Hz Abstrahlwinkel: 18° Beam, 30° Field DMX-Eingang: 3-Pol und 5-Pol XLR männlich DMX-Ausgang: 3-Pol und 5-Pol XLR weiblich...
  • Seite 28: Herstellererklärungen

    HERSTELLERERKLÄRUNGEN HERSTELLERGARANTIE & HAFTUNGSBESCHRÄNKUNG Unsere aktuellen Garantiebedingungen und Haftungsbeschränkung finden Sie unter: https://cdn-shop.adamhall.com/media/pdf/Manufactu- rers-Declarations-CAMEO_DE_EN_ES_FR.pdf. Im Service Fall wenden Sie sich bitte an Adam Hall GmbH, Adam-Hall-Str. 1, 61267 Neu Anspach / E-Mail Info@adamhall.com / +49 (0)6081 / 9419-0. KORREKTE ENTSORGUNG DIESES PRODUKTS (Gültig in der Europäischen Union und anderen europäischen Ländern mit Mülltrennung) Dieses Symbol auf dem Produkt oder dazugehörigen Dokumenten weist darauf hin, dass das Gerät am Ende der Produktlebenszeit nicht zusammen mit dem normalen Hausmüll entsorgt werden darf, um Umwelt- oder Personenschäden durch unkontrollierte Abfallentsorgung zu vermeiden.
  • Seite 29: Francais

    Cet appareil a été développé et fabriqué en appliquant des exigences de qualité très élevées: il garantit des années de fonctionnement sans problème.Veuillez lire attentivement ce Manuel Utilisateur : vous apprendrez rapidement à utiliser votre appareil Cameo Light de façon optimale.
  • Seite 30: Introduction

    34. Respectez une distance minimale de 0,5m par rapport à des matériaux inflammables. 35. Si vous désirez alimenter plusieurs projecteurs simultanément, les conducteurs du câble secteur doivent posséder une section minimale de 1,5 mm². Dans l’Union Européenne, les câbles électriques doivent être de type H05VV-F ou équivalent. Adam Hall propose des câbles secteur adaptés.
  • Seite 31: Raccordements, Éléments De Commande Et D'affichage

    Prise d’entrée Neutrik powerCON pour l’alimentation de l’appareil. Un câble d’alimentation adapté est fourni. POWER OUT (SORTIE D’ALIMENTATION) Prise de sortie Neutrik powerCON pour l’alimentation d’autres projecteurs CAMEO. Veillez à ce que le courant absorbé total de tous les appareils connectés ne dépasse pas la valeur en ampères (A) indiquée sur l’appareil.
  • Seite 32: Mode D'emploi

    • Si le projecteur est correctement branché sur l’alimentation secteur, pendant la phase de démarrage, l’écran affiche successivement la mention « Update Wait... » (uniquement à des fins de maintenance), le message « Welcome to Cameo », la référence du modèle et la version du logiciel.
  • Seite 33 MODE STANDALONE DE PILOTAGE AUTOMATIQUE (Auto) Conformément à la procédure décrite à la section MODES STANDALONE, sélectionnez le mode « Auto » et appuyez sur ENTER pour confirmer. À l’aide des touches UP et DOWN, vous pouvez maintenant sélectionner sous « Program » les modes Level Meter, Meteor, Random Raindrops, Las Vegas Style, Barce full, Barce single, night rider, tetris, Bounce doubble, fire, Bounce fillrun, Bounce inverse, Chaser inverse et snow, puis régler sous « Speed »...
  • Seite 34 MODE STANDALONE STATIC (Static) Conformément à la procédure décrite à la section MODES STANDALONE, sélectionnez le mode Static et appuyez sur ENTER pour confirmer. La luminosité générale, le stroboscope, l’ambre, le blanc froid (C White) et le blanc chaud (W White) des pixels 1 à 12 peuvent alors être réglés séparément pour créer une scène personnalisée.
  • Seite 35 PARAMÈTRES DU SYSTÈME (Settings) Appuyez plusieurs fois sur la touche MODE jusqu’à ce que la mention « Menu » s’affiche dans la ligne supérieure de l’écran, puis sélectionnez l’option de menu « Settings » à l’aide des touches UP et DOWN, et appuyez sur ENTER. Pour effectuer des modifications, sélectionnez maintenant l’option de sous-menu souhaitée à...
  • Seite 36 Structure hiérarchique du menu Menu ENTER Settings ENTER Backligh Backligh Settings UP/DOWN Display UP/DOWN ENTER ENTER Settings ENTER DMX Fail DMX Fail DMX Fail UP/DOWN Hold Blackout ENTER ENTER Settings ENTER DimCurve DimCurve DimCurve DimCurve DimCurve UP/DOWN Linear S-Curve ENTER ENTER ENTER ENTER...
  • Seite 37: Installation Et Montage

    INFORMATIONS SUR LE SYSTÈME (System) Appuyez plusieurs fois sur la touche MODE jusqu’à ce que la mention « Menu » s’affiche dans la ligne supérieure de l’écran, puis sélectionnez l’option de menu « System » à l’aide des touches UP et DOWN, et appuyez sur ENTER. Sélectionnez l’option du sous-menu souhaitée à l’aide des touches UP et DOWN, et appuyez sur ENTER pour afficher les données correspondantes.
  • Seite 38: Diffuseur

    DIFFUSEUR Si nécessaire, le diffuseur inclus se fixe sur le boîtier, devant les lentilles de focalisation, à l’aide des trois vis moletées (cf. illustration ci-dessous). ACCESSOIRES DISPONIBLES EN OPTION CLPIXBAR600IP65BSET Système de fermeture rapide pour le montage sans outil. Le kit de transformation se compose de 2 étriers en oméga, de 4 camlocks et de 8 vis avec écrous.
  • Seite 39: Technique Dmx

    TECHNIQUE DMX DMX-512 Le terme DMX (Digital Multiplex) désigne un protocole de transport universel permettant la communication entre des appareils et des contrôleurs à ce format. Un contrôleur DMX envoie des données DMX aux appareils DMX qui lui sont connectés. Les données DMX sont transportées sous forme d'un flux série, renvoyé...
  • Seite 40: Caractéristiques Techniques

    CARACTÉRISTIQUES TECHNIQUES Référence de l’article : CLPIXBARDTWPRO Catégorie de produit : Projecteur à LED Type : Pixel Bar DTW Spectre de couleurs des Blanc froid / blanc chaud / ambre LED : Nombre de LED : Type de LED : LED tricolores de 10 W Température chromatique 1600 K - 6800 K des LED : Fréquence du signal PWM :...
  • Seite 41: Déclarations Du Fabricant

    DECLARATIONS GARANTIE FABRICANT & LIMITATION DE RESPONSABILITÉ Nos conditions actuelles de garantie et de limitation de responsabilité sont disponibles à l‘adresse suivante : https://cdn-shop.adamhall.com/ media/pdf/Manufacturers-Declarations-CAMEO_DE_EN_ES_FR.pdf. Pour les réparations, veuillez contacter Adam Hall GmbH, Adam-Hall-Str. 1, 61267 Neu Anspach / E-Mail Info@adamhall.com / +49 (0)6081 / 9419-0. TRI ET MISE AUX DÉCHETS CORRECTE DE CE PRODUIT (Valid in the European Union and other European countries with waste separation) (Applicable dans l‘Union Européenne et les autres pays européens pratiquant le tri des déchets) La présence de ce symbole sur le...
  • Seite 42: Español

    Este equipo está diseñado y fabricado con los estándares de calidad más exigentes, para garantizar un correcto funcionamiento durante muchos años.Lea atentamente este manual de usuario para poder aprovechar rápidamente toda la funcionalidad de su nuevo producto de Cameo Light. Más información sobre Cameo Light en la web WWW.CAMEOLIGHT.COM. MEDIDAS DE SEGURIDAD 1.
  • Seite 43: Introducción

    (polvo, nicotina, niebla, etc.), deberá realizarse periódicamente el mantenimiento o la limpieza del equipo por personal especializado, para evitar cualquier sobrecalentamiento o fallo de funcionamiento (mantenimiento y limpieza no cubiertos por la garantía). 34. Asimismo, deberá dejarse una distancia mínima de 0,5 metros con cualquier material inflamable. 35.
  • Seite 44: Conexiones, Elementos De Manejo Y Elementos De Visualización

    POWER OUT Toma de salida de alimentación Neutrik powerCON para la alimentación eléctrica de otros focos CAMEO. Compruebe que el consumo de corriente total de todos los equipos conectados no supera el valor en amperios (A) indicado en el equipo.
  • Seite 45: Funcionamiento

    «Update Wait...» (Actualización del software, espere) (solo con fines de servicio técnico) y «Welcome to Cameo» (Bienveni- dos a Cameo), así como la denominación de modelo y la versión del software. Tras este procedimiento, el foco estará listo para funcionar y se activará...
  • Seite 46 MODO AUTÓNOMO DE CONTROL AUTOMÁTICO (Auto) Tal como se describe en el apartado MODOS AUTÓNOMOS, seleccione el modo operativo «Auto» y confirme con ENTER. Ahora, con los botones UP y DOWN, puede seleccionar en «Program» los patrones Level Meter, Meteor, Random Raindrops, Las Vegas Style, Barce full, Barce single, night rider, tetris, Bounce doubble, fire, Bounce fillrun, Bounce inverse, Chaser inverse, snow.
  • Seite 47 MODO AUTÓNOMO STATIC (Static) Tal como se describe en el apartado MODOS AUTÓNOMOS, seleccione el modo Static y confirme con ENTER. Ahora, para generar una escena individual, se pueden ajustar por separado la luminosidad general, estrobo, ámbar, blanco frío (C White) y blanco cálido (W White) de los píxeles 1 al 12.
  • Seite 48 DMX Fail Estado operativo Hold Se mantendrá la última orden en caso de in- Blackout Activa el apagón terrupción de la señal DMX Dimmer Curve Curva de atenua- Linear La intensidad luminosa aumentará de forma lineal con el valor DMX ción Exponential La intensidad luminosa podrá...
  • Seite 49: Estructura De Menús

    Estructura de menús Menu ENTER Settings ENTER Backligh Backligh Settings UP/DOWN Display UP/DOWN ENTER ENTER Settings ENTER DMX Fail DMX Fail DMX Fail UP/DOWN Hold Blackout ENTER ENTER Settings ENTER DimCurve DimCurve DimCurve DimCurve DimCurve UP/DOWN Linear S-Curve ENTER ENTER ENTER ENTER Settings...
  • Seite 50: Instalación Y Montaje

    INFORMACIÓN DEL SISTEMA (System) Pulse el botón MODE varias veces hasta que aparezca «Menu» en la línea superior de la pantalla, seleccione la opción de menú «System» con los botones UP y DOWN, y pulse ENTER. A continuación, de nuevo con los botones UP y DOWN, seleccione la opción de submenú deseada y visualice la información correspondiente pulsando ENTER.
  • Seite 51: Difusor

    DIFUSOR En caso necesario, el difusor suministrado se fija en la carcasa mediante los tres tornillos moleteados situados antes de las lentes Fresnel (véase la imagen abajo). ACCESORIOS OPCIONALES CLPIXBAR600IP65BSET Sistema de cierre rápido para el montaje sin herramientas. El kit de conversión consta de 2 soportes en omega, 4 cierres camlock y 8 tornillos más tuercas.
  • Seite 52: Tecnología Dmx

    TECNOLOGÍA DMX DMX512 DMX (Digital Multiplex) es el nombre de un protocolo universal utilizado como medio de comunicación entre dispositivos y controladores. El controlador DMX envía datos DMX a los equipos DMX conectados. Los datos DMX se envían como datos serie que se transmiten de equipo a equipo a través de los conectores XLR «DMX IN»...
  • Seite 53: Datos Técnicos

    DATOS TÉCNICOS Número de artículo: CLPIXBARDTWPRO Tipo de producto: focos LED Tipo: Barra píxel DTW Espectro cromático del LED: blanco frío / blanco cálido / ámbar Número de LED: Tipo de LED: LED triple de 10 W Temperatura de color del 1600 K - 6800 K LED: Frecuencia de la PWM:...
  • Seite 54: Declaración Del Fabricante

    DECLARACIÓN DEL FABRICANTE GARANTÍA DEL FABRICANTE Y LIMITACIÓN DE RESPONSABILIDAD Consulte nuestras condiciones de garantía y limitaciones de responsabilidad en: https://cdn-shop.adamhall.com/media/pdf/Manufactu- rers-Declarations-CAMEO_DE_EN_ES_FR.pdf. En caso de necesitar servicio técnico, póngase en contacto con Adam Hall GmbH, Daimler- straße 9, 61267 Neu Anspach (Alemania); correo electrónico Info@adamhall.com; +49 (0)6081 / 9419-0. ELIMINACIÓN CORRECTA DE ESTE PRODUCTO (Aplicable en la Unión Europea y en los países europeos que dispongan de un sistema de recogida selectiva) El símbolo que aparece sobre el producto o en la documentación adjunta indica que al final de la vida útil del equipo, no deberá...
  • Seite 55: Polski

    To urządzenie zostało zaprojektowane i wyprodukowane przy zastosowaniu najwyższych kryteriów jakościowych w celu zapewnienia wieloletniej bezawaryjnej eksploatacji. Proszę starannie przeczytać niniejszą instrukcję obsługi, aby móc jak najszybciej zacząć użytkować ten produkt marki Cameo Light. Więcej informacji na temat Cameo Light znajdą Państwo na naszej stronie internetowej pod adresem WWW.CAMEOLIGHT.COM.
  • Seite 56: Wprowadzenie

    32. Instalacja urządzenia powinna odbywać się, gdy urządzenie nie jest podłączone do źródła zasilania (należy wyjąć wtyczkę z gniazda). 33. Kurz i inne osady wewnątrz urządzenia mogą je uszkodzić. W zależności od warunków otoczenia (kurz, nikotyna, opary itp.) urządzenie powinno być konserwowane lub czyszczone przez wykwalifikowanego specjalistę (usługa nieobjęta gwarancją), aby zapobiec przegrzaniu i nieprawidłowemu działaniu.
  • Seite 57: Wyświetlacz Ciekłokrystaliczny

    Gniazdo zasilania sieciowego urządzenia powerCON firmy Neutrik. Kabel zasilania znajduje się w zestawie. POWER OUT Gniazdo wyjściowe zasilania sieciowego Neutrik powerCON do zasilania reflektora dodatkowego CAMEO. Całkowity pobór mocy wszystkich po dłączonych urządzeń nie może przekroczyć wartości w amperach (A) podanej na urządzeniu.
  • Seite 58: Obsługa

    • Po prawidłowym podłączeniu reflektora do sieci zasilania podczas procesu uruchamiania jest wyświetlana następująca sekwencja komunika- tów: „Update Wait...” (tylko do celów serwisowych), „Welcome to Cameo”, a także nazwa modelu i wersji oprogramowania. Po tej procedurze reflektor jest gotowy do pracy i przełącza się na ostatnio wybrany tryb.
  • Seite 59 TRYB PRACY STANDALONE Naciskaj przycisk MODE, aż w górnym wierszu wyświetlacza pokaże się komunikat „Menu”; przyciskami UP i DOWN wybierz punkt menu „Menu StaAlone” i naciśnij ENTER. Teraz wybierz żądany tryb pracy Standalone za pomocą przycisków UP i DOWN i potwierdź przyciskiem ENTER.
  • Seite 60 TRYB PRACY STANDALONE TUNABLE WHITE (TunWhite) Zgodnie z opisem w TRYB PRACY STANDALONE wybierz tryb pracy Tunable White i potwierdź przyciskiem ENTER. Żądaną temperaturę barwową uzyskuje się, wybierając punkt menu „TunWhiteCCT” za pomocą przycisków UP i DOWN, potwierdzając przyciskiem ENTER i ponownie ustawiając za pomocą...
  • Seite 61 TRYB PRACY SLAVE Naciskaj przycisk MODE, aż w górnym wierszu wyświetlacza pokaże się komunikat „Menu”; przyciskami UP i DOWN wybierz punkt menu „Slave” i naciśnij ENTER. Tryb pracy Slave jest teraz aktywowany. Połącz urządzenia slave i master (ten sam model) kablem DMX i włącz w urządzeniu master jeden z trybów pracy standalone (Auto, Sound, CCTMacro, TunWhite, Static).
  • Seite 62: Struktura Menu

    Struktura menu Menu ENTER Settings ENTER Backligh Backligh Settings UP/DOWN Display UP/DOWN ENTER ENTER Settings ENTER DMX Fail DMX Fail DMX Fail UP/DOWN Hold Blackout ENTER ENTER Settings ENTER DimCurve DimCurve DimCurve DimCurve DimCurve UP/DOWN Linear S-Curve ENTER ENTER ENTER ENTER Settings ENTER...
  • Seite 63: Ustawianie I Montaż

    INFORMACJE O SYSTEMIE (System) Naciskaj przycisk MODE, aż w górnym wierszu wyświetlacza pokaże się komunikat „Menu”; przyciskami UP i DOWN wybierz punkt menu „System” i naciśnij ENTER. Odpowiednią pozycję podmenu wybierz ponownie przyciskami UP i DOWN, a następnie wyświetl żądaną informację, naciskając ENTER.
  • Seite 64: Dyfuzor

    PŁYTKA ROZPRASZAJĄCA Dołączony panel rozpraszający jest w razie potrzeby mocowany za pomocą trzech śrub radełkowanych na obudowie przed soczewkami Fresnela (zob. fotografię poniżej). AKCESORIA OPCJONALNE CLPIXBAR600IP65BSET System szybkomocujący do montażu beznarzędziowego. Zawartość zestawu do przebudowy: 2 x uchwyt Omega, 4 x złącza camlock i 8 x śruby z nakrętkami.
  • Seite 65: Technika Dmx

    TECHNIKA DMX DMX-512 DMX (Digital Multiplex) to nazwa uniwersalnego protokołu transmisji do komunikacji między odpowiednimi urządzeniami a kontrolerami. Kontroler DMX wysyła dane DMX do podłączonych urządzeń DMX. Transmisja danych DMX następuje zawsze w formie szeregowego strumienia danych, który jest przekazywany z jednego urządzenia do następnego przez znajdujące się...
  • Seite 66: Dane Techniczne

    DANE TECHNICZNE Numer artykułu: CLPIXBARDTWPRO Rodzaj produktu: Reflektor LED Typ: Pixel Bar DTW Widmo kolorów LED: Chłodna biel / ciepła biel / bursztynowy Liczba diod LED: Typ diod LED: TRI LED 10W Temperatura barwowa LED: 1600 K – 6800 K Częstotliwość...
  • Seite 67: Deklaracje Producenta

    DEKLARACJE PRODUCENTA GWARANCJA PRODUCENTA I OGRANICZENIE ODPOWIEDZIALNOŚCI Nasze aktualne warunki gwarancji i informacje dotyczące ograniczenia odpowiedzialności znajdą Państwo na stronie: https://cdn-shop. adamhall.com/media/pdf/Manufacturers-Declarations-CAMEO_DE_EN_ES_FR.pdf. W razie konieczności skorzystania z serwisu proszę skontaktować się z firmą Adam Hall GmbH, Adam-Hall-Str. 1, 61267 Neu Anspach / e-mail Info@adamhall.com / +49 (0)6081 / 9419-0. PRAWIDŁOWA UTYLIZACJA NINIEJSZEGO PRODUKTU (Obowiązuje w Unii Europejskiej i innych krajach europejskich stosujących system sortowania odpadów) Niniejszy symbol na produk- cie lub związanych z nim dokumentach wskazuje, iż...
  • Seite 68: Italiano

    Questo dispositivo è stato sviluppato e prodotto in conformità con elevati standard qualitativi che ne garantiscono il regolare funzionamento per molti anni. Leggete attentamente questo manuale d‘uso per utilizzare al meglio il vostro nuovo prodotto Cameo Light. Per maggiori informazioni su Cameo Light consultare la nostra pagina Web WWW.CAMEOLIGHT.COM.
  • Seite 69: Introduzione

    nicotina, nebbia ecc.) il dispositivo deve essere sottoposto a regolari interventi di manutenzione e pulizia da parte di personale specializzato (senza garanzia, interventi a carico del proprietario) per evitare surriscaldamento e malfunzionamenti. 34. La distanza dai materiali infiammabili deve essere di almeno 0,5 m 35.
  • Seite 70: Connettori, Elementi Di Comando E Di Visualizzazione

    Presa di ingresso Neutrik powerCON per l'alimentazione elettrica del dispositivo. Il cavo di alimentazione adatto è in dotazione. POWER OUT Presa di uscita Neutrik powerCON per l'alimentazione elettrica di altri proiettori CAMEO. Assicurarsi che il totale della potenza assorbita di tutti i dispositivi collegati all'apparecchio non superi il valore indicato in Ampere (A).
  • Seite 71: Utilizzo

    • Non appena il proiettore è correttamente allacciato alla rete elettrica, durante la procedura di avvio sul display vengono visualizzati in successione i messaggi “Update Wait...” (solo per manutenzione) e “Welcome to Cameo”, seguiti dall’indicazione del modello e della versione del software.
  • Seite 72 MODALITÀ DI FUNZIONAMENTO STAND-ALONE Premere il tasto MODE fino a quando nella riga superiore del display non appare “Menu”, selezionare la voce di menu “Menu StaAlone” con i tasti UP e DOWN e premere ENTER. Utilizzando di nuovo i tasti UP e DOWN, selezionare ora la modalità di funzionamento stand-alone desiderata e confermare con ENTER.
  • Seite 73 UP e DOWN, confermare con ENTER e impostare un valore compreso tra 000 e 255 sempre con i tasti UP e DOWN (valore 000 = 1600 K, valore 255 = 6800 K). Confermare l’inserimento con ENTER, quindi selezionare la voce di menu “TunWhite Intens” con i tasti UP e DOWN, confermare con ENTER e impostare la luminosità...
  • Seite 74 MODALITÀ DI FUNZIONAMENTO SLAVE Premere il tasto MODE fino a quando nella riga superiore del display non appare “Menu”, selezionare la voce di menu “Slave” con i tasti UP e DOWN e premere ENTER. La modalità di funzionamento slave è attiva. Collegare l’unità slave e master (stesso modello) utilizzando un cavo DMX;...
  • Seite 75: Struttura Del Menu

    Struttura del menu Menu ENTER Settings ENTER Backligh Backligh Settings UP/DOWN Display UP/DOWN ENTER ENTER Settings ENTER DMX Fail DMX Fail DMX Fail UP/DOWN Hold Blackout ENTER ENTER Settings ENTER DimCurve DimCurve DimCurve DimCurve DimCurve UP/DOWN Linear S-Curve ENTER ENTER ENTER ENTER Settings...
  • Seite 76: Installazione E Montaggio

    INFORMAZIONI DI SISTEMA (System) Premere il tasto MODE fino a quando nella riga superiore del display non appare "Menu", selezionare la voce di menu "System" con i tasti UP e DOWN e premere ENTER. Selezionare la voce del sottomenu desiderata utilizzando nuovamente i tasti UP e DOWN, quindi visualizzare le informazioni corrispondenti premendo ENTER.
  • Seite 77: Diffusore

    DIFFUSORE Se necessario, il diffusore fornito in dotazione viene fissato all'alloggiamento mediante le tre viti zigrinate davanti alle lenti di collimazione (cfr. figura in basso). ACCESSORI OPZIONALI CLPIXBAR600IP65BSET Sistema di bloccaggio rapido per montaggio senza attrezzi. Kit di conversione costituito da 2 Omega Bracket, 4 Camlock e 8 viti più...
  • Seite 78: Tecnologia Dmx

    TECNOLOGIA DMX DMX512 DMX (Digital Multiplex) è la sigla di un protocollo di trasmissione universale per la comunicazione tra dispositivi e controller. Un controller DMX invia dati DMX ai dispositivi DMX collegati. I dati DMX vengono sempre trasmessi come flusso di dati seriale, che viene inoltrato da un dispositivo collegato al successivo attraverso le connessioni (connettori XLR) DMX IN e DMX OUT presenti per ogni dispositivo DMX compatibile, per un massimo di 32 dispositivi.
  • Seite 79: Dati Tecnici

    DATI TECNICI Codice articolo: CLPIXBARDTWPRO Tipologia di prodotto: Proiettore LED Tipo: Pixel Bar DTW Spettro cromatico LED: Bianco freddo / bianco caldo / ambra Numero di LED: Tipo di LED: TRI LED 10W Temperatura di colore LED: 1600 K - 6800 K Frequenza PWM: 3.000 Hz Angolo di emissione:...
  • Seite 80: Dichiarazioni Del Produttore

    HERSTELLERERKLÄRUNGEN HERSTELLERGARANTIE & HAFTUNGSBESCHRÄNKUNG Unsere aktuellen Garantiebedingungen und Haftungsbeschränkung finden Sie unter: https://cdn-shop.adamhall.com/media/pdf/Manufactu- rers-Declarations-CAMEO_DE_EN_ES_FR.pdf. Im Service Fall wenden Sie sich bitte an Adam Hall GmbH, Adam-Hall-Str. 1, 61267 Neu Anspach / E-Mail Info@adamhall.com / +49 (0)6081 / 9419-0. KORREKTE ENTSORGUNG DIESES PRODUKTS (Gültig in der Europäischen Union und anderen europäischen Ländern mit Mülltrennung) Dieses Symbol auf dem Produkt oder dazugehörigen Dokumenten weist darauf hin, dass das Gerät am Ende der Produktlebenszeit nicht zusammen mit dem normalen Hausmüll entsorgt werden darf, um Umwelt- oder Personenschäden durch unkontrollierte Abfallentsorgung zu vermeiden.
  • Seite 81: Dmx Control

    DMX CONTROL / DMX STEUERUNG / PILOTAGE DMX / CONTROL DMX / STEROWANIE DMX / CONTROLLO DMX 1CH Mode Function Values Sub-Group Dimmer 0% to 100% Dimmer 2CH Mode Function Values Sub-Group Dimmer 0% to 100% Dimmer Colour Temperature 6800K - 1600K Colour Temperature 3CH Mode DIR Function...
  • Seite 82 no function Level Meter Meteor Random Raindrops Las Vegas Style Bar full Bar single Pattern Night Rider (overrides CH 2) Tetris Pattern Double Bounce Fire Double Tetris Bounce inverse Chaser inverse Snow run forward from slow -> fast Speed Pattern run backward from fast ->...
  • Seite 83 1600K 2000K 2500K 3000K 3200K 3500K CCT Macro CCT Macro (overrides AWC) 4000K 4500K 5000K 5600K 6000K 6500K 6800K Colour Temperature Colour Temperature (overrides AWC & CCT) 6800K - 1600K 12CH PAT Mode (Pattern) Function Values Sub-Group Dimmer 0% to 100% Dimmer Dimmer fine 0% to 100%...
  • Seite 84 no function Level Meter Meteor Random Raindrops Las Vegas Style Bar full Bar single Pattern Night Rider Tetris Pattern Double Bounce Fire Double Tetris Bounce inverse Chaser inverse Snow run forward from slow -> fast Speed Pattern run backward from fast -> slow Sound Control OFF (Mic Sensitivity) Sound Control ON forward Sound Control...
  • Seite 85 15CH Mode Function Values Sub-Group Dimmer Warm White 1 0% to 100% Dimmer Warm White 2 0% to 100% Dimmer Warm White 3 0% to 100% Dimmer Warm White 4 0% to 100% Dimmer Warm White 5 0% to 100% Dimmer Dimmer Warm White 6 0% to 100%...
  • Seite 86 Amber 0% to 100% Warm White 0% to 100% Pixel 3 Cold White 0% to 100% Amber 0% to 100% Warm White 0% to 100% Pixel 4 Cold White 0% to 100% Amber 0% to 100% Warm White 0% to 100% Pixel 5 Cold White 0% to 100%...
  • Seite 87 Amber 0% to 100% Warm White 0% to 100% Pixel 2 Cold White 0% to 100% Amber 0% to 100% Warm White 0% to 100% Pixel 3 Cold White 0% to 100% Amber 0% to 100% Warm White 0% to 100% Pixel 4 Cold White 0% to 100%...
  • Seite 88 no function Level Meter Meteor Random Raindrops Las Vegas Style Bar full Bar single Pattern Night Rider Tetris Pattern Double Bounce Fire Double Tetris Bounce inverse Chaser inverse Snow run forward from slow -> fast Speed Pattern run backward from fast -> slow Sound Control OFF Sound Control ON forward Sound...
  • Seite 92 CAMEOLIGHT.COM Adam Hall GmbH | Adam-Hall-Str. 1 | 61267 Neu-Anspach | Germany Tel. +49(0)6081/9419-0 | Fax +49(0)6081/9419-1000 web : www.adamhall.com | e-mail : mail@adamhall.com REV: 02...

Diese Anleitung auch für:

Clpixbardtwpro

Inhaltsverzeichnis