Herunterladen Diese Seite drucken

Werbung

Verfügbare Sprachen
  • DE

Verfügbare Sprachen

  • DEUTSCH, seite 1
r e F e r e n z 3 7 7 7
F l i e g e r u H r
c H r O n O g r a p H
B e d i e n u n g s a n l e i t u n g
O p e r a t i n g i n s t r u c t i O n s
M O d e d ' e M p l O i
i s t r u z i O n i d ' u s O
i n s t r u c c i O n e s d e M a n e j O
M a n u a l d e i n s t r u ç Õ e s

Werbung

loading

Inhaltszusammenfassung für iwc Fliegeruhr Chronograph Ref. 3777

  • Seite 1 r e F e r e n z 3 7 7 7 F l i e g e r u H r c H r O n O g r a p H B e d i e n u n g s a n l e i t u n g O p e r a t i n g i n s t r u c t i O n s M O d e d ’...
  • Seite 3 — 3 — — 5 — B e d i e n u n g s a n l e i t u n g Deutsch — 2 1 — o p e r a t i n g i n s t r u C t i o n s English —...
  • Seite 5 Erfindungen technischer, materieller oder formaler Natur, selbst wenn sie im kleinsten Detail stecken, das vielleicht nicht einmal sichtbar ist. Ein schönes neues Beispiel dieser IWC- Tradition ist hiermit in Ihrem Besitz: Wir möchten Ihnen hierzu von Herzen gratulieren, verbunden mit den besten Wünschen für eine Zeit mit Ihrer Uhr, die man vielleicht gar nicht genauer beschreiben kann –...
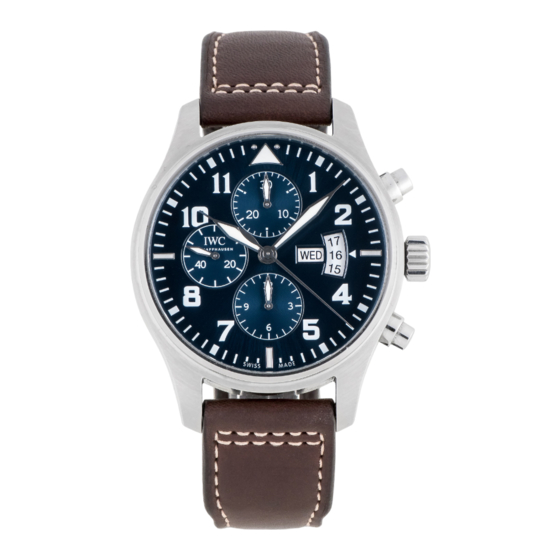
  • Seite 6 F l i e g e r u h r C h r o n o g r a p h Ihre IWC-Uhr zeigt Ihnen die Zeit in Stunden, Minuten und Sekun- den sowie das Datum und den Wochentag. Mit dem integrierten Chronographen messen Sie jede Zeitspanne bis 12 Stunden in Sekunden, Minuten und Stunden.
  • Seite 7 — 7 — Stundenzeiger Minutenzähler Minutenzeiger Stundenzähler kleiner Sekundenzeiger verschraubte Krone Datumsanzeige Start-Stopp-Drücker Wochentagsanzeige Rückstelldrücker Sekundenstoppzeiger F l i e g e r u h r C h r o n o g r a p h...
  • Seite 8 — 8 — d i e F u n k t i o n e n d e r k r o n e Normalstellung (verschraubt) X — Aufzugsstellung 0 — Datums- und Wochentagseinstellung 1 — Zeiteinstellung 2 — d i e n o r M a l s t e l l u n g Diese Uhr besitzt eine verschraubte Krone.
  • Seite 9 — 9 — d i e a u F z u g s s t e l l u n g In der Aufzugsstellung (Position 0) können Sie das automatische Uhrwerk auch von Hand aufziehen. Zum Ingangsetzen des Wer- kes genügen wenige Umdrehungen der Krone. Wir empfehlen jedoch, die Uhr durch ca.
  • Seite 10 — 1 0 — d i e z e i t e i n s t e l l u n g Ziehen Sie die Krone in Position 2. Dadurch stoppen Sie das Uhr- werk. Für ein sekundengenaues Einstellen ist es vorteilhaft, wenn das Uhrwerk beim Durchgang des Sekundenzeigers über der 60 angehalten wird.
  • Seite 11 — 1 1 — d a s r i C h t i g e e i n s t e l l e n i h r e r u h r Zum richtigen Einstellen Ihrer Uhr gehen Sie wie folgt vor: –...
  • Seite 12 — 1 2 — gestellt, dass sich beim Starten des Uhrwerkes der Minuten- zeiger ohne Verzögerung fortbewegt. – Zum Starten des Uhrwerkes drücken Sie die Krone wieder in Position 0. – Drücken Sie nun die Krone in Position X und sichern Sie diese durch gleichzeitiges Rechtsdrehen.
  • Seite 13 — 1 3 — d a s a B l e s e n d e s C h r o n o g r a p h e n Sekundenstoppzeiger: Am Rand des Zifferblattes befindet sich die Einteilung für den zentralen Sekundenstoppzeiger. Minutenzähler: Auf dem Hilfszifferblatt bei 12 Uhr befindet sich die 30-Minuten-Einteilung mit einem langsam springenden Zeiger.
  • Seite 14 Ihnen erlaubt, die Bandlänge je nach Bedarf ganz einfach um bis zu 6 Millimeter zu erweitern oder zu verringern. Zum Verlängern des Bandes drücken Sie die Taste mit dem IWC-Logo herunter und ziehen Sie das Band etwas auseinander. Zum Verkürzen schieben Sie es im Bereich der Schliesse zusammen, wobei die Taste nicht betätigt werden muss.
  • Seite 15 — 1 5 — d a s t r e n n e n d e s B a n d e s Öffnen Sie die Faltschliesse durch Drücken der seitlichen Tasten. Legen Sie das Band mit der Aussenseite nach unten auf eine feste Unterlage.
  • Seite 16 — 1 6 — Beachten Sie bitte folgende Empfehlung: In der Regel nimmt der Umfang Ihres Handgelenkes im Laufe des Tages, abhängig von Temperatur und körperlicher Anstrengung, zu. Bevor Sie einzelne Bandglieder entfernen, sollten Sie je nach Tageszeit die Feineinstellung an der Schliesse geschlossen (morgens) oder geöffnet (abends) halten.
  • Seite 17 — 1 7 — d a s h e r a u s n e h M e n e i n z e l n e r B a n d g l i e d e r u n d d a s z u s a M M e n F ü g e n d e s B a n d e s Wiederholen Sie die Schritte 1 bis 3 im soeben ermittelten Abstand von der ersten Trennstelle.
  • Seite 18 Eine solche Prüfung muss auch nach ausser- gewöhnlichen Belastungen durchgeführt werden. Werden diese Prüfungen nicht ordnungsgemäss durchgeführt oder wird die Uhr von nicht autorisierten Personen geöffnet, so lehnt IWC jegliche Garantie- oder Haftungsansprüche ab. Empfehlung: Nach jedem Öffnen und Service Ihrer IWC-Uhr muss Ihr autorisierter IWC-Fachhändler (Official Agent) wieder...
  • Seite 19 Abrieb rechtzeitig beseitigt wird. Wir empfehlen deshalb, an Ihrer Uhr ca. alle fünf Jahre einen Unterhaltsservice durch- führen zu lassen. Wenden Sie sich dazu an einen autorisierten IWC-Fachhändler (Official Agent) oder direkt an den IWC-Kunden- dienst in Schaffhausen. Stand: November 2011.
  • Seite 21 You are now the owner of a beautiful new example of this IWC tradition. We would like to congratulate you on your choice and send you...
  • Seite 22 ’ s W a t C h C h r o n o g r a p h Your IWC watch shows you the time in hours, minutes and seconds, together with the date and the day. You can use the integrated chronograph to measure any period of time up to 12 hours in seconds, minutes and hours.
  • Seite 23 — 2 3 — Hour hand Minute counter Minute hand Hour counter Small seconds hand Screw-in crown Date display Start/stop button Day display Reset button Chronograph seconds hand p i l o t ’ s W a t C h C h r o n o g r a p h...
  • Seite 24 — 2 4 — F u n C t i o n s o F t h e C r o W n Normal position (screwed in) X — Winding position 0 — Date and day setting 1 — Time setting 2 —...
  • Seite 25 — 2 5 — W i n d i n g p o s i t i o n With the crown in the winding position (0), you can also wind the automatic movement by hand. A few revolutions of the crown are enough to start the movement.
  • Seite 26 — 2 6 — t i M e s e t t i n g Pull out the crown to position 2. This will stop the movement. To set the time accurately to the second, it is best to stop the movement as the seconds hand passes 60.
  • Seite 27 — 2 7 — s e t t i n g y o u r W a t C h C o r r e C t l y To set your watch correctly, proceed as follows: – Release the crown by turning it to the left. –...
  • Seite 28 — 2 8 — – Push the crown back to position 0 to start the movement. – Now push the crown to position X and secure it by simultan- eously turning it to the right. Important: Although the watch is water-resistant in positions 0, 1 and 2, the crown should always be screwed in again for normal use (position X).
  • Seite 29 — 2 9 — r e a d i n g t h e C h r o n o g r a p h Chronograph seconds hand: The scale for the central chrono- graph seconds hand runs around the edge of the dial. Minute counter: The 30-minute scale with a slow jumping hand is situated on the subdial at 12 o’clock.
  • Seite 30 6 millimetres, de- pending on your needs. To increase the length of bracelet, press the button with the IWC logo and pull the bracelet slightly apart. To shorten it, push it together in the area of the clasp; here the button does not need to be pressed.
  • Seite 31 — 3 1 — t a k i n g t h e B r a C e l e t a p a r t Open the folding clasp by pressing the button on the side. Lay the bracelet with the outside on a firm base. To avoid scratch- ing the bracelet and base, place a cloth underneath the brace- let.
  • Seite 32 — 3 2 — Please observe the following recommendation: Generally the size of your wrist will increase during the course of the day, depending on temperature and physical exertion. Before you re- move individual bracelet links, depending on the time of day you should have the fine adjustment system on the clasp closed (in the morning) or open (in the evening).
  • Seite 33 — 3 3 — r e M o v i n g i n d i v i d u a l l i n k s a n d a t t a C h i n g t h e B r a C e l e t Repeat steps 1 to 3 at the distance from the first point of separ- ation you have just determined.
  • Seite 34 Official Agent will also be pleased to provide you with information. To ensure that your watch continues to function perfectly, you should have it checked by an IWC service centre at least once a year. Your watch should also be tested after exposure to unusual- ly harsh conditions.
  • Seite 35 For this reason, we recommend that you have your watch serviced ap- proximately every five years. Please contact an authorized IWC Official Agent or send your watch directly to the IWC Customer Service Department in Schaffhausen. Effective from November 2011.
  • Seite 37 Vous possédez aujourd’hui un bel exemple de cette tradition IWC. Nous tenons à vous en féliciter cordialement, tout en formant nos meilleurs vœux pour ces nombreuses heures en compagnie de votre montre qu’il est...
  • Seite 38 M o n t r e d ’ a v i a t e u r C h r o n o g r a p h e Votre montre IWC vous indique le temps en heures, minutes et secondes ainsi que la date et le jour de la semaine. À l’aide du chronographe intégré, vous pouvez chronométrer des temps...
  • Seite 39 — 3 9 — Aiguille des heures Trotteuse du chronographe Aiguille des minutes Compteur des minutes Petite aiguille des secondes Compteur des heures Affichage de la date Couronne vissée Affichage du jour Poussoir start-stop de la semaine Poussoir de remise à zéro M o n t r e d ’...
  • Seite 40 — 4 0 — l e s F o n C t i o n s d e l a C o u r o n n e Position normale (couronne vissée) X — Position de remontage 0 — Réglage de la date et du jour de la semaine 1 —...
  • Seite 41 — 4 1 — l a p o s i t i o n d e r e M o n t a g e Dans la position de remontage (0), vous pouvez aussi remonter manuellement le mouvement automatique. Quelques tours de la couronne suffisent à...
  • Seite 42 — 4 2 — l e r é g l a g e d e l ’ h e u r e Tirez la couronne en position 2. Cette opération arrête le mouve- ment. Pour un réglage à la seconde près, il est préférable d’arrê- ter le mouvement lorsque l’aiguille des secondes se trouve sur 60.
  • Seite 43 — 4 3 — l e B o n r é g l a g e d e v o t r e M o n t r e Pour régler correctement votre montre, veuillez procéder comme suit: – Déverrouillez la couronne en la tournant à gauche. –...
  • Seite 44 — 4 4 — réglage garantit que l’aiguille des minutes se déplacera immé- diatement lors du redémarrage du mouvement. – Pour faire démarrer le mouvement, il faut remettre la couronne en position 0. – Enfoncez maintenant la couronne en position X et verrouillez-la en la tournant simultanément à...
  • Seite 45 — 4 5 — l a l e C t u r e d u C h r o n o g r a p h e Trotteuse du chronographe: la graduation de la trotteuse centrale du chronographe se trouve sur le bord du cadran. Compteur des minutes: la graduation à...
  • Seite 46 6 millimètres selon les besoins. Pour augmenter la longueur du bracelet, veuillez appuyer sur le poussoir avec le logo IWC vers le bas et tirer un peu sur le bracelet. Pour diminuer la longueur du bracelet, veuillez le comprimer dans la zone du fermoir sans devoir appuyer sur le poussoir.
  • Seite 47 — 4 7 — s é p a r e r l e B r a C e l e t Ouvrez la boucle déployante en appuyant sur les poussoirs latéraux. Posez le bracelet à l’envers sur une surface rigide. Pour éviter de rayer le bracelet et la surface sur laquelle il est posé, il est recommandé...
  • Seite 48 — 4 8 — Veuillez à cet effet tenir compte de la recommandation sui- vante: en général, la largeur de votre poignet augmente au cours de la journée en fonction de la température et des efforts phy- siques. Avant d’enlever des maillons, vous devriez maintenir le réglage précis du fermoir fermé...
  • Seite 49 — 4 9 — r e t i r e r d e s M a i l l o n s e t a s s e M B l e r l e B r a C e l e t Veuillez répéter les étapes 1 à...
  • Seite 50 Vous trouverez sur Internet les recommandations d’utilisation relatives à l’étanchéité de votre montre sous www.iwc.com/water-resistance. Votre concession- naire IWC agréé (Official Agent) se fera également un plaisir de vous informer. Pour garantir un fonctionnement parfait de votre montre, celle- ci doit être contrôlée au minimum une fois par an par un point...
  • Seite 51 — 5 1 — Recommandation: après chaque ouverture et service de votre montre IWC, votre concessionnaire IWC agréé (Official Agent) doit de nouveau procéder à un contrôle de l’étanchéité. r e M a r q u e Le cuir est une matière naturelle et perméable. C’est la raison pour laquelle nous vous recommandons d’éviter tout contact de...
  • Seite 52 Pour ce faire, veuillez vous adresser à un concessionnaire IWC agréé (Official Agent) ou directement au service après-vente IWC à Schaffhausen. Situation: novembre 2011.
  • Seite 55 Un esempio nuovo e affascinante di questa tradizione IWC è ora in suo possesso. Le porgiamo le nostre più vive congratulazioni, unitamente all’augu- rio di trascorrere col suo orologio tempi segnati da momenti così...
  • Seite 56 ’ s W a t C h C h r o n o g r a p h Il suo orologio IWC le indica l’ora in ore, minuti e secondi nonché la data e il giorno della settimana. Il cronografo integrato le consente di misurare ogni intervallo di tempo fino a 12 ore in secondi, minuti e ore nonché...
  • Seite 57 — 5 7 — Lancetta delle ore Lancetta dei minuti Lancetta dei minuti cronografici Piccola lancetta dei secondi Lancetta delle ore Datario cronografiche Indicazione del giorno Corona a vite della settimana Pulsante start-stop Lancetta dei secondi Pulsante di azzeramento cronografici p i l o t ’...
  • Seite 58 — 5 8 — l e F u n z i o n i d e l l a C o r o n a Posizione normale (avvitata) X — Posizione di carica 0 — Regolazione della data e del giorno della settimana 1 —...
  • Seite 59 — 5 9 — l a p o s i z i o n e d i C a r i C a Nella posizione di carica (0) lei può caricare il movimento auto- matico anche manualmente. Per avviare il movimento sono sufficienti poche rotazioni della corona.
  • Seite 60 — 6 0 — l a r e g o l a z i o n e d e l l ’ o r a Estragga la corona portandola in posizione 2. In questo modo bloccherà il movimento. Per una regolazione precisa al secondo è consigliabile bloccare il movimento quando la lancetta dei secon- di si trova su 60.
  • Seite 61 — 6 1 — l a C o r r e t t a r e g o l a z i o n e d e l s u o o r o l o g i o Per una corretta regolazione del suo orologio proceda come segue: –...
  • Seite 62 — 6 2 — mente sul trattino che indica i minuti. Questo procedimento assicura l’immediato avvio della lancetta dei minuti al momento dell’azionamento del movimento. – Per avviare il movimento, prema la corona riportandola in posi- zione 0. – Ora prema la corona riportandola in posizione X e la blocchi ruotandola contemporaneamente verso destra.
  • Seite 63 — 6 3 — l a l e t t u r a d e l C r o n o g r a F o Lancetta dei secondi cronografici: sul bordo del quadrante è riportata la scala di riferimento per la lancetta centrale dei secondi cronografici.
  • Seite 64 6 millimetri secondo necessità e in modo molto semplice. Per allungare il bracciale prema il tasto con il logo IWC ed estragga leggermente il bracciale. Per accorciarlo, spinga una verso l’altra le due metà del bracciale ai lati della fibbia senza azionare il tasto.
  • Seite 65 — 6 5 — l a s e p a r a z i o n e d e l B r a C C i a l e Apra la fibbia déployante facendo pressione sui tasti laterali. Di- stenda il bracciale con il lato superiore appoggiato su un supporto rigido.
  • Seite 66 — 6 6 — Le consigliamo quanto segue: di norma la circonferenza del polso aumenta nel corso della giornata a dipendenza della tem- peratura e dello sforzo fisico. Prima di estrarre le singole maglie, le consigliamo di provare ad adeguare la regolazione di precisione sulla fibbia tenendola chiusa (al mattino) o aperta (alla sera).
  • Seite 67 — 6 7 — l ’ e s t r a z i o n e d i s i n g o l e M a g l i e e l a r i C o n g i u n z i o n e d e l B r a C C i a l e Ripeta le operazioni da 1 a 3 alla distanza precedentemente sta- bilita dal primo punto di giunzione.
  • Seite 68 — 6 8 — l ’ i M p e r M e a B i l i t À I dati sull’impermeabilità degli orologi IWC sono indicati in bar e non in metri. Sebbene sia spesso utilizzata nell’industria orologie- ra, l’indicazione in metri può...
  • Seite 69 Le consigliamo pertanto di far eseguire un servizio di manutenzione al suo orologio circa ogni cinque anni. A tale scopo potrà rivolgersi a un rivenditore IWC autorizzato (Official Agent) o direttamente al servizio clienti di IWC a Schaffhausen.
  • Seite 71 Un hermoso ejemplo de esta tradición de IWC es ahora suyo. Reciba nuestra más cordial enhorabuena y nuestros mejores deseos de que pase con su reloj un tiempo que quizás no se pueda describir...
  • Seite 72 C r o n Ó g r a F o Su reloj IWC le señalará el tiempo en horas, minutos y segun- dos, así como la fecha y el día de la semana. Con el cronógrafo integrado, usted podrá...
  • Seite 73 — 7 3 — Aguja de las horas Totalizador de los minutos Minutero Totalizador de las horas Pequeño segundero Corona atornillada Indicación de la fecha Pulsador de marcha- Indicación del día -parada de la semana Pulsador de puesta a cero Aguja de parada del segundero r e l o j d e a v i a d o r C r o n Ó...
  • Seite 74 — 7 4 — l a s F u n C i o n e s d e l a C o r o n a Posición normal (atornillada) X — Posición para dar cuerda 0 — Ajuste de la fecha y del día de la semana 1 —...
  • Seite 75 — 7 5 — l a p o s i C i Ó n p a r a d a r C u e r d a En la posición para dar cuerda (0) puede darse cuerda al movimiento automático también a mano. Para poner en marcha el movimiento bastan unas pocas vueltas a la corona.
  • Seite 76 — 7 6 — e l a j u s t e d e l a h o r a Tire de la corona hasta la posición 2. Así se detiene el movi- miento. Para una puesta en hora al segundo exacto, es conve- niente que el movimiento se detenga cuando el segundero pasa por el 60.
  • Seite 77 — 7 7 — e l a j u s t e C o r r e C t o d e s u r e l o j Para el ajuste correcto de su reloj, proceda de la siguiente manera: –...
  • Seite 78 — 7 8 — mente hacia atrás, posicione finalmente el minutero exacta- mente sobre la marca del minuto correspondiente. Proce- diendo de esta forma, se asegurará que, al ponerse en marcha el movimiento, el minutero avance sin retraso alguno. – Para poner en marcha el movimiento, vuelva a introducir la corona en la posición 0.
  • Seite 79 — 7 9 — l a l e C t u r a d e l C r o n Ó g r a F o Aguja de parada del segundero: en el borde de la esfera se encuentra la graduación para la aguja central de parada del segundero.
  • Seite 80 6 milímetros. Para alargar el bra- zalete, presione hacia abajo el pulsador con el logotipo IWC y separe levemente el brazalete. Para acortar el brazalete, comprí- malo en la zona del cierre, sin presionar el pulsador.
  • Seite 81 — 8 1 — l a d i v i s i Ó n d e l B r a z a l e t e Abra el cierre desplegable apretando los pulsadores latera- les. Coloque el brazalete sobre una base firme con su parte exterior hacia abajo.
  • Seite 82 — 8 2 — Tenga en cuenta la siguiente recomendación: por lo general, el tamaño de su muñeca aumenta durante el día, dependiendo de la temperatura y del esfuerzo físico. Antes de extraer los eslabones individuales del brazalete debería, dependiendo de la hora del día, mantener el ajuste de precisión del cierre cerrado (mañana) o abierto (tarde).
  • Seite 83 — 8 3 — l a e X t r a C C i Ó n d e e s l a B o n e s y e l e n g a n C h e d e l B r a z a l e t e Repita los pasos 1 a 3 con la distancia recién determinada desde el primer punto de separación.
  • Seite 84 M e t i C i d a d a l a g u a Los datos de la hermeticidad al agua en los relojes IWC se ex- presan en bar y no en metros. Los datos en metros, que fre-...
  • Seite 85 — 8 5 — Recomendación: tras cada apertura y servicio de su reloj IWC, su concesionario autorizado por IWC (Official Agent) de- berá siempre llevar a cabo nuevamente una comprobación de la hermeticidad al agua. a d v e r t e n C i a La piel es un material natural y permeable.
  • Seite 86 Por eso, le recomendamos que haga revisar su reloj aproximadamente cada cinco años. Diríjase para ello a un concesionario autoriza- do por IWC (Official Agent) o directamente al Servicio Posventa de IWC en Schaffhausen. Estado: noviembre de 2011.
  • Seite 89 Um belo e novo exemplo desta tradição da IWC está agora na sua posse: por isso, gostaríamos de o felicitar cordialmente, exprimindo os nossos melhores dese- jos para um bom tempo em companhia do seu relógio que talvez...
  • Seite 90 Ó g i o a v i a d o r C r o n Ó g r a F o O seu relógio IWC indica-lhe o tempo em horas, minutos, segun- dos, a data e, também, o dia da semana. Com o cronógrafo in- tegrado, pode medir qualquer espaço de tempo até...
  • Seite 91 — 9 1 — Ponteiro das horas Contador dos minutos Ponteiro dos minutos Contador das horas Pequeno ponteiro Coroa de rosca dos segundos Botão de arranque/ Indicação da data paragem Indicação do dia Botão de reposição da semana a zero Ponteiro de paragem dos segundos r e l Ó...
  • Seite 92 — 9 2 — a s F u n ç õ e s d a C o r o a Posição normal (enroscada) X — Posição para dar corda 0 — Acerto da data e do dia da semana 1 — Acerto do tempo 2 —...
  • Seite 93 — 9 3 — a p o s i ç ã o p a r a d a r C o r d a Na posição para dar corda (0), também pode dar corda ma- nualmente ao movimento automático. Para pôr a funcionar o movimento, basta rodar a coroa algumas voltas.
  • Seite 94 — 9 4 — o a C e r t o d o t e M p o Puxe a coroa para a posição 2. Desta maneira, faz parar o movi- mento. Para proceder a um acerto com uma precisão de segun- dos, é...
  • Seite 95 — 9 5 — o a C e r t o C o r r e C t o d o r e l Ó g i o Para acertar correctamente o seu relógio, proceda da maneira seguinte: – Destrave a coroa, rodando-a para a esquerda. –...
  • Seite 96 — 9 6 — Este procedimento garante que, no momento em que iniciar o movimento, o ponteiro dos minutos continua a mover-se sem causar um atraso. – Para fazer arrancar a indicação das horas, empurre a coroa novamente para a posição 0. –...
  • Seite 97 — 9 7 — a l e i t u r a d o C r o n Ó g r a F o Ponteiro de paragem dos segundos: À volta do mostrador encontra-se a divisão para o ponteiro central de paragem dos segundos.
  • Seite 98 6 milímetros. Para um aumento do comprimento, basta premir a tecla com o logótipo da IWC e puxar um pouco a bracelete. Para uma redução, deve encolher-se um pouco a bracelete empurran- do contra o fecho sem carregar na tecla.
  • Seite 99 — 9 9 — a s e p a r a ç ã o d a B r a C e l e t e Abra o fecho de engate premindo as teclas laterais. Coloque a bracelete em cima de uma base firme, com o lado exterior virado para baixo.
  • Seite 100 — 1 0 0 — Preste atenção à seguinte recomendação: Em regra, o tama- nho do seu pulso aumenta durante o dia consoante a temperatu- ra e o esforço físico. Antes de remover elos individuais e confor- me a hora do dia, deverá manter o ajuste fino do fecho fechado (de manhã) ou aberto (à...
  • Seite 101 — 1 0 1 — a r e M o ç ã o d e e l o s i n d i v i d u a i s e a l i g a ç ã o d a B r a C e l e t e Repita os passos 1 a 3 respeitando a distância acima determina- da a partir do primeiro ponto de separação.
  • Seite 102 Para garantir um funcionamento perfeito do seu relógio, este de- verá ser examinado, pelo menos, uma vez por ano num posto de assistência técnica da IWC. Um tal exame terá de ser reali- zado igualmente após situações em que o relógio foi exposto a esforços extraordinários.
  • Seite 103 — 1 0 3 — Recomendação: Depois de cada abertura e assistência do seu relógio IWC, o seu concessionário IWC oficial e autorizado (Of- ficial Agent) terá de efectuar novamente um teste de resistência à água. n o t a A pele é...
  • Seite 104 Para isso, dirija-se a um concessionário IWC oficial e autorizado (Official Agent) ou directamente aos Ser- viços de Atendimento a Clientes da IWC em Schaffhausen. Edição: Novembro de 2011.
  • Seite 106 Fax +41 (0)52 635 65 01 info@iwc.com www.iwc.com © Copyright 2011 IWC Schaffhausen, Branch of Richemont International SA Printed in Switzerland F l i e g e r u h r C h r o n o g r a p h...