Fimer SYMPLEX 320 Bedienungsanleitung
Inhaltsverzeichnis
Inhaltsverzeichnis

Verwandte Anleitungen für Fimer SYMPLEX 320


Inhaltszusammenfassung für Fimer SYMPLEX 320
- Seite 1 INSTRUCTION MANUAL Bedienungsanleitung SYMPLEX 320 SYMPLEX 420 Ed. 2015_05_28 910.100.512 REV00...
- Seite 2 It is user’s responsibility to keep it intact and in good conditions. The manufacturer has the right to apply modifies in every moment or without any forewarning. Every Fimer product is minded, designed and produced in Italy in our sites. This is guarantee of high quality and reliability.
- Seite 3 SYMPLEX 320 SYMPLEX 420 VIMERCATE 21.04.2015...
- Seite 4 Our production, assistance and training site is exclusively on Italian region and we can praise a 100% MADE IN ITALY. In addition, Fimer has inside a complete chain thanks to an efficient and high quality carpentry department, lines of electronic boards and testing/assembly department which make possible to create the entire product.
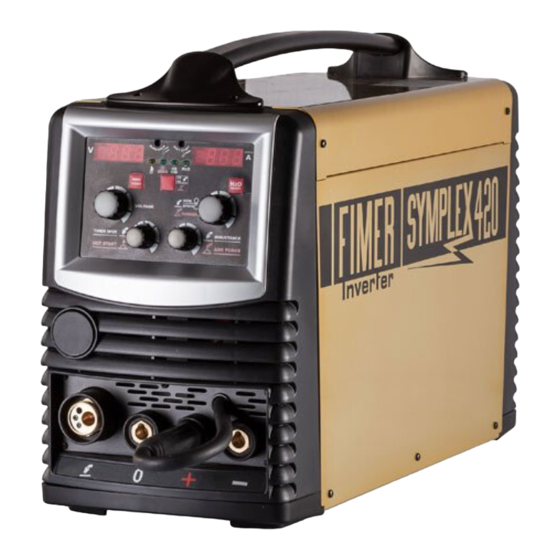
- Seite 6 SYMPLEX 320 SYMPLEX 420 5T5.321.152 5T5.421.152 MIG-MAG / MMA 3PH MIG-MAG / MMA 3PH 15 - 320 A (MIG-MAG) 15 - 400 A (MIG-MAG) 15 - 300 A (MMA) 15 - 370 A (MMA) Weight Weight 19.8 kg 21.3 kg...
-
Seite 7: Safety Warnings
DANGER EXPLOSIONE RISK DANGER Indicating the risk of explosion in the event of improper handling (Indicating a hazard that could cause injury or damage) or maintenance of compressed gas cylinders or regulators ELECTRIC SHOCK FIRE (Indicating the danger of electric shock) PRECAUTIONS IMPORTANT INFORMATION DANGER... - Seite 8 SPARE PARTS OVERLOAD PROTECTION Use only manufacturer-recommended spare parts. Check that the power source supplying the Welder carries the Other spare parts could cause equipment mal- correct voltage and is safety-protected. The power switch must open all the function. The use of non-original spare parts will also result in the war- ranty provisions becoming null and void, releasing the manufacturer power supply circuits.
-
Seite 9: Electromagnetic Compatibility
DAMAGED GAS CYLINDERS WALL AND FLOOR PROTECTION NEVER use damaged or faulty cylinders. The walls and flooring surrounding the welding CYLINDER RELOCATION environment must be shielded using non-flammable materials. This not only reduces the risk of fire but also avoids damage to the wal- NEVER lift a gas cylinder by holding the regulator. - Seite 12 DL17 POT4 POT3 Wire speed Welding Soft Start Burn Back Tacking time Inductance (m/min) voltage (V) (m/min) Time (ms) Chart 1: parameters Simplex320 – Simplex420 in MIG Simplex 320 - 420 Simplex320 Simplex420 welding current (A) welding current (A) Hot Start (%) Arc Force (%) Chart 2: parameters Simplex320 –...
- Seite 17 Torch side: remove the gas nozzle Unscrew the wire guide tip (B) Connector side (C) Unscrew the termination nut (D,E) Complete the sheath extraction (F) Grab the sheath end by a nipper and start to extract it (F) Insert the new sheath and push it Screw in again the wire guide tip on Complete the replacement of the deep inside (G)
- Seite 19 Unscrew the knob placed at the cen- Eventually remove the spacer depend- Remove the plastic protection of new ter of the welding wire roll. ing on the roll’s dimensions.. roll and place it on the defined support. Re-assemble the knob. Pay attention to the hex (M8) placed Unscrew the knobs of the wire in the center of roll support which is...
- Seite 21 Torch Trigger...
- Seite 22 Torch Torch Trigger Trigger...
- Seite 32 Exponenten des Marktes gebracht. Unsere Produktion, Ausbildung und Betreuung befindet sich ausschließlich auf dem italienischen Gebiet und wir können eine Produktion 100% MADE IN ITALY rühmen. Fimer hat auch eine vollständige Produktionskette, dankt einer effizienten, sehr technologischen Zimmereiabteilung, der zwei Produktionslinien von Platinen und der Montage- sowie Prüfungsabteilung ist es möglich das komplette Produkt innerhalb der Struktur, zu schaffen.
- Seite 34 SYMPLEX 320 SYMPLEX 420 5T5.321.152 5T5.421.152 MIG-MAG / MMA 3PH MIG-MAG / MMA 3PH 15 - 320 A (MIG-MAG) 15 - 400 A (MIG-MAG) 15 - 300 A (MMA) 15 - 370 A (MMA) Gewicht Gewicht 19.8 kg 21.3 kg...
-
Seite 35: In Bezug Auf Die Sicherheit Des Geräts
Personal dur- Bezug auf die laufende Tätigkeit entsprechend geschult werden müssen. chgeführt werden, das von Fimer S.p.A. entsprechend geschult wurde. Fimer SpA lehnt jede Haftung für Schäden an Personen oder EINFÜHREN VON GEGENSTÄNDEN Dingen ab, die aus einem unerfahrenen, unsachgemäßen oder Führen Sie keine Gegenstände in die Lüftungsschlitze... -
Seite 36: Warnhinweise In Bezug Auf Die Sicherheit Des Schweissverfahrens
Vorsichtsmaßnahmen genau befolgt wer- steller oder an ein ermächtigtes Kundendienstzentrum. Jeder nicht sch- riftlich genehmigte und nicht direkt von Fimer geleitete Reparaturversu- den. Das Schweißverfahren macht das Erzielen hoher Tempe- ch bedingt – außer dass er objektiv gefährlich ist – den sofortigen Ver- raturen erforderlich, folglich existiert ein konkretes Brandrisiko. -
Seite 37: Elektrische Entladungen
Verwenden Sie NIE Gas aus Flaschen, die kein Etikett haben. 3. Legen Sie zwischen die Schweißmaschine und die Stromleitung EMV- DRUCKREDUZIERER 1 Filter (setzen Sie sich dazu mit der technischen Abteilung von Fimer Schließen Sie NIE die Flasche direkt an die Schweißma- in Verbindung) schine an. - Seite 40 DL17 POT4 POT3 Draht- SCHWEISSS- Soft Start Zeit Burn Back geschwindigkeit PANNUNG Punktzeit (s) Induktanz (m/min) (ms) m/min) Tabelle 1: Parameter Simplex320 - Simplex420 in MIG Simplex 320 - 420 Simplex320 Simplex420 Schweißstrom (A) Schweißstrom (A) Hot Start (%) Arc Force (%) Tabelle 2: Parameter Simplex320 - Simplex420 in MMA...
- Seite 45 Brennerseite: die Gasdüse ab- Die Drahtführung losschrauben Verbinderseite (C) schrauben (A) Mutter des Endstücks losschrauben Die Ummantelung vollständig her- das Ende der Ummantelung mit (D,E) ausziehen (F) einer Zange greifen und beginnen es herauszuziehen (F) Die neue Ummantelung einfügen Die Drahtführung wieder auf den Beim Anschrauben der Gasdüse und ganz hineinschieben (G) Brenner aufschrauben (B)
- Seite 47 den Knopf in der Mitte der Drahtspu- gegebenenfalls das Distanzstück gemäß den Kunststoffschutz der neuen lenaufnahme abschrauben der Spulenabmessung entfernen Spulen entfernen und die Spulen auf der Aufnahme befestigen. den Knopf schrauben die Allen (M8) in der Mitte der Spu- die Knöpfe des Drahtvorschubgerätes lenaufnahme Drahtkupplung...
- Seite 49 Brennertaste...
- Seite 50 Brenner- Brennertaste taste...
- Seite 63 Dieses Produkt beinhaltet elektrische oder elektronische Materialien. Der Hersteller als Hersteller von elektrischen und elektronischen Komponenten befolgt die euro- päische Richtlinie 2012/19/UE nach dem italienischen DLGS 14. März 2014 Nr. 49. Die Präsenz dieser Materialien konnte negativ die Umwelt beeinflussen, wenn diese nicht richtig entsorgt werden.
-
Seite 64: Technical Assistance
+39-039-6079326 PHONE +39-039-6079326 +39-039-6079334 TECHNICAL ASSISTANCE: service.welding@fimer.com MONDAY TO FRIDAY 09.00 - 12.30 15.30 - 17.00 Via J.F. Kennedy - 20871 Vimercate (MB) Italy Phone: +39 039 98981 Fax +39 039 6079334 www.fimer.com info@fimer.com...