Electrolux EON1000 Benutzerhandbuch

Verwandte Anleitungen für Electrolux EON1000

Inhaltszusammenfassung für Electrolux EON1000
- Seite 1 ..................... EON1000 EN OVEN USER MANUAL DE BACKOFEN BENUTZERINFORMATION...
- Seite 19 11. UMWELTTIPPS ............37 WIR DENKEN AN SIE Vielen Dank, dass Sie sich für ein Electrolux Gerät entschieden haben. Sie haben ein Produkt gewählt, hinter dem eine jahrzehntelange professionelle Erfahrung und Innovation steht. Bei der Entwicklung dieses großartigen und eleganten Geräts haben wir an Sie gedacht.
-
Seite 20: Sicherheitsinformationen
20 www.electrolux.com 1. SICHERHEITSINFORMATIONEN Lesen Sie vor der Montage und Verwendung des Geräts sorgfältig die mitgelieferte Anleitung. Der Hersteller haftet nicht für Verletzungen oder Schäden, die durch eine feh- lerhafte Montage entstehen. Bewahren Sie die Anleitung zum Nachschlagen auf. 1.1 Sicherheit von Kindern und schutzbedürftigen... -
Seite 21: Benutzen Sie Keine Scheuermittel Oder Metall
DEUTSCH • Benutzen Sie zum Reinigen des Geräts keinen Dampf- reiniger. • Unterbrechen Sie vor Wartungsarbeiten die Stromver- sorgung. • Benutzen Sie keine Scheuermittel oder Metall- schwämmchen zum Reinigen der Ofenglastür; sie kön- nen die Glasfläche verkratzen und zum Zersplittern der Scheibe führen. - Seite 22 22 www.electrolux.com • Achten Sie darauf, dass das Netzkabel und der Töpfe wärmeisolierende Hand- die Gerätetür nicht berührt, insbeson- schuhe. dere wenn die Tür heiß ist. • Gehen Sie beim Öffnen der Tür vorsich- • Alle Teile, die gegen direktes Berühren tig vor, wenn das Gerät in Betrieb ist.
-
Seite 23: Innenbeleuchtung
DEUTSCH • Verwenden Sie für feuchte Kuchen die • Reinigen Sie die katalytische Emailbe- Brat- und Fettpfanne. Fruchtsäfte verur- schichtung (falls vorhanden) nicht mit sachen bleibende Flecken. Reinigungsmitteln. 2.3 Reinigung und Pflege 2.4 Innenbeleuchtung WARNUNG! • Die Leuchtmittel in diesem Gerät sind Risiko von Verletzungen, Brand nur für Haushaltsgeräte geeignet. -
Seite 24: Gerätebeschreibung
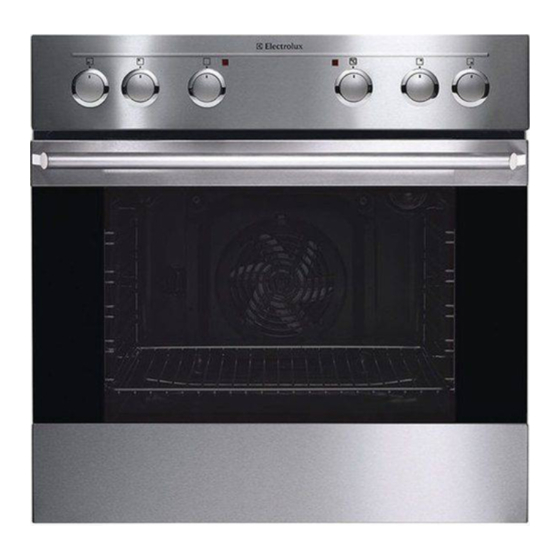
24 www.electrolux.com 3. GERÄTEBESCHREIBUNG Temperaturanzeige Kochzonen-Einstellknöpfe Grillelement Backofenlampe Einhängegitter, herausnehmbar Typenschild Einschubebenen 3.1 Backofenzubehör • Kombirost Für Geschirr, Kuchenformen, Braten. • Universalblech Betriebs-Kontrolllampe Für Kuchen und Plätzchen. Zum Ba- cken und Braten oder zum Auffangen Backofen-Einstellknopf von austretendem Fett. Temperaturwahlknopf 4. -
Seite 25: Backofen-Funktionen
DEUTSCH Die Temperatur-Kontrolllampe leuch- 5.1 Ein- und Ausschalten des tet, solange die Temperatur im Gerät Geräts ansteigt. Drehen Sie den Backofen-Einstell- Drehen Sie zum Ausschalten des Ge- knopf auf die gewünschte Backofen- räts den Backofen-Einstellknopf und funktion. den Temperaturwahlknopf in die Posi- tion Aus. -
Seite 26: Zusatzfunktionen
26 www.electrolux.com Drehen Sie den Einstellknopf auf die Zum Beenden des Kochvorgangs gewünschte Kochstufe. muss der Einstellknopf in die Position „Aus“ gedreht werden. 6. ZUSATZFUNKTIONEN fährlichen Überhitzung führen. Um dies zu 6.1 Kühlventilator verhindern, ist der Backofen mit einem Si- Wenn das Gerät in Betrieb ist, wird auto-... -
Seite 27: Back- Und Brattabelle
DEUTSCH Achten Sie beim Garen anfangs immer für Kochgeschirr, Rezepte und Mengen auf das Gargut. Finden Sie selbst die bes- bei der Verwendung dieses Geräts he- ten Einstellungen (Garstufe, Garzeit, usw.) raus. 7.4 Back- und Brattabelle KUCHEN Ober- und Unterhitze Garzeit Tempe- GERICHT... - Seite 28 28 www.electrolux.com BROT UND PIZZA Ober- und Unterhitze Garzeit Tempe- GERICHT Anmerkungen Einschub- [Min.] ratur ebene [°C] Weißbrot 60-70 1-2 Stück, 500 g pro Stück Roggenbrot 30-45 Brotform Pizza 230-250 10-20 Backblech oder Brat- und Fettpfan- Scones (Teege- 10-20 Backblech bäck)
- Seite 29 DEUTSCH Ober- und Unterhitze Garzeit Tempe- GERICHT Anmerkungen Einschub- [Min.] ratur ebene [°C] Roastbeef, eng- 70-75 Kombirost lisch, durchge- braten Schweineschul- 120-150 mit Schwarte Schweinshaxe 100-120 Zwei Hälften Lammfleisch 110-130 Keule Hähnchen 70-85 ganz Pute 210-240 ganz Ente 120-150 ganz Gans 150-200 ganz...
-
Seite 30: Reinigung Und Pflege
30 www.electrolux.com Menge Grillstufe 1 Garzeit [Min.] GERICHT Stü- Ein- Tem- 1. Seite 2. Seite schub- peratur ebene [°C] Spieße max. 10-15 10-12 Hähnchenbrust- max. 12-15 12-14 filet Hamburger max. 20-30 Fischfilet max. 12-14 10-12 Belegte Toast- max. brote Toast max. -
Seite 31: Einhängegitter
DEUTSCH 8.2 Einhängegitter Die Einhängegitter können zur Reinigung der Seitenwände entfernt werden. Abnehmen der Einhängegitter Ziehen Sie das vordere Ende des Ein- hängegitters von der Seitenwand weg. Ziehen Sie das hintere Ende des Ein- hängegitters von der Seitenwand weg, und nehmen Sie das Einhänge- gitter heraus. -
Seite 32: Reinigung Der Backofen-Tür
32 www.electrolux.com Reinigen Sie die Glasabdeckung. 8.4 Backofenlampe Ersetzen Sie die Backofenlampe WARNUNG! durch eine geeignete 300 °C hitzebe- Gehen Sie beim Austauschen der ständige Backofenlampe. Backofenlampe sorgsam vor. Es Verwenden Sie eine Ofenlampe mit besteht die Gefahr eines elektri- der gleichen Leistung. - Seite 33 DEUTSCH Heben Sie die Hebel an den beiden Scharnieren an und klappen Sie sie nach vorne. Schließen Sie die Backofentür bis zur ersten Raststellung (halb). Anschlie- ßend ziehen Sie sie nach vorn aus der Halterung heraus. Legen Sie die Backofentür auf einer ebenen Fläche auf ein weiches Tuch.
-
Seite 34: Einbau Der Backofentür Und Der Glasscheibe
34 www.electrolux.com Drehen Sie die 2 Befestigungsele- mente um 90° und nehmen Sie sie aus der Halterung. 90° Heben Sie die Glasscheibe vorsichtig an (Schritt 1) und entfernen Sie sie (Schritt 2). Reinigen Sie die Glasscheibe mit Wasser und Spülmittel Trocknen Sie die Glasscheibe sorgfältig ab. -
Seite 35: Montage
DEUTSCH Problem Mögliche Ursache Abhilfe Prüfen Sie die Sicherung. Die Sicherung im Siche- Falls die Sicherung öfter Das Gerät funktioniert rungskasten hat ausge- als einmal auslöst, wen- überhaupt nicht. löst. den Sie sich an eine Elektrofachkraft. Die Backofenlampe Die Backofenlampe ist Ersetzen Sie die Back- leuchtet nicht. -
Seite 36: Anschluss Der Klemmleiste
36 www.electrolux.com 10.4 Netzkabel Einsetzbare Kabeltypen für Einbau oder Austausch: H07 RN-F, H05 RN-F, H05 RRF, H05 VV-F, H05 V2V2-F (T90), H05 BB-F. Näheres zum Kabelquerschnitt siehe Ge- samtleistung auf dem Typenschild. 10.5 Anschluss der Klemmleiste Das Gerät ist mit einer 6-poligen Klemm- leiste ausgestattet. -
Seite 37: Umwelttipps
DEUTSCH 11. UMWELTTIPPS Recyceln Sie Materialien mit dem Symbol elektronische Geräte. Entsorgen Sie . Entsorgen Sie die Verpackung in den Geräte mit diesem Symbol nicht mit entsprechenden Recyclingbehältern. dem Hausmüll. Bringen Sie das Gerät zu Recyceln Sie zum Umwelt- und Ihrer örtlichen Sammelstelle oder wenden Gesundheitsschutz elektrische und Sie sich an Ihr Gemeindeamt. - Seite 38 38 www.electrolux.com...
- Seite 39 DEUTSCH...
- Seite 40 www.electrolux.com/shop...