Herunterladen Inhalt Inhalt Diese Seite drucken
Inhaltsverzeichnis

Werbung

Verfügbare Sprachen

Verfügbare Sprachen

Schnurlos Telefon
BDT700
Téléphone sans fil
Telefono senza fili
Cordless phone
Bedienungsanleitung
Mode d'emploi
Istruzioni per l'uso
Operating Instructions

Werbung

Inhaltsverzeichnis
loading

Inhaltszusammenfassung für switel BDT700

  • Seite 1 Schnurlos Telefon BDT700 Téléphone sans fil Telefono senza fili Cordless phone Bedienungsanleitung Mode d’emploi Istruzioni per l'uso Operating Instructions...
  • Seite 2 BDT700 Bedienungsanleitung _______________ 1 Die Displayanzeigen sind in den Sprachen Deutsch, Französisch, Englisch und Italienisch einstellbar. Siehe dazu Kapitel 3.7. Mode d’emploi ___________________ 35 Les messages peuvent être affichés à l’écran en allemand, en français, en anglais et en italien. Voir à cet effet le chapitre 3.7.
  • Seite 3: Inhaltsverzeichnis

    - Inhaltsverzeichnis - Allgemeine Hinweise................... 5 Bedienelemente ................... 7 Inbetriebnahme.................... 8 Sicherheitshinweise ....................8 Verpackungsinhalt prüfen ..................8 Basisstation anschließen ...................8 Standard-Akkus einbauen..................8 Aufladen der Standard-Akkus ..................9 TON (MFV)- oder IMPULS (IWV) - Wahlverfahren ............9 Displaysprache einstellen ..................9 Bedienung ....................10 Das Display ......................10 Anrufe entgegennehmen ..................11 Anrufe führen ......................11 Freisprechen ......................11...
  • Seite 4 - Inhaltsverzeichnis - Sonderfunktionen ..................22 Rufsignale am Handapparat einstellen (Klingelmelodien) ........22 Lautstärke des Tonrufs am Handapparat..............23 Rufsignale an der Basisstation einstellen (Klingelmelodien)........23 Lautstärke des Tonrufs an der Basisstation ............23 Anrufe automatisch entgegennehmen ..............24 Ton (MFV)- oder Impuls (IWV) - Wahlverfahren ............. 24 Displaynamen ändern .....................
  • Seite 5: Allgemeine Hinweise

    - Allgemeine Hinweise - Allgemeine Hinweise Aufladbare Batterien Keine anderen aufladbaren Batterien oder Akkupacks verwenden. Diese können möglicherweise einen Kurzschluss verursachen. Verwenden Sie beim Austauschen immer nur wiederaufladbare Batterien des Typs AAA 1,2 Volt, 550mA. Batterien nicht ins Feuer werfen oder ins Wasser tauchen. Alte oder defekte Batterien nicht mit dem normalen Hausmüll entsorgen.
  • Seite 6 - Allgemeine Hinweise - Temperatur und Umgebungsbedingungen Das Telefon ist für den Betrieb in geschützten Räumen mit einem Temperaturbereich von 10 °C bis 30 °C ausgelegt. Die Basisstation darf nicht in Feuchträumen wie Bad oder Waschküche aufgestellt werden. Vermeiden Sie die Nähe zu Wärmequellen wie Heizkörpern und setzen Sie das Gerät keiner direkten Sonnenbestrahlung aus.
  • Seite 7: Bedienelemente

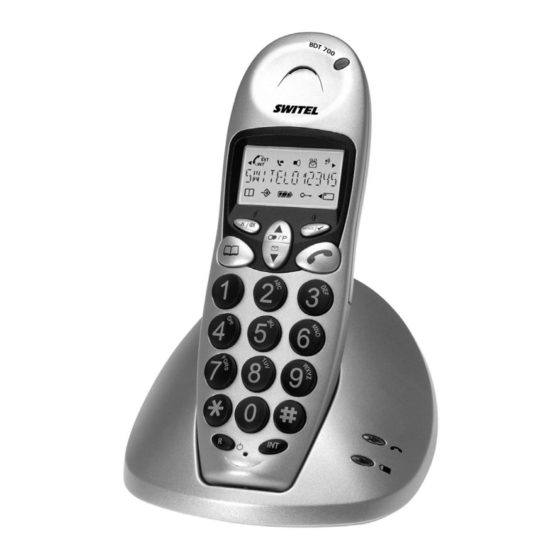
    - Bedienelemente - Bedienelemente Handapparat Gesprächsanzeige Auswahltaste/Wahlwiederholung Menü-Taste Gesprächstaste Auswahltaste/Anruferliste CLIP Interne Gespräche R-Signaltaste Telefonbuch/Menü verlassen Stumm/Löschtaste Freisprechen Basisstation BDT700 PAGE-Taste Gesprächs- und Netzanzeige Ladekontrollleuchte...
  • Seite 8: Inbetriebnahme

    - Inbetriebnahme - Inbetriebnahme Sicherheitshinweise ACHTUNG! Lesen Sie vor der Inbetriebnahme unbedingt die Sicherheitshinweise am Anfang dieser Bedienungsanleitung. Verpackungsinhalt prüfen Zum Lieferumfang gehören: eine Basisstation ein Stromanschlusskabel ein Handapparat zwei Standard-Akkus ein Telefonanschlusskabel eine Bedienungsanleitung Basisstation anschließen Stellen Sie das Telefon in der Nähe Ihrer Telefonanschlussdose und einer Netzsteckdose auf.
  • Seite 9: Aufladen Der Standard-Akkus

    - Inbetriebnahme - Aufladen der Standard-Akkus Die wiederaufladbaren Standard-Akkus Ihres Telefons besitzen eine Standby-Zeit bei Zimmertemperatur von max. 100 Stunden und eine maximale Gesprächsdauer von bis zu 10 Stunden. Die aktuelle Batteriekapazität wird im Display angezeigt: Voll Halb Schwach Ist die Batteriekapazität zu gering, blinkt das Symbol im Display, und Sie hören alle 60 Sekunden Warntöne.
  • Seite 10: Bedienung

    - Bedienung - Bedienung Das Display Im normalen Betriebszustand zeigt das Display den Namen des Handapparates an. Der voreingestellte Name kann jederzeit geändert werden. Siehe dazu 8.7. Das Display zeigt Ihnen weiterhin alle wichtigen Funktionen mit verschiedenen Symbolen an. Konstant: Sie führen ein Gespräch. Konstant: Freisprechen ist eingeschaltet.
  • Seite 11: Anrufe Entgegennehmen

    - Bedienung - Anrufe entgegennehmen Erreicht Sie ein Anruf, ertönt der Tonruf am Handapparat und an der Basisstation. Wegen der Funkübertragung klingelt der Handapparat etwas später als die Basisstation. Im Display blinkt die Anzeige EXT. Drücken Sie die Gesprächstaste am Handapparat und die Verbindung wird hergestellt.
  • Seite 12: Gespeicherte Rufnummern Aus Dem Telefonbuch Anwählen

    - Bedienung - Gespeicherte Rufnummern aus dem Telefonbuch anwählen Nachdem Sie einige Telefonnummern gespeichert haben, können Sie diese sehr schnell und einfach abrufen. Telefonbuchtaste drücken. Das Display zeigt nun die erste gespeicherte Telefonnummer in alphabetischer Reihenfolge. Mit den Tasten können Sie nun alle gespeicherten Rufnummern anwählen. Um eine Rufnummer direkt alphabetisch anzuwählen, drücken Sie den entsprechenden Buchstaben.
  • Seite 13: Mikrofon Im Handapparat Stummschalten

    - Bedienung - Mikrofon im Handapparat stummschalten Mit der Taste können Sie während eines Telefongespräches das Mikrofon des Handapparates abschalten. So ist es möglich zu sprechen, ohne dass der Gesprächspartner Sie hört. Der Lautsprecher im Handapparat bleibt eingeschaltet, und Sie können den Gesprächspartner weiterhin verstehen.
  • Seite 14: Tastatursperre

    - Bedienung - Alle Rufnummern der Wahlwiederholung löschen Um alle Rufnummern der Wahlwiederholung zu löschen, gehen Sie wie folgt vor: 1. Drücken Sie die Taste 2. Halten Sie die Taste solange gedrückt, bis das Display die Anzeige ALL LOESCH? erscheint. 3.
  • Seite 15: Das Telefonbuch

    - Telefonbuch - Das Telefonbuch In das Telefonbuch können 30 Rufnummern inklusive eines Namens gespeichert werden. Die maximale Länge einer Rufnummer beträgt 20 Stellen. Rufnummern in das Telefonbuch eingeben Menütaste drücken. Das Display zeigt die Meldung TELEFONBUCH. Drücken Sie erneut die Taste .
  • Seite 16: Gespeicherte Rufnummern Im Telefonbuch Ändern

    - Telefonbuch - Erklärung der Namenseingabe Zur Eingabe des Namens sind die Zahlentasten mit Buchstaben beschriftet. Durch mehrmaliges Drücken der entsprechenden Taste können Grossbuchstaben sowie Zahlen eingegeben werden. Beispiel: Sie möchten den Namen "Peter" eingeben. Drücken Sie: 1 x Taste 7, 2 x Taste 3, 1 x Taste 8, 2 x Taste 3, 3 x Taste 7 - Um ein Leerzeichen einzugeben, drücken Sie einmal die Taste - Durch zweimaliges Drücken der Taste kann ein Bindestrich eingegeben werden.
  • Seite 17: Gespeicherte Rufnummern Aus Dem Telefonbuch Löschen

    - Telefonbuch - Gespeicherte Rufnummern aus dem Telefonbuch löschen Menütaste drücken. Das Display zeigt TELEFONBUCH. Drücken Sie erneut die Taste . Das Display zeigt EINGABE. Drücken Sie nun die Taste . Das Display zeigt LOESCHEN. Bestätigen Sie mit der Menütaste Wählen Sie jetzt über die Tasten die Rufnummer aus, die Sie löschen möchten.
  • Seite 18: Rufnummernanzeige Clip

    - Rufnummernanzeige CLIP - Rufnummernanzeige (CLIP) In der Schweiz ist diese Funktion nicht bei jedem Netzanbieter verfügbar. Achtung! Die Rufnummernanzeige ist ein optionaler Service Ihres Telefonproviders. Ihr Telefon zeigt die Rufnummern im Display, wenn Ihr Telefonprovider diesen Service anbietet. Die Anzeige des Datums und der Uhrzeit wird nicht von allen Telefonprovidern übertragen.
  • Seite 19: Die Anruferliste

    - Rufnummernanzeige CLIP - Die Anruferliste Um die Rufnummern der Anruferliste im Display zu sehen, gehen Sie bitte wie folgt vor: Drücken Sie die Taste und die zuletzt empfangene Rufnummer wird im Display angezeigt. Ist die Anruferliste leer, zeigt das Display die Meldung LEER. Mit den Tasten können nun weitere Rufnummern der Anruferliste angewählt werden.
  • Seite 20: Einzelne Rufnummer Aus Der Anruferliste Löschen

    - Rufnummernanzeige CLIP - Bestätigen Sie wieder mit der Menütaste . Das Display zeigt die Meldung MELODIE 1 - 3. Wählen Sie nun über die Auswahltasten , welche Melodie Sie dieser Rufnummer zuordnen möchten. Bestätigen Sie wieder mit der Menütaste und die Rufnummer ist im Telefonbuch gespeichert.
  • Seite 21: Nebenstellenanlagen

    - Nebenstellenanlagen - Nebenstellenanlagen Haben Sie Ihr Telefon mit einer Nebenstellenanlage verbunden, können Sie alle Möglichkeiten, wie z.B. Anrufe weiterleiten, automatischen Rückruf usw. nutzen. Die „R“ Signaltaste verschafft Ihnen den Zugang zu diesen Möglichkeiten. An einer Nebenstellenanlage wird die FLASH-Zeit "90ms" (FLASH 1, Werkseinstellung) oder „250ms“...
  • Seite 22: Sonderfunktionen

    - Sonderfunktionen - Sonderfunktionen Alle weiteren Programmierfunktionen sind über ein sehr benutzerfreundliches Menü zu erreichen. Hier einen kleine allgemeine Anleitung, wie Sie sich im Menü zurechtfinden können: Mit der Taste wird die Programmierung gestartet. Während der Programmierung leuchtet die Anzeige im Display.
  • Seite 23: Lautstärke Des Tonrufs Am Handapparat

    - Sonderfunktionen - Lautstärke des Tonrufs am Handapparat Die Lautstärke des Tonrufs am Handapparat kann in drei Stufen eingestellt werden. Möchten Sie einmal nicht gestört werden, können Sie den Tonruf auch ganz abschalten. Ist der Tonruf ausgeschaltet, werden eingehende Anrufe nur noch an der Basisstation und über das Display am Handapparat signalisiert.
  • Seite 24: Anrufe Automatisch Entgegennehmen

    Taste Displaynamen ändern Im normalen Betrieb erscheint im Display die Anzeige „BDT700“. Haben Sie mehrere Handapparate an einer Basisstation angemeldet, kann es nützlich sein, jedem Handapparat einen eigenen Namen zu geben. Die Nummer hinter dem Namen zeigt, mit welcher Nummer der Handapparat intern zu erreichen ist.
  • Seite 25: Hinweistöne Ein-/Ausschalten

    - Sonderfunktionen - Hinweistöne ein-/ausschalten Hier können verschiedene Warntöne ein- oder ausgeschaltet werden. Tastenklick: Jeder Tastendruck wird vom Handapparat mit einem Tastenklick bestätigt. Der Tastenklick kann ein- oder ausgeschaltet werden. Warnton bei zu geringer Batteriekapazität: Bei zu geringer Batteriekapazität erinnert Sie ein Warnton, dass Sie den Handapparat laden müssen.
  • Seite 26: Displaysprache Einstellen

    Mit dieser Funktion werden der Handapparat und die Basisstation wieder auf die Werkseinstellungen zurückgesetzt. Das Telefonbuch, die Anruferliste (CLIP) und alle Rufnummern der Wahlwiederholung werden gelöscht. Werkseinstellungen: Sprache: Deutsch Name Handapparat: BDT700 Warnton Batterie: Ein Automatische Rufannahme ein Warnton Reichweite: Ein Tonrufmelodie extern: 3...
  • Seite 27 - Sonderfunktionen - Drücken Sie die Menütaste das Menü SET UP wählen und mit bestätigen. die Funktion VOREINSTELLG wählen und mit bestätigen. Über das Zahlenfeld den PIN Code eingeben (Werkseinstellung 0000) und mit bestätigen. Es erscheint die Displaymeldung BESTAETIGEN?. Bestätigen Sie mit der Menütaste Nach kurzer Zeit sind die Werkseinstellungen wieder hergestellt.
  • Seite 28: Menüstruktur

    - Sonderfunktionen - 8.13 Menüstruktur Telefonbuch Eingabe Loeschen Bearbeiten Set Up Basis Laut Lautst 1, 2, 3, Stumm Basis Melodi Melodie 1, 2, 3 Handset ABM Handset ? PIN ? Pin Code PIN ? Neue Pin Wiederh Wahlverf _ DTMF Wahl IMPULS Wahl Rueckfrage Flash 1...
  • Seite 29: Mehrere Handapparate

    Mehrere Handapparate Es kann ein weiterer Handapparat an Ihre Basisstation angemeldet werden. Hinweis: Über den international genormten GAP Standard können SWITEL und auch Handapparate von Fremdherstellern in das Telefonsystem integriert werden. Genauso können Sie einen SWITEL Handapparat an Basisstationen anderer Hersteller anschließen, sofern diese Geräte mit dem GAP Standard arbeiten.
  • Seite 30: An- Und Abmelden Von Handapparaten

    - Mehrere Handapparate - An- und abmelden von Handapparaten 9.3.1 Anmelden von Handapparaten Halten Sie die Pagetaste der Basisstation für 6 Sekunden gedrückt, bis Sie zwei Signaltöne hören. Melden Sie den neuen Handapparat nun innerhalb von 90 Sekunden an die Basisstation an. Drücken Sie die Taste am Handapparat.
  • Seite 31: Abmelden Von Handapparaten

    - Mehrere Handapparate - 9.3.3 Abmelden von Handapparaten Ein Handapparat kann nur über einen anderen, noch angemeldeten Handapparat abgemeldet werden. Es ist also nicht möglich diese Abmeldung mit dem Handapparat durchzuführen, der abgemeldet werden soll. Drücken Sie die Taste am Handapparat. das Menü...
  • Seite 32: Fehlerbeseitigung

    - Fehlerbeseitigung - 10 Fehlerbeseitigung Haben Sie Probleme mit Ihrem Telefon, kontrollieren Sie bitte die folgenden Hinweise. Bei Garantieansprüchen wenden Sie sich bitte an Ihren Fachhändler. Die Garantiezeit beträgt 2 Jahre. Für die wiederaufladbaren Batterien gilt eine Garantiezeit von 12 Monaten. Kein Telefongespräch Die Telefonleitung ist nicht korrekt angeschlossen oder gestört.
  • Seite 33: Wichtige Informationen

    - Wichtige Informationen - 11 Wichtige Informationen 11.1 Technische Daten Standard DECT-GAP Kanalzahl 1880 bis 1990 MHz Stromversorgung Basisstation 220/230V, 50 Hz Reichweite Innen bis zu 50m Reichweite Aussen bis zu 300m Standby bis zu 100 Stunden Max. Gesprächsdauer bis zu 10 Stunden Aufladbare Standard-Akkus 2 x 1,2V/550mAh, Typ AAA Wählverfahren...
  • Seite 35 - Sommaire - Remarques générales ................37 Éléments de commande................39 Mise en service ..................40 Consignes de sécurité..................... 40 Contrôler le contenu de l’emballage................ 40 Raccorder la base ....................40 Remplacer des batteries ..................40 Charge des batteries ....................40 Mode TONALITÉS (TON) ou IMPULSIONS (PULS) ..........
  • Seite 36 - Sommaire - Fonctions spéciales .................. 54 Régler les signaux de sonnerie sur le combiné (mélodies de sonnerie) ....54 Volume de la sonnerie du combiné ................. 55 Régler les signaux de sonnerie sur la base (mélodie de sonnerie) ......55 Volume de la sonnerie de la base ................
  • Seite 37: Remarques Générales

    - Remarques générales - Remarques générales Batteries rechargeables Ne pas utiliser d’autres batteries rechargeables ou bloc de batterie qui risqueraient éventuellement de provoquer un court-circuit. Pour le remplacement, utilisez toujours uniquement des batteries rechargeables de type AAA 1,2 volts, 550mA. Ne pas jeter les batteries au feu, ni les plonger dans l’eau.
  • Seite 38 - Remarques générales - Température et conditions ambiantes Le téléphone est conçu pour une utilisation dans des locaux abrités avec une plage de températures de 10 °C à 30 °C. La base ne doit pas être installée dans des pièces humides telles que la salle de bains ou la buanderie.
  • Seite 39: Éléments De Commande

    Touche de communication Touches de sélection/ La liste des appelants (CLIP) Communications internes Touche de signal R Répertoire/Sortez le menu Touche secret/d’effacement Touche mains-libres Base Touche PAGE Voyant de communication et de raccordement au réseau Voyant de contrôle de charge BDT700...
  • Seite 40: Mise En Service

    - Mise en service - Mise en service Consignes de sécurité ATTENTION ! Veuillez impérativement lire, avant la mise en service, les remarques générales faites au début du présent mode d’emploi. Contrôler le contenu de l’emballage Le contenu de l’emballage : Une base Un cordon d’alimentation électrique Un combiné...
  • Seite 41: Mode Tonalités (Ton) Ou Impulsions (Puls)

    - Mise en service - En cas de capacité de batterie insuffisante, l’icône clignote à l’écran et des signaux d’avertissement retentissent toutes les 60 secondes. Pour charger les batteries, placez le combiné dans la base avec l’écran vers l’avant. Remarque : Il faut laisser les batteries se charger durant au moins 16 heures avant la première mise en service.
  • Seite 42: Utilisation

    - Utilisation - Utilisation L’écran En mode de fonctionnement normal, l’écran affiche le nom du combiné. Le nom préréglé peut être modifié à tout moment. Voir à cet effet le point 8.7 Toutes les fonctions importantes sont en outre signalées à l’écran par diverses icônes. Allumée : vous êtes en communication.
  • Seite 43: Appeler

    - Utilisation - Remarque : Vous pouvez modifier le volume de la sonnerie pendant que le combiné sonne à l’aide des touches Pour mettre fin à la communication, replacez le combiné dans la base ou appuyez sur la touche de communication du combiné.
  • Seite 44: Composer Les Numéros De Téléphone Enregistrés Dans Le Répertoire

    - Utilisation - Composer les numéros de téléphone enregistrés dans le répertoire Après avoir enregistré quelques numéros de téléphone, vous pouvez les activer très rapidement et aisément. Appuyez sur la touche de répertoire . L’écran affiche alors dans l’ordre alphabétique le premier numéro de téléphone enregistré. Les touches vous permettent de composer tous les numéros de téléphone enregistrés.
  • Seite 45: Réglages Du Volume De L'écouteur

    - Utilisation - Appuyez une fois sur la touche en cours de communication. L’icône COUPE apparaît à l’écran. Pour réactiver le micro, appuyez à nouveau sur la touche . L’icône COUPE s’éteint et vous pouvez poursuivre normalement la communication. 4.10 Réglages du volume de l’écouteur Si vous trouvez que le volume de l’écouteur est trop faible ou trop fort, vous pouvez l’adapter à...
  • Seite 46: Verrouillage Du Clavier

    - Utilisation - Effacer tous les numéros de téléphone de la mémoire de rappel du dernier numéro composé Pour effacer tous les numéros de téléphone de la mémoire de rappel du dernier numéro composé, procédez de la manière suivante : 1.
  • Seite 47: Le Répertoire

    - Le répertoire - Le répertoire Vous pouvez enregistrer dans le répertoire 30 numéros de téléphone avec les noms. La longueur maximale d’un numéro de téléphone est de 20 chiffres. Entrer des numéros de téléphone dans le répertoire Appuyez sur la touche de menu .
  • Seite 48: Modifier Des Numéros De Téléphone Du Répertoire

    - Le répertoire - Explication pour entrer le nom Les touches de chiffres du clavier comportent des lettres servant à entrer le nom. En appuyant plusieurs fois sur la touche correspondante, vous pouvez entrer des lettres majuscules ainsi que des chiffres. Exemple : Vous souhaitez entrer le nom «...
  • Seite 49: Effacer Des Numéros De Téléphone Du Répertoire

    - Le répertoire - 12. Après avoir procédé aux modifications souhaitées, validez de nouveau à l’aide de la touche de menu . L’écran affiche le message TRAITER. 13. Si vous souhaitez modifier d’autres numéros de téléphone, poursuivez avec le point 4. Quittez le mode de programmation en appuyant sur la touche Effacer des numéros de téléphone du répertoire Appuyez sur la touche de menu...
  • Seite 50: Affichage Des Numéros De Téléphone (Clip)

    - Affichage des numßeros de téléphone (CLIP) - Affichage des numéros de téléphone (CLIP) En suisse, cette fonction n’est pas proposée par tous les opérateurs de réseau. Attention ! L’affichage des numéros de téléphone est un service proposé en option par votre opérateur de téléphonie. Votre téléphone affiche les numéros de téléphone à...
  • Seite 51: La Liste Des Appelants

    - Affichage des numßeros de téléphone (CLIP) - La liste des appelants Procédez de la manière suivante pour visualiser à l’écran les numéros de téléphone de la liste des appelants : Appuyez sur la touche et le numéro du dernier appel entrant s’affiche à l’écran. Lorsque la liste des appelants est vide, l’écran affiche VIDE.
  • Seite 52: Effacer Des Numéros De Téléphone De La Liste Des Appelants

    - Affichage des numßeros de téléphone (CLIP) - Validez de nouveau à l’aide de la touche de menu . L’écran affiche le message NOM ? Entrez alors au clavier le nom correspondant (max. 12 lettres). Validez de nouveau à l’aide de la touche de menu et le numéro de téléphone s’affiche encore une fois à...
  • Seite 53: Autocommutateurs

    - Autocommutateurs - Autocommutateurs Si vous avez raccordé votre téléphone à un autocommutateur, vous pouvez bénéficier de toutes les possibilités telles que par ex. le transfert d'appels, le rappel automatique, etc. grâce à la touche de signal « R ». La durée de FLASH « 90ms » (FLASH 1, réglage par défaut) ou «...
  • Seite 54: Fonctions Spéciales

    - Fonctions spéciales - Fonctions spéciales Un menu très convivial pour l’utilisateur permet d’accéder à toutes les autres fonctions de programmation. Voici un petit mode d’emploi général pour vous repérer dans le menu : La touche permet de lancer la programmation. L’icône est allumée à...
  • Seite 55: Volume De La Sonnerie Du Combiné

    - Fonctions spéciales - Volume de la sonnerie du combiné Le volume de la sonnerie du combiné peut être réglé sur trois niveaux. Vous pouvez également désactiver complètement la sonnerie lorsque vous ne souhaitez pas être dérangé. Lorsque la sonnerie est désactivée, les appels entrants sont seulement signalés sur la base et sur l’écran du combiné.
  • Seite 56: Volume De La Sonnerie De La Base

    - Fonctions spéciales - Volume de la sonnerie de la base Le volume de la sonnerie de la base peut être réglé sur trois niveaux. Vous pouvez également désactiver complètement la sonnerie lorsque vous ne souhaitez pas être dérangé. Appuyer sur la touche de menu Sélectionner le menu REGLAGE à...
  • Seite 57: Mode Tonalités (Mfv) Ou Impulsions (Iwv)

    Modifier les noms d’écran En mode normal, le message « BDT700 » s’affiche à l’écran. Si vous avez déclaré plusieurs combinés à une base, il peut être utile de donner un nom à chaque combiné. Le numéro indiqué après le nom est celui avec lequel le combiné peut être appelé en interne.
  • Seite 58: Activer/Désactiver Les Signaux Sonores D'indication

    - Fonctions spéciales - Activer/désactiver les signaux sonores d’indication Divers signaux sonores d’avertissement peuvent être activés ou désactivés. Clic des touches : Le combiné valide chaque pression de touche par un clic. Vous pouvez activer ou désactiver le clic de touches. Signal sonore d’avertissement en cas de capacité...
  • Seite 59: Régler La Langue D'affichage À L'écran

    - Fonctions spéciales - Entrer encore une fois le nouveau code PIN de quatre chiffres pour le valider et valider à l’aide de la touche Sélectionnez ensuite d’autres fonctions de menu ou quittez le menu en appuyant sur la touche La procédure est interrompue en cas d’entrée erronée de l’ancien code PIN.
  • Seite 60: Rétablir Les Réglages Par Défaut

    (CLIP) ainsi que tous les numéros de téléphone enregistrés dans la fonction de rappel du dernier numéro composé sont effacés. Réglages par défaut : Langue : allemand Nom du combiné : BDT700 Signal d’avertissement batterie : activé Réception automatique des appels activée Signal d’avertissement portée : activé...
  • Seite 61: Structure Du Menu

    - Fonctions spéciales - 8.13 Structure du menu Ajouter Repertoire Supprimer Modifier Volume Base Volume 1..3, Volume Coupe Reglage Melodie Base Melodie 1..3 Sub Combine Combine ? PIN? Code Pin Nou PIN PIN? Retapez Mode Numerot Freq Vocale - Impulsion Touche R Reglage 1 Reglage 2...
  • Seite 62: Plusieurs Combinés

    Remarque : Le standard GAP normalisé à l’échelle internationale permet également d’intégrer dans le système téléphonique des combinés fabricants. Vous pouvez de même raccorder un combiné SWITEL à des bases d’autres fabricants dans la mesure où ces appareils fonctionnent avec le standard GAP.
  • Seite 63: Déclaration Et Annulation De La Déclaration De Combinés

    - Plusieurs combinés - Déclaration et annulation de la déclaration de combinés 9.3.1 Déclaration de combinés Maintenez la touche page de la base enfoncée pendant 6 secondes jusqu’au retentissement de deux signaux sonores. Vous disposez alors de 90 secondes pour déclarer le nouveau combiné...
  • Seite 64: Bases Supplémentaires

    - Plusieurs combinés - 4. Entrer ensuite le code PIN de la base (réglage par défaut 0 0 0 0 ) et valider à l’aide de la touche 5. Sélectionnez à présent le numéro du combiné dont la déclaration doit être annulée 1 ou 2 et validez à...
  • Seite 65: Suppression Des Erreurs

    - Suppression des erreurs - 10 Suppression des erreurs Si vous avez des problèmes avec votre téléphone, veuillez suivre les indications ci-après. Veuillez vous adresser à votre revendeur en cas de droits à la garantie. La garantie dure 2 ans. Les batteries rechargeables bénéficient d’une garantie de 12 mois. Aucune communication La ligne téléphonique n’est pas correctement raccordée ou possible...
  • Seite 66: Informations Importantes

    - Informations importantes - 11 Informations importantes 11.1 Caractéristiques techniques Standard DECT Nombre de canaux 1880 à 1990 MHz Alimentation électrique Base 220/230V, 50 Hz Portée à l’intérieur jusqu’à 50m Portée dehors jusqu’à 300m Autonomie en veille jusqu’à 100 heures Durée max.
  • Seite 67 - Informazioni generali - Informazioni generali ................. 69 Elementi di comando ................. 71 Messa in funzione..................72 Informazioni di sicurezza...................72 Controllo del contenuto della confezione ..............72 Collegamento della stazione base ................72 Le batterie scambiano....................72 Carica delle batterie ....................72 Modalità di selezione a frequenze (TON) oppure ad impulsi (PULS) ....73 Selezione della lingua nel display ................73 Impiego......................
  • Seite 68 - Informazioni generali - Funzioni speciali..................86 Regolazione dei segnali di chiamata nell'unità portatile (melodie della suoneria) ........................86 Volume del segnale di chiamata dell'unità portatile ..........87 Regolazione dei segnali di chiamata nella stazione base (melodie della suoneria) ........................87 Volume del segnale di chiamata della stazione base..........
  • Seite 69: Informazioni Generali

    - Informazioni generali - 1 Informazioni generali Batterie ricaricabili Non utilizzare altre batterie ricaricabili o degli accumulatori universali. Questi potrebbero causare eventualmente un corto circuito. Per il cambio delle batterie è necessario utilizzare esclusivamente batterie ricaricabili del tipo AAA 1,2 Volt, 550mA. Non gettare mai le batterie nel fuoco o immergerle nell'acqua.
  • Seite 70 - Informazioni generali - Smaltimento Quando le batterie ricaricabili si sono completamente esaurite, sarà necessario provvedere ad uno smaltimento appropriato e conforme alle prescrizioni vigenti per la protezione ambientale. Temperatura e condizioni ambientali L'apparecchio telefono è concepito per funzionare in ambienti protetti in un campo di temperatura di 10 °C fino 30 °C.
  • Seite 71: Elementi Di Comando

    Tasti di selezione/ La lista delle chiamate (CLIP) Conversazioni interne Tasto di segnale R Rubrica telefonica / Rimuove il menu Tasto d'ammutolazione / cancellazione Tasto per conversazioni in viva voce Stazione base Tasto PAGE Spia di conversazione e rete BDT700 Spia di controllo della carica...
  • Seite 72: Messa In Funzione

    - Messa in funzione - 3 Messa in funzione 3.1 Informazioni di sicurezza ATTENZIONE! Prima della messa in funzione è assolutamente necessario leggere le informazioni di sicurezza generali riportate all'inizio di queste istruzioni per l'uso. 3.2 Controllo del contenuto della confezione La dotazione comprende: una stazione base un cavo d'alimentazione...
  • Seite 73: Modalità Di Selezione A Frequenze (Ton) Oppure Ad Impulsi (Puls)

    - Messa in funzione - carica semicarica debole Se la capacità delle batterie è troppo bassa, lampeggia il rispettivo simbolo nel display e ogni 60 secondi si sentono dei rispettivi segnali acustici d'avvertimento. Per ricaricare le batterie basta immettere l'unità portatile nella stazione base con il display rivolto in avanti.
  • Seite 74: Impiego

    - Impiego - 4 Impiego 4.1 Il display In condizioni di funzionamento normali, nel display viene visualizzato il nome dell'unità portatile. Il nome preimpostato può comunque essere cambiato in qualsiasi momento. Si veda a tal fine al capitolo 8.7. Inoltre, nel display vengono visualizzate tutte le informazioni più...
  • Seite 75: Conversazioni Telefoniche

    - Impiego - Avvertenza: Mentre squilla l'unità portatile, tramite i tasti potete anche regolare il volume del segnale di chiamata. Per terminare la conversazione, immettere come di consueto l'unità portatile nella stazione base oppure premere il tasto di conversazione nella stazione base. Note: Le informazioni per la visualizzazione del numero telefonico sul display sono da apprendere al capitolo 6.
  • Seite 76: Selezione Del Numero Di Telefono Memorizzato Dalla Rubrica Telefonica

    - Impiego - 4.5 Selezione del numero di telefono memorizzato dalla rubrica telefonica Dopo che avete memorizzato alcuni numeri telefonici, potete richiamarli molto rapidamente con facilità. Premere il tasto della rubrica telefonica . A questo punto nel display viene visualizzato in ordine alfabetico il primo numero telefonico memorizzato. Tramite i tasti potete ora chiamare tutti i numeri telefonici memorizzati.
  • Seite 77: Regolazione Del Volume Della Cornetta

    - Impiego - Premere il una volta il tasto durante una conversazione. Dopodiché nel display viene visualizzata l'indicazione SILENZIARE. Per inserire di nuovo il microfono, basta premere nuovamente il tasto L'indicazione SILENZIARE visualizzata nel display scompare e dopodiché potete proseguire normalmente la conversazione. 4.10 Regolazione del volume della cornetta Se il volume della cornetta Vi dovesse sembrare troppo basso o troppo alto, potete anche adattarlo individualmente alle Vostre esigenze.
  • Seite 78: Blocco Della Tastiera

    - Impiego - Eliminazione di tutti i numeri telefonici dalla lista di ripetizione delle chiamate Per cancellare tutti i numeri telefonici dalla lista di ripetizione delle chiamate, occorre procedere nel modo seguente: 1. Premere il tasto 2. Mantenere premuto il tasto , finché...
  • Seite 79: La Rubrica Telefonica

    - La rubrica telefonica - 5 La rubrica telefonica Nella rubrica telefonica si possono memorizzare fino 30 numeri telefonici con l'assegnazione del rispettivo nome dell'utente. La massima lunghezza di un numero telefonico corrisponde a 20 posizioni. 5.1 Immissione di numeri nella rubrica telefonica Premere il tasto menu .
  • Seite 80: Modifica Dei Numeri Memorizzati Nella Rubrica Telefonica

    - La rubrica telefonica - - Quando avete raggiunto la capacità di memorizzazione dei 30 numeri telefonici, alla prossima memorizzazione di un numero nel display viene visualizzato il messaggio MEMORIA COMPLETA. In questo caso sarà innanzitutto necessario cancellare degli altri numeri telefonici meno importanti, per liberare nuovo spazio di memoria. Spiegazione della modalità...
  • Seite 81: Cancellazione Del Numero Di Telefono Dalla Rubrica Telefonica

    - La rubrica telefonica - 11. Selezionare a questo punto attraverso i tasti di selezione , quale melodia desiderate assegnare a questo numero telefonico. 12. Una volta completate le modifiche desiderate, è necessario confermare ancora una volta con il tasto menu le impostazioni effettuate.
  • Seite 82: Indicazione Del Numero Degli Interlocutori (Clip)

    - Indicazione del numero degli interlocutori /CLIP) - Indicazione del numero degli interlocutori (CLIP) In Svizzera non tutti i gestori di reti di comunicazione offrono questa funzione. Attenzione! L'indicazione del numero degli interlocutori è un servizio opzionale della Vostra società telefonica. Il Vostro telefono visualizza il numero telefonico nel display, purché...
  • Seite 83: La Lista Delle Chiamate

    - Indicazione del numero degli interlocutori /CLIP) - 6.1 La lista delle chiamate Per vedere il numero telefonico dell'interlocutore nel display, occorre procedere nel modo seguente: Premere il tasto ed il numero ricevuto per ultimo viene visualizzato nel display. Se la lista delle chiamate è...
  • Seite 84: Cancellazione Di Singoli Numeri Telefonici Dalla Lista Delle Chiamate

    - Indicazione del numero degli interlocutori /CLIP) - Confermare nuovamente con il tasto menu . Il display visualizza ora il messaggio NOME?. Digitare a questo punto il nome desiderato (massimo 12 lettere) attraverso la tastiera numerica. Confermare nuovamente la selezione con il tasto menu .
  • Seite 85: Impianti Interni Di Centralino

    - Impianti interni di centralino - Impianti interni di centralino Se avete collegato il Vostro telefono ad un impianto interno di centralino, potete sfruttare tutte le più moderne possibilità oggigiorno offerte dai gestori delle reti telefoniche, come ad esempio la deviazione delle telefonate, il richiamo automatico, ecc. Il tasto di segnale “R” Vi permette di accedere a tutte queste comodissime possibilità...
  • Seite 86: Funzioni Speciali

    - Funzioni speciali - Funzioni speciali Tutte le altre funzioni di programmazione sono accessibili attraverso un menu molto facile da usare. Qui Vi illustriamo una piccola guida generale su come potete muovervi nel menu: Tramite il tasto potete avviare il livello di programmazione. Durante la programmazione lampeggia l'indicazione nel display.
  • Seite 87: Volume Del Segnale Di Chiamata Dell'unità Portatile

    - Funzioni speciali - 8.2 Volume del segnale di chiamata dell'unità portatile Il volume del segnale di chiamata dell'unità portatile può essere regolato in tre stadi. Se qualche volta desiderate non essere disturbati, potete anche disinserire completamente il segnale di chiamata. Se avete disinserito il segnale di chiamata, le telefonate in arrivo vengono segnalate acusticamente soltanto nella stazione base e per mezzo del display dell'unità...
  • Seite 88: Volume Del Segnale Di Chiamata Della Stazione Base

    - Funzioni speciali - 8.4 Volume del segnale di chiamata della stazione base Il volume del segnale di chiamata della stazione base può essere regolato in tre livelli. Se qualche volta desiderate non essere disturbati, potete anche disinserire completamente il segnale di chiamata.
  • Seite 89: Modalità Di Selezione A Frequenze Oppure Ad Impulsi

    8.7 Modifica dei nomi nel display Nel funzionamento normale il display visualizza l'indicazione „BDT700“. Se avete registrato parecchie unità portatili ad una stazione base, può essere utile assegnare ad ogni unità portatile un nome proprio. Il numero dietro il nome indica con quale numero potete raggiungere la rispettiva unità...
  • Seite 90: Attivazione / Disattivazione Dei Segnali Acustici D'avvertimento

    - Funzioni speciali - 8.8 Attivazione / disattivazione dei segnali acustici d'avvertimento Qui potete attivare ossia disattivare i diversi segnali acustici d'avvertimento. Clic dei tasti: Ogni volta che premete un tasto, nell'unità portatile sentite un segnale acustico, detto clic tasti. Questo cosiddetto clic dei tasti può essere naturalmente inserito oppure disinserito, a piacere.
  • Seite 91: Selezione Della Lingua Nel Display

    - Funzioni speciali - Per confermare definitivamente l'impostazione, è necessario digitare ancora una volta il nuovo codice PIN con quattro posizioni attraverso la tastiera numerica e confermare successivamente con Selezionate adesso ulteriori funzioni menu oppure uscite dal menu, mantenendo premuto il tasto In un'immissione sbagliata del codice PIN il procedimento di programmazione viene automaticamente annullato.
  • Seite 92 - Funzioni speciali - Impostazioni di fabbrica: lingua: tedesco nome dell'unità portatile: BDT700 segnale d'avvertimento batterie: ON ricezione automatica delle chiamate ON segnale d'avvertimento raggio d'azione: melodia del segnale di chiamata esterna: 3 clic dei tasti: ON melodia del segnale di chiamata interna: 1 volume della cornetta: 3 volume del segnale di chiamata dell'unità...
  • Seite 93: Struttura Del Menu

    - Funzioni speciali - 8.13 Struttura del menu Aggiungi Rubrica Cancella Modifica Volume Base Configura Volume 1..3, Vol Spento Melodie Base Melodie 1..3 Canc Portat Portati? PIN? Codice Pin PIN? Nouvo Riscrivi Tipo Selez Toni - Impulsi Tasto R Tempo Flash 1 Tempo Flash 2 Settaggi STD PIN ?
  • Seite 94: Parecchie Unità Portatili

    Nota: Grazie alla normativa internazionale GAP standard potete integrare nel Vostro sistema telefonico delle unità portatili di altri produttori. Altrettanto potete collegare un'unità portatile SWITEL a stazioni base di altri produttori, per quanto siano previste per funzionare con la modalità GAP standard.
  • Seite 95: Registrazione E Deregistrazione Di Unità Portatili

    - Parecchie unitá portatili - 9.3 Registrazione e deregistrazione di unità portatili 9.3.1 Registrazione di unità portatili Mantenere premuto il tasto PAGE della stazione base per 10 secondi, fino a sentire due segnali acustici. A questo punto è necessario registrare la nuova unità portatile entro 90 secondi alla stazione base.
  • Seite 96: Stazioni Base Supplementari

    - Parecchie unitá portatili - Selezionare ora la funzione CANC PORT tramite i tasti e confermare successivamente con il tasto Digitare a questo punto il codice PIN della stazione base (impostazione di fabbrica “0 0 0 0”) e confermare successivamente con il tasto Selezionare a questo punto il numero dell'unità...
  • Seite 97: Rimedio In Caso Di Errori

    - Rimedio in caso di errori - 10 Rimedio in caso di errori Nel caso di eventuali complicazioni con il Vostro telefono, si prega di attenersi innanzitutto alle seguenti istruzioni.Per le richieste di garanzia Vi preghiamo di rivolgerVi al Vostro rivenditore di fiducia.
  • Seite 98: Informazioni Importanti

    - Dati tecnici - 11 Informazioni importanti 11.1 Dati tecnici Standard DECT Numero canale 1880 fino 1990 MHz Alimentazione di corrente stazione base 220/230V, 50 Hz Raggio d'azione in edifici fino a 50m Raggio d'azione all'aperto fino a 300m Standby fino a 100 ore Max.
  • Seite 99 - Contents - General Information ................101 User controls ................... 103 Setting up ....................104 Safety information ....................104 Check contents of pack..................104 Connecting the base station ..................104 Fitting standard batteries..................104 Charging the standard batteries................105 Tone (TD) or pulse (PD) dialling ................105 Setting the display language ..................105 Operation....................
  • Seite 100 - Contents - Special functions ..................118 Setting the ring tone on the handset (ring melodies) ..........118 Ring tone volume on the handset................119 Setting the ring tones on the base station (ring melodies) ........119 Ring tone volume on the base station ..............119 Accepting calls automatically ................
  • Seite 101: General Information

    - General information - General Information Standard rechargeable batteries - do not use any other rechargeable batteries or battery packs. These could possibly cause a short circuit. When changing batteries, always use standard batteries, Type AAA 1.2V 550mA. Do not throw standard batteries into the fire or immerse in water. Do not dispose of old or defective standard batteries with the normal household waste.
  • Seite 102 - General information - Temperature and Ambient Conditions The telephone is designed for use in protected rooms with a temperature range of 10 °C to 30 °C. The base station must not be installed in damp rooms such as a bathroom or laundry room. Avoid proximity to sources of heat such as radiators and do not expose the unit to direct sunlight.
  • Seite 103: User Controls

    - User controls - User controls Handset Call indicator Selection button/Redial Menu button Call button Selection button/Caller list CLID Internal calls R signal button Phone book/Exit menu Mute button/Delete Handsfree Base station PAGE button Call and mains indicator Charge monitoring lamp BDT700...
  • Seite 104: Setting Up

    - Setting up - Setting up Safety information NOTE: Before setting up, it is essential that you read the Safety Information at the beginning of this operating manual. Check contents of pack The following items are supplied: one base station one mains cable one handset two standard batteries...
  • Seite 105: Charging The Standard Batteries

    - Setting up - Charging the standard batteries The rechargeable batteries for your telephone have a stand-by time of max. 100 hours at room temperature and a maximum talk time of up to 10 hours. The current battery capacity is shown in the display. Full Half If the battery capacity is too low, the symbol will flash in the display and you will hear...
  • Seite 106: Operation

    - Operation - Operation The display In the normal operating mode, the display shows the name of the handset. The pre-set name can be changed at any time. For more information, refer to 8.7. In addition, the main functions are shown in the display by means of various symbols. Lit: You are making a call.
  • Seite 107: Receiving Calls

    - Operation - Receiving calls When a call arrives, the ringing tone sounds on the handset and on the base station. The handset will ring a little later than the base station due to the radio transmission. The message EXT. will flash in the display. Press the call button on the handset and the connection will be made.
  • Seite 108: Dialling Stored Numbers From The Phone Book

    - Operation - Dialling stored numbers from the phone book After you have stored a few phone numbers, you can call these up very quickly and easily. Press the phone book button . The display will now show the first number stored in alphabetical order.
  • Seite 109: Muting The Microphone In The Handset

    - Operation - Muting the microphone in the handset You can turn off the handset microphone during a call by using the button. It is thus possible to speak without the other person hearing you. The loudspeaker in the handset remains switched on and you can continue to hear the other person.
  • Seite 110: Keypad Lock

    - Operation - Deleting all redial numbers To delete all numbers from the redial list, proceed as follows: 1. Press the button. 2. Hold the button pressed until DELETE ALL? appears in the display. 3. Confirm with the menu button and the telephone number will be deleted from the redial list.
  • Seite 111: The Phone Book

    - Phone book - The phone book 30 numbers including a name can be stored in the phone book. The maximum length for a number is 20 characters. Entering numbers in the phone book Press the menu button . The display shows the message PHONE BOOK. Press the button again.
  • Seite 112: Changing Numbers Stored In The Phone Book

    - Phone book - How to enter names The number keys are also printed with letters for entering names. By repeatedly pressing the appropriate button, upper case letters as well as numbers can be entered. Example: You want to enter the name "Peter". Press: 1 x button 7, 2 x button 3, 1 x button 8, 2 x button 3, 3 x button 7 - To enter a space, press the button once.
  • Seite 113: Deleting Stored Numbers From The Phone Book

    - Phone book - Deleting stored numbers from the phone book Press the menu button . The display will show PHONE BOOK. Press the button again. The display will show ADD ENTRY. Now press the button. The display will show DELETE ENTRY. Confirm with the menu button Now choose the number that you want to delete using the buttons.
  • Seite 114: Caller Display Clid

    - Caller display CLID - Caller display (CLID) In Switzerland, this function is not available with all network providers. NOTICE! The calling number indication is an optional service from your telephone provider. Your telephone will show the calling number in the display if your provider makes this service available.
  • Seite 115: The Caller List

    - Caller display CLID - The caller list To view the phone numbers on the caller list, please proceed as follows: Press the button and the last phone number received will be shown in the display. If the caller list is empty, the display will show the message EMPTY. Further numbers in the caller list can now be selected by means of the buttons.
  • Seite 116: Deleting Individual Telephone Numbers From The Caller List

    - Caller display CLID - Now select which melody you wish to assign to this phone number using the selection buttons Again confirm with the menu button and the number will be stored in the phone book. Note: When the telephone number has been stored with a name in the phone book, the name that has been entered will appear in the caller list instead of the phone number.
  • Seite 117: Private Exchanges

    - Private exchanges - Private exchanges If you have connected your telephone to a PBX, you can use all the special functions such as call forwarding and automatic call-back. These can be accessed using the "R" button. For a PBX, a FLASH time of 90 ms (FLASH 1, factory setting) or 250ms (FLASH 2) is required (Adjustment, see 8.11).
  • Seite 118: Special Functions

    - Special functions - Special functions All further programming functions can be accessed by means of a very user-friendly menu. Here are a few general instructions to help you find your way around the menu: Programming is started by means of the button.
  • Seite 119: Ring Tone Volume On The Handset

    - Special functions - Ring tone volume on the handset The volume of the ring tone on the handset can be adjusted in three steps. If at any time you do not want to be disturbed, you can also turn the ring tone off altogether. If the ring tone is turned off, incoming calls will only be signalled at the base station and by means of the display on the handset.
  • Seite 120: Accepting Calls Automatically

    Changing display names In normal operation, the message "BDT700" appears in the display. If you have logged on several handsets to one base station, it can be useful to give each handset its own name. The number after the name shows with which number the handset can be called internally.
  • Seite 121: Activating/Deactivating Warning Tones

    - Special functions - Activating/Deactivating warning tones Here, various warning tones can be activated or deactivated. Button click: Each time a button is pressed, the handset confirms with a button click. The button click can be switched on or off. Warning tone for low battery: If the battery capacity is too low, a warning tone will remind you that you must charge the handset.
  • Seite 122: Setting The Display Language

    The handset and the base station are reset to the factory settings using this function. The phone book, the caller list (CLID) and all phone numbers in the redial facility will be deleted. Factory settings: Language: German Handset name: BDT700 Battery warning tone: On Automatic call accept: On Range warning: On...
  • Seite 123 - Special functions - Press the menu button Select the SETUP menu with and confirm with Select the DEFAULT function with and confirm with Enter the PIN code using the number pad (factory setting 0000) and confirm with The message CONFIRM? will appear in the display. Confirm with the menu button After a short time, the factory settings will be restored.
  • Seite 124: Menu Structure

    - Special functions - 8.13 Menu structure Phone Book Add Entry Delete Entry Modify Entry Set Up Base Volume Volume 1, 2, 3, Off Base Melody Melody 1, 2, 3 Del Handset Handset ? Pin ? Pin Code New Pin Retype Pin ? Dial Mode...
  • Seite 125: Multiple Handsets

    Note: SWITEL handsets and also handsets from other manufacturers can be integrated into the telephone system by means of the internationally adopted GAP standard. In the same way, you can use an SWITEL handset with base stations from other manufacturers, as long as these units work using the GAP standard.
  • Seite 126: Logging On And Logging Off Handsets

    - Multiple handsets - Logging on and logging off handsets 9.3.1 Logging on handsets Press and hold the page button on the base station for 6 seconds until you hear two signal tones. Now log on the new handset to the base station within 90 seconds. Press the button on the handset.
  • Seite 127: Logging Off Handsets

    - Multiple handsets - 9.3.3 Logging off handsets A handset can only be logged off using another handset that is still logged-on. It is therefore not possible to carry out the logging-off procedure using the handset that is to be logged off. Press the button on the handset.
  • Seite 128: Troubleshooting

    - Troubleshooting - 10 Troubleshooting If you have problems with your telephone, please check the following points first. For any claims under the warranty, please refer to your dealer. The warranty period is 2 years and 1 year for the rechargeable batteries. No calls possible The telephone line is not correctly connected or is faulty.
  • Seite 129: Important Information

    - Important information - 11 Important information 11.1 Technical data Standard DECT-GAP Channel number 1880 to 1990 MHz Power supply Base station 220/230V, 50 Hz Range Indoors up to 50 m Range Outdoors up to 300 m Standby up to 100 hours Max.
  • Seite 130: Declaration Of Conformity

    TELGO AG, Route d'Englisberg 17, CH-1763 Granges Paccot Product: SWITEL BDT700 This product is intended for connection to analogue PSTN lines within Switzerland. However, due to differences between the individual PSTNs provided in the different countries, the approval does not, of itself, give an unconditional assurance of successful operation on every PSTN network termination point.
  • Seite 132 www.switel.com...

Inhaltsverzeichnis