Sony RM-X4S Bedienungsanleitung
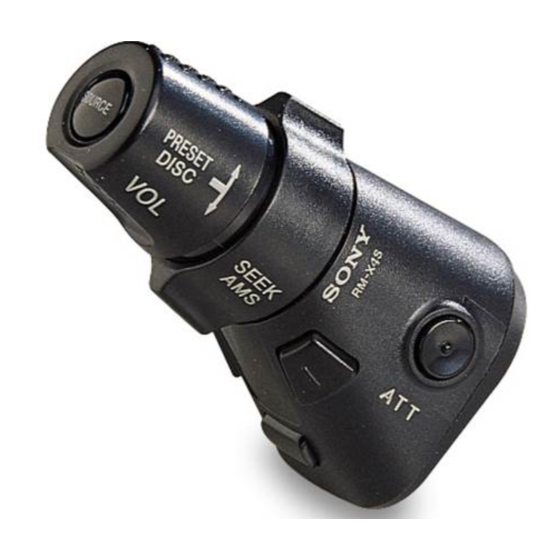
Rotary commander
Vorschau ausblenden
Andere Handbücher für RM-X4S:
- Installationshandbuch (2 Seiten) ,
- Installationshandbuch (2 Seiten)
Features
With this rotary commander, you can control your car audio
equipment easily as you would control the headlight or the wiper
switch of your car while driving.
Use this rotary commander with master units which have the special
input jack for the rotary commander.
Note
This rotary commander cannot be used for units which are designed for the
rotary commander RM-X38/X33/X32 and S commander RM-X1S.
Location and Function of Controls
The following buttons and controls (except the SOURCE and MODE
button) share the same functions as those on the master unit or the
wireless remote commander.
For more information about the functions of each button or control,
refer to the operating instructions of your Sony car audio equipment.
1 VOL (volume) control
2 SEEK/AMS control
During tape or CD/MD playback:
• AMS* function: Locates the beginning of the tracks. Rotate the
control the number of times you wish to skip the tracks.
To skip several tracks at once, rotate the control momentarily and
release. Within one second, rotate it again and hold it in this
position. When the desired track is reached, release.
* Automatic Music Sensor.
• Manual search: Locates the desired part of a track. Rotate the
control either left or right, and keep it in the rotated position until
the desired part is located.
During radio/TV reception:
• Automatic tuning: Automatically tunes to a station. When a
station is tuned in, the search stops automatically. Rotate the
control momentarily several times until a desired station is tuned
in.
• Manually searches a station. Rotate the control either left or right,
and keep it in the rotated position until the desired station is
tuned in. If you rotate again within one second, you can continue
manual search for another station.
3 OFF button
Press to turn off the unit.
4 MODE button
• Changes the playback side of the cassette.
• Selects CD units when several CD units are connected.
For example: CD1 n CD2 n ···
• Selects MD units when several MD units are connected.
For example: MD1 n MD2 n ···
• Changes the preset groups.
FM/AM model:
For example: FM1 n FM2 n AM n ···
FM/MW/LW(SW) model:
For example: FM1 n FM2 n MW n LW(SW) n ···
• Changes the TV/video mode (Only in the U.S.A. and Canada
models).
5 ATT button
Press to attenuator the sound momentarily.
The 6 and 7 buttons activate the different
function for the master unit.
— The master unit with the SEL button.
6 SEL button*
7 DSPL button* (models with DSPL button on the master
unit)
FILE button* (models with FILE button on the master unit)
Attach that label which matches the functions of the connected master
unit.
Refer to the master unit operating instructions.
— The master unit with the SOUND button.
6 SOUND button*
7 LIST button* (models with LIST button on the master unit)
DSPL button* (models with DSPL button on the master
unit)
Attach that label which matches the functions of the connected master
unit.
Refer to the master unit operating instructions.
* Functions in the same way as the button on the master unit.
8 SOURCE button
Press to select program sources.
9 PRESET/DISC control
Press and rotate the VOL control. (The VOL control and the SEEK/
AMS control turn together.)
• Fast-winds the tape. To resume normal playback, press the MODE
button.
• Changes the disc when (a) CD/MD unit(s) is (are) connected.
• Receives the stations memorized on the preset number buttons on
the master unit.
Changing the operative direction
The operative direction of controls is factory preset as in the
illustration (A).
If you need to mount the rotary commander on the right of the steering
A
column, you can reverse the operative direction of controls.
Press the 6 button more than two seconds while pressing the VOL
control (B).
When the POWER SELECT switch on your master unit is set to the
B (OFF) position, your master unit cannot be operated with the
commander unless on of the operational buttons is pressed or a
disc/cassette is inserted to activate the master unit. Depending on
the type of the master unit, you can turn on the master unit with the
SOURCE button of the rotary commander. For details, refer to the
Operating Instructions of the master unit.
B
Caractéristiques
Funktionen
Ce satellite de commande vous permet de contrôler d'une façon
Mit diesem Joystick können Sie das Audiogerät in Ihrem Auto
extrêmement simple et tout en roulant le fonctionnement de votre
während der Fahrt genauso mühelos bedienen wie zum Beispiel den
équipement audio de voiture comme s'il s'agissait des phares ou des
Schalter für Scheinwerfer oder Scheibenwischer.
essuie-glaces.
Diesen Joystick können Sie an Hauptgeräte anschließen, die über eine
Utilisez ce satellite de commande avec des appareils principaux dotés
spezielle Eingangsbuchse für den Joystick verfügen.
d'une prise d'entrée spéciale pour satellite de commande.
Hinweis
Dieser Joystick kann nicht mit Geräten verwendet werden, die für den
Remarque
Ce satellite de commande ne peut être utilisé avec des appareils conçus pour
Anschluß der Joysticks RM-X38/X33/X32 und des S-Steuerteils RM-X1S
konzipiert wurden.
les satellites de commande RM-X38/X33/X32 et la commande S RM-X1S.
Emplacement et fonction des commandes
Lage und Funktion der Teile und
Les touches et les commandes suivantes (à l'exception des touches
Bedienelemente
SOURCE et MODE) remplissent les mêmes fonctions que celles de
Die folgenden Tasten und Bedienelemente (außer den Tasten SOURCE
l'appareil principal ou de la télécommande.
und MODE) entsprechen in ihrer Funktionsweise denen des
Pour des informations plus détaillées sur les fonctions de chacune des
Hauptgeräts bzw. der schnurlosen Fernbedienung.
touches et des commandes, reportez-vous au mode d'emploi de votre
Nähere Erläuterungen zu den Funktionen der einzelnen Tasten und
équipement audio de voiture Sony.
Regler finden Sie in der Bedienungsanleitung zu Ihrem Sony-
1 Commande VOL (volume)
Audiogerät.
2 Commande SEEK/AMS
1 Lautstärkeregler VOL
En cours de lecture de cassette ou CD/MD:
2 Regler SEEK/AMS
•Fonction AMS*: Localise le début des plages. Tournez la
Bei der Wiedergabe von Kassetten oder CD/MD:
commande autant de fois que vous souhaitez sauter de plage.
•AMS*-Funktion: Sucht den Anfang von Musikstücken. Drehen Sie
Pour sauter plusieurs plages à la fois, tournez brièvement le
den Regler so oft, wie Sie Titel überspringen wollen.
satellite et relâchez-le. Tournez-le à nouveau dans la seconde et
Um mehrere Musikstücke auf einmal zu überspringen, drehen Sie
maintenez-le dans cette position. Relâchez-le dès que vous êtes
den Regler zunächst einmal kurz und lassen ihn dann los. Dann
arrivé à la plage de votre choix.
drehen Sie ihn innerhalb einer Sekunde nochmals und halten ihn in
* Détecteur automatique de musique (Automatic Music Sensor)
dieser Position. Wenn das gewünschte Musikstück erreicht ist,
•Recherche manuelle: Localise un passage déterminé sur une
lassen Sie ihn los.
plage. Tournez la commande vers la gauche ou vers la droite et
* Automatic Music Sensor (Automatischer Musiksensor)
maintenez-la dans cette position jusqu'à ce que vous ayez trouvé
•Manuelle Suchfunktion: Zum Suchen einer bestimmten Stelle in
le passage voulu.
einem Musikstück. Drehen Sie den Regler nach links oder rechts,
En cours de réception radio/télévisée:
und halten Sie ihn in dieser Position, bis Sie die gewünschte Stelle
•Syntonisation automatique: Syntonise automatiquement une
gefunden haben.
station émettrice. Dès qu'une station est syntonisée, la recherche
Beim Radio-/Fernsehempfang:
est interrompue automatiquement.Tournez plusieurs fois
•Automatischer Sendersuchlauf: Sucht automatisch einen Sender.
brièvement le satellite jusqu'à ce que la station de radio voulue
Wenn ein Sender gefunden ist, stoppt die Suche automatisch.
soit syntonisée.
Drehen Sie den Regler mehrere Male kurz, bis der gewünschte
•Recherche manuelle d'une station. Tournez la commande vers la
Sender empfangen wird.
gauche ou vers la droite et maintenez-la dans cette position
•Manueller Sendersuchlauf: Drehen Sie den Regler nach links oder
jusqu'à ce que la station voulue ait été syntonisée. Si vous tournez
rechts, und halten Sie ihn in dieser Position, bis Sie den gewünschten
encore la commande dans la seconde, vous pouvez poursuivre la
Sender gefunden haben.
recherche manuelle d'une autre station.
Wenn Sie innerhalb einer Sekunde nochmals drehen, können Sie
3 Touche OFF
die manuelle Suche nach einem anderen Sender fortsetzen.
Appuyez sur cette touche pour mettre l'appareil hors tension.
3 Taste OFF
4 Touche MODE
Zum Ausschalten des Geräts.
•Change la face de lecture de la cassette.
4 Taste MODE
•Sélectionne les unités CD lorsque plusieurs unités CD sont
•Wechselt die Wiedergabeseite der Kassette.
raccordés. Par exemple: CD1 n CD2 n ···
•Wählt das CD-Gerät aus, wenn mehrere CD-Geräte angeschlossen
•Sélectionne les unités MD lorsque plusieurs unités MD sont
sind. Beispiel: CD1 n CD2 n ···
raccordés. Par exemple: MD1 n MD2 n ···
•Wählt das MD-Gerät aus, wenn mehrere MD-Geräte
•Change les groupes présélectionnés.
angeschlossen sind. Beispiel: MD1 n MD2 n ···
Modèle FM/AM:
•Wechselt zwischen den voreingestellten Gruppen.
Par exemple: FM1 n FM2 n AM n ···
UKW/AM-Modell:
Modèle FM/PO/GO(OC):
Beispiel: UKW1 n UKW2 n AM n ···
Par exemple: FM1 n FM2 n PO n GO(OC) n ···
UKW/MW/LW(KW)-Modell:
•Commute le téléviseur/vidéo (Modèles pour les U.S.A. et le
Beispiel: UKW1 n UKW2 n MW n LW(KW) n ···
Canada uniquement).
•Wechselt zwischen TV- und Videomodus (nur bei den Modellen
5 Touche ATT
für USA und Kanada).
Appuyez sur cette touche pour atténuer temporairement le son.
5 Taste ATT
Zum kurzfristigen Dämpfen des Tons.
Les touches 6 et 7 activent les différentes
fonctions de l'appareil principal.
Mit den Tasten 6 und 7 aktivieren Sie je nach
— Appareil principal doté d'une touche SEL.
Hauptgerät unterschiedliche Funktionen.
6 Touche SEL*
— Bei einem Hauptgerät mit de Taste SEL.
7 Touche DSPL* (modèles dont l'appareil principal comporte
6 Taste SEL*
une touche DSPL)
7 Taste DSPL* (Modelle mit Taste DSPL am Hauptgerät)
Touche FILE* (modèles dont l'appareil principal comporte
Taste FILE* (Modelle mit Taste FILE am Hauptgerät)
une touche FILE)
Bringen Sie den Aufkleber an, der den Funktionen des
Apposez l'étiquette correspondant aux fonctions de l'appareil
angeschlossenen Hauptgeräts entspricht.
principal raccordé.
Schlagen Sie dazu in der Bedienungsanleitung zum Hauptgerät nach.
Reportez-vous au mode d'emploi de l'appareil principal.
— Bei einem Hauptgerät mit der Taste SOUND.
— Appareil principal doté d'une touche SOUND.
6 Taste SOUND*
6 Touche SOUND*
7 Taste LIST* (Modelle mit Taste FILE am Hauptgerät)
7 Touche LIST* (modèles dont l'appareil principal comporte
Taste DSPL* (Modelle mit Taste DSPL am Hauptgerät)
une touche LIST)
Bringen Sie den Aufkleber an, der den Funktionen des
Touche DSPL* (modèles dont l'appareil principal comporte
angeschlossenen Hauptgeräts entspricht.
une touche DSPL)
Schlagen Sie dazu in der Bedienungsanleitung zum Hauptgerät nach.
Apposez l'étiquette correspondant aux fonctions de l'appareil
* Funktioniert genauso wie die Taste am Hauptgerätt.
principal raccordé.
Reportez-vous au mode d'emploi de l'appareil principal.
8 Taste SOURCE
* Fonctionne de la même manière que la touche de l'appareil
Zum Auswählen der Programmquellen.
principal.
9 Regler PRESET/DISC
Drücken und drehen Sie den Regler VOL. Der Regler VOL und der
8 Touche SOURCE
Regler SEEK/AMS drehen sich zusammen.
Appuyez sur cette touche pour sélectionner les sources audio/
•Zum Spulen des Bandes. Um die Wiedergabe wieder
vidéo.
fortzusetzen, drücken Sie die Taste MODE.
9 Commande PRESET/DISC
•Wechselt die CD/MD, wenn ein oder mehrere CD/MD-Geräte
Pressez et tournez la commande VOL. (La commande VOL et la
angeschlossen sind.
commande SEEK/AMS tournent ensemble.)
•Schaltet auf Empfang der Sender, die am Hauptgerät auf den
•Fait avancer rapidement la bande. Pour reprendre la lecture
Stationstasten gespeichert sind.
normale, appuyez sur la touche MODE.
•Change le disque une ou plusieurs unités CD/MD sont
Wechseln der Drehrichtung der Regler am Joystick
raccordées.
Werkseitig ist die Drehrichtung der Regler am Joystick wie auf
•Capte les stations émettrices mémorisées sous les touches de
Abbildung (A) gezeigt eingestellt. Wenn Sie den Joystick jedoch an der
présélection de l'appareil principal.
rechten Seite der Lenksäule anbringen, können Sie die Drehrichtung
der Regler ändern.
Inverser le sens de fonctionnement
Halten Sie die Taste 6 mehr als zwei Sekunden lang gedrückt, und
Le sens de fonctionnement des commandes est réglé par défaut comme
drücken Sie dabei den Regler VOL (B).
indiqué dans l'illustration (A).
Si vous devez monter le satellite du côté droit de la colonne de
Wenn der Schalter POWER SELECT am Hauptgerät in der Position
direction, vous pouvez inverser le sens de fonctionnement des
B (OFF) steht, können Sie das Hauptgerät nur über den Joystick
commandes.
steuern, wenn Sie am Hauptgerät eine der Funktionstasten drücken
Appuyez sur la touche 6 pendant au moins deux secondes tout en
oder eine CD/Kassette einlegen, so daß sich das Hauptgerät
appuyant sur la commande VOL (B).
einschaltet. Je nach dem Typ können Sie das Hauptgerät aber auch
mit der Taste SOURCE am Joystick einschalten. Einzelheiten dazu
Lorsque le sélecteur POWER SELECT de votre appareil principal est
finden Sie in der Bedienungsanleitung zu Ihrem Hauptgerät.
réglé sur la position B (OFF), votre appareil principal ne peut être
commandé à l'aide du satellite, sauf si l'une des touches de
commande est pressée ou si un disque/cassette est introduit de
manière à activer l'appareil principal. Selon le type de l'appareil
principal, vous pouvez mettre l'appareil principal sous tension à
l'aide de la touche SOURCE du satellite de commande. Pour plus de
détails, reportez-vous au mode d'emploi de l'appareil principal.
Características
Specifications
Con este mando rotativo, puede controlar el equipo de audio para
Dimensions
automóvil con la misma facilidad con la que controla los faros o el
Mass
interruptor del limpiaparabrisas mientras conduce.
Supplied accessories Screw (1)
Utilice este mando rotativo con las unidades principales que
dispongan de una toma de entrada especial para dicho mando.
Nota
Este mando rotativo no puede utilizarse con unidades diseñadas para el
mando rotativo RM-X38/X33/X32 y el mando S RM-X1S.
Spécifications
Dimensions
Masse
Accessoires fournis
Localización y función de los controles
Los siguientes botones y controles (excepto los botones SOURCE y
MODE) realizan las mismas funciones que los de la unidad principal o
del mando a distancia sin cable.
Si desea más información sobre las funciones de cada botón o control,
Technische Daten
consulte el manual de instrucciones del equipo de audio Sony para
automóvil.
Abmessungen
Gewicht
1 Control VOL (volumen)
Mitgeliefertes Zubehör
2 Control SEEK/AMS
Durante la reproducción de cintas o de CD/MD:
•Función AMS*: localiza el comienzo de los temas. Gire el control
tantas veces como temas desee omitir.
Para omitir varios temas de una vez, gire el control durante un
instante y suéltelo. En el intervalo de un segundo, gírelo de nuevo
Especificaciones
y mantenga fija esta posición. Cuando llegue al tema que desee,
suéltelo.
Dimensiones
* Sensor automático de música
•Búsqueda manual: localiza la parte deseada de un tema. Gire el
Peso
control hacia la izquierda o hacia la derecha y manténgalo en la
Accesorios suministrados
posición girada hasta que localice la parte que desee.
Durante la recepción de radio/TV:
•Sintonización automática: sintoniza emisoras automáticamente.
Una vez sintonizada la emisora, la búsqueda se detiene
automáticamente. Gire el control varias veces durante un instante
hasta que sintonice la emisora que desee.
Specificaties
•Busca emisoras manualmente. Gire el control hacia la izquierda o
hacia la derecha y manténgalo en la posición girada hasta que
Afmetingen
sintonice la emisora que desee. Si vuelve a girarlo en un espacio de
Gewicht
Meegeleverde accessoires
tiempo de un segundo, es posible continuar la búsqueda manual
de otra emisora.
3 Botón OFF
Púlselo para apagar la unidad.
4 Botón MODE
•Cambia la cara de reproducción del cassette.
•Selecciona unidades de CD cuando hay varios conectadas.
Specifikationer
Por ejemplo: CD1 n CD2 n ···
Mått
•Selecciona unidades de MD cuando hay varios conectadas.
Vikt
Por ejemplo: MD1 n MD2 n ···
Medföljande tillbehör Skruv (1)
•Cambia los grupos programados.
Modelo FM/AM:
Por ejemplo: FM1 n FM2 n AM n ···
Modelo FM/MW/LW(SW):
Por ejemplo: FM1 n FM2 n MW n LW(SW) n ···
•Cambia el modo de TV/vídeo (sólo modelos para EE.UU. y
Labels/Etiquettes/Aufkleber/Etiquetas/Labels/Etiketter/Etichette/Etiquetas/
Canadá).
5 Botón ATT
...—ˆ–
Púlselo para atenuar el sonido momentáneamente.
SOUND
Los botones 6 y 7 activan las diferentes
MODE
funciones de la unidad principal.
DSPL
— Unidad principal con botón SEL.
6 Botón SEL*
SEL
7Botón DSPL* (modelos con botón DSPL en la unidad
MODE
principal)
DSPL
Botón FILE* (modelos con botón FILE en la unidad
principal)
Eight button name labels are supplied with the rotary
Adhiera la etiqueta que corresponda a las funciones de la unidad
commander. Attach the appropriate label for the functions of
principal conectada.
the connected master unit and the installing position of the
Consulte el manual de instrucciones de la unidad principal.
rotary commander.
If you have the master unit with the SEL button:
— Unidad principal con botón SOUND.
Use the FILE label for a master unit with custom file function,
6 Botón SOUND*
for other units use the DSPL label.
7 Botón LIST* (modelos con botón LIST en la unidad
If you have the master unit with the SOUND button:
Use the SOUND label.
principal)
Refer to "The rotary commander labels" or "Attaching the
Botón DSPL* (modelos con botón DSPL en la unidad
label to the rotary remote" in the master unit operating
instructions.
principal)
Adhiera la etiqueta que corresponda a las funciones de la unidad
Huit étiquettes d'identification de touche sont fournies avec le
principal conectada.
satellite de commande. Apposez les étiquettes correspondant
Consulte el manual de instrucciones de la unidad principal.
aux fonctions de l'appareil principal raccordé et à la position
de montage du satellite de commande.
* Funciona de la misma manera que el botón de la unidad principal.
Si votre appareil principal est doté d'une touche SEL:
Utilisez l'étiquette FILE pour un appareil principal à fonction
de personnalisation de lecture et l'étiquette DSPL pour les
8 Botón SOURCE
autres appareils.
Púlselo para seleccionar las fuentes de programa.
Si votre appareil principal est doté d'une touche SOUND:
9 Control PRESET/DISC
Utilisez l'étiquette SOUND.
Consultez les sections "Etiquettes du satellite de commande"
Pulse y gire el control VOL. (Los controles VOL y SEEK/AMS giran
ou "Apposition des étiquettes sur le satellite de
juntos.)
télécommande" dans le mode d'emploi de l'appareil principal.
•Avanza o retrocede la cinta rápidamente. Para reanudar la
reproducción normal, pulse el botón MODE.
Mit dem Joystick werden acht Aufkleber mit Tastennamen
•Cambia el disco cuando hay conectadas una o varias unidades de
geliefert. Bringen Sie den Aufkleber an, der den Funktionen
des angeschlossenen Hauptgeräts und der Montageposition
CD/MD.
des Joystick in Ihrem Auto entspricht.
•Recibe las emisoras memorizadas en los botones numéricos
Bei einem Hauptgerät mit der Taste SEL:
programados de la unidad principal.
Verwenden Sie den FILE-Aufkleber für ein Hauptgerät mit
Anwenderprogramm-Speicherfunktion, für andere Geräte
Cambio de la dirección de funcionamiento
verwenden Sie den DSPL-Aufkleber.
Bei einem Hauptgerät mit der Taste SOUND:
La dirección de funcionamiento de los controles viene ajustada de
Verwenden Sie den SOUND-Aufkleber.
fábrica como se muestra en la ilustración (A).
Schlagen Sie dazu bitte unter den Erläuterungen zu den
Si necesita instalar el mando rotativo en la parte derecha de la columna
Etiketten bzw. zum Anbringen der Etiketten am Joystick in der
de dirección, es posible invertir la dirección de funcionamiento de los
Bedienungsanleitung zum Hauptgerät nach.
controles.
Pulse el botón 6 durante más de dos segundos mientras presiona el
Se suministran ocho etiquetas de nombre de botón con el
mando rotativo. Adhiera la etiqueta adecuada correspondiente
control VOL (B).
a las funciones de la unidad principal conectada y a la posición
de instalación del mando rotativo.
Si la unidad principal dispone del botón SEL:
Cuando el selector POWER SELECT de la unidad principal se
Utilice la etiqueta FILE para una unidad principal con la
encuentra en la posición B (OFF), no es posible utilizar la unidad
función de archivo personalizado y, para otras unidades,
principal con el mando, a menos que pulse uno de los botones de
utilice la etiqueta DSPL.
control o inserte un disco/cinta para activarla. Dependiendo del tipo
Si la unidad principal dispone del botón SOUND:
de unidad principal de que disponga, será posible activarla con el
Utilice la etiqueta SOUND.
Consulte "Etiquetas del mando rotativo" o "Fijación de la
botón SOURCE del mando rotativo. Para obtener información
etiqueta al mando a distancia giratorio" en el manual de
detallada, consulte el Manual de instrucciones de la unidad
instrucciones de la unidad principal.
principal.
3-861-879-21 (1)
Approx. 43 × 83 × 49 mm (w/
× 3
× 1
h/d) (1
3
/
3
/
15
/
in.)
4
8
16
Rotary
Approx. 70 g (2.47 oz.)
Commander
Mounting hardware (1)
Labels (8)
Cramper (1)
Operating Instructions
Mode d'emploi
Approx. 43 × 83 × 49 mm (l/h/
× 3
× 1
Bedienungsanleitung
p) (1
3
/
3
/
15
/
pouces)
4
8
16
Approx. 70 g (2,47 onces)
Manual de instrucciones
Vis (1)
Matériel de montage (1)
Gebruiksaanwijzing
Etiquettes (8)
Bruksanvisning
Agrafe (1)
Istruzioni per l'uso
Manual de instruções
ca. 43 × 83 × 49 mm (B/H/T)
¤ˇ¥˛»¡'œfi
ca. 70 g
Schraube (1)
RM-X4S
Montageteil (1)
Aufkleber (8)
Klammer (1)
Sony Corporation 1998
Printed in Japan
43 × 83 × 49 mm. aprox. (an/al/
f)
Specifiche
70 g. aprox.
Dimensioni Appross. 43 × 83 × 49 mm (l/a/p)
Tornillo (1)
Peso Appross.
70 g
Ferretería de montaje (1)
Accessori in dotazione Vite (1)
Etiquetas (8)
Staffa di montaggio (1)
Fijador de cables (1)
Etichette (8)
Morsetto (1)
Especificações
Ong. 43 × 83 × 49 mm (b/h/d)
Aprox. 43 × 83 × 49 mm (l/a/p)
Ong. 70 g
Dimensöes
Peso
Aprox. 70 g
Schroef (1)
Acessórios fornecidos Parafuso (1)
Bevestigingselementen (1)
Material de montagem (1)
Labels (8)
Etiquetas (8)
Klemband (1)
Braçadeira (1)
‡Wfi
Ca 43 × 83 × 49 mm (b/h/d)
‹ø 43 × 83 × 49mm¡]"ł / "/ ...e¡^
⁄ ⁄o
Ca 70 g
›«¶q
‹ø 70g
" ˜ „s¥
`‡ • v (1)
Monteringsdel (1)
ƒw‚¸„D¤ª (1)
Etiketter (8)
...—ˆ– (8)
Krampa (1)
" § –a (1)
SOUND
MODE
LIST
SEL
MODE
SOUN D
LIST
MODE
MODE
FILE
SOUN D
LIST
Bij de bedieningssatelliet worden acht functielabels geleverd.
Bevestig het juiste label voor de functies van de aangesloten
speler en de montagepositie van de bedieningssatelliet.
Als op uw speler de toets SEL aanwezig is:
Gebruik het label FILE voor een speler met een custom file-
functie (functie gebruikersbestand). Gebruik voor andere
apparaten het label DSPL.
Als op uw speler de toets SOUND aanwezig is:
Gebruik het label SOUND.
Zie "De labels van de bedieningssatelliet" of "De label
bevestigen aan de bedieningssatelliet" in de handleiding bij de
speler.
Åtta etiketter medföljer vridkontrollen. Fäst rätt etikett för rätt
funktion (på den anslutna huvudenheten) på motsvarande
ställe på vridkontrollen.
Om du har en huvudenhet med knappen SEL:
Använd FILE för den huvudenhet som har funktionen för eget
minne. För andra enheter använder du etiketten DSPL.
Om du har en huvudenhet med knappen SOUND:
Använd etiketten SOUND.
Se "Ettiketter för den roterbara fjärrkontrollen" eller "Fästa
etiketten på vridkontrollen" i bruksanvisningen till
huvudenheten.
Assieme al comando a rotazione sono fornite apparecchi
etichette di identificazione dei tasti. Applicare l'etichetta
corrispondente alle funzioni dell'apparecchio collegato e alla
posizione di montaggio del comando a rotazione.
Se l'apparecchio principale è provvisto del tasto SEL:
Utilizzare l'etichetta FILE se sull'apparecchio principale è
presente la funzione di schedario personalizzato e l'etichetta
DSPL negli altri casi.
Se l'apparecchio principale è provvisto del tasto SOUND:
Utilizzare l'etichetta SOUND.
Consultare la sezione "Etichette del comando a rotazione" o la
sezione sul collegamento dell'etichetta al comando a rotazione
nelle istruzioni d'uso dell'apparecchio principale.
O comando rotativo é fornecido com oit etiquetas com o nome
das teclas. Cole no comando a etiqueta que indica as funções
do aparelho principal ligado e a posição de instalação do
comando rotativo.
Se o aparelho principal estiver equipado com a tecla SEL:
Utilize a etiqueta FILE para um aparelho principal equipado com
a função de ficheiro personalizado e a etiqueta DSPL para os
outros aparelhos.
Se o aparelho principal estiver equipado com a tecla SOUND:
Utilize a etiqueta SOUND.
Consulte as secções "Etiquetas do telecomando rotativo" ou
"Colar a etiqueta no telecomando rotativo" nas instruções de
funcionamento do aparelho principal.
– ´ «‹»»–– „" ƒ‡
8 –i
§@` ƒW" ...—ˆ–
- ‰—« • ' ‡s–
""¥D
""¥\fl 'M»»–– „""ƒw'æƒ ‚m¿
ƒX A""...—ˆ–¤ˇ¥˛
-
ƒp"G¥D
ƒ‡ SEL ` ¡R
„ ƒ‡...˘
ƒ ‰s¥\fl ""¥D
FILE ...—ˆ–¡M¤ ¥L¥D
¡M¥˛
¥˛
DSPL ...—
ˆ– -
ƒp"G¥D
ƒ‡ SOUND ` ¡R
‰—¤ˇ¥˛ SOUND ...—¯ -
‰—
• ¥D
¤ˇ¥˛»¡'œfi ⁄⁄""¡§– ´ «‹»»–– „""...—ˆ–¡¤'˛¡§ƒpƒ
– ´ «‹»»–– „⁄W¶K...—ˆ–¡¤⁄@‚'
-

Verwandte Anleitungen für Sony RM-X4S


Inhaltszusammenfassung für Sony RM-X4S
- Seite 1 Hauptgeräts bzw. der schnurlosen Fernbedienung. Manual de instruções Technische Daten refer to the operating instructions of your Sony car audio equipment. touches et des commandes, reportez-vous au mode d’emploi de votre consulte el manual de instrucciones del equipo de audio Sony para Nähere Erläuterungen zu den Funktionen der einzelnen Tasten und...
- Seite 2 1 VOL Á]Ý ¦qÁ^ÐÐÛ ã in de handleiding van uw Sony audio-apparatuur voor in de auto. till Sonys billjudutrustning. equipamento áudio da Sony para automóveis. 2 SEEK/AMS Á]áM¤ Á Ý É ¥PÒ Á^ÐÐÛ...