Sony RM-X6S Bedienungsanleitung
Infrarot
1
1
2
3
+ side up
Seite + nach oben
Pôle + vers le haut
2
(ATT)
(OFF)
Direction of infrared signal
Richtung des Infrarotsignals
Direction du signal infrarouge
1
Stick knob
2
Joystick-Kopf
(MODE)
Molette
multidirectionnelle
3
+
DISC
PUSH
.
>
5
m
SOURCE
M
DISC
-
4
6
4
3
./> control
SOURCE control
Regler ./>
Regler SOURCE
Commande ./>
Commande SOURCE
By pressing the control
By pressing the control
Drücken des Reglers
Drücken des Reglers
En appuyant sur la commande
En appuyant sur la commande
5
6
DISC +/– control
VOL control
Regler DISC +/–
Regler VOL
Commande DISC +/–
Commande VOL
By pressing the control
By rotating the control
Drücken des Reglers
Drehen des Reglers
En appuyant sur la commande
En tournant la commande
Features
Merkmale und Funktionen
• Viewless operation
• Bedienung ohne Sichtkontakt
• Installation flexibility
• Mehrere Installationsmöglichkeiten
• Detachable for theft prevention
• Zum Schutz vor Diebstahl abnehmbar
Only master units marked with
are controllable with this rotary
Nur mit
commander. For details on available models of master unit, consult your
steuern. Weitere Informationen zu verfügbaren Hauptgerätemodellen
nearest Sony dealer.
erhalten Sie bei Ihrem Sony-Händler.
Precautions
Sicherheitsmaßnahmen
• Do not spray the rotary commander with deodorant, or the surface of the
• Sprühen Sie kein Deodorant auf den Joystick. Andernfalls kann die
rotary commander may be damaged.
Oberfläche des Joysticks beschädigt werden.
• Do not cover the infrared emitter with your hand while operating the
• Decken Sie den Infrarotsender nicht mit der Hand ab, während Sie den
rotary commander.
Joystick bedienen.
The functions of the master unit are controllable with identical
Die Funktionen des Hauptgeräts lassen sich mit den Tasten und
buttons and controls on the rotary commander corresponding to
Reglern am Joystick steuern, die den Bedienelementen am
the master unit. For details on these functions, refer to the
Hauptgerät entsprechen. Näheres zu diesen Funktionen finden Sie
operating manual for the master unit.
in der Bedienungsanleitung zu dem Hauptgerät.
1
Replacing the lithium battery (
)
Austauschen der Lithiumbatterie (
1 Opening the battery compartment lid
1 Öffnen des Batteriefachdeckels
Hold the infrared adjusting dial and open the battery compartment lid
Halten Sie den Regler zum Einstellen der Infrarotstrahlen fest, und
by rotating counter-clockwise with a coin.
öffnen Sie den Batteriefachdeckel, indem Sie ihn mit einer Münze gegen
den Uhrzeigersinn drehen.
2 Removing the battery
Press the side of the battery as illustrated, then remove.
2 Herausnehmen der Batterie
Drücken Sie wie in der Abbildung dargestellt auf eine Seite der Batterie,
3 Inserting the battery
und nehmen Sie sie heraus.
Insert the battery as illustrated. Make sure the polarity of the battery is
oriented in the correct way.
3 Einlegen der Batterie
Legen Sie die Batterie wie in der Abbildung dargestellt ein. Achten Sie
Note on lithium battery life
dabei auf die richtige Polarität der Batterie.
• The battery will last for approximately 1 year in normal operation.
• When the battery becomes weak, you will not be able to operate the unit
Hinweise zur Lebensdauer der Lithiumbatterie
with the rotary commander. Replace the battery as soon as possible with a
• Unter normalen Bedingungen halten die Batterien etwa 1 Jahr.
new CR2032 lithium battery.
• Wenn die Batterie schwächer wird, können Sie das Gerät nicht mehr mit
dem Joystick steuern. Tauschen Sie die Batterie so bald wie möglich
Notes on lithium battery
gegen eine neue CR2032-Lithiumbatterie aus.
• Keep the lithium battery out of the reach of children. Should the battery
be swallowed, immediately consult a doctor.
Hinweise zur Lithiumbatterie
• Wipe the battery with a dry cloth to assure a good contact.
• Halten Sie die Lithiumbatterie von Kindern fern. Falls ein Kind die Batterie
• Be sure to observe the correct polarity when installing the battery.
verschluckt, bringen Sie es bitte sofort zu einem Arzt.
• Do not hold the battery with metallic tweezers, otherwise a short-circuit
• Wischen Sie die Batterie mit einem trockenen Tuch ab, damit die Kontakte
may occur.
sauber sind und gut funktionieren.
• Achten Sie beim Einlegen der Batterie auf die korrekte Polarität.
WARNING
• Halten Sie die Batterie nicht mit einer Metallpinzette. Andernfalls kann es
zu einem Kurzschluß kommen.
Battery may explode if mistreated.
Do not recharge, disassemble, or dispose of in fire.
VORSICHT
Die Batterie kann bei falscher Handhabung explodieren!
Auf keinen Fall darf sie aufgeladen, auseinandergenommen oder ins
Feuer geworfen werden.
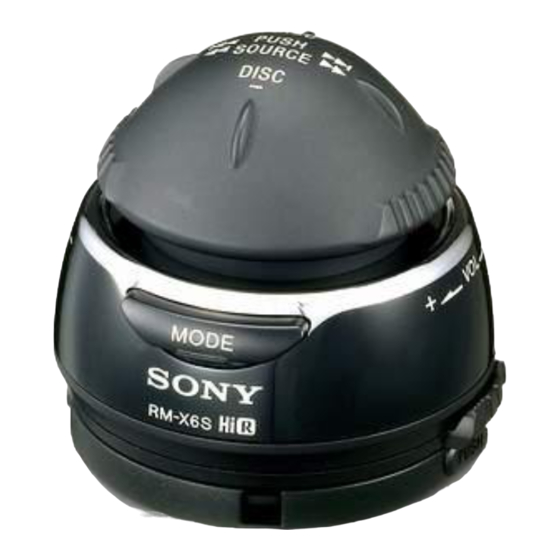
Location and Function of Controls
(
2
)
Press
To
Lage und Funktion der Teile und
(MODE)
Change operation
(Radio band/CD unit/MD unit
Bedienelemente
/Tape playback direction/TV
*
1
, etc.)
(ATT)
Attenuate sound
Drücken Sie
(OFF)
*
2
Stop playback or radio reception
(MODE)
1 Infrared rays dial
Rotate the dial to change the direction of infrared rays.
(ATT)
2 Infrared emitter
(OFF)
*
2
The rotary commander emits infrared rays in the direction of the dial
setting.
1 Regler für Infrarotstrahlen
Drehen Sie den Regler, um die Richtung der Infrarotstrahlen zu
Stick knob operation
ändern.
3 SOURCE control
Press the control to change the source.
2 Infrarotsender
(Radio/CD/MD/Tape/TV*
1
/AUX, etc.)
Der Joystick gibt die Infrarotstrahlen in der Richtung aus, die mit dem
Regler eingestellt ist.
4 ./> control
Bedienen des Joystick-Kopfes
Press to:
— tune in stations automatically.
3 Regler SOURCE
— skip tracks on the disc.
Durch Drücken des Reglers wechseln Sie die Tonquelle.
— locate the beginning of tracks on the tape.
(Radio/CD/MD/Kassette/TV*
Press and hold to:
4 Regler ./>
— find a station manually.
Drücken Sie den Regler zum:
— fast-forward/reverse a track.
— automatischen Einstellen von Sendern.
— first-wind the tape.
— überspringen von Titeln.
5 DISC +/– control
— ansteuern des Anfangs von Titeln auf der Kassette.
Press to:
Halten Sie den Regler gedrückt zum:
— receive preset stations.
— manuellen Einstellen von Sendern.
— change the disc.
— Vorwärts-/Rückwärtssuchen in einem Titel.
— change the album.
*
3
— spulen der Kassette.
Press and hold to:
5 Regler DISC +/–
— change the album.
4
*
Drücken Sie den Regler zum:
— gespeicherte Sender einstellen.
6 VOL control
— die CD/MD wechseln.
Rotate the control to adjust the volume.
— Wechseln des Albums.*
Halten Sie den Regler gedrückt zum:
*
1
Only in the U.S.A. and Canada models.
— Wechseln des Albums.*
2
*
If your car has no ACC (accessory) position on the ignition key switch, be
sure to press (OFF) for 2 seconds to turn off the clock indication after
6 Regler VOL
turning off the ignition.
Stellen Sie durch Drehen des Reglers die Lautstärke ein.
*
3
When an MP3 file is played back on an MP3 compatible master unit.
*
4
When an MP3 file is played back on a CD unit (MP3 compatible)
connected to the master unit.
1
nur bei den Modellen für USA und Kanada.
*
*
2
Wenn Ihr Fahrzeug nicht über ein Zündschloß mit Zubehörposition (ACC
oder I) verfügt, halten Sie unbedingt 2 Sekunden lang (OFF) gedrückt,
um die Uhrzeitanzeige auszuschalten. Andernfalls wird der Autobatterie
weiterhin Strom entzogen.
*
3
Wenn eine MP3-Datei auf einem MP3-kompatiblen Hauptgerät
wiedergegeben wird.
*
4
Wenn eine MP3-Datei auf einem CD-Gerät (MP3-kompatibel)
wiedergegeben wird, das an das Hauptgerät angeschlossen ist.
Caractéristiques
• Utilisation par reconnaissance tactile
• Plusieurs options d'installation
• Amovible pour prévenir les risques de vol
Ce satellite de commande contrôle uniquement les appareils principaux
markierte Hauptgeräte lassen sich mit diesem Joystick
portant le symbole
. Pour de plus amples informations concernant
les modèles d'appareils principaux en vente, contactez votre revendeur
Sony le plus proche.
Précautions
• Ne pas vaporiser de déodorant sur le satellite de commande pour ne
pas endommager la finition.
• Ne pas couvrir l'émetteur à infrarouges avec la main pendant
l'utilisation du satellite de commande.
Les touches et les commandes du satellite de commande
permettent de commander les mêmes fonctions que les touches et
commandes de l'appareil principal. Pour de plus amples
informations sur ces fonctions, reportez-vous au mode d'emploi de
l'appareil principal.
1
)
Remplacement de la pile au lithium (
1 Ouverture du couvercle du logement de la pile
Saisissez la molette de réglage de direction des rayons infrarouges et
ouvrez le couvercle du logement de la pile en le faisant tourner dans le
sens contraire des aiguilles d'une montre avec une pièce de monnaie.
2 Retrait de la pile
Appuyez sur le côté de la pile comme indiqué, puis retirez-la.
3 Mise en place de la pile
Insérez la pile comme indiqué dans l'illustration. Veillez à installer la
pile en respectant la polarité.
Remarques concernant la durée de vie de la pile au lithium
• Dans les conditions d'utilisation normales, la pile dure environ 1 an.
• Lorsque la pile faiblit, il n'est plus possible de commander l'appareil avec
le satellite de commande. Remplacez la pile le plus tôt possible par une
nouvelle pile au lithium CR2032.
Remarques concernant la pile au lithium
• Gardez la pile au lithium hors de portée des enfants. En cas d'ingestion
de la pile, consultez un médecin sans tarder.
• Nettoyez la pile avec un chiffon sec afin d'assurer un contact optimal.
• Respectez la polarité lorsque vous installez la pile.
• Ne manipulez pas la pile avec des pinces métalliques. Cette opération
pourrait provoquer un court-circuit.
ATTENTION
Utilisée de façon incorrecte, la pile peut exploser. Ne pas la recharger,
la démonter ni la jeter au feu.
Emplacement et fonction des commandes
2
(
)
(
2
)
Funktion
Appuyer sur
Pour
Wechseln des Modus
(MODE)
changer de fonction
(Radiofrequenzbereich/CD-Gerät/MD-Gerät/
(bande radio/lecteur CD/lecteur MD/sens de
Bandwiedergaberichtung/Fernsehgerät
*
1
usw. )
lecture de la cassette/TV
Dämpfen des Tons
(ATT)
Atténuer le son
Stoppen der Wiedergabe oder des Radioempfangs
(OFF)
*
2
Arrêter la lecture ou l'écoute de la radio
1 Molette de réglage des rayons IR
Tournez la molette pour modifier la direction des rayons infrarouges.
2 Emetteur à infrarouges
Le satellite de commande transmet des rayons infrarouges dans la
direction réglée avec la molette.
Fonctionnement de la molette multidirectionnelle
3 Commande SOURCE
Appuyez sur la commande pour changer de source.
(Radio/CD/MD/Cassette/TV*
1
/AUX usw.)
4 Commande ./>
Appuyez sur cette commande pour :
— passer d'une plage à l'autre.
— rechercher des stations automatiquement.
— repérer le début des pistes sur la bande.
Maintenez cette commande enfoncée pour :
— trouver une station manuellement.
— avancer rapidement/revenir en arrière dans une plage.
— rembobiner d'abord la bande.
5 Commande DISC +/–
Appuyez sur cette commande pour :
— écouter des stations prédéfinies.
— changer le disque.
— passer d'un album à l'autre.*
3
Maintenez cette commande enfoncée pour :
— passer d'un album à l'autre.*
4
6 Commande VOL
Réglez le volume en faisant tourner la commande.
*
1
Modèles pour les E-U et le Canada uniquement.
*
2
Si votre voiture ne dispose pas de position ACC (accessoires) au niveau
du contact, assurez-vous d'éteindre l'appareil en appuyant sur (OFF)
pendant 2 secondes afin d'éteindre l'affichage de l'horloge après avoir
coupé le contact.
3
Lors de la lecture d'un fichier MP3 sur un appareil principal compatible
*
MP3.
4
Lors de la lecture d'un fichier MP3 sur un lecteur CD compatible MP3
*
raccordé à l'appareil principal.
Specifications
Dimensions
Approx. 55 × 53 × 55 mm
(w/h/d)
(2
1
/
× 2
1
/
× 2
1
/
in.)
4
8
4
Mass
Approx. 55 g (2 oz.)
Supplied accessories Screw (1)
Mounting holder (1)
Strap (1)
Lithium battery CR2032 (1)
Technische Daten
ca. 55 × 53 × 55 mm (B/H/T)
Abmessungen
Gewicht
ca. 55 g
Mitgeliefertes Zubehör
Schraube (1)
Montagehalterung (1)
Riemen (1)
CR2032-Lithiumbatterie (1)
Spécifications
Approx. 55 × 53 × 55 mm
Dimensions
(l/h/p)
× 2
× 2
(2
1
/
1
/
1
/
po.)
4
8
4
1
)
Masse
Approx. 55 g (2 on.)
Accessoires fournis
Vis (1)
Support de montage (1)
Courroie (1)
Pile au lithium CR2032 (1)
Specifiche
Circa. 55 × 53 × 55 mm
Dimensioni
(l/a/p)
Peso
Circa. 55 g
Accessori in dotazione Vite (1)
Supporto di montaggio (1)
Cordino (1)
Batteria al litio CR2032 (1)
Specificaties
Ong. 55 × 53 × 55 mm (b/h/d)
Afmetingen
Gewicht
Ong. 55 g
Meegeleverde accessoires
Schroef (1)
Houder (1)
Riem (1)
CR2032 lithiumbatterij (1)
Especificaciones
Aprox. 55 ×53 × 55 mm
Dimensiones
(an/al/f)
Peso
Aprox. 55 g
Accesorios suministrados
Tornillo (1)
Soporte de montaje (1)
Correa (1)
Pila de litio CR2032 (1)
規格
*
1
, etc.)
約 55 × 53 × 55 mm
尺寸
(長/高/寬)
重量
約 55 g
附屬零件
螺絲釘 (1)
安裝底座 (1)
保險帶 (1)
CR2032 鋰電池 (1)
1
/AUX, etc.)
3
4
3-243-260-11 (1)
Wireless Rotary
Commander
Operating Instructions
Bedienungsanleitung
Mode d'emploi
Istruzioni per l'uso
Gebruiksaanwijzing
Manual de instrucciones
使用說明書
RM-X6S
Sony Corporation 2002 Printed in Japan
WARNING
This equipment has been tested and found
to comply with the limits for a Class B
digital device, pursuant to Part 15 of the
FCC Rules. The limits are designed to
provide reasonable protection against
harmful interference in a residential
installation. This equipment generates,
uses, and can radiate radio frequency
energy and, if not installed and used in
accordance with the instructions, may cause
harmful interference to radio
communications. However, there is no
guarantee that interference will not occur in
a particular television reception, which can
be determined by turning the equipment
off and on, the user is encouraged to try to
correct the interference by one or more of
the following measures:
— Reorient or relocate the receiving
antenna.
— Increase the separation between the
equipment and receiver.
— Connect the equipment into an outlet on
a circuit different from that to which the
receiver is connected.
— Consult the dealer or an experienced
radio/TV technician for help.
You are cautioned that any changes or
modifications not expressly approved in
this manual could void your authority to
operate this equipment.
THIS DEVICE COMPLIES WITH PART 15
OF THE FCC RULES. OPERATION IS
SUBJECT TO THE FOLLOWING
TWO CONDITIONS;
(1) THIS DEVICE MAY NOT CAUSE
HARMFUL INTERFERENCE, AND
(2) THIS DEVICE MUST ACCEPT ANY
INTERFERENCE RECEIVED, INCLUDING
INTERFERENCE THAT MAY CAUSE
UNDESIRED OPERATION.
VARNING
Explosionsfara vid felaktigt batteribyte.
Använd samma batterityp eller en likvärdig typ
som rekommenderas av apparattillverkaren.
Kassera använt batteri enligt gällande
föreskrifter.
Entsorgungshinweis
Bitte werfen Sie nur entladene Batterien in die
Sammelboxen beim Handel oder den Kommunen.
Entladen sind Batterien in der Regel dann, wenn
das Gerät abschaltet und signalisiert „Batterie
leer" oder nach längerer Gebrauchsdauer der
Batterien „nicht mehr einwandfrei funktioniert".
Um sicherzugehen, kleben Sie die Batteriepole
z.B. mit einem Klebestreifen ab oder geben Sie
die Batterien einzeln in einen Plastikbeutel.
Voor de Klanten in Nederland
Gooi de batterij niet weg maar
lever deze in als klein chemisch
afval (KCA).
Printed on 100 % recycled paper.

Verwandte Anleitungen für Sony RM-X6S


Inhaltszusammenfassung für Sony RM-X6S
- Seite 1 Masse Approx. 55 g (2 on.) 1 Opening the battery compartment lid 1 Öffnen des Batteriefachdeckels Sony Corporation 2002 Printed in Japan Accessoires fournis Vis (1) Hold the infrared adjusting dial and open the battery compartment lid Halten Sie den Regler zum Einstellen der Infrarotstrahlen fest, und Support de montage (1) by rotating counter-clockwise with a coin.
- Seite 2 . Si desea información adicional sobre los modelos de 近的 Sony 銷售商聯繫。 informazioni sui modelli di unità principali disponibili, rivolgersi al più vicino details over hoofdtoestellen. unidades principales disponibles, póngase en contacto con su distribuidor Sony rivenditore Sony. más cercano. 注意事項...