Clearaudio Magnify Bedienungsanleitung
Vorschau ausblenden
Andere Handbücher für Magnify:
- Bedienungsanleitung (40 Seiten) ,
- Bedienungsanleitung (26 Seiten) ,
- Bedienungsanleitung (22 Seiten)
Inhaltsverzeichnis
Verfügbare Sprachen
Verfügbare Sprachen
Quicklinks
Kapitel
Inhaltsverzeichnis

Verwandte Anleitungen für Clearaudio Magnify


Inhaltszusammenfassung für Clearaudio Magnify
- Seite 1 Magnify User manual Bedienungsanleitung © clearaudio electronic GmbH, 2017/02 Made in Germany...
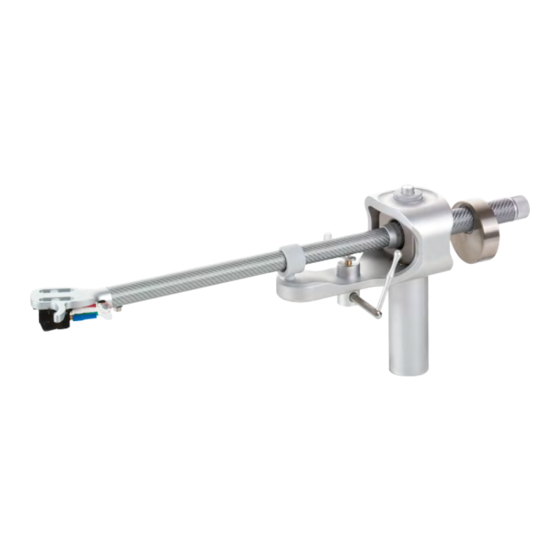
- Seite 12 Sie haben mit dem Tonarm einen der besten Drehtonarme der High-End Welt erworben. Dieser innovative Drehtonarm verfügt über eine, von clearaudio entwickelte, einzigartige Kugel- lager – Magnet- Hybridlagerung. Dies ermöglicht Ihnen eine höchst - qualitative Musikwiedergabe und weitere raffinierte Optionen für die Feinjustage des Headshells, des Azimuths, sowie des VTAs (optional), sogar während des Abspielens.
- Seite 13 User manual / Bedienungsanleitung Inhaltsverzeichnis 1. Lieferumfang ..............14 Magnify 2. Montage des Tonarms ........15 - 17 Magnify 3. Einstellungen des Tonarms ....... 18 - 19 4. Service ................20 5. Technische Daten ............21 Garantieinformationen ............22 Made in Germany...
-
Seite 14: Lieferumfang
Tonarmbasis und Schrauben: - 3 x M4 x 10 Hilfreiches Zubehör: Tonarmeinstellschablone • clearaudio , Art. Nr. AC005 / IEC; • clearaudio Weight Watcher (zur Messung der Auflagekraft des Tonabnehmers), Art.Nr. AC094 Erhältlich über www.analogshop.de © clearaudio electronic GmbH, 2017/02... -
Seite 15: Montage Des Magnify Tonarms
Bitte beachten Sie, dass diese Montageanleitung zur Installation des Tonarms nur für clearaudio Plattenspieler gilt. Sie können den Magnify – Tonarm auch auf anderen Plattenspielern installieren, allerdings gehen wir in dieser Anleitung nicht gesondert darauf ein. Bei Fremdfabrikaten folgen Sie bitte den Hinweisen in der Bedienungsanleitung des jeweiligen Herstellers. -
Seite 16: Einstellung Der Tonarmhöhe Mit Vta-Lifter
User manual / Bedienungsanleitung Zur exakten Einstellung des Drehpunktes des Tonarms empfehlen wir die clearaudio Drehtonarm- Einstellschablone / IEC (Art. Nr. AC 005, auch erhältlich über www.analogshop.de. Beachten Sie hierbei, dass der Abstand der Spindel zum Drehpunkt des Tonarms exakt 222 mm betragen muss! (siehe Abb. - Seite 17 Magnify Abb. 6: Ansicht Tonarm ohne VTA-Lifter Nehmen Sie die Magnify – Montierbasis aus der Verpackungsebene und befestigen Sie diese mit den mitgelieferten Schrauben auf der vormontier- ten Tonarmbasis (siehe Abb. 7). Führen Sie das Tonarmkabel des Magnify - Tonarms durch die Montageplatte und schieben Sie den Ton- armfuss in die Bohrung der Montageplatte.
-
Seite 18: Einstellungen Des Magnify Tonarms
Sie bitte wie folgt: Lösen Sie die Schraube seitlich am Tonarmrohr nahe des Headshells (#1,5). Jetzt können Sie den Azimuth durch Drehen des Heads- hells im Tonarmrohr verstellen. Abb. 10: Azimuth Einstellung © clearaudio electronic GmbH, 2017/02... -
Seite 19: Einstellung Antiskating
Vor dem erstmaligen Benutzen oder nach längerem Stillstand müssen Sie den Lift ca. 4-5 x betäti- gen, damit sich das Fett im Tonarmlift lösen kann und die Liftbank gleichmäßig und ordnungsgemäß abgesenkt werden kann. Die Tonarmjustage ist nun abgeschlossen. Magnify Wir wünschen Ihnen viel Hörvergnügen mit Ihrem neuen Tonarm. Ihr clearaudio Team Made in Germany... -
Seite 20: Service
Andernfalls könnte Ihr Tonarm ernsthafte Schäden davon tragen. 4.3 Pflege Wenn eine Wartung oder Reparatur an einem clearaudio Produkt erforderlich ist, wenden Sie sich bitte zuerst immer an Ihren Händler oder Vertriebspartner. Alternativ können Sie clearaudio direkt kontaktieren und wir werden Sie von Ihrer nächstgelegenen Servicestelle beraten. -
Seite 21: Technische Daten
133 mm und 83.9 mm: Effektive Tonarmlänge: 239,3 mm Gesamtlänge: 345 mm Tonarmaufnahmebohrung: clearaudio (Bohrungsdurchmesser: 24,85 mm) Gewicht: 620 g (inkl. Gegengewicht) Garantie: 5 Jahre* * Bitte Garantiekarte ausfüllen innerhalb von 14 Tagen an clearaudio zurück senden Made in Germany... -
Seite 22: Warranty Information
User manual / Bedienungsanleitung To achieve the full Clearaudio warranty, it is necessary that you fill out and send the corresponding part of the warranty registration certificate /card back to Clearaudio, within two weeks after purchase. Only if the product is returned in it’s... - Seite 24 91054 Erlangen Germany Phone/Tel.: +49 9131 40300 100 Fax: +49 9131 40300 119 www.clearaudio.de www.analogshop.de info@clearaudio.de Handmade in Germany (Technische Änderungen vorbehalten - Technical specification are subject to change without pror notification) 2017 © clearaudio electronic GmbH, 2017/02 Made in Germany...