Inhaltsverzeichnis
Werbung
Verfügbare Sprachen
Verfügbare Sprachen
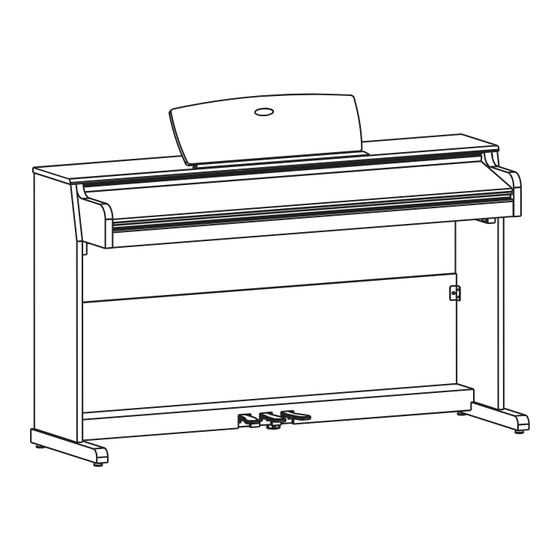
Digital-Piano „DP-263"
Digital Piano „DP-263"
Piano numérique « DP-263 »
Digitale piano „DP-263"
Best.-Nr. / Item No. / N° de commande / Bestelnr.: 30 43 03
Bedienungsanleitung
Operating instructions
Mode d'emploi
Gebruiksaanwijzing
Seite 2 - 35
Page 36 - 69
Page 70 - 103
Pagina 104 - 137
30 48 54
Version 11/12
Werbung
Kapitel
Inhaltsverzeichnis

Inhaltszusammenfassung für MC Crypt DP-263
- Seite 1 Digital-Piano „DP-263“ Digital Piano „DP-263“ Piano numérique « DP-263 » Digitale piano „DP-263“ Best.-Nr. / Item No. / N° de commande / Bestelnr.: 30 43 03 30 48 54 Bedienungsanleitung Seite 2 - 35 ...
-
Seite 2: Inhaltsverzeichnis
Inhaltsverzeichnis Seite 1. Einführung ........................................ 4 2. Bestimmungsgemäße Verwendung ............................... 4 3. Lieferumfang ......................................5 4. Symbol-Erklärung ....................................5 5. Sicherheitshinweise ....................................5 6. Beschreibung der Einzelteile .................................. 7 7. Zusammenbau ......................................8 a) Seitenteile und Fußpdeal zusammensetzen ............................8 b) Rückwand festschrauben .................................. - Seite 3 Seite 14. Funktionseinstellungen ..................................23 a) Funktion „Transpose“ ..................................23 b) Funktion „Tune“ ....................................23 c) Funktion „Beat“ ....................................23 d) Funktion „Touch“ ....................................23 e) Funktion „Split-Point“ ................................... 24 f) Funktion „DSP-Level“ ..................................24 g) Funktion „MIDI-IN-Channel“ ................................24 h) Funktion „MIDI-OUT-Channel“...
-
Seite 4: Einführung
1. Einführung Sehr geehrte Kundin, sehr geehrter Kunde, wir bedanken uns für den Kauf dieses Produkts. Dieses Produkt entspricht den gesetzlichen, nationalen und europäischen Anforderungen. Diese Bedienungsanleitung gehört zu diesem Produkt. Sie enthält wichtige Hinweise zur Inbetriebnahme und Handha- bung. Achten Sie hierauf, auch wenn Sie dieses Produkt an Dritte weitergeben. Heben Sie deshalb diese Bedienungsanleitung zum Nachlesen auf! Alle enthaltenen Firmennamen und Produktbezeichnungen sind Warenzeichen der jeweiligen Inhaber. -
Seite 5: Lieferumfang
3. Lieferumfang • Digital-Piano (Oberteil, linkes Seitenteil, rechtes Seitenteil, Rückwand, Fußpedal-Box, Montagematerial) • Bedienungsanleitung 4. Symbol-Erklärung Dieses Symbol wird verwendet, wenn Gefahr für Ihre Gesundheit besteht, z.B. durch elektrischen Schlag. Das Symbol mit dem Ausrufezeichen weist Sie auf besondere Gefahren bei Handhabung, Betrieb oder Bedienung hin. Das „Pfeil“-Symbol steht für spezielle Tipps und Bedienhinweise. - Seite 6 • Stellen Sie keine Gefäße mit Flüssigkeiten, z.B. Gläser, Eimer, Vasen oder Pflanzen, auf das Gerät oder in seine unmittelbare Nähe. Flüssigkeiten könnten ins Gehäuseinnere gelangen und dabei die elektrische Sicherheit beeinträchtigen. Außerdem be- steht höchste Gefahr eines Brandes oder eines lebensgefährlichen elektrischen Schlages! Schalten Sie in einem solchen Fall die zugehörige Netzsteckdose stromlos (z.B.
-
Seite 7: Beschreibung Der Einzelteile
6. Beschreibung der Einzelteile Oberteil mit Tastatur Rechtes Seitenteil Linkes Seitenteil Rückwand Fußpedale Griff-Schraube (4 Stück) Schraube Ø6mm x 30mm (4 Stück) Schraube Ø4mm x 15mm (5 Stück) Kabelhalterung mit Klebepad 10 Netzkabel 11 Schraube Ø6mm x 12mm (2 Stück) 12 Kabel des Fußpedals... -
Seite 8: Zusammenbau
7. Zusammenbau Aufgrund der großen und schweren Einzelteile ist die Hilfe einer zweiten Person sehr empfehlenswert! Durch das Umfallen der schweren Teile besteht nicht nur Verletzungsgefahr, sondern auch die Gefahr der Beschädigung des Produkts. a) Seitenteile und Fußpedal zusammensetzen Erforderliche Schrauben: Ø6mm x 30mm, 4 Stück Setzen Sie wie im Bild gezeigt die beiden Seitenteile und das Fußpedal mit den 4 Schrauben (Ø6mm x 30mm) zusammen. -
Seite 9: Oberteil Mit Tastatur Montieren
c) Oberteil mit Tastatur montieren Setzen Sie das Oberteil auf die beiden Seitenteile auf. Mit den vier Griff-Schrauben kann das Oberteil dann fixiert werden. d) Fußpedal am Oberteil anschließen, Kabel fixieren, Gerät aufstellen Verbinden Sie den Stecker des Fußpedals mit der entsprechenden Buchse am Oberteil. Mit den zwei Kabelhalterungen kann sowohl das Netzkabel als auch das Kabel des Fußpedals an der Rückseite der Rückwand seitlich fixiert werden. -
Seite 10: Bedienelemente
8. Bedienelemente a) Oberteil Bedienfeld Kopfhörer-Buchsen Notenhalter Klaviatur Die Klaviatur ist mit einer Abdeckung versehen, die Sie leicht einschieben und auch wieder herausziehen können. b) Rückseite Fußpedale Netzkabel USB-Buchse Ausgang „AUX OUT“ c) Fußpedale Pedal „Soft“ 10 Pedal „Sostenuto“ 9 10 11 11 Pedal „Sustain“... -
Seite 11: Bedienfeld
d) Bedienfeld Ein-/Ausschalter („POWER“) Haupt-Lautstärkeregler („VOLUME“) Direktwahltasten für den Begleitrhythmus („STYLE“) Funktionstasten für den Begleitrhythmus („START/STOP“, „SYNC“, „INTRO/ENDING“, „FILL A“, „FILL B“, „A.B.C./MELODY OFF“) Lautstärke-Einstellung für die Begleitspuren („ACC VOL +/-“) Tasten „TEMPO -“ und „TEMPO +“ für Geschwindigkeitseinstellung Taste „MIXER“ für die Einstellung der Lautstärke der Audiospuren Taste „FUNCTION“... -
Seite 12: E) Lc-Display
e) LC-Display Symbol für „A.B.C.“ Symbol für „FILL A“ Symbol für „FILL B“ Symbol für „MELODY OFF“ Symbol für „DUAL“ Symbol für „SPLIT“ Symbol für „TOUCH“ Symbol für „RECORD“ Symbole für die verschiedenen Einstellmodi (z.B. Begleitrhythmus „STYLE“ usw.) 10 Anzeigefeld „CHORD“ für die Akkorde 11 Anzeigefeld „TEMPO“... -
Seite 13: Anschlüsse
9. Anschlüsse a) Kopfhörerbuchsen Auf der Unterseite finden Sie zwei Kopfhörer-Buchsen (1) und (2). Bei Anschluss eines Kopfhörers an Buchse (1) erfolgt die Wiedergabe sowohl über den Kopfhörer als auch über die Lautsprecher im Digital- Piano. Bei Anschluss eines Kopfhörers an Buchse (2) werden die Lautspre- cher des Digital-Pianos abgeschaltet, die Wiedergabe erfolgt nur über den Kopfhörer. -
Seite 14: Inbetriebnahme, Anschluss An Die Netzspannung
10. Inbetriebnahme, Anschluss an die Netzspannung Gehen Sie in folgenden Schritten vor: 1. Drehen Sie die Lautstärke auf Minimum zurück („VOLUME“-Dreh- regler). 2. Schalten Sie das Digital-Piano aus. 3. Verbinden Sie den Netzstecker des Digital-Pianos mit einer Netz- steckdose (230 V/AC, 50 Hz). 4. -
Seite 15: Demos Abspielen
11. Demos abspielen Um die Leistungsfähigkeit des Digital-Pianos zu demonstrieren, können insgesamt 3 verschiedene Demo-Songs ausgewählt und abgespielt werden. Drücken Sie gleichzeitig die beiden Tasten „VOICE“ und „STYLE“, um die Wiedergabe des ersten Demo-Songs zu starten. Stellen Sie mit dem Lautstärkeregler („VOLUME“) die gewünschte Laut- stärke ein. -
Seite 16: Instrumente Und Effekte
12. Instrumente und Effekte a) Instrument auswählen („VOICE“) Das Digital-Piano verfügt über insgesamt 210 verschiedene Instrumente. Nach dem Einschalten ist automatisch immer das Instrument „001“ („GrdPiano“ = „Grand Piano“) voreingestellt. Im Display wird oben links der Instrument-Modus „VOICE R1“ angezeigt Im Anhang finden Sie eine Tabelle mit allen Instrumenten. -
Seite 17: C) Split-Funktion, Taste "Split
c) Split-Funktion, Taste „SPLIT“ Die Klaviatur lässt sich in zwei Bereiche aufteilen. Dabei kann z.B. der linke Bereich mit einem Schlagzeug-Instrument belegt werden und der rechte Bereich mit einem herkömmlichen Instrument. Diese Einstellung gilt auch für den Zweiklang-Effekt, siehe dazu das Kapitel 12. -
Seite 18: Begleitrhythmen ("Style")
13. Begleitrhythmen („STYLE“) a) Begleitrhythmus auswählen Das Digital-Piano verfügt über insgesamt 120 verschiedene Begleit- rhythmen. Der jeweils von Ihnen ausgewähltte Begleitrhythmus kann im Hintergrund abgespielt werden. Im Anhang finden Sie eine Tabelle mit allen Begleitrhyth- men. Gehen Sie zur Auswahl eines Begleitrhythmus („STYLE“) wie folgt vor: •... -
Seite 19: C) Automatische Begleitung, Auto-Bass-Chord, Taste „A.b.c./Melody Off
c) Automatische Begleitung, Auto-Bass-Chord, Taste „A.B.C./MELODY OFF“ • Drücken Sie die Taste „A.B.C./MELODY OFF“, um die sog. „Auto- Bass-Chord“-Funktion zu aktivieren (ein Symbol bei „A.B.C.“ erscheint oben links im Display). Drücken Sie je nach gewünschtem Akkord eine oder mehrere Tasten im linken Bereich (siehe Kapitel 12. -
Seite 20: F) Normal-/Variation-Modus, Tasten „Fill A" Und „Fill B
f) Normal-/Variation-Modus, Tasten „FILL A“ und „FILL B“ Jeder Begleitrhythmus hat zwei verschiedene Variationen („A“ und „B“). Normalerweise ist Version „A“ (Normal-Modus) einfacher ausgelegt (z.B. wenig Schlagzeug-Einsatz) und Version „B“ (Variation-Modus) aufwändiger (z.B. mehr und unterschiedlicher Schlagzeug-Einsatz). • Im Normal-Modus („A“) wird durch Drücken der Taste „FILL A“ ein spezieller Einfüge-Rhythmus abgespielt, dann wird der normale Be- gleitrhythmus weiter abgespielt. -
Seite 21: H) Lautstärke Für Begleitrhythmus Einstellen, Tasten „Acc. Vol
h) Lautstärke für Begleitrhythmus einstellen, Tasten „ACC. VOL“ • Mit den beiden Tasten „ACC. VOL +“ und „ACC. VOL -“ kann die Lautstärke des Begleitrhythmus eingestellt werden. • Durch gleichzeitiges Drücken der beiden Tasten wird die Lautstärke auf „00“ gestellt (Stummschaltung), im Display wird oben links „OFF“ angezeigt. -
Seite 22: Auswahl Eines Akkords
j) Auswahl eines Akkords • Drücken Sie die Taste „A.B.C./MELODY OFF“, um die sog. „Auto- Bass-Chord“-Funktion zu aktivieren (ein Symbol bei „A.B.C.“ erscheint oben links im Display), siehe Kapitel 13. c). • Drücken Sie je nach gewünschtem Akkord eine oder mehrere Tasten im linken Bereich (siehe Kapitel 12. -
Seite 23: Funktionseinstellungen
14. Funktionseinstellungen Durch mehrfaches Drücken der Taste „FUNCTION“ können verschiedene Funktionen aufgerufen werden, die in den nächsten Abschnitten beschrieben werden. Drücken Sie einfach so oft die Taste „FUNCTION“, bis die gewünschte Funktion im Display angezeigt wird. Wenn innerhalb von 5 Sekunden keine Taste gedrückt wird, so wird das Funktionsmenü automatisch verlassen. a) Funktion „Transpose“... -
Seite 24: E) Funktion „Split-Point
e) Funktion „Split-Point“ Beim Aufteilen der Klaviatur in zwei Bereiche (linker Teil der Klaviatur z.B. Schlagzeug, rechter Teil Piano-Instrument) kann mit dieser Funk- tion festgelegt werden, an welcher Stelle die Klaviatur geteilt wird. Drücken Sie so oft die Taste „FUNCTION“, bis „Split pt“ im LC-Display erscheint. -
Seite 25: Mixer
15. Mixer Drücken Sie so oft die Taste „MIXER“, bis im LC-Display die gewünschte Audiospur („Track“) erscheint. Wählen Sie mit dem Drehrad oder den Tasten „+“ bzw. „-“ die Lautstärke für die jeweilige Audiospur aus. Wird für einige Sekunden keine Taste betätigt, werden die Einstellun- gen übernommen und das Mixer-Menü... -
Seite 26: Speicher
16. Speicher Das Digital-Piano verfügt über 4 Speicherbänke mit je 4 Speichern. Damit stehen insgesamt 16 Speicher zur Verfügung, in denen Sie Vorein- stellungen (z.B. eine Kombination aus Begleitrhytmus und Instrument) ablegen können. Diese lassen sich danach per Tastendruck schnell wieder aufrufen. -
Seite 27: O.t.s.", „One-Touch-Setting
17. „O.T.S.“, „One-Touch-Setting“ Für jeden Begleitrhythmus gibt es je 4 unterschiedliche Voreinstellungen. Beispielsweise hat der Hersteller ein zum Begleitrhythmus passendes Instrument ausgesucht. • Wählen Sie zuerst einen Begleitrhytmus aus. • Drücken Sie die Taste „O.T.S.“. Im LC-Display erscheint rechts eine kleine Einblendung „O.T.S.“. -
Seite 28: Aufnahme-Funktion
18. Aufnahme-Funktion a) Aufnahmemodus vorbereiten • Drücken Sie die Taste „REC“, rechts im LC-Display erscheint bei „RECORD“ ein kleines Symbol, außerdem blinkt die Taktanzeige. Dies zeigt Ihnen die Aufnahmebereitschaft an. Die Aufnahme startet jetzt aber noch nicht! • Sie können nun (falls gewünscht) noch ein anderes Instrument oder einen anderen Begleitrhythmus auswählen, die Geschwindigkeit ein- stellen usw.. -
Seite 29: Songs
19. Songs Das Digital-Piano verfügt über 60 verschiedene Songs. Die Melodie ist dabei jeweils abschaltbar; damit Sie diese selbst spielen können. Drücken Sie die Taste „SONG“, eine entsprechende Anzeige erscheint im Display. Mit der Taste „START/STOP“ kann die Wiedergabe gestartet bzw. be- endet werden. -
Seite 30: Handhabung
20. Handhabung Beachten Sie die Sicherheitshinweise und alle anderen Informationen in dieser Bedienungsanleitung Stellen Sie das Gerät auf eine ebene, stabile, ausreichend große Fläche. Stellen Sie das Gerät nicht auf wertvolle Oberflächen, da andernfalls Druckstellen oder Kratzer möglich sind. Verwenden Sie ggf. eine geeignete Unterlage. Durch das hohe Gewicht sind außerdem Druckstellen in Teppichen, Linoleum- oder Korkböden möglich. -
Seite 31: Wartung Und Reinigung
21. Wartung und Reinigung Das Produkt ist für Sie wartungsfrei, öffnen oder zerlegen Sie es niemals. Eine Reparatur darf nur von einer Fachkraft oder Fachwerkstatt vorgenommen werden. Zur Reinigung des Produkts reicht ein trockenes, weiches Tuch. Wir empfehlen Ihnen, das Produkt mit einer geeigneten Abdeckung gegen Staub zu schützen, wenn es längere Zeit nicht verwendet wird. 22. -
Seite 32: Anhang A: Instrumente
24. Anhang A: Instrumente... -
Seite 34: Anhang B: Begleitrhythmen
25. Anhang B: Begleitrhythmen... -
Seite 35: Anhang C: Songs
26. Anhang C: Songs... - Seite 36 Table of contents Page 1. Introduction ......................................38 2. Intended use ......................................38 3. Scope of delivery ....................................39 4. Explanation of symbols ..................................39 5. Safety instructions ....................................39 6. Description of individual parts ................................41 7. Assembly ........................................ 42 a) Assembly of side panels and pedal box ..............................
- Seite 37 Page 14. Function settings ....................................57 a) „Transpose“ function ................................... 57 b) „Tune“ function ....................................57 c) „Beat“ function ..................................... 57 d) „Touch“ function ....................................57 e) „Split Point“ function .................................... 58 f) „DSP Level“ function ................................... 58 g) „MIDI IN Channel“ function .................................. 58 h) „MIDI OUT Channel“...
-
Seite 38: Introduction
1. Introduction Dear Customer, We thank you for purchasing this product. This product meets the requirements of current statutory European and national guidelines. These operating instructions are part of this product. They contain important information concerning operation and handling. Bear this in mind when you pass on this product to others. Therefore, keep these operating instructions for future reference! Any company or product names are trademarks of their respective owners. -
Seite 39: Scope Of Delivery
3. Scope of delivery • Digital piano (top unit, left side panel, right side panel, back panel, pedal box, installation material) • Operating instructions 4. Explanation of symbols This symbol is used when your health is at risk, e.g. through an electric shock. The exclamation mark in a triangle indicates a particular risk in handling, operating or controlling the product. - Seite 40 • Do not place open sources of fire, such as burning candles, on or directly next to the device. • Do not operate the device when it is unattended. • Only use the device in moderate climate and avoid tropical environments. •...
-
Seite 41: Description Of Individual Parts
6. Description of individual parts Top unit with keyboard Right side panel Left side panel Rear panel Pedals 4 knurled screws 4 screws Ø 6mm x 30mm 5 screws Ø 4mm x 15mm Cable holder with stick pad 10 Mains cable 11 2 screws Ø... -
Seite 42: Assembly
7. Assembly Due to the weight of the heavy individual parts, the help of a second person is recommended! Not only can the heavy parts injure you when tipping over, but the product itself might be damaged. a) Assembling the side panels and the pedal box Needed screws: 4 screws Ø... -
Seite 43: C) Attaching The Top Unit With Keyboard
c) Attaching the top unit with keyboard Put the top unit on the two side panels. Use the 4 knurled screws to fasten the top unit. d) Connecting the pedal, installing the cables, positioning the piano Connect the pedal cable with the respective socket at the top unit. Use the two cable holders to secure the mains cable and the pedal cable on the sides at the back of the rear panel. -
Seite 44: Controls
8. Controls a) Top unit Operating panel Headphone sockets Music rack Keyboard The keyboard has a lid which you can easily slide in and out again. b) Back Pedals Mains cable USB socket „AUX OUT“ output c) Pedals „Soft“ pedal 10 „Sostenuto“... -
Seite 45: Control Panel
d) Control panel On/off switch („POWER“) Main volume control („VOLUME“) Direct selection buttons for accompaniment rhythm („STYLE“) Function buttons for the accompaniment rhythm („START/STOP“, „SYNC“, „INTRO/ENDING“, „FILL A“, „FILL B“, „A.B.C./MELODY OFF“) Volume control for accompaniment tracks („ACC VOL +/-“) „TEMPO -“... -
Seite 46: E) Lc Display
e) LC display „A.B.C.“ symbol „FILL A“ symbol „FILL B“ symbol „MELODY OFF“ symbol „DUAL“ symbol „SPLIT“ symbol „TOUCH“ symbol „RECORD“ symbol Setting mode symbols (e.g. accompaniment rhythm „STYLE“ etc.) 10 „CHORD“ display 11 „TEMPO“ display 12 „MEASURE“ display 13 „BEAT“ display 14 „MEMORY/TICK/O.T.S.“... -
Seite 47: Connections
9. Connections a) Headphone sockets Two headphone sockets - (1) and (2) - are located on the underside. When headphones are connected to socket (1), music is played through the headphones as well as the loudspeakers in the digital piano. When headphones are connected to socket (2), the loudspeakers in the digital piano are switched off and music is only played through the headphones. -
Seite 48: Operation, Mains Connection
10. Operation, mains connection Proceed as follows: 1. Turn down the volume completely („VOLUME“ control). 2. Turn off the digital piano. 3. Connect the mains plug of the digital piano to a 230 V/AC, 50 Hz mains socket. 4. Turn on the digital piano. The display lights up. Turn the volume control („VOLUME“) slightly to the right. -
Seite 49: Play Demo Tunes
11. Play demo tunes To demonstrate the capabilities of the digital piano, you can choose between three different demo songs and play them. Press the „VOICE“ and „STYLE“ buttons simultaneously to play the first demo tune. Set the desired volume using the volume control („VOLUME“). Use the control wheel or the „+“... -
Seite 50: Instruments And Effects
12. Instruments and effects a) Select instrument („VOICE“) The digital piano provides a total of 210 different instruments. When the digital piano is switched on, instrument „001“ („GrdPiano“ = „Grand Piano“) is selected. In the top left-hand corner of the display, the instrument mode „VOICE R1“... -
Seite 51: C) Split Function, „Split" Button
c) Split function, „SPLIT“ button The keyboard can be split into two sections. You can, for example, assign a drum instrument to the left section and a common instrument to the right section. This also applies to the dual sound effect. See chapter 12. b). •... -
Seite 52: Accompaniment Rhythms („Style")
13. Accompaniment rhythms („STYLE“) a) Select accompaniment rhythm The digital piano provides a total of 120 different accompaniment rhythms. The accompaniment rhythm selected can be played in the background. See the appendix for a list of all accompaniment rhythms. To select an accompaniment rhythm („STYLE“), proceed as follows: •... -
Seite 53: C) Automatic Accompaniment, Automatic Bass Chord, „A.b.c./Melody Off" Button
c) Automatic accompaniment, automatic bass chord, „A.B.C./MELODY OFF“ button • Press the „A.B.C./MELODY OFF“ button to activate the „automatic bass chord“ function (the „A.B.C.“ symbol is displayed in the top left- hand corner). Depending on the desired chord, press one or more keys in the left keyboard section (see chapter 12. -
Seite 54: F) Normal/Variation Mode, „Fill A" And „Fill B" Buttons
f) Normal/variation mode, „FILL A“ and „FILL B“ buttons Every accompaniment rhythm has two different variations („A“ and „B“). In general, „A“ (normal mode) is simpler (e.g. less drums) than „B“ (variation mode) (e.g. more drums are used in more variations). •... -
Seite 55: H) Set Volume Of Accompaniment Rhythm, „Acc. Vol" Buttons
h) Set volume of accompaniment rhythm, „ACC. VOL“ buttons • Use the „ACC. VOL +“ and „ACC. VOL -“ buttons to set the volume of the accompaniment rhythm. • Press the two buttons simultaneously to set the volume to „00“ (muting). -
Seite 56: J) Selecting A Chord
j) Selecting a chord • Press the „A.B.C./MELODY OFF“ button to activate the „automatic bass chord“ function (the „A.B.C.“ symbol is displayed in the top left- hand corner). See chapter 13. c). • Depending on the desired chord, press one or more keys in the left keyboard section (see chapter 12. -
Seite 57: Function Settings
14. Function settings Press the „FUNCTION“ button repeatedly to activate different functions that are described in the following sections. Press the „FUNCTION“ button repeatedly until the desired function type is displayed. If no button is pressed for five seconds, the function menu is exited automatically. a) „Transpose“... -
Seite 58: E) „Split Point" Function
e) „Split Point“ function This function allows you to determine at what position the keyboard is split into two sections (e.g. left section for drums, right section for pia- no). Press the „FUNCTION“ key repeatedly until „Split pt“ appears in the display. -
Seite 59: Mixer
15. Mixer Press the „MIXER“ button repeatedly until the desired track („Track“) appears in the display. Use the control wheel or the „+“ and „-“ buttons to set the volume for the respective audio track. If no button is pressed for some seconds, the settings are accepted and the mixer menu is exited automatically. -
Seite 60: Memory
16. Memory The digital piano has 4 memory banks with 4 memory positions each. This provides a total of 16 memory positions to save settings (e.g. a combination of accompaniment rhythm and instrument). These settings can be loaded quickly by pressing a button. The memory positions have already been preset with various combinations. -
Seite 61: O.t.s.", „One Touch Setting
17. „O.T.S.“, „One Touch Setting“ Every accompaniment rhythm has 4 different presettings. For instance, the manufacturer has selected an instrument that suits the accompaniment rhythm. • First select the accompaniment rhythm. • Press the „O.T.S.“ button. „O.T.S.“ is displayed on the right-hand side. •... -
Seite 62: Recording Function
18. Recording function a) Prepare record mode • Press the „REC“ button. The „RECORD“ symbol is displayed on the right-hand side and the beat display starts flashing. The digital piano is now ready for recording. However, the digital piano does not start recording yet! •... -
Seite 63: Songs
19. Songs The digital piano provides 60 different songs. For every song you can disable the melody and play it yourself. Press the „SONG“ button. „SONG“ is displayed. Press the „START/STOP“ button the start the song or stop it. When a song has been stopped, you can exit song mode by pressing one of these buttons: „STYLE“, „VOICE“, „DUAL“... -
Seite 64: Handling
20. Handling Observe the safety instructions and all other information in these instructions Place the device on a flat, solid and sufficiently large surface. Do not place the device on valuable surfaces to avoid pressure marks of scratches. Use a suitable mat, if needed. The weight of the digital piano might leave marks on carpets, linoleum or cork flooring. Avoid the following adverse ambient conditions at the place of installation or during transport: - direct sunlight - moistness or high humidity... -
Seite 65: Maintenance And Cleaning
21. Maintenance and cleaning The product does not require any maintenance. You should never open or disassemble it. Repairs may only be carried out by a specialist or specialist workshop. Use a dry, lint-free and soft cloth to clean the product. We recommend using a suitable cover to protect the product against dust if it is not used over a period of time. -
Seite 66: Appendix A: Instruments
24. Appendix A: Instruments... -
Seite 68: Appendix B: Accompaniment Rhythms
25. Appendix B: Accompaniment rhythms... -
Seite 69: Appendix C: Songs
26. Appendix C: Songs... - Seite 70 Table des matières Page 1. Introduction ......................................72 2. Utilisation conforme ....................................72 3. Contenu de la livraison ..................................73 4. Explication des symboles ..................................73 5. Consignes de sécurité ................................... 73 6. Description des pièces constitutives ..............................75 7.
- Seite 71 Page 14. Réglages des fonctions ..................................91 a) Fonction « Transpose » ..................................91 b) Fonction « Tune » ....................................91 c) Fonction « Beat » ....................................91 d) Fonction « Touch » ....................................91 e) Fonction « Split-Point » ..................................92 f) Fonction «...
-
Seite 72: Introduction
1. Introduction Chère cliente, cher client, Nous vous remercions de l’achat du présent produit. Le produit est conforme aux exigences des directives européennes et nationales en vigueur. Le mode d'emploi suivant correspond au produit mentionné ci-dessus. Il contient des consignes importantes pour la mise en service et la manipulation du produit. -
Seite 73: Contenu De La Livraison
3. Contenu de la livraison • Piano numérique (pièce supérieure, pièce latérale gauche, pièce latérale droite, face arrière, boîte des pédales, matériel de montage) • Mode d'emploi 4. Explication des symboles Ce symbole est utilisé pour signaler un danger pour votre santé, par ex. par une décharge électrique. Un point d'exclamation placé... - Seite 74 • Ne placez pas de récipients comportant des liquides, p. ex. verres, seaux, vases ou plantes, sur ou à proximité immédiate de l'appareil. Les liquides pourraient pénétrer à l'intérieur du boîtier et compromettre sa sécurité électrique. Risque important d'incendie ou d'électrocution mortelle ! Dans ce cas, mettez la prise de courant correspondante hors tension (déconnectez p.
-
Seite 75: Description Des Pièces Constitutives
6. Description des pièces détachées Pièce supérieure avec clavier Pièce latérale droite Pièce latérale gauche Face arrière Pédales Vis à poignée (4 pièces) Vis de Ø6mm x 30mm (4 pièces) Vis de Ø4mm x 15mm (5 pièces) Support de câble avec pad adhésif 10 Câble d'alimentation 11 Vis de Ø6mm x 12mm (2 pièces) 12 Câble de la pédale... -
Seite 76: Assemblage
7. Assemblage En raison du poid et de la taille importants des pièces constitutives il est très recommandé de se faire aider par une seconde personne ! Le renverserement des pièces lourdes ne risque pas seulement de blesser des personnes, mais aussi d'endommager le produit. -
Seite 77: C) Monter La Pièce Supérieure Avec Le Clavier
c) Monter la pièce supérieure avec le clavier Placez la partie supérieure sur les deux pièces latérales. Les quatre vis à poignée permettent de fixer la partie supérieure. d) Relier la pédale à la partie supérieure, fixer le câble, installer l'appareil Reliez le connecteur de la pédale à... -
Seite 78: Eléments De Commande
8. Éléments de commande a) Partie supérieure Tableau de commande Prises pour casque d'écoute Pupitre Clavier Le clavier est doté d'un revêtement qui se laisse facilement rentrer et ressortir. b) Face arrière Pédales Câble d'alimentation Port USB Sortie « AUX OUT » c) Pédales Pédale «... -
Seite 79: D) Tableau De Commande
d) Tableau de commande Interrupteur marche/arrêt (« POWER ») Régulateur principal du volume (« VOLUME ») Touches de sélection directe du rythme d'accompagnement (« STYLE ») Touches de fonction pour le rythme d'accompagnement (« START/STOP », « SYNC », « INTRO/ENDING », « FILL A », « FILL B », «... -
Seite 80: E) Afficheur À Cristaux Liquides (Lcd)
e) Afficheur à cristaux liquides (LCD) Symbole pour « A.B.C. » Symbole pour « FILL A » Symbole pour « FILL B » Symbole pour « MELODY OFF » Symbole pour « DUAL » Symbole pour « SPLIT » Symbole pour « TOUCH » Symbole pour «... -
Seite 81: Branchements
9. Branchements a) Prises pour casque d'écoute Deux prises pour casque d'écoute (1) et (2) se trouvent sur la face inférieure. Lors du branchement d'un casque d'écoute à la prise (1), la reproduction se fait aussi bien par le casque d'écoute que par les haut-parleurs du piano numérique. -
Seite 82: Mise En Serivce, Branchement À La Tension Secteur
10. Mise en serivce, branchement à la tension secteur Procédez de la manière suivant : 1. Réglez le volume sonore sur le minimum (bouton de réglage tournant « VOLUME »). 2. Eteignez le piano numérique. 3. Branchez la fiche de secteur du piano numérique à une prise de courant (230 V/CA, 50 Hz). -
Seite 83: Lire Des Exemples Musicaux
11. Lire des exemples musicaux Afin de montrer la puissance du piano numérique, vous pouvez sélectionner et reproduire un total de 3 exemples musicaux. Appuyez simultanément sur les touches « VOICE » et « STYLE », afin de démarrer la reproduction de premier exemple musical. Réglez le volume désiré... -
Seite 84: Instruments Et Effets
12. Instruments et effets a) Choisir l'instrument (« VOICE ») Le piano numérique dispose au total de plus de 210 instruments différents. Après la mise en marche, l'instrument « 001 » (« GrdPiano » = « Grand Piano ») s'active toujours par défaut. En haut à gauche de l'écran apparaît le mode d'instruments «... -
Seite 85: C) Fonction Split, Touche « Split
c) Fonction Split, touche « SPLIT » Le clavier se divise en deux parties. La partie gauche peut par ex. être utilisée pour un instrument de batterie et la partie drotie pour un instrument classique. Cette division est également valable lors de l'activation de l'effet double son, voir à... -
Seite 86: Rythmes D'accompagnement (« Style »)
13. Rythmes d´accompagnement (« STYLE ») a) Sélectionner un rythme d'accompagnement Le piano numérique dispose au total de plus de 120 rythmes d'accompagnements différents. Le rythme d'accompagnement choisi peut être reproduit dans le fond. Dans l'annexe, vous trouverez un tableau qui liste tous les rythmes d'accompagnement. -
Seite 87: C) Accompagnement Automatique, Auto-Bass-Chord, Touche « A.b.c./Melody Off
c) Accompagnement automatique, Auto-Bass-Chord, touche « A.B.C./MELODY OFF » • Appuyez sur la touche « A.B.C./MELODY OFF », pour activer la fonction dite « Auto-Bass-Chord » (en haut à gauche de l'écran, dans le champ d'affichage « A.B.C. », apparaît un symbole). Selon l'accord souhaité, appuyez sur l'une ou sur plusieurs touches dans la partie gauche du clavier (voir chapitre 12. -
Seite 88: F) Mode Normal/Variation, Touches « Fill A » Et « Fill B
f) Mode normal/variation, touches « FILL A » et « FILL B » Chaque rythme d´accompagnement existe en deux variations (« A » et « B »). En règle général, la version « A » (mode normal) est la plus simple (par ex. -
Seite 89: H) Régler Le Volume Du Rythme D'accompagnement, Touches « Acc. Vol
h) Régler le volume du rythme d'accompagnement, touches « ACC. VOL » • Les deux touches « ACC. VOL + » et « ACC. VOL - » permettent de régler le volume du rythme d'accompagnement. • En appuyant simultanément sur les deux touches, le volume est réglé sur «... -
Seite 90: J) Sélectionner Un Accord
j) Sélectionner un accord • Appuyez sur la touche « A.B.C./MELODY OFF », pour activer la fonction dite « Auto-Bass-Chord » (en haut à gauche de l'écran, dans le champ d'affichage « A.B.C. » apparaît un symbole), voir chapitre 13. c). •... -
Seite 91: Réglages Des Fonctions
14. Réglages des fonctions En appuyant à plusieurs reprises sur la touche « FUNCTION » vous pouvez appeler différentes fonctions, décrites dans les paragraphes suivants. Appuyez simplement autant de fois que nécessaire sur la touche « FUNCTION » pour faire afficher la fonction souhaitée sur l'écran. Si dans l'espace de 5 secondes aucune touche n'est actionnée, le menu des fonctions est automatiquement quitté. -
Seite 92: E) Fonction « Split-Point
e) Fonction « Split-Point » Lors de la division du clavier en deux parties (la partie gauche du clavier par ex. pour la batterie, la partie droite pour un instrument de piano) cette fonction permet de déterminer le point auquel le clavier sera divisé. Appuyez autant de fois sur la touche «... -
Seite 93: Mixage
15. Mixage Appuyez autant de fois sur la touche « MIXER » que nécessaire pour faire afficher la piste sonore souhaitée (« Track ») sur l'écran LC. Sélectionnez le volume de la piste sonores correspondante au moyen de la molette de réglage ou des touches « + » ou « - ». Si aucune touche n'est actionnée pendant quelques seonces, les réglages sont repris et le menu de mixage est automatiquement quitté. -
Seite 94: Mémoire
16. Mémoire Le piano numérique dispose de 4 bases de mémoire à 4 mémoires chacune. Ainsi, un total de 16 mémoires est à votre disposition pour enregistrer des préréglages (tels qu'une combinaison de rythme d'accompagnement et d'instrument). Ces préréglages enregistrés peuvent être appelés ensuite par une seule pression de touche. -
Seite 95: One-Touch-Setting
17. « O.T.S. », « One-Touch-Setting » Pour chacun des rythmes d'accompagnement il y a 4 préréglages différents. Par exemple, le constructeur a choisi un instrument allant avec le rythme d'accompagnement. • Sélectionnez en premier un rythme d'accompagnement. • Appuyez sur la touche « O.T.S. ». « O.T.S. » apparaît à droit dans l´afficheur LCD. -
Seite 96: Fonction D'enregistrement
18. Fonction d'enregistrement a) Préparer le mode d'enregistrement • Appuyez sur la touche « REC » et à droite sur l'écran LC, dans le champ d'affichage « RECORD », apparaîtra un petit symbole, de plus, l'affichage de la mesure clignotera. Cela vous indique que l'appareil est prêt à... -
Seite 97: Chansons
19. Chansons Le piano numérique dispose au total de plus de 60 chansons différentes. La mélodie peut être éteinte pour que vous puissiez la jouer vous- même. Appuyez sur la touche « SONG », un affichage correspondant apparaît sur l'écran. Vous pouvez lancer ou arrêter la lecture en appuyant sur la touche «... -
Seite 98: Manipulation
20. Manipulation Tenez compte des consignes de sécurité et de toutes les autres informations du présent mode d'emploi ! Placez l´appareil sur une surface plane, stable et suffisamment grande. Ne placez pas l'appareil sur des surfaces précieuses sous risque de provoquer des marques ou des rayures. Utilisez si nécessaire un support approprié. Le poid important risque en plus de laisser des traces dans les tapis ou les moquettes de linoleum ou de liège. -
Seite 99: Maintenance Et Nettoyage
21. Maintenance et nettoyage Le produit n'a pas besoin d'entretien, ne jamais l'ouvrir ou le démonter. Une reparation ne doit être effectuée que par une personne qualifiée ou un atelier spécialisé. Un chiffon sec, doux suffit pour le nettoyage du produit. Nous vous recommandons de protéger le produit par un revêtement approprié... -
Seite 100: Annexe A : Instruments
24. Annexe A : Instruments... -
Seite 102: Annexe B : Rythmes D´accompagnement
25. Annexe B : Rythmes d´accompagnement... -
Seite 103: Annexe C : Chansons
26. Annexe C : Chansons... - Seite 104 Inhoudsopgave Pagina 1. Inleiding ........................................ 106 2. Beoogd gebruik ....................................106 3. Omvang van de levering ..................................107 4. Verklaring van symbolen ..................................107 5. Veiligheidsinstructies ..................................107 6. Beschrijving van de afzonderlijke onderdelen ..........................109 7. Montage ........................................ 110 a) Zijdelen en voetpedaal samenstellen ..............................
- Seite 105 Pagina 14. Functie-instellingen ..................................... 125 a) Functie "Transpose" ..................................125 b) Functie "Tune" ....................................125 c) Functie "Beat" ....................................125 d) Functie "Touch" ....................................125 e) Functie "Split-Point" ..................................126 f) Functie "DSP-Level" ..................................126 g) Functie "MIDI IN-Channel" ................................126 h) Functie "MIDI OUT-Channel"...
-
Seite 106: Inleiding
1. Inleiding Geachte klant, Hartelijk dank voor de aanschaf van dit product. Het product voldoet aan de wettelijke nationale en Europese voorwaarden. Deze gebruiksaanwijzing hoort bij dit product. Deze bevat belangrijke instructies voor de ingebruikneming en het gebruik. Neem deze instructies in acht, ook wanneer u het product aan derden doorgeeft. Bewaar deze gebruiksaanwijzing zorgvuldig om later nog eens door te kunnen lezen! Alle voorkomende bedrijfsnamen en productaanduidingen zijn handelsmerken van de betreffende eigenaren. -
Seite 107: Omvang Van De Levering
3. Omvang van de levering • Digitale piano (bovendeel, linker zijdeel, rechter zijdeel, achterzijde, voetpedaal-box, montagemateriaal) • Gebruiksaanwijzing 4. Verklaring van symbolen Dit symbool wordt gebruikt wanneer er gevaar bestaat voor uw gezondheid, bijv. door een elektrische schok. Het symbool met het uitroepteken wijst op bijzondere gevaren bij de hantering, het gebruik en de bediening. Het “pijl”-symbool wijst op speciale tips en bedieningsvoorschriften. - Seite 108 • Zet geen vloeistof, bijv. glazen, emmers, vazen of planten op het apparaat of in de buurt ervan. Vloeistoffen kunnen in de behuizing dringen en daarbij afbreuk doen aan de elektrische veiligheid. Bovendien bestaat het gevaar van brand of een elektrische schok; levensgevaarlijk! Schakel in dit geval de bijbehorende wandcontactdoos stroomvrij (bijv.
-
Seite 109: Beschrijving Van De Afzonderlijke Onderdelen
6. Beschrijving van de afzonderlijke onderdelen Bovendeel met klavier Rechter zijdeel Linker zijdeel Achterplaat Voetpedalen Greepschroeven (4 stuks) Schroeven Ø6mm x 30mm (4 stuks) Schroeven Ø4mm x 15mm (5 stuks) Kabelhouder met kleefpad 10 Netkabel 11 Schroeven Ø6mm x 12mm (2 stuks) 12 Kabel van het voetpedaal... -
Seite 110: Montage
7. Montage Op basis van de grote en zware afzonderlijke delen is de hulp van een tweede persoon zeer aangewezen! Door het omvallen van de zware onderdelen bestaat er niet alleen gevaar op letsels, maar ook op beschadiging van het product. a) Zijdelen en voetpedaal samenstellen Vereiste schroeven: Ø6mm x 30mm, 4 stuks Bouw zoals afgebeeld de beide zijdelen en het voetpedaal samen met de 4 schroeven (Ø6mm x 30mm). -
Seite 111: C) Bovendeel Met Klavier Monteren
c) Bovendeel met klavier monteren Plaats het bovenste deel op de beide zijdelen. Met de vier greep-schroeven kan daarna het bovendeel worden bevestigd. d) Voetpedaal op het bovendeel aansluiten, kabel fixeren, apparaat opstellen Verbind de stekker van het voetpedaal met de betrokken bus van het bovendeel. Met twee kabelhouders kunnen zowel het netsnoer als de kabel van het voetpedaal op de achterkant van de rugzijde zijdelings worden gemonteerd. -
Seite 112: Bedieningselementen
8. Bedieningselementen a) Bovendeel Bedienveld Koptelefoon-bussen Partituurhouder Klavier Het klavier is voorzien van een afdekking, die u gemakkelijk kan inschuiven en weer uittrekken. b) Achterkant Voetpedalen Netkabel USB-bus Uitgang "AUX OUT" c) Voetpedalen Pedaal "Soft" 10 Pedaal "Sostenuto" 9 10 11 11 Pedaal "Sustain"... - Seite 113 d) Bedieningsveld Aan-/uitschakelaar ("POWER") Hoofd-volumeregelaar ("VOLUME") Directe keuzetoetsen voor het begeleidingsritme ("STYLE") Functietoetsen voor het begeleidingsritme ("START/STOP", "SYNC", "INTRO/ENDING", "FILL A", "FILL B", "A.B.C./MELODY OFF") Volume-instelling voor de begeleiding ("ACC VOL +/-") Toetsen "TEMPO -" en "TEMPO +" voor de snelheidsinstelling Toets "MIXER"...
-
Seite 114: Lcd-Display
e) LCD-display Symbool voor "A.B.C." Symbool voor "FILL A" Symbool voor "FILL B" Symbool voor "MELODY OFF" Symbool voor "DUAL" Symbool voor "SPLIT" Symbool voor "TOUCH" Symbool voor "RECORD" Symbolen voor de verschillende instelmodi (bijv. begeleidingsritme "STYLE" enz.) 10 Displayveld "CHORD" voor de akkoorden 11 Displayveld "TEMPO"... -
Seite 115: Aansluitingen
9. Aansluitingen a) Koptelefoonbussen Aan de onderkant vindt u twee koptelefoonbussen (1) en (2). Bij aansluiting van een koptelefoon op bus (1) gebeurt de weergave zowel via de koptelefoon als via de luidsprekers van de digitale piano. Bij aansluiten van een koptelefoon op bus (2) worden de luidsprekers van de digitale piano uitgeschakeld, de weergave gebeurt alleen nog via de koptelefoon. -
Seite 116: In Bedrijfname, Aansluiten Op De Netspanning
10. In bedrijfname, aansluiten op de netspanning Doe de volgende stappen: 1. Draai het volume op de laagste stand ("VOLUME"-regelaar). 2. Schakel de digitale piano uit. 3. Steek de netstekker van de digitale piano in een 230 V/AC, 50 Hz wandcontactdoos. -
Seite 117: Demo's Weergeven
11. Demo's weergeven Om de mogelijkheden van de digitale piano te demonstreren, kunnen in het totaal 3 verschillende demo-songs worden geselecteerd en weergegeven. Druk gelijktijdig op de beide toetsen "VOICE" en "STYLE", om de weergave te starten van de eerste demo-song. Stel nu het gewenste volume in met de volumeregelaar ("VOLUME"). -
Seite 118: Instrumenten En Effecten
12. Instrumenten en effecten a) Instrument selecteren ("VOICE") De digitale piano beschikt over in het totaal 210 verschillende instrumenten. Na het inschakelen is automatisch steeds het instrument "001" ("GrdPiano" = "Grand Piano") ingesteld. Op het display wordt boven links de instrument-modus "VOICE R1" weergegeven. In bijlage vindt u een tabel met alle instrumenten. -
Seite 119: C) Split-Functie, Toets "Split
c) Split-functie, toets "SPLIT" Het klavier laat zich in twee delen opdelen. Daarbij kan bijvoorbeeld het linker deel worden gekoppeld aan een slaginstrument, en het rech- ter aan een gewoon instrument. Deze instelling geldt ook voor het twee-stemmen effect, zie daartoe hoofdstuk 12. -
Seite 120: Begeleidingsritmes ("Style")
13. Begeleidingsritmes ("STYLE") a) Begeleidingsritme selecteren De digitale piano beschikt over in het totaal 120 verschillende begeleidingsritmes. Het telkens door u gekozen begeleidingsritme kan op de achtergrond worden weergegeven. In bijlage vindt u een tabel met alle begeleidingsritmes. Ga voor het selecteren van een ritme ("STYLE") als volgt te werk: •... -
Seite 121: C) Automatische Begeleiding, Auto-Bass Chord, Toets "A.b.c./Melody Off
c) Automatische begeleiding, auto-bass chord, toets "A.B.C./MELODY OFF" • Druk op de toets "A.B.C./MELODY OFF", om de zog. "Auto-Bass- Chord"-functie in te schakelen (er verschijnt een symbool naast "A.B.C." boven links op het display). Druk naargelang het gewenste akkoord een of meer toetsen op het linkerdeel van het klavier (zie hoofdstuk 12. -
Seite 122: F) Normal-/Variation-Modus, Toetsen "Fill A" En "Fill B
f) Normal-/variation-modus, toetsen "FILL A" en "FILL B" Elk begeleidingsritme heeft twee verschillende variaties ("A" en "B"). Normaal is de versie "A" (normale modus) eenvoudiger (er wordt bijv. minder slagwerk gebruikt) en versie "B" (variatie-modus) iets complexer (bijv. meer en uiteenlopend gebruik van slagwerk). •... -
Seite 123: H) Volume Begeleidingsritme Instellen, Toetsen "Acc. Vol
h) Volume begeleidingsritme instellen, toetsen "ACC. VOL" • Met de beide toetsen "ACC. VOLUME -" en "ACC. VOL -" kan het volume van het begeleidingsritme worden ingesteld. • Door gelijktijdig indrukken van de beide toetsen wordt het volume op "00" ingesteld (stom schakelen); op het display wordt bovenaan links "OFF"... -
Seite 124: J) Selecteren Van Een Akkoord
j) Selecteren van een akkoord • Druk op de toets "A.B.C./MELODY OFF", om de zog. "Auto-Bass- Chord"-functie in te schakelen (er verschijnt een symbool naast "A.B.C." boven links op het display), zie hoofdstuk 13. c). • Druk naargelang het gewenste akkoord een of meer toetsen op het linkerdeel van het klavier (zie hoofdstuk 12. -
Seite 125: Functie-Instellingen
14. Functie-instellingen Door meermaals indrukken van de toets "FUNCTION" kunnen verschillende functies worden opgeroepen, die in de volgende paragrafen wor- den beschreven. Druk eenvoudig net zo vaak op de toets "FUNCTION" tot de gewenste functie op het display zichtbaar wordt. Indien er niet binnen de 5 seconden op een toets wordt gedrukt, wordt het functiemenu automatisch verlaten. -
Seite 126: E) Functie "Split-Point
e) Functie "Split-Point" Bij het opdelen van het klavier in twee delen(linkerdeel van het klavier bijv. slagwerk, rechterdeel piano) kan met deze functie worden vastgelegd, op welke plaats het klavier wordt opgedeeld. Druk zo vaak op de toets "FUNCTION", tot op het LCD-display "Split pt"... -
Seite 127: Mixer
15. Mixer Druk zo vaak op de toets "MIXER", tot op het LCD-display het gewenste geluidsspoor ("Track") zichtbaar wordt. Selecteer met het draaiwiel of met de toetsen "+" resp. "-" het volume van het betrokken geluidsspoor. Indien er enkele seconden geen toets wordt ingedrukt, dan worden de instellingen overgenomen en het mixer-menu automatisch verlaten. -
Seite 128: Geheugen
16. Geheugen Het digitale piano beschikt over 4 geheugenbanken met elk 4 geheugens. Daarmee stan er in het totaal 16 geheugens ter beschikking, waarin u voorinstellingen (bijv. een combinatie van begeleidingsritme en instrument) kunt opslaan. Deze kunnen daarna door indrukken van een toets snel terug worden opgeroepen. -
Seite 129: O.t.s.", "One-Touch-Setting
17. "O.T.S.", "One-Touch-Setting" Voor elk begeleidingsritme zijn er 4 verschillende voorinstellingen. Zi heeft de fabrikant voor elk begeleidingsritme een passend instrument gekozen. • Selecteer eerst een begeleidingsritme. • Druk op de toets "O.T.S.". Op het LC-display verschijnt rechts een klein symbool "O.T.S.". •... -
Seite 130: Opname-Functie
18. Opname-functie a) Opnamemodus voorbereiden • Druk op de toets "REC", rechts op het LC-display wordt bij "RECORD" een klein symbool zichtbaar, bovendien knippert de tempo-indicatie. Dit wijst er op dat alles klaar is voor de opname. De opname start echter nog niet! •... -
Seite 131: Songs
19. Songs De digitale piano beschikt over 60 verschillende songs. De melodie is daarbij telkens uitschakelbaar; zodat u deze zelf kunt spelen. Druk op de toets "SONG", een overeenkomstige indicatie wordt op het display zichtbaar. Met de toets "START/STOP" kan de weergave gestart resp. gestopt worden. -
Seite 132: Gebruik
20. Gebruik Neem alle veiligheidsvoorschriften en andere informatie uit deze gebruiksaanwijzing in acht. Plaats het apparaat op een stabiele, vlakke, voldoende grote oppervlakte. Plaats het apparaat niet op waardevolle meubeloppervlakken, omdat anders drukplaatsen of krassen mogelijk zijn. Gebruik eventueel een geschikte onderlegger. Door het grote gewicht zijn boçvendien drukplaatsen in het tapijt, de linoleum- en de kurkvloer mogelijk. -
Seite 133: Onderhoud En Reiniging
21. Onderhoud en reiniging Het product is voor u onderhoudsvrij. U mag het nooit openen of demonteren. Een herstelling mag alleen door een erkende vakman of een bevoegde werkplaats worden uitgevoerd. Gebruik voor het reinigen van het product een droge en pluisvrije doek. We adviseren u het product met een geschikte afdekking te beschermen tegen stof als het langree tijd niet wordt gebruikt. -
Seite 134: Bijlage A: Instrumenten
24. Bijlage A: Instrumenten... -
Seite 136: Bijlage B: Begeleidingsritmes
25. Bijlage B: Begeleidingsritmes... -
Seite 137: Bijlage C: Songs
26. Bijlage C: Songs... -
Seite 140: Legal Notice
Impressum Diese Bedienungsanleitung ist eine Publikation der Conrad Electronic SE, Klaus-Conrad-Str. 1, D-92240 Hirschau (www.conrad.com). Alle Rechte einschließlich Übersetzung vorbehalten. Reproduktionen jeder Art, z. B. Fotokopie, Mikroverfilmung, oder die Erfassung in elektronischen Datenverarbeitungsanlagen, bedürfen der schriftlichen Genehmigung des Herausgebers. Nachdruck, auch auszugsweise, verboten. Diese Bedienungsanleitung entspricht dem technischen Stand bei Drucklegung.