krick Neptun Montage- Und Bedienungsanweisung
Verfügbare Sprachen
Verfügbare Sprachen
Quicklinks
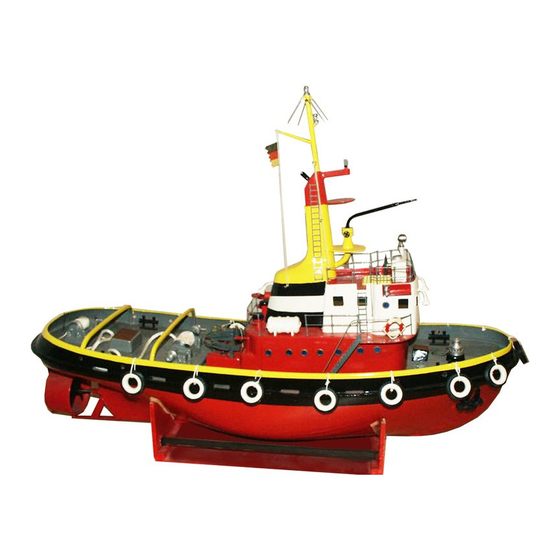
Herzlichen Glückwunsch zum Erwerb diese handlichen
und gleichzeitig kraftvollen und wendigen Schlepper-
modells. Dieser Baukasten ist für den fortgeschrittenen
Einsteiger im Modellbau gedacht. Es wird etwas Er-
fahrung im Schiffsmodellbau beim Bau dieses Modells
erwartet. Auch die Ausstattung des Baukastens erlaubt
dem erfahreneren Modellbauer das Modell mit eigenen
Ideen, Erweiterungen und Sonderfunktionen auszustat-
ten.
Technische Daten
Länge ü.a.:
570 mm
Breite ü.a.:
175 mm
Höhe:
470 mm
Gewicht, max.: ca. 2,5 kg
Antrieb:
Elektromotor
Nicht enthaltenes, jedoch zum Bau des Modells
erforderliches Zubehör:
- Beschlagsatz (Bestell-Nr. ro1031)
- Getriebemotor Max Gear 2,5:1 (Bestell-Nr. 42275)
Neptun
Montage- und Bedienungsanweisung
© Krick Modelltechnik, Germany, Stand 03.2018
- Entsörkondensator Satz (Bestell-Nr. 42128)
- Gelenkkupplung mit Doppelverbinder
(Bestell-Nr. 63706 + 63500 + 63510)
- Bleiakku 6V, 3,4 Ah oder anderer Akkupack bis 7,4V
- Fernsteuerung ab 2-Kanal
- Lenkservo Standard (Bestell-Nr. 79050)
- Fahrtregler (Bestell-Nr. 67051)
Benötigte Klebstoffe und Materialien
- Weißleim wasserfest (Bestell-Nr. 48510)
- UHU Plus acrylit (Bestell-Nr. 48315)
oder DELUXE Fusion Acrylit (Bestell-Nr. 44014)
- Sekundenkleber Roket Rapid (Bestell-Nr. 44051)
- Epoxikleber (Bestell-Nr. 80479)
- Trimmballast (Bestell-Nr. 60108)
- Bohrer, Durchmesser 1, 2, 4, 5, 6, 7, 9 mm
- Grundierung, Spachtel und Lack für die Farbgebung
1

Verwandte Anleitungen für krick Neptun


Inhaltszusammenfassung für krick Neptun
- Seite 1 - Bohrer, Durchmesser 1, 2, 4, 5, 6, 7, 9 mm - Grundierung, Spachtel und Lack für die Farbgebung Nicht enthaltenes, jedoch zum Bau des Modells erforderliches Zubehör: - Beschlagsatz (Bestell-Nr. ro1031) - Getriebemotor Max Gear 2,5:1 (Bestell-Nr. 42275) © Krick Modelltechnik, Germany, Stand 03.2018...
- Seite 2 Rundfeile zu erweitern, damit der Kunststoff nicht einreißt. Sonderfunktionen: In die Neptun können zahlreiche Sonderfunktionen einge- Am Bootsspant 5 wird der Getriebemotor 6 mit den Inbus- baut werden. Neben dem Einbau einer funktionsfähigen schrauben 7 und den Unterlegscheiben 8 montiert.
- Seite 3 Die so fertiggestellte Einheit wird gemäß Draufsicht im Rumpf verleimt und das Servo 29 nach Trocknen des Nach diesen Einstell- und Prüfarbeiten sollten die Akkus Leims in die Halterung eingesetzt. sowie lose liegende Teile der RC-Anlage ausgebaut wer- den. © Krick Modelltechnik, Germany, Stand 03.2018...
- Seite 4 Abnehmen des Windenunterbaus wird der so fertiggestellte Dichtleistenrahmen von innen gut vermufft. Achse 55 einschieben, Trommel 53 und Bremstrommel 56 aufschieben. Unter Zugabe von je einem Tropfen Sekun- Ausgeschnittenen Unterbau 49 für die Verholwinde unten © Krick Modelltechnik, Germany, Stand 03.2018...
- Seite 5 Kamin auf den Decksaufbau aufsetzen und die im Plan Rumpf und Kettenstopper fädeln, um den Spillkopf legen gemessenen Abstände der Plattformen vom Peildeck auf und nach Einfädeln in den Kettenklüsen mit einem Tropfen dem Kamin anzeichnen. © Krick Modelltechnik, Germany, Stand 03.2018...
- Seite 6 Antennen, von der entsprechenden Bohrungen verleimt, wobei der Relings- Seite gesehen, fluchten. zug, wie in der Draufsicht zu sehen, jeweils entsprechend zu biegen ist. Das Toplicht 110 und die zwei Signallichter 111 werden an © Krick Modelltechnik, Germany, Stand 03.2018...
- Seite 7 Bohrungen verleimt, wobei die Relingszüge genden Schrauben montiert. entsprechend zu biegen sind. Relingszüge genau ablän- gen und mit den Relingstützen verlöten. Zum genauen Anpassen und Anleimen des Lichtschachts und der Maschinenhausluke sind diese Bereiche auf dem © Krick Modelltechnik, Germany, Stand 03.2018...
- Seite 8 Arbeiten am Deck beendet. Aufbau abnehmen. nichts mehr im Weg. In das Halteklötzchen 177 und die Halteleiste 178 wird Viel Freude an Ihrer Neptun wünsch Ihnen nach Bohren eines Loches Ø1 mm nun je eine Schrauböse 179 eingedreht. Halteklötzchen auf dem Montagebrett 24, Klaus Krick Modelltechnik.
- Seite 9 Beschlagsatz Handkurbel Ø 1 n. Plan Ankerkette Metall 120 lang Fertigt. Beschlagsatz Hallanker Metall Fertigteil Beschlagsatz Maschinenhaus 1,5 Tiefziehteil Brückendeck 1 mm Laserteil Platte 3 Peildeck 1,5 mm Laserteil Platte 2 Steuerhaus 1,5 Tiefziehteil © Krick Modelltechnik, Germany, Stand 03.2018...
- Seite 10 Ø 1 Fertigteil Kompaß Fertigteil Beschlagsatz Gräting Sperrholz 1 mm Laserteil Platte 4 Suchscheinwerfer Fertigteil Beschlagsatz Scheinwerferfuß Ø 3,2 x Ø 4 x 35 Signalleine Takelgarn n. Plan 0,5 Unterbau, Positionslampe Metall Fertigteil Beschlagsatz © Krick Modelltechnik, Germany, Stand 03.2018...
- Seite 11 Trossenbügel 3 x 3 n. Plan Reifenfender Fertigteil Beschlagsatz Leine, Fender Takelgarn n. Plan 0,5 Halteklötzchen Kiefer 6 x 6 x 20 Halteleiste Kiefer 6 x 6 x 90 Schrauböse Metall Fertigteil Gummiring Fertigteil © Krick Modelltechnik, Germany, Stand 03.2018...
- Seite 33 © Krick Modelltechnik, Germany, Stand 03.2018...
- Seite 34 7, 8 © Krick Modelltechnik, Germany, Stand 03.2018...
- Seite 35 45, 46 50, 51 © Krick Modelltechnik, Germany, Stand 03.2018...
- Seite 36 66 - 69 © Krick Modelltechnik, Germany, Stand 03.2018...
- Seite 37 2 x 25 2 x 25 © Krick Modelltechnik, Germany, Stand 03.2018...
- Seite 38 © Krick Modelltechnik, Germany, Stand 03.2018...
- Seite 39 © Krick Modelltechnik, Germany, Stand 03.2018...
- Seite 40 155a 155b 155c 155c © Krick Modelltechnik, Germany, Stand 03.2018...
- Seite 41 Schaltplan Neptun für 2 Kanal Fernsteuerung mit Dauerbeleuchtung Fahrtregler an/aus 2-Kanal Empfänger 2 CH receiver on/o Akku Zum Ladegerät To charger Schaltplan Neptun für 4 Kanal Fernsteuerung mit Zusatzfunktionen Fahrtregler an/aus Min. Empfänger on/o 4-Kanal min. Receiver 4 ch. Uno Switch Artikel-Nr.
- Seite 42 Irrtum und technische Änderungen vorbehalten Copyright Klaus Krick Modelltechnik 2018 Kopie und Nachdruck, auch auszugsweise, nur mit schriftlicher Genehmigung von Klaus Krick Modelltechnik Klaus Krick Modelltechnik Industriestr. 1 75438 Knittlingen Germany © Krick Modelltechnik, Germany, Stand 03.2018...