
Verwandte Anleitungen für WALTHER PILOT PILOT WA 55


Inhaltszusammenfassung für WALTHER PILOT PILOT WA 55
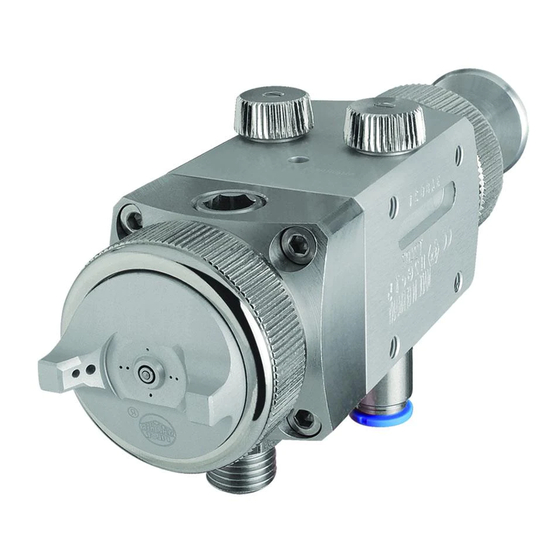
- Seite 1 Betriebsanleitung / Operating Instruction / Manuale d‘uso PILOT WA 55 Automatik-Spritzpistole / Automatic Spray Gun / Pistola a spruzzo automatica...
- Seite 2 PILOT WA 55 Stand: Mai 2017...
-
Seite 3: Disegno Quotato
Maßblatt / Dimension Sheet / Disegno quotato... - Seite 4 Seite 8 - 19 Page 20 - 31 Pagina 32 - 43...
-
Seite 5: Inhaltsverzeichnis
Tel.: +49(0)202 / 787 - 0 Sachwidrige Verwendung Fax: +49(0)202 / 787 - 2217 www.walther-pilot.de • e-mail: info@walther-pilot.de Technische Beschreibung Typenbezeichnung Automatische Spritzpistole PILOT WA 55 V 20 301 51 XX3 Sicherheitshinweise Verwendungszweck Verarbeitung spritzbarer Materialien Kennzeichnung der Sicherheitshinweise Allgemeine Sicherheitshinweise... -
Seite 6: Ersatzteilliste
Die spritzbaren Materialien dürfen lediglich auf Werkstücke bzw. Gegenstände auf- getragen werden. . Kolbenfeder V 20 305 12 005 Das Modell PILOT WA 55 ist kein handgeführter Spritzautomat und muss deshalb an Federbuchse V 20 300 02 003 einer geeigneten Halterung befestigt werden. -
Seite 7: Technische Beschreibung
• Die einschlägigen Unfallverhütungsvorschriften sowie die sonstigen anerkannten sicherheitstechnischen und arbeitsmedizinischen Regeln sind einzuhalten. Das Modell PILOT WA 55 arbeitet automatisch über eine Druckluftsteuerung und • Benutzen Sie die Spritzpistole nur in gut belüfteten Räumen. Im Arbeitsbereich ist wird über 3/2-Wege-Steuerventile angesteuert. Dazu können Hand-, Fuß- oder Feuer, offenes Licht und Rauchen verboten. -
Seite 8: Bedienung
Warnung Warnung Material- und Luftschläuche, die mit einer Schlauchtülle befestigt werden, müssen Die Spritzpistole muss nach Arbeitsende immer drucklos geschaltet werden. Die unter Druck stehenden Leitungen können platzen und nahestehende Personen zusätzlich mit einer Schlauchschelle gesichert sein. durch das ausströmende Material verletzen. = Materialanschluss (QSM-1/8-6) = Spülmittelanschluss (QSML-1/8-4) Spritzbild verändern... -
Seite 9: Spülvorgang
Schrauben Sie die Packungsschraube (Pos. 4) aus dem Gehäuse. In Betrieb wird das Model PILOT WA 55 nach jedem Spritzvorgang automatisch Ziehen Sie die Nadeldichtung (Pos. 5) mit einem Hilfswerkzeug aus ihrem Sitz. gereinigt. Es ist dennoch zu beachten: Verwenden Sie hierzu einen festen Draht, dessen Ende zu einem kleinen Haken Der letzte Arbeitsgang vor dem Ausserbetriebsetzen sollte immer das Spülen... -
Seite 10: O-Ringe Des Nutkolbens Austauschen
O-Ringe des Nutkolbens austauschen Entsorgung Schrauben Sie die Federstopfbuchse (Pos. 23) aus den Kolbenkörper (Pos. 21). Die bei der Reinigung und Wartung anfallenden Materialien sind den Gesetzen und Ziehen Sie den Nutkolben (Pos. 18) aus den Kolbenkörper nach hinten heraus. Vorschriften entsprechend sach- und fachgerecht zu entsorgen. - Seite 11 Fax: +49(0)202 / 787 - 2217 Improper Use www.walther-pilot.de • e-mail: info@walther-pilot.de Technical Description Type Designation Automatic Spray Gun PILOT WA 55 V 20 301 51 XX3 Safety Instructions Intended purpose Processing of sprayable media Identification of safety instructions Applied Standards and Directives...
-
Seite 12: Walther Spritz- Und Lackiersysteme Gmbh Kärntner Str
The sprayable materials must be sprayed only on workpieces or objects. The model Piston spring V 20 305 12 005 PILOT WA 55 is not a manual spray gun and must therefore be mounted in a suitab- Spring bushing V 20 300 02 003 le bracket. -
Seite 13: Technical Description
• All applicable accident prevention rules and regulations as well as other recognis- The model PILOT WA 55 is operated automatically by compressed air and is con- ed industrial safety and health rules and regulations must be observed at all times. -
Seite 14: Operational Handling
Warning Warning Material and air hoses which are installed with a hose grommet must be additionally It is important to remember to relieve the spray gun of all pressures when work is terminated. Lines left under pressure may burst and the released material may inju- secured with a hose clamp. -
Seite 15: Cleaning Process
Replacement of Needle Seal Cleaning Process Remove the air cap, the material nozzle and material needle as described under The model PILOT WA 55 is automatic cleaned after each spraying process when it 7.1 and 7.2. is in use. Unscrew the packing screw (item 4) from the housing. -
Seite 16: Replacement Of O-Rings Of The Flute-Piston
Disposal of Cleaning / Servicing Substances Replacement of O-rings of the Flute-Piston Unscrew the spring gland (item 23) from the piston body (item 21). Disposal of any such substances must be in accordance with all applicable local and Pull back the flute-piston (item 18) from the piston body. national regulations, directives and laws. -
Seite 17: D- 42327 Wuppertal
Fax: +49 202 / 787 - 2217 Uso improprio www.walther-pilot.de • e-mail: info@walther-pilot.de Specifica tecnica Designazione del tipo Pistole a spruzzo automatiche PILOT WA 55 V 20 301 51 XX3 Avvertenze di sicurezza Uso previsto Applicazione di materiali spruzzabili Pittogrammi per le avvertenze di sicurezza... -
Seite 18: Tel.: +49(0)202 / 787
I materiali spruzzabili devono essere applicati solo su pezzi oppure su oggetti. Molla pistone V 20 305 12 005 Il modello PILOT WA 55 non è un apparecchio di verniciatura a spruzzo manuale, Boccola della molla V 20 300 02 003 per questo motivo deve essere montato su un portapistola idoneo. -
Seite 19: Specifica Tecnica
Specifica tecnica Avvertenze di sicurezza generali Il modello PILOT WA 55 funziona in modo completamente automatico mediante un • Le norme antinfortunistiche in materia così come le altre regole di sicurezza e di comando pneumatico. Il pilotaggio avviene tramite una valvola di comando a 3/2 vie. -
Seite 20: Uso
Avvertimento É possibile mettere in funzione e fuori funzione la pistola a spruzzo azionando la I flessibili del materiale e dell'aria che vengono fissati con un portagomma devono valvola di comando a 3/2 vie (vedere manuale del costruttore dell'impianto). essere fissati anche con una fascetta stringitubo. Avvertimento = Attacco materiale (QSM-1/8-6) Al termine del lavoro, la pistola a spruzzo deve essere sempre depressurizzata. -
Seite 21: Lavaggio
Sostituzione della guarnizione dell‘ago Lavaggio Smontare il cappello aria, l‘ugello materiale e l‘ago materiale come descritto ai Durante l‘impiego, il modello PILOT WA 55 viene pulito automaticamente al termine punti 7.1 e 7.2. di ogni spruzzatura, tuttavia deve essere rispettato quanto segue: Svitare la vite della guarnizione (pos. -
Seite 22: Sostituzione Degli Anelli Di Tenuta Or Del Pistone Con Scanalatura
Smaltimento Sostituzione degli anelli di tenuta OR del pistone con scanalatura Svitare la molla premistoppa (pos. 23) dal corpo del pistone (pos. 21). I materiali risultanti dalla pulizia e dalla manutenzione devono essere smaltiti a rego- Estrarre il pistone con scanalatura (pos. 18) all'indietro dal corpo del pistone. la d'arte secondo le leggi e le disposizioni vigenti. -
Seite 23: Walther Spritz- Und Lackiersysteme Gmbh Kärntner Str
Das WALTHER PILOT-Programm The WALTHER PILOT Programme • Hand-Spritzpistolen • Manual Spray Guns • Automatik-Spritzapparate • Automatic Spray Guns • Niederdruck-Spritzpistolen (System HVLP) • Low Pressure Spray Guns (System HVLP) • Zweikomponenten-Spritzsysteme • Two-Component Spray Guns • Materialfördersysteme • Material Pressure Tanks •...