WALTHER PILOT WA 53 Betriebsanleitung
Automatik-spritzpistole
Inhaltsverzeichnis
Verfügbare Sprachen
Verfügbare Sprachen
Quicklinks
Das WALTHER PILOT-
Programm
• Hand-Spritzpistolen
• Automatik-Spritzapparate
• Niederdruck-Spritzpistolen
(System HVLP)
• Zweikomponenten-
Spritzsysteme
• Pulverbeschichtungs-Systeme
• Materialfördersysteme
• Materialdruckbehälter
• Drucklose Behälter
• Rührwerk-Systeme
• Farbwechsler
• Airless-Geräte und
Flüssigkeitspumpen
• Kombinierte Spritz- und
Trockenboxen
• Absaugsysteme mit
Trockenabscheidung
• Absaugsysteme mit
Naßabscheidung
• Trockner
• Zuluft-Systeme
• Atemschutzsysteme
und Zubehör
WALTHER Spritz- und Lackiersysteme
Kärntner Str. 18-30 • 42327 Wuppertal
Telefon: 0202 / 787-0 • Telefax: 0202 / 787-217
http://www.walther-pilot.de
E-mail:info@walther-pilot.de
The WALTHER PILOT
Programme
• Manual Spray Guns
• Automatic Spray Guns
• Low Pressure Spray Guns
(System HVLP)
• Two-Component Spray Guns
• Material Pressure Tanks
• Nonpressurized Tanks
• Agitator Systems
• Airless Equipment and Transfer
Pumps
• Material Circulation Systems
• Combined Spraying and Drying
Booths
• Spray Booths with Filter Mats
• Spray booths with
Water-Wash Function
• Powder Spray Stands
• Dryers
• Ventilation Systems
• Protective Respiratory Systems
and Accessory Items
W W A A L L T T H H E E R R P P I I L L O O T T
Betriebsanleitung / Operating Instruction
Automatik-Spritzpistole / Automatic Spray Gun
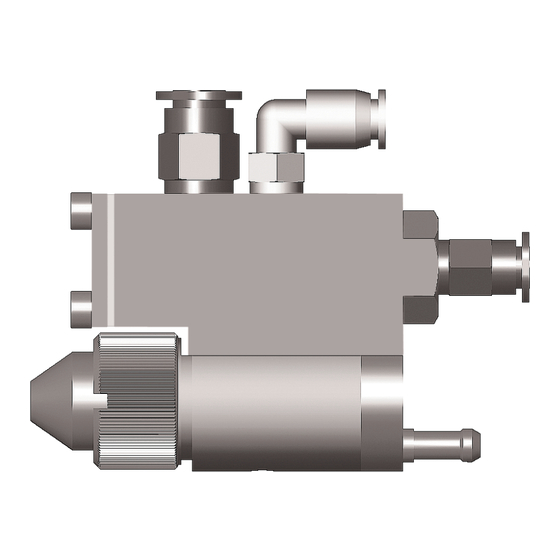
PILOT WA 53
DISTRIBUTED BY COATING EQUIPMENT TECHNOLOGY, INC
PHONE: 586-210-0555
WEB: www.cetinc.com
Inhaltsverzeichnis

Verwandte Anleitungen für WALTHER PILOT WA 53


Inhaltszusammenfassung für WALTHER PILOT WA 53
- Seite 1 Automatik-Spritzpistole / Automatic Spray Gun • Zweikomponenten- • Two-Component Spray Guns Spritzsysteme • Material Pressure Tanks • Pulverbeschichtungs-Systeme • Nonpressurized Tanks PILOT WA 53 • Materialfördersysteme • Agitator Systems • Materialdruckbehälter • Airless Equipment and Transfer • Drucklose Behälter Pumps •...
- Seite 2 PILOT WA 53...
-
Seite 4: Eg-Konformitätserklärung
Fax: 0202 / 787-217 www.walther-pilot.de • Email: info@walther-pilot.de www.walther-pilot.de • Email: info@walther-pilot.de Typenbezeichnung Automatische Spritzpistolen PILOT WA 53 Type Designation Automatic Spray Gun PILOT WA 53 PILOT WA 53 V 20 308 PILOT WA 53 V 20 308 Verwendungszweck Verarbeitung spritzbarer Materialien... - Seite 5 Ersatzteilliste: PILOT WA 53 Inhaltsverzeichnis Allgemeines Pos. Artikel-Nr. Bezeichnung Kennzeichnung des Modells Bestimmungsgemäße Verwendung V 20 335 15 000 Überwurfmutter Sachwidrige Verwendung V 20 336 34 125 Rundstrahlluftkopf V 20 336 23 153 Materialdüse Technische Beschreibung V 20 305 04 003...
-
Seite 6: Allgemeines
Die Temperatur des Spritzmaterials darf 80°C nicht überschreiten. Zufuhr zur Materialdüse. Das Modell PILOT WA 53 ist kein handgeführter Spritzautomat und muß deshalb an Die Spritzpistole wird jetzt gespült. Der Spülvorgang dauert zwischen 5 - 10 einer geeigneten Halterung befestigt werden. -
Seite 7: Spritzpistole Befestigen
Sicherheitshinweise Montage Die Spritzpistole ist werkseitig komplett montiert. Bevor Sie die Spritzpistole in Die einschlägigen Unfallverhütungsvorschriften sowie die sonstigen anerkannten Betrieb setzen können, sind die folgenden Tätigkeiten durchzuführen: sicherheitstechnischen und arbeitsmedizinischen Regeln sind einzuhalten. Spritzpistole befestigen Benutzen Sie die Spritzpistole nur in gut belüfteten Räumen. Im Arbeitsbereich ist Feuer, offenes Licht und Rauchen verboten. -
Seite 8: Inbetrieb- Und Außerbetriebsetzen
Inbetrieb- und Außerbetriebsetzen Reinigung und Wartung Bevor Sie die Spritzpistole in Betrieb setzen können, müssen folgende Vorausset- • Schalten Sie vor jeder Wartung die Steuer- und Zerstäuberluft sowie die Material- zungen erfüllt sein: zufuhr zur Spritzpistole drucklos - Verletzungsgefahr. • Der Steuerluftdruck muss an der Spritzpistole anstehen. •... -
Seite 9: Nadeldichtung Austauschen
Der Einbau geschieht in umgekehrter Reihenfolge. Spülvorgang Nadeldichtung austauschen In Betrieb wird das Model PILOT WA 53 nach jedem Spritzvorgang automatisch gerei- 1. Bauen Sie den Luftkopf, Matrialdüse und Materialnadel, wie unter 7.1 und 7.2 nigt, es ist dennoch zu beachten: beschrieben, aus. -
Seite 10: Federn Und Dichtungen Austauschen
Federn und Dichtungen austauschen Technische Daten Zerlegen Sie die Spritzpistole gemäß Abschnitt 7.1 und 7.2, wenn die folgenden Gewicht: 232 g Bauteile ausgetauscht werden müssen: • Materialdüse Anschluß: • Materialnadel* Zerstäuberluft M 3-4 mm ø • Kolbenfeder* Steuerluft (Kolbenkörper) QSML-M5-4 •...