auna BC-10 Bedienungsanleutung
Karaokesystem
Inhaltsverzeichnis
Verfügbare Sprachen
Verfügbare Sprachen
Quicklinks
Kapitel
Inhaltsverzeichnis
Fehlerbehebung

Verwandte Anleitungen für auna BC-10


Inhaltszusammenfassung für auna BC-10
-
Seite 3: Inhaltsverzeichnis
Sehr geehrter Kunde, wir gratulieren Ihnen zum Erwerb Ihres Geräts. Lesen Sie die folgenden Hinweise sorgfältig durch und befolgen Sie diese, um möglichen Schäden vorzubeugen. Für Schäden, die durch Missachtung der Hinweise und unsachgemäßen Gebrauch entstehen, übernehmen wir keine Haftung. TECHNISCHE DATEN Artikelnummer 10031939... -
Seite 4: Sicherheitshinweise
SICHERHEITSHINWEISE • Lesen Sie die Bedienungsanleitung und bewahren Sie sie auf. • Beachten Sie alle Sicherheitshinweise. • Befolgen Sie die Anleitungen. • Verwenden Sie das Gerät nicht in der Nähe von Wasser. • Nur mit einem sauberen Tuch reinigen. • Blockieren Sie nicht die Lüftungsöffnungen. -
Seite 5: Lieferumfang
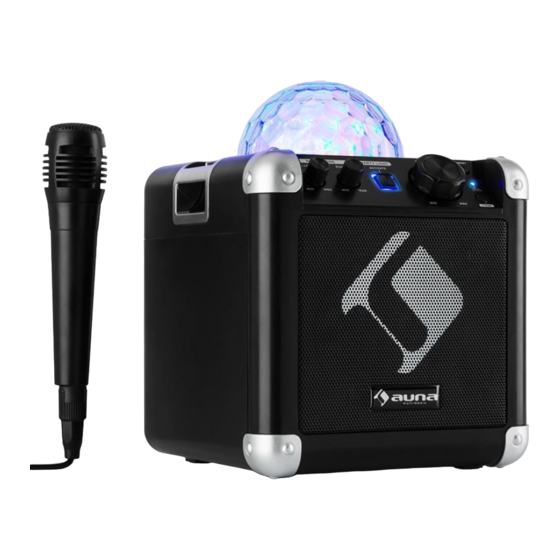
LIEFERUMFANG Anlage Netzadapter Bedienungsanleitung Mikrofon... -
Seite 6: Geräteübersicht
GERÄTEÜBERSICHT Vorderansicht Discolicht Gürtelclip ECHO-Steuerung Das Echo hoch- und herunterregeln MIC-Lautstärke Zur Einstellung der Mikrofonlautstärke Partylicht Ein- und Ausschalten des Partylichts Lautstärkeregelung Die Lautstärke erhöhen oder verringern STANDBY Standby ein- und ausschalten BT-LED PAIRING Kopplung mit einem BT-Gerät 10 Betriebsleuchte Hauptlautsprecher... - Seite 7 Rückseite MIC1 und MIC2-EINGANG Gitarreneinfang AUDIO- Ausgang Zum Anschluss an einen externen Verstärker AUX-Eingang Netzteil-Anschluss USB-Ladeanschluss Mobile Geräte anschließen, um sie aufzuladen Betriebsleuchte Netzschalter Gerät ein- und ausschalten...
-
Seite 8: Stromversorgung
STROMVERSORGUNG Anschluss der Anlage an die Stromversorgung. 1. Schließen Sie den Netzadapter an den Anschluss im Gerät an. 2. Schließen Sie den Netzadapter an eine Steckdose an. 3. Schalten Sie das Gerät hinten am Netzschalter und vorne an der STANDBY-Taste ein. Steckdose Netzadapter Hinweis: Wenn Sie das Gerät längere Zeit nicht verwenden, ziehen Sie den... -
Seite 9: Anschlüsse Und Verbindungen
ANSCHLÜSSE UND VERBINDUNGEN Anschluss eines MIkrofons 1. Schließen Sie Ihr Mikrofon an die MIC1- bzw. MIC2-Buchse auf der Rückseite des Karaokesystems an. Das MIC-Signal wird mit dem Signal eines BT-Geräts, dem Signal des USB-Eingangs oder des AUX-Eingangs gemischt. 2. Am Mikrofon gibt es einen Ein/Aus-Schalter. Darauf achten, dass der Schalter während der Benutzung eingeschaltet ist. -
Seite 10: Bt- Verbindung Und Wiedergabe
BT- VERBINDUNG UND WIEDERGABE Kopplung mit einem BT-Gerät herstellen 1. Schalten Sie das Gerät mit der STANDBY-Taste ein. Die Betriebsleuchte geht an und die BT-Anzeige blinkt. Halten Sie die PAIRING-Taste ca. 5 Sekunden lang gedrückt. Halten Sie das Gerät während der Kopplung innerhalb von einem Meter von der Karaokeanlage entfernt. -
Seite 11: Aufladen Eines Externen Geräts
Hinweise • Wenn Sie am Line-Out-Anschluss einen Lautsprecher angeschlossen haben, müssen Sie nur den Lautstärkeregler der Anlage bedienen. Wenn Sie das externe Gerät am Kopfhörereingang angeschlossen haben, müssen Sie die Lautstärke sowohl über die Anlage als auch über den externen Lautsprecher regeln. •... -
Seite 12: Energiesparfunktion
bevor Sie erneut versuchen, das Gerät aufzuladen. • Es ist normal, dass das Gerät während des Ladens warm wird. • Laden Sie Ihr Smartphone nicht länger als 12 Stunden hintereinander auf. ENERGIESPARFUNKTION Das Gerät schaltet sich nach 15 Minuten in den Standby-Modus, wenn einer der folgenden Situationen eintritt. -
Seite 13: Fehlerbehebung
FEHLERBEHEBUNG Problem Möglicher Grund Abhilfe Das Gerät wurde nicht richtig Trennen Sie Ihr externes Gerät angeschlossen. vom Ladekabel. Anschlüsse auf Fremdkörper hin überprüfen. Der Akku des Das Gerät ist abgestürzt. Achten Sie darauf, dass Ihr externen Gerätes Gerät richtig funktioniert, lädt nicht. -
Seite 14: Hinweise Zur Entsorgung
HINWEISE ZUR ENTSORGUNG Befindet sich die linke Abbildung (durchgestrichene Mülltonne auf Rädern) auf dem Produkt, gilt die Europäische Richtlinie 2012/19/EU. Diese Produkte dürfen nicht mit dem normalen Hausmüll entsorgt werden. Informieren Sie sich über die örtlichen Regelungen zur getrennten Sammlung elektrischer und elektronischer Gerätschaften.