Herunterladen Inhalt Inhalt Diese Seite drucken
Signat ROM2 Bedienungsanleitung

Signat ROM2 Bedienungsanleitung

2 x 200 watt, 4 x 80 watt und 4 x 50 + 1 x 120 watt

Werbung

Verfügbare Sprachen

Verfügbare Sprachen

2 x 200 WATTS
4 x 80 WATTS
4 x 50 + 1 x 120 WATTS
1

Werbung

Inhaltsverzeichnis
loading

Inhaltszusammenfassung für Signat ROM2

  • Seite 1 2 x 200 WATTS 4 x 80 WATTS 4 x 50 + 1 x 120 WATTS...
  • Seite 2 info@signat.de...
  • Seite 3 ROM AMPLIFIER SERIES OWNER’S MANUAL 2 x 200 WATTS 4 x 80 WATTS 4 x 50 + 1 x 120 WATTS...
  • Seite 4: Inhaltsverzeichnis

    Index English Page 1. Features 1.1 General features 1.2 Specifications 2. Installation 2.1 Planning your system 2.2 Installation location 2.3 Installation 3. Connection 3.1 Voltage and polarity 3.2 Fuses 3.3 Cabling – general instructions 3.4 Power supply connections 3.5 Signal connection 3.6 Speaker connection 3.7 System configurations 4.
  • Seite 5: Specifications

    ENS electronic noise suppression, adjustable for maximum effectiveness 2 Ohm stereo / 4 Ohm mono stability Turn-on delay, turn-off muting Protection circuitry against thermal and electrical overload, short circuit, DC-offset SIGNAT power/protection indicator Selectable crossover HPF/LPF Subsonic filter RCA line output...
  • Seite 6: Installation Location

    Operation of a motor vehicle while listening to audio equipment at sound pressure levels may impair your ability to hear external sounds such as horns, warning signals, or emergency vehicles. This constitutes a potential traffic hazard. In the interest of safety SIGNAT recommends listening at lower volume levels while driving.
  • Seite 7: Installation

    2. Common mounting locations are under the front passenger seat, or in the trunk area. Choose a location with unimpaired air circulation. If you are going to mount the amplifier in the passenger compartment, make sure you leave adequate room for amplifier ventilation.
  • Seite 8: Fuses

    Connection Voltage and polarity SIGNAT amplifiers can only be installed in vehicles in which the 12-volt negative terminal is grounded. If the amplifier is connected to other systems, the electrical system of the car and the amplifier can be damaged.
  • Seite 9: Power Supply Connections

    Power supply connections 3.4.1 Ground cable Good grounding constitutes the basis for a high audio quality of the entire system. To avoid unwanted ignition noise caused by ground loops, it is essential to permanently connect the ground cable of the ROM amplifier to a clean, bare, metal surface of the vehicle’s chassis. Please ensure that the metal of the vehicle chassis is bright and free from paint residues.
  • Seite 10: Signal Connection

    Make sure the RCA plugs fit tightly for a secure connection. SIGNAT ROM amplifiers feature BIC (Balanced input circuitry). The input sensitivity of the amplifier can be adjusted to the output voltage of your radio using the “GAIN” control.
  • Seite 11 Bridged configuration for ROM2 Lowest recommended impedance is 4 Ohm bridged mono RCA inputs are connected to both left and right channels Line output is configured summed bridged which is ideal for subwoofer applications 4-channel stereo configuration for ROM4 Lowest...
  • Seite 12 Bridged configuration for ROM4 Lowest recommended impedance is 4 Ohm bridged mono RCA inputs are connected to both left and right channels Line output is configured summed bridged which is ideal for subwoofer applications 5-channel configuration for ROM5 Lowest recommended impedance is 2 Ohm stereo RCA inputs are...
  • Seite 13 Bridged rear channels configuration for ROM5 Configuration for mono rear fill (ameliorates front staging) Lowest recommended impedance is 2 Ohm stereo RCA inputs are connected to both left and right channels Line output configured for stereo operation Double bridged configuration for ROM5 Front and rear channels both bridged;...
  • Seite 14: Controls

    A car system constructed using with SIGNAT takes its power from the car battery. Therefore the system should only be operated with the engine running.
  • Seite 15: Description Of Features And Controls

    4.3.1 Line input INPUT With the signal input RCA jacks, left (‘L’) and right (‘R’) input channels can be connected to the amplifier. Please use high performance audio cable, eg. Signat Platinum cable! 4.3.2 Line output OUTPUT The RCA line outputs offer an easy system expansion option to provide an input signal to another amplifier or component in the system.
  • Seite 16: Highpass Filter

    CAUTION: the amplifier must be installed correctly, and connected to the source and any other components normally used in the system. Never insert anything metallic into any openings of the amplifier. For ENS adjustment, only use a small, non metallic, blade type screwdriver that will fit though the opening. Recommended adjustment of ENS: 1.
  • Seite 17: Subsonic Filter

    4.3.9 Power Indication The LED indicator in the SIGNAT logo at the top panel provides a visual indication of the switched on status of the amplifier. If the LED indicator doesn’t light up, the amplifier has been shut off.
  • Seite 18: Troubleshooting

    Troubleshooting Condition Possible Cause Solution No sound Low or no remote turn on Check the remote turn on connection and the voltage, or no remote turn voltage at the amplifier and source unit POWER indicator on connection unlit Blown fuse(s) Check all system fuses Wiring problems Recheck all connections...
  • Seite 19: Technische Daten

    Wirkungsgrad 2 Ohm Stereo / 4 Ohm Mono stabil Einschaltverzögerung, Ausschalt-Mute Elektronische Schutz-und Überwachungskreise (thermische und elektrische Überlast, Kurzschluss, DC-Offset) SIGNAT Indikator für “Power / Protection” Schaltbare Aktivweiche Hochpass/Tiefpass (HPF/LPF) Subsonic Weiche RCA Line Ausgang Einstellbare Eingangsempfindlichkeit PWM Mosfet Betriebsspannungsversorgung +12V DC, Negative Masse (GND)
  • Seite 20: Einbauort

    Lautstärke kann Ihre Fähigkeit schwächen um äußere Lärme zu hören wie Hupen, Warnsignale oder Notfahrzeuge. Dies erbringt eine mögliche Verkehrsgefahr. Im Sinne der Sicherheit empfehlt SIGNAT um während der Fahrt das System anzuhören mit niedrigeren Lautstärken. Planung des Systems Bevor Sie mit der Montage beginnen, planen Sie zuerst den kompletten Einbau unter Berücksichtigung der Kabelverläufe und der Installation des Gerätes.
  • Seite 21: Befestigung

    VORSICHT! Solche Teile können sich auch in der doppelten Wandverkleidung verbergen! 2. Gängige Einbauorte sind unter den vordere Passagiersitz, oder im Kofferraum. Wählen Sie einen Einbauort mit ausreichender Luftzirkulation, notwendig für die Kühlung des Gerätes. Falls Sie den Verstärker im Passagiersraum installieren, vergewissern Sie sich dass Sie ausreichend Raum lassen für die Verstärkerventilation.
  • Seite 22: Sicherungen

    Anschluss Spannung und Polarität SIGNAT Verstärker sind Hochleistungs-Endstufen für den automotiven Einsatz. Sie können nur in KFZ eingebaut werden, die den 12-Volt Minuspol an Masse haben. Wird das Gerät an andere Systeme angeschlossen, können die elektrische Anlage des Autos und die Elektronik der Endstufe beschädigt werden.
  • Seite 23: Stromversorgungsanschlüsse

    Remotekabel: mindenstens 1.5 mm² All zu niedrige Kabelquerschnitte trüben nicht nur die Audioqualität Ihres Systems und führen zu einem drastischen Leistungsverlust; es besteht auch die Gefahr eines Kabelbrandes, die Fahrzeugelektrik kann Schaden nehmen und die Elektronik der Endstufe kann zerstört werden! Stromversorgungsanschlüsse 3.4.1...
  • Seite 24: Signalanschluss

    Kontakt zu gewährleisten. Verwenden Sie ausschließlich qualitativ hochwertige Cinch-Kabel für den automotiven Einsatz, wie die SIGNAT Platinum Kabelserie. SIGNAT ROM Verstärker verfügen über BIC (Balanced Input Circuitry) Eingänge. Die Empfindlichkeit der Signaleingänge kann über die „LEVEL“-Regler entsprechend angepasst werden.
  • Seite 25: Gebrückte Konfiguration Für Rom2

    Gebrückte Konfiguration für ROM2 Verwendbare Tiefstimpedanz 4 Ohm gebrückt mono RCA Eingänge angeschlossen an linke und rechte Kanäle Line Ausgang ist mono gebrückt, ideal für Subwoofer Anwendungen 4-Kanal Stereo Konfiguration für ROM4 Verwendbare Tiefstimpedanz ist 2 Ohm stereo RCA Eingänge...
  • Seite 26: Gebrückte Konfiguration Für Rom4

    Gebrückte Konfiguration für ROM4 Verwendbare Tiefstimpedanz 4 Ohm gebrückt mono RCA Eingänge angeschlossen an linke und rechte Kanäle Line Ausgang ist mono gebrückt, ideal für Subwoofer Anwendungen 5-Kanal Konfiguration für ROM5 Verwendbare Tiefstimpedanz ist 2 Ohm stereo RCA Eingänge angeschlossen an linke und rechte Kanäle Line Ausgang...
  • Seite 27: Konfiguration Für Rom5 Mit Gebrückte Rearkanäle

    Konfiguration für ROM5 mit gebrückte Rearkanäle Konfiguration für Mono Rear Fill (verbessert die Front Staging) Verwendbare Tiefstimpedanz ist 2 Ohm stereo RCA Eingänge angeschlossen an linke und rechte Kanäle Line Ausgang konfiguriert für Stereo Betrieb Doppel gebrückte Konfiguration für ROM5 Front und Rear Kanäle gebrückt;...
  • Seite 28: Bedienungselemente

    Leistungs-Endstufen können Lautstärken erzeugen, die das menschliche Gehör dauerhaft schädigen können. Ein verantwortungsvoller Umgang mit dem Lautstärkeregler ist angeraten. Wir empfehlen dringend den Einbau, den Anschluss und die Einstellung durch Ihre SIGNAT Fachwerkstatt vornehmen zu lassen. Die technischen Daten der verwendeten Lautsprecher sowie die akustischen Gegebenheiten Ihres Fahrzeugs müssen bei der Einstellung und...
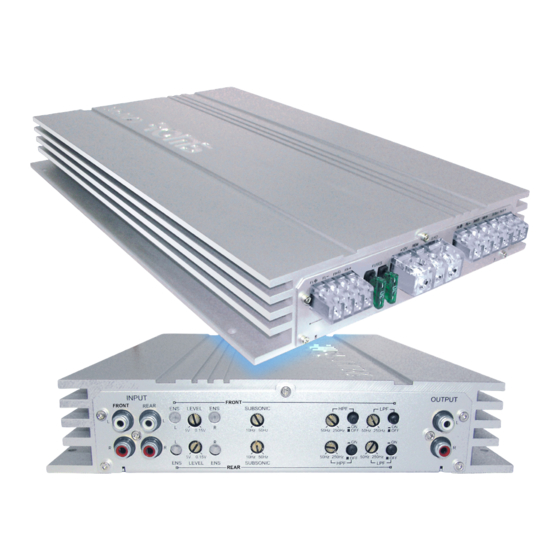
  • Seite 29: Bezeichnung Der Kontroll- Und Bedienungselemente

    Eine falsche Einstellung dieses Drehreglers beeinflusst nicht nur ihr Klangbild negativ, es kann auch zu Defekten der Lautsprecher führen! 4.3.4 Das SIGNAT ENS (ElectronicNoiseSuppression) System stellt eine elektronische Störunterdrückung dar, welche durch die Möglichkeit des Feinabgleiches eine individuelle Optimierung des Entstörungseffektes im Fahrzeug ermöglicht.
  • Seite 30: Hochpass Weiche

    Treten dennoch Störungen auf (Pfeifgeräusche, Summen, Knacken), sollten Sie einen Einbauspezialisten zu Rate ziehen, der einen Eingriff in das ENS System vornehmen kann; er wird die ENS Regler individuell abstimmen um in Ihrem speziellen Fall eine maximale Störunterdrückung zu erzielen. Hinweis: Störungen, die durch Masseschleifen (Ground-Loops) verursacht werden, können durch ENS nicht eliminiert werden! ACHTUNG: zum ENS Abgleich muß...
  • Seite 31: Tiefpass Weiche

    Dieser ROM Verstärker weist diverse integrierte elektronische Schutzschaltungen auf, die die Elektronik sowie die angeschlossenen Lautsprecher weitgehend vor Schäden schützen. Der LED im SIGNAT Logo an der Oberseite des Verstärkers bietet eine visuelle Anzeige eines Problems. Falls der LED erlischt, hat eine der integrierten Schutzschaltungen das Gerät elektronisch abgeschaltet.
  • Seite 32: Problemlösungen

    Problemlösungen Funktionsstörung Mögliche Ursache Mögliche Lösung des Problems Kein Ton, kein Sound Keine Spannung am Remote Spannung an der Remote Klemme der Endstufe Eingang oder Spannung zu messen; wenn unter 10V, Anschluss der Remote POWER Indikator niedrig Leitung überprüfen, Ausgang des Radios überprüfen. leuchtet nicht Sicherung(en) durchgebrannt Überprüfe alle Sicherungen des Audiosystems, ggf.
  • Seite 33: Caractéristiques Générales

    2 Ohm stabilisé (stéréo mode), pontage possible (min. 4 Ohm) Suppression de bruits pendant la mise en tension et hors tension Circuits de protection contre surchauffe, surconsommation, court-circuit et courant continu SIGNAT indicateur pour “Power / Protection” Filtre actif incorporé (LPF / HPF) Filtre subsonique Sortie RCA ligne Sensibilité...
  • Seite 34: Emplacement

    Pour le montage du SIGNAT amplificateur, nous vous conseillons de faire appel à un professionnel. En effet, en cas de défectuosité et pour profiter de la garantie offerte par SIGNAT, il faut apporter la preuve d’un montage et d’un câblage effectués selon les règles de l’art.
  • Seite 35: Montage

    ATTENTION ! Ces éléments pourraient aussi se trouver dissimulés sous un panneau à double épaisseur ! 2. Des emplacements appropriés se trouvent sous les sièges avant ou dans le coffre. Choisissez un endroit assurant une circulation d’air suffisante autour de l’appareil. Quand vous choisissez un emplacement dans le compartiment passager, veuillez laisser plein d’espace pour la ventilation de l’ampli.
  • Seite 36: Fusibles

    Raccordement Tension et polarité Les amplificateurs SIGNAT sont des dispositifs de haute qualité pour utilisation mobile. Ils ne peuvent être montés que dans des voitures dont le pôle négatif a été mise à la masse. Raccorder l’amplificateur à d’autres systèmes pourrait endommager l’installation électrique de la voiture ainsi que l’amplificateur.
  • Seite 37 Câble de télécommande: au moins 1.5 mm² Des diamètres incorrects puissent provoquer un son de qualité inférieure et même enflammer et détruire l'installation électrique de la voiture, ainsi que l'amplificateur ! Câblage de l’alimentation 3.4.1 Câble de masse Une prise de terre adéquate est une condition absolue pour obtenir une bonne qualité de son du système total.
  • Seite 38: Raccordement Du Signal

    Utilisez seulement des câbles RCA de bonne qualité, appropriés aux applications mobiles. SIGNAT ROM amplificateurs disposent d’entrées ‘BIC’ (Balanced Input Circuitry), prises d’entrée balancées. La sensitivité des entrées signal peut être ajusté à la tension de sortie de la radio, au moyen des commutateurs "LEVEL".
  • Seite 39 ROM2: configuration pontée L’impédance peut être baissée jusqu`à 4 Ohm ponté mono Entrées RCA raccordés aux canaux gauche et droite Sortie ligne pontée mono, idéal pour des applications avec subwoofer. ROM4: configuration stéréo à 4 canaux L’impédance peut être baissée jusqu’à...
  • Seite 40 ROM4: configuration pontée L’impédance peut être baissée jusqu`à 4 Ohm ponté mono Entrées RCA raccordés aux canaux gauche et droite Sortie ligne pontée mono, idéal pour des applications avec subwoofer. ROM5: configuration à 5 canaux L’impédance peut être baissée jusqu’à 2 Ohm Entrées RCA raccordés aux canaux gauche et...
  • Seite 41 ROM5: configuration avec canaux arrière pontés Configuration pour mono rear fill (front staging amélioré) L’impédance peut être baissée jusqu`à 2 Ohm Entrées RCA raccordés aux canaux gauche et droite Sortie ligne configurée pour opération stéréo ROM5: configuration doublement pontée Canaux avant et arrière pontés;...
  • Seite 42: Contrôles

    (+12V) près de la batterie. Respectez la valeur correcte du fusible. L'installation d'un amplificateur SIGNAT ROM a pour effet de solliciter la batterie de la voiture. C'est pourquoi ce système ne devrait être utilisé que lorsque le moteur est en marche.
  • Seite 43: Explication Des Caractéristiques Et Contrôles

    En cas de difficultés concernant un parasite alternateur ou/et des bruits de fonctionnement, nous vous conseillons de consulter un spécialiste expérimenté sur le terrain de systèmes caraudio SIGNAT pour vous assister avec l’ajustage d’ENS. Il ajustera individuellement les potentiomètres ENS afin de réaliser la suppression maximale dans votre cas spécial.
  • Seite 44: Filtre Passe-Haut

    Remarque: bruits causés par des boucles de terre sérieuses ne peuvent pas être éliminées par ENS! ATTENTION: Pour l’ajustage d’ENS l’amplificateur doit être installé de façon correcte, raccordé à la source audio et aux autres composants normalement intégrés dans un système audio mobil.
  • Seite 45: Filtre Subsonique

    4.3.9 Indicateur de mise en tension L’indicateur LED allumé dans le logo SIGNAT au dessus de l’amplificateur donne une indication visuelle de l’état enclenché de l’amplificateur. Si l’indicateur est éteint, l’amplificateur a été coupé par raisons de sécurité.
  • Seite 46: En Cas De Difficulté

    En cas de difficulté Condition Cause probable Solution Pas de son. Câble de télécommande a Vérifier la connexion du câble de télécommande et Indicateur Power une tension trop basse ou la tension à l’amplificateur et à la source audio. éteint. est absent.
  • Seite 47 Copyright © SEPTEMBER 2006 v1 SIGNAT Subject to modifications without notice. Änderungen ohne Gewähr. Susceptible de modification sans préavis...
  • Seite 48 info@signat.de...

Diese Anleitung auch für:

Rom4Rom5

Inhaltsverzeichnis