Futurelight DMD-512 Bedienungsanleitung

Verwandte Anleitungen für Futurelight DMD-512


Inhaltszusammenfassung für Futurelight DMD-512
- Seite 1 BEDIENUNGSANLEITUNG USER MANUAL DMD-512 DMX-controller © Copyright Für weiteren Gebrauch aufbewahren! Nachdruck verboten! Keep this manual for future needs! Reproduction prohibited!
-
Seite 2: Inhaltsverzeichnis
Inhaltsverzeichnis Table of contents 1. EINFÜHRUNG ............................... 3 2. SICHERHEITSHINWEISE..........................3 3. BESTIMMUNGSGEMÄßE VERWENDUNG....................4 4. GERÄTEBESCHREIBUNG........................... 5 5. SETUP ................................5 6. BEDIENUNG ..............................6 7. PROBLEMBEHEBUNG ..........................6 8. REINIGUNG UND WARTUNG........................6 9. TECHNISCHE DATEN ..........................7 1. -
Seite 3: Dmx-Controller
- sich die letzte Version der Anleitung im Internet herunter laden 1. EINFÜHRUNG Wir freuen uns, dass Sie sich für einen FUTURELIGHT DMD-512 entschieden haben. Wenn Sie nachfolgende Hinweise beachten, sind wir sicher, dass Sie lange Zeit Freude an Ihrem Kauf haben werden. -
Seite 4: Bestimmungsgemäße Verwendung
Das Gerät darf nicht in Betrieb genommen werden, nachdem es von einem kalten in einen warmen Raum gebracht wurde. Das dabei entstehende Kondenswasser kann unter Umständen Ihr Gerät zerstören. Lassen Sie das Gerät solange uneingeschaltet, bis es Zimmertemperatur erreicht hat! Der Aufbau entspricht der Schutzklasse III. -
Seite 5: Gerätebeschreibung
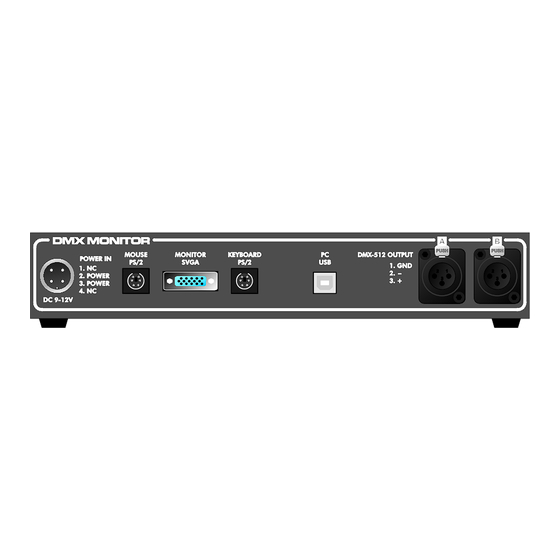
4. GERÄTEBESCHREIBUNG 4.1 Features Komfortabler DMX-Monitortreiber • Versorgt einfache DMX-Steuerungen mit Monitor, Maus-, Tastatur- und Computeranschluss • 1024 Steuerkanäle • 3 Arbeitsmodi: DMX Receiver (2x 512 Kanäle), DMX Converter (1x 512 Kanäle), DMX Controller (1024 Kanäle) • Komfortable Einstellung verschiedener Parameter •... -
Seite 6: Bedienung
DMX-Ausgängen angeschlossen werden, müssen Adapterkabel verwendet werden. Aufbau einer seriellen DMX-Kette: Verbinden Sie den DMX-Ausgang des DMD-512 mit dem DMX-Eingang des nächsten Gerätes. Verbinden Sie immer einen Ausgang mit dem Eingang des nächsten Gerätes bis alle Geräte angeschlossen sind. -
Seite 7: Technische Daten
9. TECHNISCHE DATEN Spannungsversorgung: 230 V AC, 50 Hz ~ über mitgeliefertes 12 V DC, 500 mA Netzteil Gesamtanschlusswert: DMX-Steuerkanäle: 1024 DMX 512-Anschluss: 3-pol. XLR, 2x IN, 2x OUT Maße (LxBxH): 315 x 75 x 68 mm Gewicht: 0,75 kg Bitte beachten Sie: Technische Änderungen ohne vorherige Ankündigung und Irrtum vorbehalten.