Herunterladen Diese Seite drucken

Werbung

Verfügbare Sprachen
  • DE

Verfügbare Sprachen

  • DEUTSCH, seite 7
walimeSpro
Your Inspiration.
Your Chance.
StabyFlow
Director
System
Gebrauchsanleitung
Instruction
Manual

Werbung

loading

Inhaltszusammenfassung für Walimex Pro StabyFlow Director System

  • Seite 1 walimeSpro Your Inspiration. Your Chance. StabyFlow Director System Gebrauchsanleitung Instruction Manual...
  • Seite 2 walimeSpro Your Inspiration. Your Chance. Inhalt So verstehen Sie diese Gebrauchsanleitung richtig ......7 Kennzeichnungen in dieser Gebrauchsanleitung.. Wichtige Sicherheitsinformation Übersicht über Bestandteile und Bedienelemente des Systems ..9 Installieren Kamera Schwebestativ .......II Ausbalancieren der Schlittenkomponenten ........12 Schwenk Drehtest ........13 Anlegen der Weste ..15 Instandhaltung Zubehör...
  • Seite 3 walimeSpro Your Inspiration. Your Chance. Contents Understanding these instructions for use correctly......20 Identifications in these instructions for use ..20 Important safety information ..............21 Overview of components and control elements of the system ..22 Mounting the camera on the ..24 Balancing the slide components Panning and rotation test..............26 Putting on the SteadyCam...
  • Seite 4 walimeSpro Your Inspiration. Your Chance. Contenu Pour bien comprendre Ia notice d'utilisation ........33 Symbole de la notice d'utilisation ..33 Informations de sécurité importantes......34 Apergu des composants et des éléments de ........35 commande du systéme Installer l'appareil photo sur le steadicam ........37 Équilibrage des composants du traineau..........38 Test...
  • Seite 5 walimeSpro Your Inspiration. Your Chance. indice De esta forma comprenderå correctamente eI manual de instrucciones Simbolos en este manual de instrucciones..Informaciones importantes Vista general de los componentes y los elementos de....48 control sistema Instalaciön de Ia camara en eI Steady ..50 Equilibrado de los componentes...
  • Seite 6 walimeSpro Your Inspiration. Your Chance. Indice Come comprendere correttamente queste Istruzioni per I'uso..59 Contrassegni di identificazione in queste Istruzioni per l'uso....59 Importante informazione per la sicurezza .........60 Prospetto dei componenti e degli elementi operativi del sistema ..61 Come installare la macchina fotografica sullo stativo sospeso..63...
  • Seite 7 Ihr Vertrauen und wünschen Ihnen viel Freude Erfolg mit Ihrem neuen walimex pro Produkt. Lesen Sie diese Gebrauchsanleitung sorgfältig durch, bevor Sie Ihr neues System das erste Mal benutzen. Sie enthält alles, was Sie wis- sen müssen, damit Sie Personen- und Sachschäden...
  • Seite 8 walimeSpro Your Inspiration. Your Chance. 2. Wichtige Sicherheitsinformation HINWEIS Gefahr von Beschädigungen durch Herunterfallen der Kamera, bei nicht sachgerechter Befestigung der Schnellwechselplatte und Montage auf dem StabyPod. Sowie nicht sachgerechter Befestigung der Gegengewichte. • Achten Sie stets darauf, dass alle Feststellschraube festgezogen und der Sicherungshebel der Schnellwechselplatte...
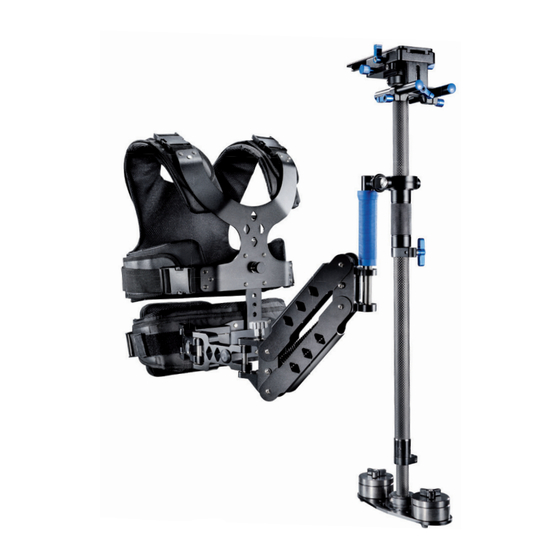
  • Seite 9 walimeSpro Your Inspiration. Your Chance. 3. Übersicht über Bestandteile und Bedienelemente des Systems Schwebestativ Rundstäbe für Zubehörmontage Feststellhebel Schnellwechselplatte Schnellwechselplatte Entriegelungsschraube Schnellwechselplatte Einheit Handgriff, Stativ- Federarmaufnahme Feststellschraube Einheit Handgriff, Stativ Federarmaufnahme Feststellschraube Stativlänge Gewichtsblock...
  • Seite 10 walimeSpro Your Inspiration. Your Chance. Weste Westenschnalle Schulter Westenschnalle Brust Beckengurt Halterung Federarm Westenschnalle Hüfte Verriegelungsstift Brustplatte...
  • Seite 11 walimeSpro Your Inspiration. Your Chance. Installieren Kamera Schwebestativ Stecken Sie das Schwebestativ mit dem Handgriff auf ein Lampenstativ (optional). HINWEIS Achten Sie auf einen sicheren und festen Halt des Schwebe- und Lampenstatives. Lösen Sie den Feststellhebel Schnell- wechselplatte. Ziehen Sie die Entriegelungsschraube nach außen.
  • Seite 12 walimeSpro Your Inspiration. Your Chance. 5. Ausbalancieren der Schlittenkomponenten Kippen Sie das Schwebestativ auf dem feststehenden Lampenstativ vor und zurück. Stellen Sie die Vorwärts- und Rückwärtsneigung des Kamerasystems Hilfe der Verstellmöglichkeit der Schnellwechselplatte so ein, dass eine ausgeglichene Gewichtsverteilung erzielt wird. (Kameraschwerpunkt) Lösen Sie den Feststellhebel der Schnellwechselplatte.
  • Seite 13 walimeSpro Your Inspiration. Your Chance. Schwenk- Drehtest Ordnen Sie das Schwebestativ auf dem feststehenden Lampenstativ zum Testen der Fallbewegung horizontal an. Fällt der Schlitten zu schnell, korrigieren Sie die Zahl der Gewichte am Gewichts- block. Fällt der Schlitten zu langsam, korrigieren Sie die Länge Schwebestatives und/oder den Schwerpunkt der Einheit Handgriff,...
  • Seite 14 walimeSpro Your Inspiration. Your Chance. HINWEIS Die Fallzeit des Kameraschlittens muss zwischen 2 und 3 Sekunden liegen; der Schlitten darf sich nicht drehen. Sie müssen einige der Schritte eventuell so oft wiederholen, bis das Gleichgewicht hergestellt ist. Ordnen Sie den Kameraschlitten vertikal an, um den Schwenktest durchzuführen.
  • Seite 15 walimeSpro Your Inspiration. Your Chance. Zur endgültigen Überprüfung: Greifen Sie das Schwebestativ mit der Hand und überprüfen Sie die Vor- und Rückwärtsbewegung. Greifen Sie das Schwebestativ mit der Hand, um den horizontalen Schwenktest durchzuführen. Evtl. müssen Sie eine vorher erklärten Schritte zur Feinjustierung durchführen.
  • Seite 16 walimeSpro Your Inspiration. Your Chance. HINWEIS Achten Sie darauf, dass der Verriegelungsstift nach dem Einstellen wieder einrastet. Stellen Sie die Westenspannung so ein, dass die Weste bequem sitzt. Wenn die Weste beim Atmen zu sehr spannt, stellen Sie die Weste etwas lockerer ein.
  • Seite 17 walimeSpro Your Inspiration. Your Chance. 8. Instandhaltung System regelmäßig prüfen und warten müssen Sie tun? Vor jedem Einsatz Befestigungsschrauben überprüfen Gegebenenfalls nachziehen Geräte Z.B. Kamera auf festen Halt überprüfen Gegebenenfalls Befestigungen nachziehen Stärke der Schere prüfen / einstellen Reinigen HINWEIS Verwenden Sie ausschließlich die in der nachfolgenden Tabelle angegebenen...
  • Seite 18 walimeSpro Your Inspiration. Your Chance. 10. Technische Daten Schwebestativ Max. Länge Stativ ca. 68 cm Min. Länge Stativ ca. 123 cm Maße Kamerabacke (LxB) ca. 17 x Gewicht (ohne Gegengewichte) ca. 1,6 kg ca. 6 kg Max. Belastbarkeit Anschlussgewinde Länge Haltegriff ca.
  • Seite 19 walimeSpro Your Inspiration. Your Chance. Praxistipps und Hinweise Machen Sie sich mit der Strecke und dem Gelände für den Filmeinsatz vertraut. Zeichnen Sie sich eine Skizze von der Strecke, urn Ihre eigene Sicherheit und die der Filmausrüstung zu gewährleisten. Kennzeichnen Sie alle Hindernisse, die sich möglicherweise auf der Strecke befinden.
  • Seite 20 Manual We would like to thank you for your trust in us and wish you much fun and success with your new walimex pro product. Please read these instructions for use thoroughly before you use this new equipment for the first time. It contains everything you need to know in order to avoid damage to persons or property.
  • Seite 21 walimeSpro Your Inspiration. Your Chance. 2. Important safety information NOTE Danger of damage caused by the camera falling down, if the quick-release plate has not been correctly fastened and mounted on the SteadyCam. And if the counter-weights have not been correctly fastened •...
  • Seite 22 walimeSpro Your Inspiration. Your Chance. 3. Overview of components and control elements of the system Steadycam Round rods for mounting accessories Locking lever for quick-release plate Quick-release plate Unlocking screw for quick-release plate Handle, support and spring arm receptacle unit Fastening screw for handle, support and spring arm receptacle unit Fastening screw for support length...
  • Seite 23 walimeSpro Your Inspiration. Your Chance. Vest Vest buckle shoulder Vest buckle chest Hip plate Spring arm holder Vest buckle hip Locking pin Chest plate...
  • Seite 24 walimeSpro Your Inspiration. Your Chance. 4. Mounting the camera on the steadycam Plug the steadycam with the handle on a lamp tripod (optional) NOTE Ensure stability of steadycam and lamp tripod. Loosen the locking lever for the quick-re- lease plate. Pull the unlocking screw towards the outside.
  • Seite 25 walimeSpro Your Inspiration. Your Chance. 5. Balancing the slide components Tilt the steadycam forward and back on the stationary lamp tripod. Adjust the forward and backward inclination of the camera system by using the adjustment possibilities of the quick-release plate, so that the weight is evenly distributed.
  • Seite 26 walimeSpro Your Inspiration. Your Chance. 6. Panning and rotation test Arrange the steadycam on the stationary lamp tripod horizontally to test the dropping movement. If the slide drops too quickly, correct the number of weights on the weight block. If the slide drops too slowly, correct the length of the steadycam and/or the centre of gravity of the unit of handle, support and spring arm receptacle:...
  • Seite 27 walimeSpro Your Inspiration. Your Chance. NOTE The dropping time of the camera slide must be between 2 and 3 seconds; the slide should not rotate. You may need to repeat some of these steps, until the system is perfectly balanced. Arrange the camera slide vertically to be able to conduct the panning test.
  • Seite 28 walimeSpro Your Inspiration. Your Chance. For final testing: Hold the steadycam with your hand and check the forward backwards movement. Hold the steadycam with your hand and execute the horizontal panning test. You may possibly need to repeat one of previously described tests for fine adjustment.
  • Seite 29 walimeSpro Your Inspiration. Your Chance. NOTE Make sure that the locking pin clicks back into place once the adjustment has been made. Adjust the tightness of the vest so that is fits comfortably. If the vest feels too tight when breathing, adjust the vest more loosely.
  • Seite 30 walimeSpro Your Inspiration. Your Chance. 8. Maintaining the device Check and service the system at regular intervals Before each What to do? Check the fastening screws Retighten if necessary Check the equipment, e.g. camera for secure hold Retighten the fastening , if necessary Checking / adjusting the scissor strength Cleaning NOTE...
  • Seite 31 walimeSpro Your Inspiration. Your Chance. 10. Technical specifications Steadycam Max. length of steadycam ca. 68 cm Min. length of steadycam ca. 123 cm Dimensions of camera mount (LxW) ca. 17 x Weight (without counterweights) ca. 1,6 kg Max. loadability ca. 6 kg Connecting thread Length of holding grip ca.
  • Seite 32 walimeSpro Your Inspiration. Your Chance. II. Tips and notes for everyday Become familiar with the track and the terrain where your filming is to take place. Draw a sketch of the track to ensure your own safety and the safety of your filming equipment.
  • Seite 33 walimeSpro Your Inspiration. Your Chance. Mode Nous vous remercions de votre confiance et vous souhaitons beaucoup de plaisir et de succes avec votre nouvel appareil. Veuillez lire attentivement cette notice avant d'utiliser pour la premiére fois votre nouvel systéme. Elle contient tout ce que vous devez savoir afin d'éviter tout dommage corporel ou matériel.
  • Seite 34 walimeSpro Your Inspiration. Your Chance. 2. Informations de sécurité importantes REMARQUE Risque de dommages suite å la chute de l'appareil photo en cas de mau- vaise fixation du plateau de fixation rapide et de montage sur le steadicam, ainsi qu'en cas de mauvaise fixation des contrepoids. •...
  • Seite 35 walimeSpro Your Inspiration. Your Chance. 3. Aperqu des composants et des éléments de commande systéme Steadicam Tubes ronds pour montage des accessoires Levier de réglage du plateau de fixation rapide Plateau de fixation rapide Vis de déverrouillage du plateau de fixation rapide Unité...
  • Seite 36 walimeSpro Your Inspiration. Your Chance. Gilet Boucles du gilet épaules Boucles du gilet poitrine Panneau ventral Dispositif de fixation du bras ressort Boucle du gilet hanches Broche deverrouillage 7 Panneau de poitrine...
  • Seite 37 walimeSpro Your Inspiration. Your Chance. 4. Installer I'appareil photo sur Ie steadicam Installez le steadicam sur un trépied pour lampe å l'aide de Ia poignée (en option). REMARQUE Assurez-vous de la fixation et de la stabilité correctes du steadicam et du trépied pour lampe.
  • Seite 38 walimeSpro Your Inspiration. Your Chance. 5. Équilibrage des composants du traineau Faites basculer Ie steadicam en avant/arriére sur Ie trépied pour lampe fixe. Réglez I'inclinaison avant/arriére du systéme I'aide des possibilités d'ajustement offertes par Ie plateau de fixation rapide afin d'obtenir une répartition équilibrée du poids.
  • Seite 39 walimeSpro Your Inspiration. Your Chance. Test d'inclinaison et de rotation Installez le steadicam en position horizon- tale sur Ie trépied pour lampe fixe afin de tester Ie mouvement de chute. Si le traineau tombe trop rapidement, corrigez le nombre de poids contenus dans Ie bloc de contrepoids.
  • Seite 40 walimeSpro Your Inspiration. Your Chance. REMARQUE Le temps de chute du traineau de l'appareil doit se situer entre deux et trois secondes. Le traineau ne doit pas pivoter. Vous devez éventuellement répéter certaines des étapes jusqu'å obtenti- on d'un équilibrage correct. Installez le traineau å...
  • Seite 41 walimeSpro Your Inspiration. Your Chance. Contröle final Prenez Ie steadicam en main et vérifiez son mouvement avant/arriére. Prenez Ie steadicam en main afin d'effectuer Ie test d'inclinaison horizontale. Vous devez éventuellement répéter une des étapes précédentes afin d'affiner I'ajustement. REMARQUE Cette procédure dure un certain temps et nécessite de la patience.
  • Seite 42 walimeSpro Your Inspiration. Your Chance. REMARQUE Veillez å ce que la broche de verrouillage se renclenche bien aprés réglage. Serrez le gilet de maniére le porter con- fortablement. Si le gilet serre trop lorsque vous respirez, desserrez-le un peu. Insérez les broches du bras ressort...
  • Seite 43 walimeSpro Your Inspiration. Your Chance. Entretien Contröler et entretenir réguliérement Ie systéme Comment procéder Avant toute utilisation Vérifier les vis de fixation Les resserrer si nécessaire. Vérifier Ia stabilité et Ia fixation correctes appareils (par ex. appareil photo) Resserrer Ies fixations si nécessaire.
  • Seite 44 walimeSpro Your Inspiration. Your Chance. 10. Caractéristiques techniques Steadicam Longueur max. du trépied ca. 68 cm Longueur min. du trépied ca. 123 cm Dimensions du support pour ca. 17 x appareil photo (lxL) Poids (sans contrepoids) ca. 1,6 kg Capacité de charge max. ca.
  • Seite 45 walimeSpro Your Inspiration. Your Chance. II. Conseils d'utilisation et remarques Familiarisez-vous avec Ie trajet et Ie site de tournage du film. Dessinez un croquis du trajet afin d'assurer votre sécurité et celle du matériel. Signalez tous Ies obstacles éventuels situés sur Ie trajet. Effectuez un premier passage avant de commencer Ie tournage.
  • Seite 46 walimeSpro Your Inspiration. Your Chance. Instrucciones de uso Le agradecemos su confianza y Ie deseamos éxito y satisfacciön con eI uso de su nuevo dispositivo. Léase atentamente este manual de instrucciones antes de utilizar por primera vez su nuevo sistema. Contiene todo 10 que necesita saber para evitar dafios corporales o materiales.
  • Seite 47 walimeSpro Your Inspiration. Your Chance. 2. Informaciones importantes de seguridad NOTA Peligro de daäos por la caida de la cåmara en caso de una fijaciön incorrecta de la placa de cambio råpido o por un incorrecto montaje de la SteadyCam. En caso de una fijaciön incorrecta del contrapeso •...
  • Seite 48 walimeSpro Your Inspiration. Your Chance. 3. Vista general de Ios componentes y Ios elementos control del sistema Steady Cam Barra para el montaje de accesorios Palanca de fijaciön de Ia placa de cambio råpido Placa de cambio råpido Tornillo de desbloqueo de Ia placa de cambio råpido Unidad del agarre, toma del tripode...
  • Seite 49 walimeSpro Your Inspiration. Your Chance. Chaleco Hebilla del chaleco para los hombros Hebilla del chaleco para el pecho Placa de la cadera Soporte del brazo de resorte Hebilla del chaleco para la cadera Chaveta de bloqueo Placa del pecho...
  • Seite 50 walimeSpro Your Inspiration. Your Chance. 4. Instalaciön de Ia camara en eI Steady Cam Coloque eI Steady Cam con eI agarre sobre eI tripode de luz (opcional). NOTA Asegürese de la correcta fijaciÖn del Steady Cam y eI tripode de luz. Afloje la palanca de fijaciön de Ia placa de cambio räpido.
  • Seite 51 walimeSpro Your Inspiration. Your Chance. 5. Equilibrado de Ios componentes del carro Vuelque Ia Steady Cam sobre eI tripode de luz fijo hacia delante y hacia aträs. Coloque eI angulo de inclinaciön de avance y retroceso del sistema de Ia camara con ayuda de Ia posibilidad de ajuste de Ia placa de cambio råpido de tal forma que se consiga Ia distribuciÖn equilibrada del peso.
  • Seite 52 walimeSpro Your Inspiration. Your Chance. Prueba de oscilaciön y giro Coloque eI Steady Cam sobre un tripode de luz fijo para probar el movimiento de caida. Si el carro se cae demasiado råpido, corrija eI nümero de pesos del bloque de peso. Si el carro cae demasiado despacio, corrija Ia longitud del Steady Cam y/o el centro de gravedad de la unidad del agarre, la toma...
  • Seite 53 walimeSpro Your Inspiration. Your Chance. NOTA El tiempo de caida del carro de la cåmara debe estar entre 2 y 3 se- gundos; el carro no debe girarse. Debe repetir alguno de los pasos a menudo hasta que se haya consegui- do el equilibrio.
  • Seite 54 walimeSpro Your Inspiration. Your Chance. Para Ia comprobaciön final: Tome eI Steady Cam con Ia mano y compruebe eI movimiento de avance y de retroceso. Tome eI Steady Cam con Ia mano para realizar Ia prueba de oscilaciÖn horizontal. Podria ser necesario realizar Ios pasos indicados anteriormente para un ajuste preciso...
  • Seite 55 walimeSpro Your Inspiration. Your Chance. NOTA Asegürese de que la barra de bloqueo se quedé enclavada tras el ajuste. Ajuste la tensiön del chaleco de tal forma que el chaleco se le asiente cömodamente. Si respira con dificultades, afloje algo el chaleco.
  • Seite 56 walimeSpro Your Inspiration. Your Chance. Mantenimiento Compruebe y realice eI mantenimiento periödico del sistema debo hacer? Antes de cada Comprobar los tornillos de sujeciån Si no, apretar Comprobar que los dispositivos por ej. la cåmara estén correctamente colocados. Si no, apretar las fijaciones Comprobar/ajustar la fuerza de las tijeras Limpieza...
  • Seite 57 walimeSpro Your Inspiration. Your Chance. 10. Datos técnicos Steady Cam Longitud måx. del tripode ca. 68 cm Longitud min. del tripode ca. 123 cm Dimensiones de la brida ca. 17 x de la cåmara (L x An) Peso (sin contrapeso) ca.
  • Seite 58 walimeSpro Your Inspiration. Your Chance. II. Indicaciones y consejos pråcticos Familiaricese con eI camino y eI terreno para eI uso del video. Realice un esquema del camino para garantizar su propia seguridad y Ia del equipa- miento del video. Marque todos Ios obstäculos que se podria encontrar en eI camino.
  • Seite 59 walimeSpro Your Inspiration. Your Chance. Istruzioni per l'uso La ringraziamo per Ia fiducia e Le auguriamo molta gioia e molto successo con il Suo nuovo apparecchio. Legga attentamente queste Istruzioni per l'uso prima di usare per la prima volta il Suo nuovo sistema. Contengono tutto quello che Lei deve sapere per evitare danni alle persone e alle cose.
  • Seite 60 walimeSpro Your Inspiration. Your Chance. 2. Importante informazione per Ia sicurezza INDICAZIONE Pericolo di danni causati dalla caduta della macchina fotografica in caso di montaggio e fissaggio inadeguato della piastra di sostituzione rapida sulla SteadyCam. E anche in caso di fissaggio inadeguato dei contrappesi Faccia sempre attenzione che tutte le viti di fissaggio siano bene avvitate e che la leva di sicurezza della piastra di sostituzione rapida sia bene...
  • Seite 61 walimeSpro Your Inspiration. Your Chance. 3. Prospetto dei componenti e degli elementi operativi sistema Stativo sospeso Perni rotondi per il montaggio degli accessori Piastra di sostituzione rapida con leva di fissaggio Piastra di sostituzione rapida Vite di sbloccaggio della piastra di sostituzione rapida Unita comprendente impugnatura,...
  • Seite 62 walimeSpro Your Inspiration. Your Chance. Imbragatura Fibbia dell'imbragatura sulla spalla Fibbia dell'imbragatura sul petto Piastra in corrispondenza dei fianchi Supporto del braccio molleggiato Fibbia dell'imbragatura sui fianchi Perno di bloccaggio Piastra in corrispondenza del petto...
  • Seite 63 walimeSpro Your Inspiration. Your Chance. Come installare Ia macchina fotografica sullo stativo sospeso Innestare 10stativo sospeso con l'impugnatura su uno stativo per lampade (componente a richiesta) INDICAZIONE Faccia attenzione che il supporto dello stativo sospeso e dello stativo per lampade sia fissato in modo solido...
  • Seite 64 walimeSpro Your Inspiration. Your Chance. 5. Equilibratura dei componenti della slitta Rovesci avanti e indietro 10 stativo sospeso sullo stativo fisso per lampade. Sfruttando Ia possibilitå di spostamento della piastra di sostituzione rapi- da, regoli I'inclinazione in avanti e indietro del gruppo macchina fotografi- ca, in modo tale da raggiungere una distribuzione equilibrata del peso.
  • Seite 65 walimeSpro Your Inspiration. Your Chance. Test di sospensione e di rotazione Disponga in direzione orizzontale 10 stativo sospeso sullo stativo fisso per lampade, per verificare il movimento di caduta. Se la slitta cade troppo velocemente, corregga il numero di pesi sul blocco di supporto dei pesi.
  • Seite 66 walimeSpro Your Inspiration. Your Chance. INDICAZIONE II tempo di caduta della slitta della camera fotografica deve essere compre- so tra 2 e 3 secondi e la slitta non deve ruotare. Se necessario, Lei deve ripetere questi passaggi diverse volte, fino a creare l'equilibrio.
  • Seite 67 walimeSpro Your Inspiration. Your Chance. Come eseguire Ia verifica definitiva: Afferri 10stativo di sospensione con Ia mano e verifichi come si muove avanti indietro. Afferri 10stativo di ospensione con Ia mano , per eseguire il test di sospensione orizzontale. Per ottenere una registrazione fine, Lei deve, se necessario, eseguire alcuni dei passaggi prima descritti.
  • Seite 68 walimeSpro Your Inspiration. Your Chance. INDICAZIONE Faccia attenzione che dopo la regolazione il perno di bloccaggio si innesti nuovamente. Regoli la tensione dell'imbragatura in modo tale che l'imbragatura Le stia comoda. Se nel respirare l'imbragatura stringe troppo, la regoli in modo che sia un po' piü lenta. Inserisca i perni del braccio molleggiato nell'apposito supporto...
  • Seite 69 walimeSpro Your Inspiration. Your Chance. Manutenzione Eseguire regolarmente il controllo e Ia manutenzione del sistema cosa deve fare? Ogni volta prima di usarlo Verificare le viti di fissaggio Eventualmente stringerle Verificare che gli apparecchi, ad esempio, la macchina fotografica, siano fissati solidamente. Eventualmente consolidare i punti di fissaggio Verificare o regolare la forza delle articolazioni.
  • Seite 70 walimeSpro Your Inspiration. Your Chance. 10. Dati Tecnici Stativo sospeso Lunghezza massima dello stativo ca. 68 cm Lunghezza minima dello stativo ca. 123 cm Dimensioni della ganascia della ca. 17 x macchina fotografica (l x l) Peso (senza contrappesi) ca. 1,6 kg Carico massimo applicabile ca.
  • Seite 71 walimeSpro Your Inspiration. Your Chance. II. Suggerimenti pratici e indicazioni Prenda famigliaritå con il tragitto e con il sito in cui deve essere girato il film. Disegni uno schizzo del tragitto per garantire Ia sicurezza propria e delle attrezzature per il film. Identifichi tutti gli ostacoli che potrebbero trovarsi sul Suo tragitto.
  • Seite 72 walimeSpro Your Inspiration. Your Chance. WALSER GmbH & co. Gewerbering 26 86666 Burgheim Tel: +49 8432 9489-0 Fax: 8432 9489-8333 Germany www.walimex.com Made in China Fabricado en China Fabbricato in China...