Walimex Pro RGB TUBE SMALL M10 Gebrauchsanleitung

Verwandte Anleitungen für Walimex Pro RGB TUBE SMALL M10


Inhaltszusammenfassung für Walimex Pro RGB TUBE SMALL M10
- Seite 1 WALSER GmbH & Co. KG Senefelderstrasse 23 86368 Gersthofen Germany info@walser.de www.walser.de Made in China...
- Seite 2 RGB TUBE SMALL M10 Gebrauchsanleitung Instruction Manual...
-
Seite 3: Inhaltsverzeichnis
Gebrauchsanleitung 1. Hinweise zum Verständnis dieser Gebrauchsanleitung ...... 4 1.1 Kennzeichen und Symbole am Gerät ..............4 1.2 Symbole zu Sicherheitshinweisen in dieser Gebrauchsanleitung ....5 2. Bestimmungsgemäße Verwendung ............5 3. Wichtige Sicherheitshinweise ..............5 3. Gerät auspacken und prüfen ..............7 4. - Seite 4 Instruction Manual 1. Notes on understanding these operating instructions ......17 1.1 Markings and symbols on the unit ..............17 1.2 Symbols for safety instructions in these operating instructions .......18 2. Intended use ..................... 18 3. Important safety instructions ..............18 3.
-
Seite 5: Hinweise Zum Verständnis Dieser Gebrauchsanleitung
Wir danken Ihnen für Ihr Vertrauen und wünschen Ihnen viel Freude und Erfolg mit Ihrem neu- en Leuchtstab. Die Walimex pro RGB Tube Small M10 ist ein handlicher RGB-Leuchtstab mit Bi-Color- Funktion für Lichteffekte bei Foto- und Video-Sets. Er eignet sich perfekt für die Ausleuchtung sowie Spezialeffekte beim Streamen, bei Food- bzw. -
Seite 6: Symbole Zu Sicherheitshinweisen In Dieser Gebrauchsanleitung
Bestimmungsgemäße Verwendung Die Walimex pro RGB Tube Small M10 ist ein leistungsstarker Leuchtstab mit integriertem Akku für die Anwendung bei Foto- und Videoaufnahmen. Sie ist individuell einstellbar und kann mit Adapter per Netzstrom oder über einen PC o. ä. geladen werden. - Seite 7 WARNUNG Stromschlaggefahr und Brandgefahr durch Kurzschluss Ein Kurzschluss kann u. a. durch defekte Kabel, Feuchtigkeit oder Nässe verursacht werden. Bei einem Kurzschluss kann die Isolierung oder der Leitungsdraht schmelzen. Dadurch kann es zu einem Brand oder Stromschlag kommen. ■ Verwenden Sie für den Leuchtstab nur die mitgelieferten Originalkabel. ■...
-
Seite 8: Gerät Auspacken Und Prüfen
Brand- bzw. Explosionsgefahr Die Benutzung des Leuchtstabes in explosiver Umgebung oder mit brennbaren Gasen kann zu lebensgefährlichen Verletzungen oder Tod führen. ■ Benutzen Sie den Leuchtstab nicht in explosiver Umgebung oder mit brennbaren Ga- sen. VORSICHT Verbrennungs- und Brandgefahr Das Gehäuse und die Leuchtmittel können bis zu 42° C heiß werden. ■... -
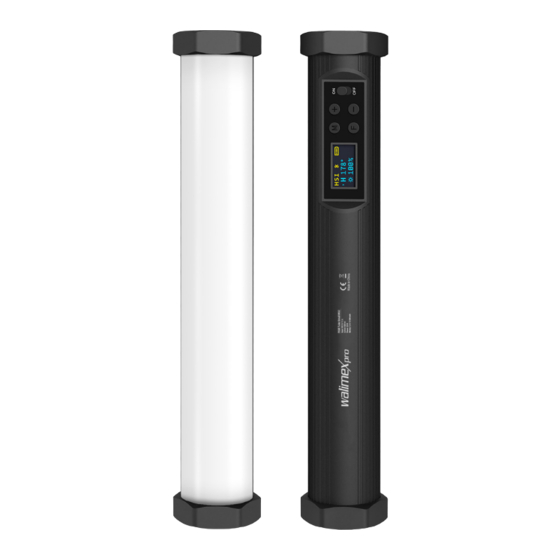
Seite 9: Übersicht Über Bestandteile Und Bedienelemente
Übersicht über Bestandteile und Bedienelemente... - Seite 10 1. Diffusor 2. Gehäuse 3. Bedienbereich 4. Display 5. Funktionsknopf 6. Einstellknöpfe + – 7. Ein/Aus-Schalter 8. Helligkeitsknopf 9. Farb-Modus 10. Ladestand des Akkus 11. Farbe H in ° 12. Helligkeit in % 13. Farbsättigung S 14. Farbtemperatur-Modus 15. Akkuladesymbol 16.
-
Seite 11: Kurzanleitung
Kurzanleitung HINWEIS Die detaillierte Anleitung zu den nachfolgenden Tätigkeiten finden Sie in den jeweiligen Ab- schnitten dieser Gebrauchsanleitung. Halten Sie bei der ersten Inbetriebnahme die Reihen- folge der nachfolgenden Tätigkeiten ein, um Schäden am Gerät zu vermeiden. WARNUNG Beachten Sie bei allen Tätigkeiten die Sicherheitshinweise in den jeweiligen Abschnitten. Gerät für den Einsatz vorbereiten 6.1 Leuchtstab auf einem Stativ / dem Ministativ montieren HINWEIS... -
Seite 12: Leuchtstab Ein- Bzw. Ausschalten
6.4 Leuchtstab ein- bzw. ausschalten 1. Zum Einschalten bringen Sie den Ein/Aus-Schalter (7) in die Stellung [ON]. HINWEIS Schalten Sie den Leuchtstab nach Gebrauch aus und trennen Sie ihn vom Smartphone o.ä. bzw. Stromnetz, wenn Sie ihn länger nicht verwenden. 2. -
Seite 13: Helligkeit ( 1-100%) Am Leuchtstab Einstellen
7.3 Helligkeit ( 1-100%) am Leuchtstab einstellen 1. Schalten Sie den Leuchtstab gemäß Kapitel 6 ein. 2. Drücken Sie die Taste F (8) 1× kurz um die Helligkeitseinstellung auszuwählen. - Das Display zeigt HSI in der oberen Zeile des Displays an. 3. -
Seite 14: Reinigen
3. Ziehen Sie den USB-C-Stecker des Ladekabels (20) aus der Anschlussbuchse (21) auf der Unterseite des Leuchtstabs. 4. Lassen Sie den Leuchtstab vollständig abkühlen. 5. Demontieren Sie ggf. den Leuchtstab vom Stativ. 6. Reinigen Sie den Leuchtstab und das Ministativ, falls nötig (siehe Kapitel 9). 7. -
Seite 15: Technische Daten
13. Technische Daten Gerät RGB Tube Small M10 Artikel Nummer 23121 Leuchtstab Material Aluminiumgehäuse Leuchtmittel LED, 190 Stück Max. Leistung 10 W Max. Lichtstrom 620 lm Farbraum 0-360° volles Farbspektrum RGB Farbsättigung 1-100 Lichtintensität 1-100 % Farbtemperatur 3.200 – 7.500 K (bei Weißlicht) -
Seite 16: Lieferumfang
Lithium-Ion-Akku, DC 7,4 V, 2500 mAh Laufzeit ca. 130 min bei 7500 K und 100 % Helligkeit Ladezeit ca. 2,5 Std. Ladetemperatur 0° C bis + 45° C Stromversorgung Akku 5V 1A Walimex pro RGB Tube Small M10, Ministativ, USB-C Ladekabel, Lieferumfang Sicherheitshinweise... - Seite 17 WALSER ist bekannt für seine hochwertige Verarbeitung, beste Funktionalität und einen kun- dennahen Service. Um unserem außergewöhnlichen Serviceniveau zusätzlichen Ausdruck zu verleihen, geben wir für dieses Walimex pro Produkt eine Garantie von 2 Jahren. Diese Garantie ist nur in Verbindung mit Ihrem Kaufbeleg gültig.