Akrapovic Evolution Race Header Set Einbauanleitung
Inhaltsverzeichnis
Verfügbare Sprachen
Verfügbare Sprachen
Einbauanleitung
DE
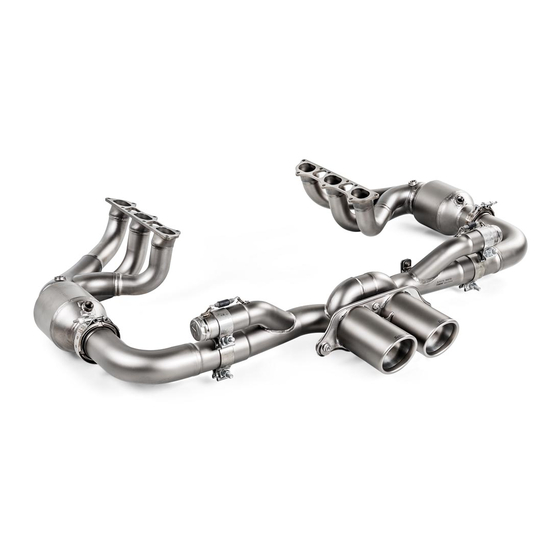
Akrapovič-Auspuffanlage Evolution Race Header Set
Istruzioni per il montaggio
IT
Impianto di scarico Akrapovič Evolution Race Header Set
Instructions d'installation
FR
Système d'échappement d'Akrapovič Evolution Race Header Set
Instrucciones de montaje
ES
Sistema de escape Akrapovič Evolution Race Header Set
Instruções de montagem
PT
Sistema de Escape Akrapovič Evolution Race Header Set
Navodila za namestitev
SI
Izpušni sistem Akrapovič Evolution Race Header Set
Porsche 911 GT3 (type 911.2)
Version 1.0
07/2018
www.akrapovic.com
Inhaltsverzeichnis

Verwandte Anleitungen für Akrapovic Evolution Race Header Set


Inhaltszusammenfassung für Akrapovic Evolution Race Header Set
- Seite 1 Einbauanleitung Akrapovič-Auspuffanlage Evolution Race Header Set Istruzioni per il montaggio Impianto di scarico Akrapovič Evolution Race Header Set Instructions d‘installation Système d‘échappement d‘Akrapovič Evolution Race Header Set Instrucciones de montaje Sistema de escape Akrapovič Evolution Race Header Set Instruções de montagem Sistema de Escape Akrapovič...
- Seite 3 Einbauanleitung Akrapovič-Auspuffanlage Evolution Race Header Set Istruzioni per il montaggio Impianto di scarico Akrapovič Evolution Race Header Set Instructions d‘installation Système d‘échappement d‘Akrapovič Evolution Race Header Set Instrucciones de montaje Sistema de escape Akrapovič Evolution Race Header Set Instruções de montagem Sistema de Escape Akrapovič...
- Seite 4 www.akrapovic.com...
- Seite 5 Einbauanleitung Akrapovič-Auspuffanlage: Evolution Race Header Set für Porsche 911 GT3 (Typ 991.2) Version 1.0 07/2018 www.akrapovic.com...
- Seite 7 Einbauanleitung Akrapovič-Auspuffanlage: Evolution Race Header Set für Porsche 911 GT3 (Typ 991.2) Version 1.0 07/2018 www.akrapovic.com...
-
Seite 8: Allgemeine Informationen
Auspuffanlage oder dieser Anleitung haben, wenden Sie sich bitte an Ihren Akrapovič-Partner vor Ort. Weitere Informationen über die Akrapovič-Auspuffanlagen finden Sie auf der offiziellen Website von Akrapovič unter: http://www.akrapovic.com ALLGEMEINE INFORMATIONEN Ihre Sicherheit hat für uns oberste Priorität. Bitte fahren Sie Ihr Auto verantwortungsvoll, sicher und halten Sie sich stets an die örtlichen Verkehrsregeln. -
Seite 9: Urheberrecht Und Andere Rechtliche Hinweise
Akrapovič unterzieht alle Fälle von Verstößen gegen Urheber- und andere Rechte einer eingehenden Prüfung. Sollten Sie Grund zu der Annahme haben, dass es sich bei Ihrer Auspuffanlage nicht um ein Originalprodukt von Akrapovič handelt, wenden Sie sich bitte an unsere Partner vor Ort oder an Akrapovič unter info@akrapovic.com. 9 / 24... -
Seite 10: Allgemeiner Hinweis
Bitte gleichen Sie die erhaltenen Teile mit denen auf unserer Webseite verfügbaren Teileliste ab (Bitte verwenden Sie den QR-Code auf der Vorderseite oder suchen Sie nach „Schematische Übersicht“ auf der jeweiligen Produktseite unter www.akrapovic.com). Stellen Sie sicher, dass Ihnen alle erforderlichen Teile für den Einbau Ihrer neuen Akrapovič-Auspuffanlage zur Verfügung stehen. - Seite 11 Bild 1 – Position der Seriennummer Bild 1 – Position der Seriennummer 11 / 24...
-
Seite 12: Warnungen Zu Lärm Und Emissionen
Teil oder die Anlage nicht aufgrund der Nutzung ausschließlich an Rennfahrzeugen auf geschlossenen Rennstrecken von dieser Regelung ausgenommen ist. Weder Akrapovic d.d. noch ihre Tochtergesellschaften garantieren, dass für eines ihrer Teile oder eine ihrer Anlagen eine solche Durchführungsverordnung erlassen wurde oder dass eines ihrer Teile oder eine ihrer Anlagen der Ausnahmeregelung für Rennfahrzeuge entsprechen. -
Seite 13: Einbautipp
SYMBOLE Die folgenden Symbole werden in dieser Einbauanleitung verwendet: WERKZEUG UND ANZIEHDREHMOMENT SCHUTZAUSRÜSTUNG ERFORDERLICH VON HAND FESTZIEHEN SCHMIERUNG VORSICHT ODER WARNUNG EINBAUTIPP SCHRAUBENDICHTUNGSMITTEL VERWENDEN Geben Sie 3 bis 4 Tropfen Schraubendichtungsmittel auf das gereinigte und entfettete Gewinde, bevor Sie die Schrauben festziehen. WARNUNG! Vermeiden Sie den Kontakt mit Haut, Augen und Schleimhäuten. -
Seite 14: Teileliste
Garantieschein • Montagematerial • Schalldämpfer und Rohre Eine detaillierte Teileliste finden Sie auf der Website von Akrapovič (bitte verwenden Sie den QR-Code auf der Vorderseite oder suchen Sie nach „Schematische Übersicht“ auf der jeweiligen Produktseite unter www.akrapovic.com). 14 / 24... -
Seite 15: Ausbau Der Original-Auspuffanlage
WICHTIG: Das Fahrzeug sollte sich während des gesamten Ausbaus und der Installation sowie anderen Arbeiten in seiner Aus-Position befindet. AUSBAU DER ORIGINAL-AUSPUFFANLAGE: Der Vorgang des Ausbaus der Original-Auspuffanlage kann je nach der bestehenden Auspuffanlage variieren. Bitte halten Sie sich für den Ausbau der Original-Auspuffanlage an die Anweisungen des Herstellers dieser Anlage. - Seite 16 AUSBAU DER ORIGINAL-AUSPUFFANLAGE: Stellen Sie das Fahrzeug auf eine Hebebühne. VORSICHT: Stellen Sie sicher, dass der Wagen sicher und ordnungsgemäß angehoben ist, um ein Risiko für Schäden am Wagen, Verletzungen oder sogar den Tod zu vermeiden! Lösen Sie die markierten Schrauben und entfernen Sie vorsichtig die Unterbodenverkleidung des Motors (F 01).
- Seite 17 VORSICHT: Achten Sie darauf, dass Sie sich während dieses Vorgangs nicht verletzen oder ein Teil des Fahrzeugs beschädigen! Lösen Sie die markierten Schrauben und Muttern auf beiden Seiten des Fahrzeugs und entfernen Sie die Hitzeschutzbleche der Seitenschalldämpfer (F 11, 12). VORSICHT: Achten Sie darauf, dass Sie sich während dieses Vorgangs nicht verletzen oder ein Teil des Fahrzeugs beschädigen! 10.
- Seite 18 EINBAU DER AKRAPOVIČ-AUSPUFFANLAGE: Bringen Sie die Rohrverteiler von Akrapovič mit neuen Original-Dichtungen und mit den vor- handenen Muttern an. Ziehen Sie die Muttern im Zickzack-Muster in drei Schritten mit dem vom Hersteller angegebenen Drehmoment fest (F 18, 19). WICHTIG: Verwenden Sie neue Dichtungen für den Auspuffstutzen! WICHTIG: Informieren Sie sich im Handbuch des Fahrzeugherstellers über den korrekten...
- Seite 19 VORSICHT: Achten Sie darauf, dass Sie sich während dieses Vorgangs nicht verletzen oder ein Teil des Fahrzeugs/der Auspuffanlage beschädigen! Nur für Slip-On: Richten Sie den Akrapovič-Schalldämpfer im Verhältnis zum Fahrzeug aus, zentrieren Sie ihn und ziehen Sie die Schalldämpfer-Klemmen und die Flanschmuttern auf beiden Seiten des Schalldämpfers bis zu den angegebenen Drehmomenten fest (F 27).
- Seite 20 Auspuffanlage beschädigen! 12. Nur für Slip-On Race: Bringen Sie die Slip-On Race-Anlage am Fahrzeug an und ziehen Sie die Klemmen von Hand fest (F 32, 33). VORSICHT: Achten Sie darauf, dass Sie sich während dieses Vorgangs nicht verletzen oder ein Teil des Fahrzeugs/der Auspuffanlage beschädigen!
- Seite 21 21 / 24...
- Seite 22 ENDMONTAGE: WICHTIG: Installieren Sie die abmontierten oder teilweise entfernten Teile (Radkästen, Stoßdämpfer usw.) und überprüfen Sie im Handbuch des Fahrzeugherstellers die Anziehdrehmomente. WICHTIG: Stellen Sie sicher, dass alle Muttern und Schrauben ausreichend festgezogen sind. Falls die Auspuffanlage mit der Karosserie oder anderen Teilen in Berührung kommt, wiederholen Sie die Anpassung der Auspuffanlage oder wenden Sie sich an Ihren autorisierten Händler.
- Seite 23 FEHLERBEHEBUNG: Problem Mögliche Ursache Lösung ziehen Sie die Klemme mit dem gelockerte Klemme vorgegebenen Drehmoment fest Abgase treten aus den Verbindungen von Schalldämpfer und Rohrklemmen aus klopfen Sie die Verbindung an die die Verbindung ist nicht richtige Stelle und ziehen Sie die vollständig verbunden Klemme mit dem vorgegebenen Drehmoment fest...
- Seite 24 www.akrapovic.com...
- Seite 44 *506534* www.akrapovic.com...
- Seite 64 www.akrapovic.com...
- Seite 84 *506534* www.akrapovic.com...
- Seite 104 www.akrapovic.com...
- Seite 124 *506535* www.akrapovic.com...
- Seite 131 Picture 1 - Serial Number Position Picture 1 - Serial Number Position 7 / 56...
- Seite 147 F 12 23 / 56...
- Seite 154 18 x F 19 30 / 56...
- Seite 158 TIE WRAP F 23 34 / 56...
- Seite 160 F 25 36 / 56...
- Seite 168 F 33 44 / 56...
- Seite 170 22Nm 22Nm 16ftlb 16ftlb F 35 46 / 56...
- Seite 173 M8 NUT ECCENTRIC ECCENTRIC WASHER + WASHER + M8 NUT M8 NUT F 38 49 / 56...
- Seite 174 F 39 50 / 56...
- Seite 178 [EMPTY PAGE] 54 / 56...
- Seite 179 [EMPTY PAGE] 55 / 56...
- Seite 180 *506534* www.akrapovic.com...