Herunterladen Inhalt Inhalt Diese Seite drucken
THOMSON 512399 Bedienungsanleitung

THOMSON 512399 Bedienungsanleitung

Wlan-ip-außenkamera 720p
Inhaltsverzeichnis

Werbung

Verfügbare Sprachen
  • DE

Verfügbare Sprachen

  • DEUTSCH, seite 80
All manuals and user guides at all-guides.com
Caméra IP WiFi extérieure 720P
Fr
723S
DSC -
720p
réf. 512399
www.thomsonbox.eu
www.thomsonsecurity.eu
V2

Werbung

Inhaltsverzeichnis
loading

Inhaltszusammenfassung für THOMSON 512399

  • Seite 1 All manuals and user guides at all-guides.com Caméra IP WiFi extérieure 720P 723S DSC - 720p réf. 512399 www.thomsonbox.eu www.thomsonsecurity.eu...
  • Seite 2: Inhaltsverzeichnis

    All manuals and user guides at all-guides.com Caméra IP WIFI extérIeure 720P SOMMAIRE A - cOnSIgnES dE SécuRIté 1 - précautions d’utilisation 2 - entretien et nettoyage 3 - recyclage B - dEScRIptIOn du pROduIt 1 - contenu du kit 2 - caméra 3 - adaptateur secteur c - InStAllAtIOn...
  • Seite 3 All manuals and user guides at all-guides.com E - REInItIAlISAtIOn f - fAQ g - InfORMAtIOnS tEchnIQuES Et légAlES 1 - caractéristiques générales 2 - garantie 3 - assistance et conseils 4 - retour produit/ saV 5 - déclaration de conFormité ce...
  • Seite 4 All manuals and user guides at all-guides.com...
  • Seite 5: A - Consignes De Sécurité

    All manuals and user guides at all-guides.com Caméra IP WIFI extérIeure 720P A - cOnSIgnES dE SécuRIté 1 - PRéCAUTIONS D’UTILISATION 3 - RECYCLAGE • La caméra ne doit pas être installée dans un Ce logo signifie qu’il ne faut pas jeter les lieu où le filtre de l’objectif serait exposé aux appareils hors d’usage avec les ordures rayures et aux salissures.
  • Seite 6: B - Description Du Produit

    All manuals and user guides at all-guides.com Caméra IP WIFI extérIeure 720P B - dEScRIptIOn du pROduIt 1 - CONTENU DU KIT 1 Caméra 5 Vis pour fixation du pied 2 Adaptateur secteur 6 Câble RJ45 pour connexion filaire au réseau 3 Antenne 7 CD-Rom contenant le logiciel 4 Chevilles pour fixation du pied 8 Clé à 6 pans 2 - CAméRA 1 Antenne WiFi 5 Prise réseau RJ45 2 Pied orientable...
  • Seite 7: Adaptateur Secteur

    All manuals and user guides at all-guides.com Caméra IP WIFI extérIeure 720P B - dEScRIptIOn du pROduIt 3 - ADAPTATEUR SECTEUR Un adaptateur secteur 230Vac 50Hz / 12Vdc est fourni dans le kit pour l’alimentation de la caméra. Ne pas utiliser d’autres modèles d’alimentation sous risques de détériorer la caméra et annuler la garantie.
  • Seite 8: C - Installation

    All manuals and user guides at all-guides.com Caméra IP WIFI extérIeure 720P c - InStAllAtIOn 1 - INSTALLATION DE LA CAméRA Avant fixation de la caméra à son emplacement définitif il est recommandé de faire des essais de connexion. • Fixez la caméra à l’aide de vis et chevilles appropriées à la nature du support (les vis et chevilles fournies conviennent pour des murs en matériau plein). • Attention à fixer solidement la caméra pour éviter toute chute. 2 - CONNEXION DE LA CAméRA • L’accès de votre caméra au réseau et à internet peut être établi au choix à l’aide d’une connexion filaire par un câble réseau, ou d’une connexion sans fil WiFi. 2.1 - CONNexiON sANs FiL: FONCtiON ezLiNk • Votre caméra est équipée de la fonction ezLink : si vous disposez d’une tablette ou d’un smartphone sous Android ou iOs, l’application dédiée permet de se connecter à la caméra le temps de lui indiquer quel réseau WiFi elle doit utiliser.
  • Seite 9: Connexion Filaire

    All manuals and user guides at all-guides.com Caméra IP WIFI extérIeure 720P c - InStAllAtIOn • Connectez ensuite votre smartphone ou tablette sur le réseau WiFi que votre caméra devra utiliser par la suite, puis lancez l’application thomview. Remarque importante : Votre caméra n’est pas compatible avec les réseaux sans fi l de fréquence 5GHz (réseau WiFi 802.11ac). Ne connectez pas votre smartphone ou tablette à un réseau de ce type. • Cliquez sur l’icone puis sur l’icone pour scanner le QRCode présent sur la caméra. Une fois le code lu, votre smartphone ou tablette vous invite à saisir la clé du réseau WiFi auquel vous êtes connecté, pour pouvoir la transmettre à la caméra. 2.2 - CONNexiON FiLAiRe si vous ne souhaitez pas utiliser une connexion sans fi l, reliez votre caméra à un accès internet à l’aide d’un câble réseau RJ45. caméra Modem/routeur connecté à internet Adaptateur secteur iMPORtANt : Ne connectez pas votre caméra sur votre ordinateur. Cela ne lui fournira pas accès à internet.
  • Seite 10: Insertion D'une Carte Microsd (Non Fournie)

    All manuals and user guides at all-guides.com Caméra IP WIFI extérIeure 720P c - InStAllAtIOn Dans la majeure partie des cas, la caméra est immédiatement détectée par le modem/routeur qui lui attribue un accès à internet. Après quelques secondes, la led d’activité réseau de la caméra clignote. Remarque : si vous souhaitez utiliser votre caméra en WiFi mais ne pouvez utiliser la fonction ezLink, effectuez la mise en service avec une connexion filaire pour pouvoir ensuite passer sur une connexion sans fil. 3 - INSERTION D’UNE CARTE mICROSD (NON FOURNIE) Votre caméra dispose d’un logement pour carte microsD lui permettant de disposer d’une mémoire de stockage interne. La taille maximum est de 32Go. ATTENTION : L’installation d’une carte microsD dans la caméra nécessite d’ouvrir la caméra. Afin d’éviter toute marque ou trace dans la caméra (face interne du verre, objectif…), il est fortement recommandé de procéder au démontage sur une surface plane, propre et bien éclairée. Retirez à l’aide de la clé à 6 pans fournie les 2 vis en façade de la caméra. Retirez les 4 vis sur le pourtour de la carte électronique. Attention : ne retirez pas les 4 vis côté intérieur.
  • Seite 11 All manuals and user guides at all-guides.com Caméra IP WIFI extérIeure 720P c - InStAllAtIOn Retirez la carte électronique en tirant délicatement. insérez une carte microsDHC dans le logement prévu à cet effet sans débrancher les câbles et connecteurs de la caméra. Procédez dans l’ordre inverse pour refermer la caméra. Assurez-vous que le joint est correctement placé pour éviter toute infiltration d’eau.
  • Seite 12: D - Configuration Et Utilisation

    All manuals and user guides at all-guides.com Caméra IP WIFI extérIeure 720P d - cOnfIguRAtIOn Et utIlISAtIOn 1 - CONFIGURATION A L’AIDE D’UN Retour à la liste des caméras enregistrées SmARTPHONE OU D’UNE TABLETTE Lancement/arrêt d’un enregistrement (stocké s ur le téléphone ou la tablette) Lors de votre première connexion à votre caméra Prise d’une photo (stockée sur le téléphone avec l’appli thomView, vous êtes immédiatement o u la tablette) invité à changer l’identifiant et le mot de passe de...
  • Seite 13: Configuration A L'aide Du Logiciel Thomview

    All manuals and user guides at all-guides.com Caméra IP WIFI extérIeure 720P d - cOnfIguRAtIOn Et utIlISAtIOn 2 - CONFIGURATION A L’AIDE DU LOGICIEL Activation ou désactivation des témoins de THOmVIEW f onctionnement de la caméra Modifi cation de l’identifi ant et du mot de Le logiciel thomView compatible PC et MacOs p asse d’accès à la caméra (si vous souhaitez permet de confi gurer et gérer une ou plusieurs c hanger l’identifi ant et le mot de passe de la...
  • Seite 14 Accès aux vidéos enregistrées sur ordinateur Accès au journal des opérations faites sur le l ogiciel sélection du nombre de caméras UiD de la caméra (code unique indiqué sur la s imultanément à l’écran c améra) Page précédente/ suivante, Le logiciel Nom d’utilisateur de la caméra (par défaut, pouvant gérer jusqu’à 64 caméras, ces « admin») fl èches vous permettent de passer aux caméras 5 à 8 puis 9 à 12, etc. type d’appareil : sélectionnez «THOmSON IPC» Passage en plein écran Nom sous lequel la caméra va apparaître d ans le logiciel (à votre convenance Lancement d’une patrouille (caméras c ompatibles uniquement) Connexion P2P : à cocher pour ajouter une c améra à l’aide de son UiD. L’UiD de chacune Coupure de l’affi chage de l’image de des caméras est un code unique à 20 ou 24 l ’ensemble des caméras chiffres et lettres, indiqué sur la caméra elle- Date, heure courante, charge processeur et m ême.
  • Seite 15 All manuals and user guides at all-guides.com Caméra IP WIFI extérIeure 720P d - cOnfIguRAtIOn Et utIlISAtIOn • Cochez la case «Connexion P2P». L’ensemble des réglages de votre caméra est • Cliquez sur le bouton «Recherche» pour accessible à distance, en faisant un clic droit sur détecter votre caméra sur le réseau auquel est le nom de la caméra dans la liste (ou sur l’image connecté votre ordinateur.
  • Seite 16 All manuals and user guides at all-guides.com Caméra IP WIFI extérIeure 720P d - cOnfIguRAtIOn Et utIlISAtIOn Lorsqu’une caméra diffuse son image à l’écran, des Ouverture d’un fichier vidéo commandes supplémentaires sont affichées dans le externe coin inférieur droit : Défilement rapide vers l’avant Défilement rapide vers l’arrière Contrôles Arrêt de la lecture de lecture Avance image par image Lancement de la lecture Cet icone vous indique la présence Pause d’enregistrements sur l’ordinateur utilisé (blanc Journée en cours de visionnage : les au repos, vert lorsque des enregistrements programmés/sur détection/manuels ont été intervalles de temps colorés vous indiquent la présence de vidéos et leurs heures de début effectués) et de fin approximatives Arrêt de la diffusion et fermeture de l’image Liste des caméras pour recherche : cochez Lancement d’un enregistrement sur le disque les caméras dont vous souhaitez consulter...
  • Seite 17 All manuals and user guides at all-guides.com Caméra IP WIFI extérIeure 720P d - cOnfIguRAtIOn Et utIlISAtIOn • Utilisez les contrôles de lecture pour Cochez la case « Activer » pour activer l’envoi lire, avancer, reculer, ou utilisez la zone d’e-mails «Positionner» pour indiquer précisément à Serveur SmTP : dépend du fournisseur de quelle heure placer le curseur de lecture.
  • Seite 18: Configuration A L'aide D'un Navigateur Internet

    All manuals and user guides at all-guides.com Caméra IP WIFI extérIeure 720P d - cOnfIguRAtIOn Et utIlISAtIOn 3 - CONFIGURATION A L’AIDE D’UN NAVIGATEUR INTERNET Attention : les fréquents changements de politique des principaux développeurs de navigateurs web, ainsi que les nombreuses confi gurations et versions possibles peuvent rendre délicate la confi guration de votre caméra. Préférez si possible l’utilisation d’un smartphone, d’une tablette ou du logiciel dédié.
  • Seite 19 All manuals and user guides at all-guides.com Caméra IP WIFI extérIeure 720P d - cOnfIguRAtIOn Et utIlISAtIOn sélectionnez la langue d’affi chage puis entrez l’identifi ant et le mot de passe de connexion à votre caméra. Par défaut l’identifi ant est admin et le mot de passe est vierge, laissez la zone vide. Lors de Renversement vertical de l’image votre première connexion, la caméra va aussitôt Anti scintillement: si l’éclairage à l’image...
  • Seite 20 All manuals and user guides at all-guides.com Caméra IP WIFI extérIeure 720P d - cOnfIguRAtIOn Et utIlISAtIOn Vous retrouvez ici les mêmes fonctions que celles accessibles depuis le logiciel thomView. Reportez- vous au paragraphe précédent pour connaître chacune d’entre elles. ATTENTION : si vous utilisez votre navigateur pour passer votre caméra d’un réseau fi laire à un réseau sans fi l, la connexion sera perdue car l’adresse iP de la caméra sera changée. il faudra relancer iP Camera search tool pour détecter de nouveau la caméra.
  • Seite 21: E - Reinitialisation

    All manuals and user guides at all-guides.com Caméra IP WIFI extérIeure 720P E - REInItIAlISAtIOn en cas de problème ou de parte des identifiants, la caméra peut être réinitialisée à ses valeurs par défaut en appuyant 10 secondes sur la touche Reset.
  • Seite 22: F - Faq

    All manuals and user guides at all-guides.com Caméra IP WIFI extérIeure 720P f - fAQ si votre problème n’est pas répertorié ci-dessous, vous devez contacter notre service technique. symptômes Causes possibles solutions La caméra n’est pas détectée Connection caméra trop lente Connectez temporairement votre comme étant en ligne lorsqu’on smartphone ou tablette sur le veut l’associer sur smartphone même réseau que la caméra lors ou tablette de l’ajout dans l’appli. Problème réseau / alimentation Vérifiez vos connexions réseau et électrique électrique. Branchez temporairement si nécessaire le câble réseau filaire La connexion à la caméra est si la caméra est en WiFi impossible depuis le réseau local Problème configuration réseau Contrôlez la configuration réseau de votre caméra. Réinitialisez votre caméra si elle n’est plus du tout accessible.
  • Seite 23: G - Informations Techniques Et Légales

    All manuals and user guides at all-guides.com Caméra IP WIFI extérIeure 720P g - InfORMAtIOnS tEchnIQuES Et légAlES 1 - CARACTéRISTIqUES GéNéRALES Caméra 12VDC 1a Alimentation Interface réseau filaire ethernet 10/100, auto-MDix, RJ45 Interface réseau sans fil iee 802.11b/g/n ¼’’ CMOs - Angle de vision 106° Capteur optique 0 lux Intensité lumineuse minimum Manuelle ou automatique Vision de nuit Portée 30m...
  • Seite 24: Garantie

    AViDseN déclare que l’équipement désigné ci- ou des questions, il est fortement conseillé dessous : de contacter nos spécialistes qui sont à votre Caméra iP WiFi extérieure 720p 512399 (DsC- disposition pour vous conseiller. 723s) • en cas de problème de fonctionnement est conforme à la directive 1999/5/Ce et sa pendant l’installation ou après quelques jours conformité a été évaluée selon les normes en vigueur :...
  • Seite 25 All manuals and user guides at all-guides.com...
  • Seite 26 All manuals and user guides at all-guides.com est une marque de TECHNICOLOR S.A. utilisée sous licence par : Avidsen France s.A.s - 32 Rue Augustin Fresnel 37170 CHAMBRAY Les tOURs - France...
  • Seite 27 All manuals and user guides at all-guides.com Outdoor 720P IP WiFi camera 723S dSc - 720p ref. 512399 www.thomsonbox.eu www.thomsonsecurity.eu...
  • Seite 28 All manuals and user guides at all-guides.com OutdOOr 720P IP WIFI camera TABLE OF CONTENTS A - SAFETy iNSTruCTiONS 1 - operating precautions 2 - maintenance and cleaning 3 - recycling B - prOduCT dESCripTiON 1 - contents of the kit 2 - camera 3 - mains adapter C - iNSTALLATiON...
  • Seite 29 All manuals and user guides at all-guides.com E - rESETTiNg F - FAQ g - TEChNiCAL ANd LEgAL iNFOrmATiON 1 - general characteristics 2 - Warranty 3 - help and adVice 4 - product returns/after-sales serVice 5 - ec declaration of conformity...
  • Seite 30 All manuals and user guides at all-guides.com...
  • Seite 31: A - Safety Instructions

    All manuals and user guides at all-guides.com OutdOOr 720P IP WIFI camera A - SAFETy iNSTruCTiONS 1 - OPERATING PRECAUTIONS 3 - RECYCLING • The cameras must not be installed where the This logo indicates that devices which are lens filter may be vulnerable to scratching and no longer in use must not be disposed of dirt. as household waste. They are likely to • The camera is not designed for outside contain hazardous substances which are installation and should not be installed in dangerous to both health and the...
  • Seite 32: B - Product Description

    All manuals and user guides at all-guides.com OutdOOr 720P IP WIFI camera B - prOduCT dESCripTiON 1 - CONTENTS OF THE KIT 1 Camera 5 Screws for attaching the base 2 Mains adapter 6 RJ45 cable for wired connection to the network 3 Antenna 7 CD-Rom containing the software 4 Wall plugs for attaching the base 8 Allen key 2 - CAMERA 1 WiFi antenna 5 RJ45 network socket 2 Adjustable base...
  • Seite 33: Mains Adapter

    All manuals and user guides at all-guides.com OutdOOr 720P IP WIFI camera B - prOduCT dESCripTiON 3 - MAINS ADAPTER A 230 VAC 50Hz / 12 VDC mains adapter is supplied in the kit for the camera power supply. Do not use other power supplies as they could damage the camera and invalidate the warranty.
  • Seite 34: C - Installation

    All manuals and user guides at all-guides.com OutdOOr 720P IP WIFI camera C - iNSTALLATiON 1 - INSTALLING THE CAMERA Connection tests are recommended before fitting the camera in its final location. • Mount the camera using suitable screws and wall plugs for the type of surface (the screws and plugs supplied are suitable for solid walls). • Make sure the camera is properly secured to prevent it from falling. 2 - CONNECTING THE CAMERA • Access from your camera to the network and to the Internet can be established using a wired connection via a network cable or wireless WiFi connection. 2.1 - WIReLeSS CoNNeCTIoN: ezLINk FUNCTIoN • Your camera is fitted with the ezLink function: if you have an Android or ioS smartphone or tablet, the application can connect to the camera when it is shown which WiFi network to use. • Download then install the ThomView application on your smartphone or tablet. Important: To be configured for the ezLink function, your camera must use the default user name and password. Reset your camera if necessary by pressing the camera "Reset" button for at least 10 seconds, using a thin tool.
  • Seite 35: Wired Connection

    All manuals and user guides at all-guides.com OutdOOr 720P IP WIFI camera C - iNSTALLATiON • Then connect your smartphone or tablet to the WiFi network that your camera will use, then launch the Thomview application. Important note: Your camera is not compatible with 5 GHz wireless networks (802.11ac WiFi network). Do not connect your smartphone or tablet to this type of network. • Click on then to scan the QRCode on the camera. once read, your smartphone or tablet will ask you to enter the WiFi network key to which you are connected, so that it can transmit to the camera. 2.2 - WIReD CoNNeCTIoN If you do not want to use a wireless connection, connect your camera to the Internet using an RJ45 network cable. camera Modem/router connected to the internet Mains adapter IMPoRTANT: Do not connect your camera to your computer. This will not provide it with access to the internet.
  • Seite 36: Inserting A Micro Sd Card (Not Included)

    All manuals and user guides at all-guides.com OutdOOr 720P IP WIFI camera C - iNSTALLATiON In most cases, the camera is immediately detected by the modem/router, which grants it access to the Internet. After a few seconds, the camera's network activity LeD should flash. Note: if you want to use your camera with WiFi but cannot use the ezLink function, set it up with a wired connection so that you can then move to a wireless connection. 3 - INSERTING A MICRO SD CARD (NOT INCLUDED) Your camera has a micro SD card slot, which gives it an internal storage memory. The maximum size is 32 WARNING: Inserting a micro SD card into the camera requires opening the camera. To prevent any marks or scratches on the camera (inside face of the glass, lens, etc.), it is strongly recommended that you disassemble it on a flat, clean and well-lit surface. Remove the camera's 2 front screws using an Allen key. Remove the 4 screws around the electronic card. Warning: do not remove the 4 inside screws.
  • Seite 37 All manuals and user guides at all-guides.com OutdOOr 720P IP WIFI camera C - iNSTALLATiON Remove the electronic card by pulling it carefully. Insert a micro SDHC card into the slot without disconnecting the camera cables and connectors. Carry out the steps in reverse to close the camera again. ensure that the seal is correctly positioned to prevent any water ingress.
  • Seite 38: D - Configuration And Use

    All manuals and user guides at all-guides.com OutdOOr 720P IP WIFI camera d - CONFigurATiON ANd uSE 1 - CONFIGURATION USING A SMARTPHONE Return to the list of saved cameras OR TABLET Start/stop save (stored on the telephone or tablet) When you connect your camera to the ThomView Take a photo (stored on the telephone or app for the first time, you are immediately asked to tablet)
  • Seite 39: Configuration Using Thomview Software

    All manuals and user guides at all-guides.com OutdOOr 720P IP WIFI camera d - CONFigurATiON ANd uSE 2 - CONFIGURATION USING THOMVIEW Activation or deactivation of camera indicator SOFTWARE lights Change to the user name and password to The ThomView software is compatible with PC and access the camera (if you want to change the MacoS and confi gures and manages one or more camera user name and password for all of cameras connected to the same local network. on the users, you should change it here) another network, it enables remote access to the Model and MAC address of the camera...
  • Seite 40 - CONFigurATiON ANd uSE Add a new camera Software settings Access to videos saved on the computer Access to the operations log in the software Selection of the number of cameras on the screen at one time Camera UID (unique code shown on the Previous/next page. The software can manage camera) up to 64 cameras: these arrows let you switch Camera user name (default is "admin") from cameras 5 to 8 then 9 to 12, etc. Type of device: select "THOMSON IPC" Go to full screen Name under which the camera will appear in Launch a patrol (compatible cameras only) the software (according to your preference) Cut the image display for all of the cameras P2P connection: to be ticked to add a Date, current time, processor load and hard camera using its UID. The UID of each of the disk use cameras is a unique code of 20 to 24 numbers List of cameras saved to the software and letters, shown on the camera itself.
  • Seite 41 All manuals and user guides at all-guides.com OutdOOr 720P IP WIFI camera d - CONFigurATiON ANd uSE • Check the "Connexion [P2P All of your camera settings can be accessed remotely connection]" box. by right clicking on the name of the camera in the list • Click the "Recherche [Search]" button to (or on the image that it displays) then clicking on fi nd your camera on the network to which your "Paramètres caméra [Camera parameters]": computer is connected.
  • Seite 42 All manuals and user guides at all-guides.com OutdOOr 720P IP WIFI camera d - CONFigurATiON ANd uSE When a camera displays its image on the screen, open an external video file additional commands are displayed in the bottom Quick scroll forward right corner: Quick scroll back Playback Stop playback controls Progress image by image Start playback This icon shows the presence of records on...
  • Seite 43 All manuals and user guides at all-guides.com OutdOOr 720P IP WIFI camera d - CONFigurATiON ANd uSE • Use the playback controls to play, fast forward, Tick the "Activer [enable]" box to enable rewind or use the "Positionner [Position]" email sending area to indicate the precise time with the SMTP server: varies with the email provider of cursor.
  • Seite 44: Configuration Using A Web Browser

    All manuals and user guides at all-guides.com OutdOOr 720P IP WIFI camera d - CONFigurATiON ANd uSE 3 - CONFIGURATION USING A WEB BROWSER Warning: frequent policy changes made by the main web browser developers as well as the number of possible confi gurations and versions can make it tricky to confi gure your camera. If possible, it is preferable to use a smartphone, tablet or dedicated software.
  • Seite 45 All manuals and user guides at all-guides.com OutdOOr 720P IP WIFI camera d - CONFigurATiON ANd uSE Select the display language, then enter the username and password for connecting to your camera. The default username is admin and the password is left blank, so you should leave the fi eld empty. At the Vertical image inversion fi rst connection, the camera will immediately ask you Anti-fl icker: if the image lighting is artifi cial, to replace the default username and password to...
  • Seite 46 All manuals and user guides at all-guides.com OutdOOr 720P IP WIFI camera d - CONFigurATiON ANd uSE Here you will fi nd the same functions as those accessible from the ThomView software. Refer to the previous paragraph to see these functions. NOTE: if you use your browser to switch your camera from a wired to a wireless network, the connection will be lost because the camera IP address will change. You must restart the IP Camera Search Tool to detect the camera again.
  • Seite 47: E - Resetting

    All manuals and user guides at all-guides.com OutdOOr 720P IP WIFI camera E - rESETTiNg If there is a problem or the login details have been lost, the camera can be reset to its default settings by pressing the camera Reset button for 10 seconds.
  • Seite 48: F - Faq

    All manuals and user guides at all-guides.com OutdOOr 720P IP WIFI camera F - FAQ If your problem is not covered below, please contact our technical support department. Symptoms Possible causes Solutions Camera connection too slow Temporarily connect your The camera is not detected as smartphone or tablet to the same being online when connected to a network as the camera when smartphone or tablet adding to the app. Network/power supply issue Check your network and electrical connections. Temporarily connect using the network cable if the camera is Cannot connect to camera over connected over WiFi...
  • Seite 49: G - Technical And Legal Information

    All manuals and user guides at all-guides.com OutdOOr 720P IP WIFI camera g - TEChNiCAL ANd LEgAL iNFOrmATiON 1 - GENERAL CHARACTERISTICS Camera 12 V DC/1 A Power supply Wired network interface ethernet 10/100, auto-MDIX, RJ45 Wireless network interface Iee 802.11b/g/n ¼" CMoS - Viewing angle 106° Optical sensor 0 lux Minimum luminous intensity Manual or automatic Night vision 30m range...
  • Seite 50: Warranty

    RMA number so that you can return the unit to the shop. Without this RMA number, the In Chambray les Tours Alexandre Chaverot, shop may refuse to exchange your product. 25/10/2016 Contact our customer service technicians on: 0 892 701 369 0,35 € / min Monday to Friday, 9AM to 12PM and 2PM to 6PM. Visit our website to find out more about our Thomson range at...
  • Seite 51 All manuals and user guides at all-guides.com...
  • Seite 52 All manuals and user guides at all-guides.com is a TECHNICOLOR S.A. brand used under licence by: Avidsen France S.A.S - 32, rue Augustin Fresnel 37170 CHAMBRAY LeS ToURS - France...
  • Seite 53 All manuals and user guides at all-guides.com IP-buitencamera wifi 720p 723S DSc - 720p ref. 512399 www.thomsonbox.eu www.thomsonsecurity.eu...
  • Seite 54 All manuals and user guides at all-guides.com IP-buItencamera wIfI 720P INHOUDSOPGAVE A - VEIlIGHEIDSVOOrScHrIftEN 1 - gebruiksvoorschriften 2 - onderhoud en reiniging 3 - recyclage B - BEScHrIjVING VAN HEt PrODUct 1 - inhoud van de kit 2 - camera 3 - lichtnetadapter c - INStAllAtIE 1 - installatie van de camera...
  • Seite 55 All manuals and user guides at all-guides.com E - rESEttEN f - fAQ G - tEcHNIScHE EN wEttElIjKE INfOrmAtIE 1 - algemene eigenschappen 2 - garantie 3 - hulp en tips 4 - retour product/service 5 - ce conformiteitsverklaring...
  • Seite 56 All manuals and user guides at all-guides.com...
  • Seite 57: A - Veiligheidsvoorschriften

    All manuals and user guides at all-guides.com IP-buItencamera wIfI 720P A - VEIlIGHEIDSVOOrScHrIftEN 1 - GEBRUIKSVOORSCHRIFTEN 3 - RECYCLAGE • De camera mag niet worden geplaatst op Dit logo betekent dat u geen apparaten die een plek waar de filter van de lens bekrast of buiten gebruik zijn mag weggooien bij het vervuild kan worden. huishoudelijk afval. De gevaarlijke stoffen • De aansluiting van de camera is niet geschikt die ze mogelijk kunnen bevatten, kunnen voor installatie buitenshuis. Niet installeren in de gezondheid en het milieu schaden.
  • Seite 58: B - Beschrijving Van Het Product

    All manuals and user guides at all-guides.com IP-buItencamera wIfI 720P B - BEScHrIjVING VAN HEt PrODUct 1 - INHOUD VAN DE KIT 1 Camera 5 Schroeven voor het bevestigen van de standaard 2 Netwerkadapter 6 RJ45-kabel voor draadverbinding met het netwerk 3 Antenne 7 CD-Rom met de software 4 Pluggen voor het bevestigen van de standaard 8 Inbussleutel 2 - CAmERA 5 Netwerkcontactdoos RJ45 1 WiFi antenne 6 Lens...
  • Seite 59 All manuals and user guides at all-guides.com IP-buItencamera wIfI 720P B - BEScHrIjVING VAN HEt PrODUct 3 - VOEDINGSADApTER De kit wordt geleverd met een 230Vac 50Hz/12Vdc netwerkadapter om de camera te voeden. Gebruik geen andere voedingsmodellen omdat deze de camera kunnen beschadigen en de garantie kunnen annuleren.
  • Seite 60: Camera

    All manuals and user guides at all-guides.com IP-buItencamera wIfI 720P c - INStAllAtIE 1 - INSTALLATIE VAN DE CAmERA Voordat de camera definitief wordt bevestigd, raden wij aan verbindingstesten uit te voeren. • Maak de camera vast met behulp van geschikte schroeven en bouten, aangepast aan het materiaal (schroeven en bouten geschikt voor muren, in vol materiaal). • Zorg ervoor dat de camera stevig is bevestigd zodat deze niet kan vallen 2 - AANSLUITING VAN DE CAmERA • Toegang van uw camera tot het netwerk en internet kan naar keuze tot stand gebracht worden met behulp van een bedrade aansluiting met een netwerkkabel of een draadloze WiFi-aansluiting.
  • Seite 61: Elektrische Verbinding

    All manuals and user guides at all-guides.com IP-buItencamera wIfI 720P c - INStAllAtIE • Maak vervolgens met uw smartphone of tablet verbinding met het WiFi-netwerk dat uw camera daarna gaat gebruiken en start de Thomview applicatie. Belangrijke opmerking: uw camera is niet compatibel met het draadloze netwerk met frequentie 5GHz (WiFi-netwerk 802.11ac). Maak met uw smartphone of tablet geen verbinding met een netwerk van dit type. • klik op het icoon en daarna op het icoon voor het scannen van de QRCode die op de camera staat. Als de code gelezen is, vraagt uw smartphone of tablet u de sleutel in te voeren van het WiFi-netwerk waarmee u verbonden bent, om dit door te geven aan de camera. 2.2 - ELEkTRISCHE VERBINDING Als u geen draadloze verbinding wilt gebruiken, sluit u uw camera op internet aan met een RJ45 netwerkkabel. camera Modem/ router met internetverbinding Netwerkadapter BELANGRIJk: Sluit uw camera niet aan op uw computer. Hierdoor krijgt deze geen toegang tot internet...
  • Seite 62: Een Microsd-Kaart Plaatsen (Niet Meegeleverd)

    All manuals and user guides at all-guides.com IP-buItencamera wIfI 720P c - INStAllAtIE In de meeste gevallen wordt de camera onmiddellijk gedetecteerd door de modem/router die deze een internetcode toekent. Na ene paar seconden knippert het ledlampje netwerkactiviteit van de camera. Opmerking: als u uw camera met wifi wilt gebruiken, maar geen gebruik kunt maken van de EzLink- functie, voert u de inwerkingtreding uit met een bedrade verbinding en gaat u daarna over op een draadloze verbinding. 3 - EEN mICROSD-KAART pLAATSEN (NIET mEEGELEVERD) uw camera heeft een vak voor een microSD-kaart, zodat u het apparaat kunt uitrusten met een intern opslaggeheugen. De maximale geheugencapaciteit is 32 GB. LET Op: Als u een microSD-kaart in uw camera wilt installeren, moet u de camera openen. Om sporen en schade in de camera te voorkomen (binnenzijde van het glas, lens enz.) raden we u sterk aan de demontage uit te voeren op een vlakke, schone en goed verlichte ondergrond. Verwijder de 2 schroeven aan de voorkant van de camera met de meegeleverde inbussleutel. Verwijder de 4 schroeven aan de randen van de elektronische kaart. Let op: de 4 schroeven binnenin mogen niet worden verwijderd.
  • Seite 63 All manuals and user guides at all-guides.com IP-buItencamera wIfI 720P c - INStAllAtIE Trek de elektronische kaart voorzichtig los en verwijder deze. Plaats een microSDHC-kaart in het daartoe bestemde vak zonder de kabels en aansluitingen van de camera te ontkoppelen. Voer de bovengenoemde stappen in omgekeerde volgorde uit om de camera weer te sluiten. Controleer of de pakking naar behoren is geplaatst om insijpeling van water te voorkomen.
  • Seite 64: D - Configuratie En Gebruik

    All manuals and user guides at all-guides.com IP-buItencamera wIfI 720P D - cONfIGUrAtIE EN GEBrUIK 1 - CONFIGURATIE mET BEHULp VAN EEN Terug naar de lijst met geregistreerde SmARTpHONE OF TABLET camera's Starten/stoppen van een opname Tijdens uw eerste verbinding van de camera met de (opgeslagen op de telefoon of tablet) ThomView appli, wordt u onmiddellijk gevraagd om Een foto nemen (opgeslagen op de telefoon de standaard-ID en het standaard wachtwoord te o f tablet) vervangen voor een betere beveiliging: Activering van de micro en/of luidspreker van de camera (alleen compatibele camera's)
  • Seite 65: Configuratie Met Behulp Van De Thomview Software

    gureren en beheren. Op Modellen en MAC-adres van de camera een ander netwerk hebt u daarmee toegang tot het WiFi-instellingen van de camera (als u de beeld van de camera op afstand. camera hebt ingeschakeld met behulp van een bedrade verbinding en over wilt gaan De Thomson CMS software wordt verstrekt op naar een draadloze verbinding, kunt u hier een een CD die bij uw product zit, en kan gedownload WiFi-netwerk kiezen en confi gureren) worden op onze website: Weergave van de naam en de tijd op het beeld http://www.thomsonsecurity.eu/infos.php?pfc_...
  • Seite 66 Toegang tot video's die op computer zijn opgeslagen Toegang tot het operatielogboek opgesteld op de software uID van de camera (unieke code aangegeven keuze van het aantal camera's dat gelijktijdig op de camera. op het scherm komt ID van de camera (standaard,"admin") Vorige/volgende pagina, De software kan Type apparaat: kies "THOmSON IpC" tot 64 camera's beheren, met deze pijlen kunt overgaan naar de camera's 5 tot 8 en Naam waaronder de camera verschijnt in de vervolgens 9 tot 12, etc. software (naar keuze) Overgang naar full screen Connexion P2P: aanvinken om een camera toe te voegen met behulp van de Starten van een patrouille (alleen compatibele uID. De uID van elke camera is een unieke...
  • Seite 67 All manuals and user guides at all-guides.com IP-buItencamera wIfI 720P D - cONfIGUrAtIE EN GEBrUIK • Vink het vakje "Connexion p2p" aan. Het geheel aan instellingen van uw camera is op • klik op de knop "Recherche (Zoeken)" om afstand toegankelijk, door rechts te klikken op de uw camera te detecteren op het netwerk naam van de camera in de lijst (of op het beeld dat waarop uw computer is aangesloten.
  • Seite 68 All manuals and user guides at all-guides.com IP-buItencamera wIfI 720P D - cONfIGUrAtIE EN GEBrUIK Als een camera het beeld weergeeft op het scherm, Openen van een extern worden de extra bedieningen weergegeven in de videobestand rechter onderhoek: Snel afspelen vooruit Snel afspelen achteruit Controle Lezen stoppen van lezen Per beeld vooruit Lezen starten Dit icoon geeft aan dat er opnames aanwezig Pauze zijn op de gebruikte computer (wit in ruststand, groen als geprogrammeerde/bij detectie/ Dag die bekeken wordt: de gekleurde handmatige opnames zijn uitgevoerd) tijdintervallen geven de aanwezigheid van...
  • Seite 69 All manuals and user guides at all-guides.com IP-buItencamera wIfI 720P D - cONfIGUrAtIE EN GEBrUIK • Gebruik de leescommando's om af te spelen, Vink het vakje "Activer (Activeren)" aan om vooruit of achteruit te spoelen of gebruik de het verzenden van e-mails te activeren zone "positionner" (Positioneren) om precies Server SmTp(SMTP-server): afhankelijk van aan te geven op welk tijdstip u de afspeelcursor de e-mailprovider van het e-mailadres dat de wilt plaatsen. waarschuwing verstuurt. In ons voorbeeld met gmail, smtp.gmail.com Voor het signaal voor het versturen van een e-mail port SmTp(SMTP-poort): afhankelijk van de bij bewegingsdetectie, moet u 2 e-mailadressen e-mailprovider van het e-mailadres dat de hebben: het verzendadres dat door de camera...
  • Seite 70: Configuratie Met Behulp Van Een Internetbrowser

    All manuals and user guides at all-guides.com IP-buItencamera wIfI 720P D - cONfIGUrAtIE EN GEBrUIK 3 - CONFIGURATIE mET BEHULp VAN EEN INTERNETBROWSER Let op: de veelvuldige beleidswijzigingen van de belangrijkste web browsers developpers en de talloze mogelijke confi guraties en versies kunnen het confi gureren van uw camera bemoeilijken. Geef indien mogelijk de voorkeur aan een smartphone, een tablet of speciale software.
  • Seite 71 All manuals and user guides at all-guides.com IP-buItencamera wIfI 720P D - cONfIGUrAtIE EN GEBrUIK kies de weergavetaal en voer de ID en het wachtwoord in voor de verbinding met uw camera. Standaard is de ID admin en is het wachtwoord leeg. Tijdens uw eerste verbinding vraagt de Verticaal zetten van het beeld camera u onmiddellijk om de standaard-ID en het Anti-weerspiegeling: indien verlichting van...
  • Seite 72 All manuals and user guides at all-guides.com IP-buItencamera wIfI 720P D - cONfIGUrAtIE EN GEBrUIK Hier vindt u dezelfde functies als de functies die vanuit de ThomView software toegankelijk zijn. Raadpleeg de vorige paragraaf voor meer informatie over de functies. LET Op: als u uw browser gebruikt om uw camera van een bedraad netwerk over te zetten op een draadloos netwerk, gaat de verbinding verloren omdat het IP-adres van de camera wordt veranderd.
  • Seite 73: E - Resetten

    All manuals and user guides at all-guides.com IP-buItencamera wIfI 720P E - rESEttEN In geval van een probleem of verlies van logingegevens kan de camera gereset worden op de standaardwaarden door 10 seconden op de Resetknop te drukken.
  • Seite 74: F - Faq

    All manuals and user guides at all-guides.com IP-buItencamera wIfI 720P f - fAQ Als uw probleem hieronder niet vermeld staat, moet u contact opnemen met onze technische dienst. Problemen Mogelijke oorzaken Oplossingen De camera wordt niet Verbinding camera te langzaam Sluit uw smartphone of tablet gedetecteerd als online bij een tijdelijk aan op hetzelfde netwerk poging tot koppelen aan een als de camera tijdens het smartphone of tablet toevoegen van de appli Probleem netwerk/elektrische Controleer uw netwerk/elektrische voeding voeding verbindingen Sluit de kabel van het bekabelde netwerk tijdelijk aan als de camera De camera kan niet worden op WiFi is ingesteld verbinden vanaf het lokaal netwerk Probleem met de Controleer de netwerkconfiguratie netwerkconfiguratie van uw camera. Voer een reset van uw camera uit als deze helemaal niet meer toegankelijk is.
  • Seite 75: G - Technische En Wettelijke Informatie

    All manuals and user guides at all-guides.com IP-buItencamera wIfI 720P G - tEcHNIScHE EN wEttElIjKE INfOrmAtIE 1 - ALGEmENE EIGENSCHAppEN Camera 12VDc 1a Voeding Bekabelde netwerkinterface Ethernet 10/100, auto-MDIX, RJ-45 Draadloze netwerkinterface IEE 802.11b/g/n ¼’’ CMOS - Zichthoek 106° Optische sensor 0 lux Minimale lichtintensiteit Handmatig of automatisch Nachtzicht Bereik 30m Een reset toets Knoppen h.264 Videocompressie...
  • Seite 76: Garantie

    Zonder dit dossiernummer heeft de winkel het recht de omwisseling van uw product te weigeren. Neem contact op met de technici van de dienst na verkoop op: Helpline: +352 26302353 Van maandag tot vrijdag van 9 tot 12 uur en van 13 tot 17 uur. Bekijk het volledige Thomson-gamma op...
  • Seite 77 All manuals and user guides at all-guides.com...
  • Seite 78 All manuals and user guides at all-guides.com is een merk van TECHNICOLOR S.A. onder licentie gebruikt door: Avidsen France S.A.S - 32, rue Augustin Fresnel 37170 CHAMBRAY LES TOuRS - France...
  • Seite 79: Wlan-Ip-Außenkamera 720P

    All manuals and user guides at all-guides.com WLan-IP-Außenkamera 720P 723S DSC - 720p art.-nr. 512399 www.thomsonbox.eu www.thomsonsecurity.eu...
  • Seite 80 All manuals and user guides at all-guides.com WLan-IP-auSSenkamera 720P INHALT A - SIcHerHeITSANweISuNgeN 1 - Vorsichtsmassnahmen 2 - instandhaltung und reinigung 3 - recycling B - ProdukTBeScHreIBuNg 1 - inhalt des sets 2 - Kamera 3 - netzadapter c - MoNTAge 1 - montage der Kamera 2 - anschluss der Kamera 2.1 - drahtlose Verbindung: Funktion ezlink...
  • Seite 81 All manuals and user guides at all-guides.com e - reSeT F - FAQ g - TecHNIScHe uNd geSeTzLIcHe INForMATIoNeN 1 - allgemeine merKmale 2 - garantie 3 - hilFe und support 4 - geräteumtausch / Kundendienst 5 - eg-KonFormitätserKlärung...
  • Seite 82 All manuals and user guides at all-guides.com...
  • Seite 83: A - Sicherheitsanweisungen

    All manuals and user guides at all-guides.com WLan-IP-auSSenkamera 720P A - SIcHerHeITSANweISuNgeN 1 - VORSICHTSMASSNAHMEN 3 - RECYCLING • Installieren Sie die Kamera nicht an einem Ort, Dieses Logo bedeutet, dass Altgeräte wo die Objektivfilter verkratzt oder verschmutzt nicht mit dem Hausmüll entsorgt werden werden könnten. dürfen. Sie enthalten möglicherweise • Die Anschlüsse der Kamera sind nicht für gefährliche Materialien, die der Gesundheit eine Installation im Außenbereich geeignet;...
  • Seite 84: B - Produktbeschreibung

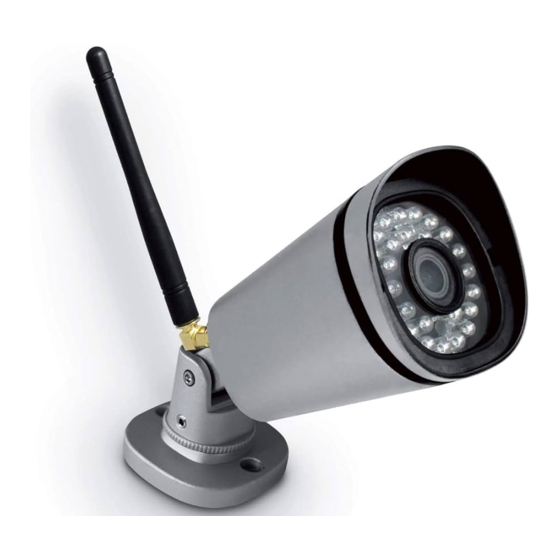
    All manuals and user guides at all-guides.com WLan-IP-auSSenkamera 720P B - ProdukTBeScHreIBuNg 1 - INHALT DES SETS 5 Schrauben zur Befestigung des Fußes 1 Kamera 6 RJ45-Kabel für den drahtgebundenen 2 Netzadapter Netzwerk-Anschluss 3 Antenne CD-ROM mit der Software 4 Dübel zur Befestigung des Fußes 8 Sechskantschlüssel 2 - KAMERA 5 Netzwerkstecker RJ45 1 WiFi-Antenne 6 Objektiv 2 Schwenkfuß...
  • Seite 85: Netzadapter

    All manuals and user guides at all-guides.com WLan-IP-auSSenkamera 720P B - ProdukTBeScHreIBuNg 3 - NETzADApTER Ein Netzadapter 230VAC 50Hz / 12VDC für die Stromversorgung der Kamera ist im Lieferumfang des Sets enthalten. Die Verwendung anderer Stromversorgungsmodelle kann die Kamera beschädigen und ein Erlöschen der Garantie bewirken.
  • Seite 86: C - Montage

    All manuals and user guides at all-guides.com WLan-IP-auSSenkamera 720P c - MoNTAge 1 - MONTAGE DER KAMERA Bevor Sie die Kamera an ihrem vorgesehenen Standort montieren, wird empfohlen, Verbindungstests durchzuführen. • Verwenden Sie für die Befestigung der Kamera nur Schrauben und Dübel, die zum Halterungstyp passen (die mitgelieferten Schrauben und Dübel eignen sich für massive Wände). • Achten Sie darauf, dass Sie die Kamera gut befestigen, um ein Herunterfallen zu vermeiden. 2 - ANSCHLUSS DER KAMERA • Die Verbindung Ihrer Kamera mit dem Netzwerk und mit dem Internet kann drahtgebunden mithilfe eines Netzwerkkabels oder drahtlos per WLan-Verbindung erfolgen. 2.1 - DRAHTLOSE VERBINDUNG: FUNKTION EzLINK • Ihre Kamera ist mit der Funktion EzLink ausgestattet: Wenn Sie ein Tablet oder ein Smartphone unter Android oder iOS verwenden, können Sie sich mithilfe einer entsprechenden App mit der Kamera verbinden, bis sie mit dem gewünschten WLan-Netz verbunden werden kann.
  • Seite 87: Drahtgebundene Verbindung

    All manuals and user guides at all-guides.com WLan-IP-auSSenkamera 720P c - MoNTAge • Verbinden Sie dann Ihr Smartphone oder Tablet mit dem WLan-Netz, welches Ihre Kamera später nutzen soll und starten Sie die App ThomView. Wichtiger Hinweis: Ihre Kamera ist nicht mit WLan-Netzen mit einer Frequenz von 5GHz kompatibel (WLan-Netzwerk 802.11ac). Verbinden Sie Ihr Smartphone oder Tablet nicht mit dieser Art Netzwerken. • Klicken Sie auf das Symbol und anschließend auf das Symbol , um den QRCode der Kamera einzuscannen. Nachdem der Code gelesen wurde, werden Sie von Ihrem Smartphone oder Tablet aufgefordert, den Schlüssel des WLan-Netzes, mit dem Sie verbunden sind, einzugeben, um diesen an die Kamera zu übertragen. 2.2 - DRAHTGEBUNDENE VERBINDUNG Wenn Sie keine WLan-Verbindung verwenden möchten, müssen Sie Ihre Kamera mithilfe eines Netzwerkkabels RJ45 mit dem Internet verbinden. Kamera Modem/Router mit bestehender Internetverbindung Netzadapter WICHTIG: Schließen Sie Ihre Kamera nicht an Ihren Computer an. Die Kamera erhält dadurch keine Internetverbindung.
  • Seite 88: Einführen Einer Microsd-Karte (Nicht Im Lieferumfang Enthalten)

    All manuals and user guides at all-guides.com WLan-IP-auSSenkamera 720P c - MoNTAge In den meisten Fällen wird die Kamera umgehend vom Modem/Router erkannt und mit dem Internet verbunden. Nach einigen Sekunden beginnt die Kamera-LED für Netzwerkaktivität zu blinken. Hinweis: Wenn Sie Ihre Kamera mit einem WLan-zugang verwenden möchten, aber die EzLink-Funktion nicht nutzen können, führen Sie die Inbetriebnahme mit einer drahtgebundenen Verbindung durch und wechseln Sie später zu einer drahtlosen Verbindung. 3 - EINFÜHREN EINER MICROSD-KARTE (NICHT IM LIEFERUMFANG ENTHALTEN) Ihre Kamera besitzt einen Steckplatz für eine MicroSD Karte, um über einen internen Speicher zu verfügen. Ihre maximale Speicherkapazität beträgt 32 GB. ACHTUNG: Um die MicroSD-Karte in der Kamera installieren zu können, muss die Kamera geöffnet werden. Um jegliche Spuren oder Abdrücke in der Kamera (an der Innenseite des Glases, am Objektiv usw.) zu vermeiden, wird nachdrücklich empfohlen, die Kamera auf einer geraden, sauberen und gut beleuchteten Fläche zu öffnen. Lösen Sie die zwei Schrauben an der Vorderseite der Kamera mit Hilfe des im Lieferumfang enthaltenen Sechskantschlüssels. Lösen Sie die vier Schrauben rund um die Elektronikkarte. Achtung: Die vier Schrauben an der Innenseite nicht entfernen.
  • Seite 89 All manuals and user guides at all-guides.com WLan-IP-auSSenkamera 720P c - MoNTAge ziehen Sie die elektronische Karte vorsichtig heraus. Führen Sie die MicroSDHC-Karte in das dafür vorgesehene Fach ein, ohne die Kabel und die Steckverbinder der Kamera zu lösen. zum Schließen der Kamera in umgekehrter Reihenfolge vorgehen. Sicherstellen, dass die Dichtung korrekt positioniert ist, um ein Eindringen von Wasser und Feuchtigkeit zu vermeiden.
  • Seite 90: D - Konfiguration Und Bedienung

    All manuals and user guides at all-guides.com WLan-IP-auSSenkamera 720P d - koNFIgurATIoN uNd BedIeNuNg 1 - KONFIGURATION MIT DEM SMARTpHONE Rückkehr zur Liste der gespeicherten ODER TABLET Kameras Start/Unterbrechung einer Aufzeichnung (auf Bei der ersten Verbindung Ihrer Kamera mit der d em Smartphone oder Tablet gespeichert) ThomView App werden Sie aus Sicherheitsgründen Aufnahme eines Fotos (auf dem Smartphone sofort aufgefordert, den Benutzernamen und das o der Tablet gespeichert)
  • Seite 91: Konfiguration Mithilfe Der Software Thomview

    All manuals and user guides at all-guides.com WLan-IP-auSSenkamera 720P d - koNFIgurATIoN uNd BedIeNuNg 2 - KONFIGURATION MITHILFE DER Aktivierung oder Deaktivierung der SOFTWARE THOMVIEW Funktionskontrollleuchten der Kamera Änderung des Benutzernamens und des Die Software ThomView kompatibel PC und Passworts zum zugriff auf die Kamera (wenn MacOS ermöglicht es, eine oder mehrere Kameras Sie den Benutzernamen und das Passwort für zu konfi gurieren oder zu verwalten, die in einem alle Nutzer ändern wollen, müssen Sie diese Änderung hier vornehmen) lokalen Netzwerk erkannt werden. In einem anderen...
  • Seite 92 Auswahl der Anzahl Kameras, die gleichzeitig UID der Kamera: Einmaliger Code, der am Bildschirm erscheinen a uf der Kamera angegeben ist Vorherige/nächste Seite, Die Software kann Benutzername der Kamera (standardmäßig bis zu 64 Kameras managen, mit diesen "admin") Pfeilen können Sie zu den Kameras 5 bis 8, 9 Gerätetyp: wählen Sie "THOMSON IpC" bis 12 usw. wechseln. Name unter dem die Kamera in der Wechsel in den Vollbildmodus S oftware erscheinen wird (von Ihnen gewählt) Starten einer Patrouille (nur kompatible P2P-Verbindung: ankreuzen, um eine Kameras) Kamera mithilfe ihrer UID hinzuzufügen. Die Unterbrechung der Anzeige der Kamerabilder UID der Kameras ist ein einmaliger Code mit aller Kameras 20 bzw. 24 ziffern und Buchstaben, welcher...
  • Seite 93 All manuals and user guides at all-guides.com WLan-IP-auSSenkamera 720P d - koNFIgurATIoN uNd BedIeNuNg • Kreuzen Sie das Feld "Connexion p2p" werden: Da sie nicht zum selben Netzwerk gehört, kann (Verbindung P2P) an. sie nicht erkannt und automatisch eingetragen werden. • Klicken Sie auf die Taste "Recherche" (Suche), um Ihre Kamera im Netzwerk, mit dem Ihr Alle Einstellungen Ihrer Kamera sind per Fernzugriff Computer verbunden ist, zu erkennen.
  • Seite 94 All manuals and user guides at all-guides.com WLan-IP-auSSenkamera 720P d - koNFIgurATIoN uNd BedIeNuNg Wenn eine Kamera ihr Bild am Bildschirm anzeigt, Öffnen einer externen Videodatei werden weitere Funktionen in der rechten unteren Schneller Vorlauf Ecke angezeigt: Schneller Rücklauf Steuerung der Unterbrechen der Wiedergabe Wiedergabe) Wiedergabe Bild für Bild Start der Wiedergabe Dieses Symbol zeigt Ihnen an, dass Pause Aufzeichnungen auf dem verwendeten Tagesplan Videos: die farbig gekennzeichneten...
  • Seite 95 All manuals and user guides at all-guides.com WLan-IP-auSSenkamera 720P d - koNFIgurATIoN uNd BedIeNuNg Um bei Erkennen einer Bewegung das Senden Kreuzen Sie das Kästchen Aktivieren an, um einer E-Mail auszulösen, benötigen Sie 2 E-Mail- das Senden von E-Mails zu aktivieren Adressen: Die Sender-Adresse, die von der SMTp-Server: abhängig vom Provider Kamera verwendet wird, und die Adresse, auf der der E-Mail-Adresse, die zum Senden der die Benachrichtigungen eingehen. Die Kamera...
  • Seite 96: Konfiguration Mithilfe Eines Internet-Browsers

    All manuals and user guides at all-guides.com WLan-IP-auSSenkamera 720P d - koNFIgurATIoN uNd BedIeNuNg weiß, wann Benachrichtigungen zu versenden sind, Die Konfi guration ist beendet. Im Anschluss klicken Sie auf Bewegungserkennung: daran löst jegliche Bewegung vor der Kamera in den festgelegten zonen und zu den festgelegten Uhrzeiten das Senden einer Benachrichtigung aus. 3 - KONFIGURATION MITHILFE EINES INTERNET-BROWSERS Achtung: Häufi ge Änderungen in der Politik der...
  • Seite 97 All manuals and user guides at all-guides.com WLan-IP-auSSenkamera 720P d - koNFIgurATIoN uNd BedIeNuNg Wählen Sie die Anzeigesprache und geben Sie den Benutzernamen und das Passwort für die Verbindung mit Ihrer Kamera ein. Standardmäßig lautet der Benutzernamenadmin und ein Passwort Vertikale Drehung des Bildes ist nicht eingegeben, lassen Sie es leer. Bei Ihrer "Anti scintillement" (Anti-Flimmern): Wählen...
  • Seite 98 All manuals and user guides at all-guides.com WLan-IP-auSSenkamera 720P d - koNFIgurATIoN uNd BedIeNuNg Hier sehen Sie die gleichen Funktionen, die auch über die Software ThomView verfügbar sind. Informationen zu den einzelnen Funktionen fi nden Sie im vorhergehenden Abschnitt. ACHTUNG: Wenn Sie Ihren Browser verwenden, um die Verbindung Ihrer Kamera von drahtgebunden auf drahtlos zu wechseln, wird die Verbindung unterbrochen, weil sich die IP-Adresse der Kamera...
  • Seite 99: E - Reset

    All manuals and user guides at all-guides.com WLan-IP-auSSenkamera 720P e - reSeT Im Fall von Problemen oder bei Verlust der Benutzeridentifizierung kann die Kamera auf Ihre Standardeinstellung zurückgesetzt werden, indem der Reset-Knopf 10 Sekunden gedrückt wird.
  • Seite 100: F - Faq

    All manuals and user guides at all-guides.com WLan-IP-auSSenkamera 720P F - FAQ Wenn Ihr Problem nicht unten aufgeführt ist, kontaktieren Sie bitte unseren technischen Kundendienst. Problem Mögliche Ursachen Lösungen Verbinden Sie Ihr Smartphone Kameraverbindung zu langsam Die Kamera wird nicht als oder Tablet vorübergehend mit "online", wenn man Sie auf dem gleichen Netzwerk wie die dem Smartphone oder Tablet Kamera, während Sie sie in der hinzufügen möchte. App hinzufügen.
  • Seite 101: G - Technische Und Gesetzliche Informationen

    All manuals and user guides at all-guides.com WLan-IP-auSSenkamera 720P g - TecHNIScHe uNd geSeTzLIcHe INForMATIoNeN 1 - ALLGEMEINE MERKMALE Kamera 12VDC 1a Stromversorgung Drahtgebundene Ethernet 10/100, Auto-MDIX, RJ-45 Netzwerkschnittstelle Drahtlose Netzwerkschnittstelle IEE 802.11b/g/n Optischer Sensor ¼’’ CMOS - Blickwinkel 106° 0 Lux Mindesthelligkeit Manuell oder automatisch Nachtsicht Reichweite 30m Reset-Taste Tasten H.264 Videokomprimierung Bis zu1280x720 Pixel Auflösung...
  • Seite 102: Garantie

    Einstellung oder eine nicht ordnungsgemäße EN301489-1V1.9.2 Installation zurückzuführen. Sollte das Problem EN301489-17V2.2.1 vom Gerät verursacht werden, erhalten Sie EN300328V1.8.1 vom Techniker eine Bearbeitungsnummer für eine Rückgabe im Geschäft. Ohne diese Chambray les Tours Alexandre Chaverot, Nummer ist das Geschäft dazu berechtigt, den 25.10.2016 Präsident Umtausch Ihres Geräts abzulehnen. Die komplette Produktpalette von Thomson finden Sie auf:...
  • Seite 103 All manuals and user guides at all-guides.com...
  • Seite 104 All manuals and user guides at all-guides.com ist eine Marke von TECHNICOLOR S.A., verwendet in Lizenz von: Avidsen France S.A.S - 32, Rue Augustin Fresnel 37170 CHAMBRAY LES TOURS - Frankreich...
  • Seite 105 All manuals and user guides at all-guides.com Cámara IP WiFi exterior 720P 723S DSC - 720p ref. 512399 www.thomsonbox.eu www.thomsonsecurity.eu...
  • Seite 106 All manuals and user guides at all-guides.com Cámara IP WIFI exterIor 720P ÍNDICE A - NormAs DE sEgurIDAD 1 - precauciones de uso 2 - mantenimiento y limpieza 3 - reciclaje 05 B - DEsCrIpCIóN DEl proDuCto 1 - contenido del kit 2 - cámara 3 - adaptador de red C - INstAlACIóN...
  • Seite 107 All manuals and user guides at all-guides.com E - rEINICIo F - prEguNtAs FrECuENtEs g - INFormACIóN téCNICA Y lEgAl 1 - características Generales 2 - Garantía 3 - asistencia y asesoramiento 4 - deVolución del producto / spV 5 - declaración de conFormidad ce...
  • Seite 108 All manuals and user guides at all-guides.com...
  • Seite 109: A - Normas De Seguridad

    All manuals and user guides at all-guides.com Cámara IP WIFI exterIor 720P A - NormAs DE sEgurIDAD 1 - PRECAUCIONES DE USO 3 - RECICLAJE • La cámara no debe instalarse en un sitio donde Este logotipo significa que no se deben el filtro del objetivo se pueda rayar o ensuciar. tirar aparatos inservibles con los residuos • La conexión de la cámara no está prevista domésticos. Las posibles sustancias para una instalación en el exterior, no se...
  • Seite 110: B - Descripción Del Producto

    All manuals and user guides at all-guides.com Cámara IP WIFI exterIor 720P B - DEsCrIpCIóN DEl proDuCto 1 - CONTENIDO DEL kIT 1 Cámara 5 Tornillos para la fijación del pie 2 Adaptador de red 6 Cable RJ45 para la conexión a la red 3 Antena 7 CD-Rom con el programa 4 Tacos para la fijación del pie 8 Llave hexagonal 2 - CáMARA 1 Antena WiFi 5 Toma de red RJ45 2 Pie orientable...
  • Seite 111: Adaptador De Red

    All manuals and user guides at all-guides.com Cámara IP WIFI exterIor 720P B - DEsCrIpCIóN DEl proDuCto 3 - ADAPTADOR DE RED Se suministra en el kit un adaptador de red 230 VCA 50 Hz / 12 VCC para la alimentación de la cámara. No se deben usar otros modelos de alimentación, ya que podrían dañar la cámara y anular la garantía.
  • Seite 112: C - Instalación

    All manuals and user guides at all-guides.com Cámara IP WIFI exterIor 720P C - INstAlACIóN 1 - INSTALACIÓN DE LA CáMARA Antes de fijar la cámara en su ubicación definitiva, se recomienda realizar pruebas de conexión. • Fije la cámara con tornillos y tacos adecuados para la naturaleza del soporte (los tornillos y tacos suministrados son adecuados para muros macizos).
  • Seite 113: Conexión Por Cable

    All manuals and user guides at all-guides.com Cámara IP WIFI exterIor 720P C - INstAlACIóN • Después, conecte el teléfono inteligente o la tableta a la red WiFi que la cámara deberá usar después, e inicie la aplicación Thomview. Observación importante: La cámara no es compatible con las redes inalámbricas con frecuencia de 5 GHz (red WiFi 802.11ac). No conecte el teléfono inteligente o la tableta a una red de este tipo. • Pulse el icono y después el icono para escanear el código QR de la cámara. Una vez leído el código, el teléfono inteligente o la tableta le invita a introducir la clave de la red WiFi a la que está conectado, para poder transmitirla a la cámara. 2.2 - CONExIóN POR CABLE Si no desea usar una conexión inalámbrica, conecte la cámara a un acceso de internet con un cable de RJ45. cámara módem / enrutador conectado a Internet Adaptador de red ImPORTANTE: No conecte la cámara al ordenador. No le dará acceso a internet.
  • Seite 114: Introducción De Una Tarjeta Microsd (No Suministrada)

    All manuals and user guides at all-guides.com Cámara IP WIFI exterIor 720P C - INstAlACIóN En la mayoría de los casos, el módem/enrutador detecta inmediatamente la cámara y le asigna un acceso a Internet. Después de unos segundos, parpadea el LED de actividad de la red de la cámara. Observación: si desea usar la cámara con WiFi, pero no puede usar la función EzLink, realice la puesta en servicio con una conexión por cable para poder pasar después a una conexión inalámbrica. 3 - INTRODUCCIÓN DE UNA TARJETA MICROSD (NO SUMINISTRADA) La cámara dispone de una ranura para tarjeta microSD que le permite disponer de una memoria de almacenamiento interna. La capacidad máxima es de 32 Gb. ATENCIÓN: La instalación de una tarjeta microSD en la cámara requiere abrirla. Para evitar cualquier marca o rastro en la cámara (parte interna del cristal, objetivo...), se recomienda encarecidamente realizar el desmontaje sobre una superficie plana, limpia y correctamente iluminada. Retire con la llave hexagonal suministrada los 2 tornillos de la parte frontal de la cámara. Retire los 4 tornillos del contorno de la tarjeta electrónica. Atención: no retire los 4 tornillos de la parte interior.
  • Seite 115 All manuals and user guides at all-guides.com Cámara IP WIFI exterIor 720P C - INstAlACIóN Retire la tarjeta electrónica tirando suavemente. Introduzca una tarjeta microSDHC en el alojamiento previsto para ello sin desconectar los cables ni conectores de la cámara. Proceda en el orden inverso para volver a cerrar la cámara. Asegúrese de que la junta esté correctamente colocada para evitar cualquier infiltración de agua.
  • Seite 116: D - Configuración Y Uso

    All manuals and user guides at all-guides.com Cámara IP WIFI exterIor 720P D - CoNFIgurACIóN Y uso Volver a la lista de las cámaras guardadas 1 - CONFIGURACIÓN CON UN TELÉFONO Inicio/parada de una grabación (almacenada INTELIGENTE O UNA TABLETA en el teléfono o la tableta) Toma de una foto (almacenada en el teléfono En la primera conexión a la cámara con la aplicación o tableta) ThomView, se le invita inmediatamente a cambiar Activación del micrófono y/o altavoz de la el identificador y la contraseña de conexión a la cámara (solo para las cámaras compatibles)
  • Seite 117: Configuración Con El Programa Thomview

    All manuals and user guides at all-guides.com Cámara IP WIFI exterIor 720P D - CoNFIgurACIóN Y uso 2 - CONFIGURACIÓN CON EL PROGRAMA Activación o desactivación de los testigos de THOMVIEW funcionamiento de la cámara modifi cación del identifi cador y de la El programa ThomView compatible PC y macOS contraseña de acceso a la cámara (si desea permite confi gurar y gestionar una o varias cámaras cambiar el identifi cador y la contraseña para...
  • Seite 118 UID de la cámara (código único indicado en Selección de la cantidad de cámaras que se la cámara) ven simultáneamente en la pantalla Nombre de usuario de la cámara (de forma Página anterior/siguiente; como el programa predeterminada, «admin») puede gestionar hasta 64 cámaras, las Tipo de aparato: seleccione «THOMSON IPC» fl echas le permiten pasar a las cámaras 5 a 8 Nombre con el cual va a aparecer la cámara y después 9 a 12, etc. en el programa (elegido por usted) Visualización en pantalla completa Conexión P2P: debe marcarse para añadir Inicio de un patrullaje (solo para las cámaras una cámara usando su UID. El UID de cada...
  • Seite 119 All manuals and user guides at all-guides.com Cámara IP WIFI exterIor 720P D - CoNFIgurACIóN Y uso • marque la casilla «Connexion P2P» (Conexión Todos los ajustes de la cámara se pueden acceder P2P). a distancia, haciendo un clic derecho en el nombre • Pulse el botón «Recherche» (Buscar) para de la cámara en la lista (o en la imagen que muestra) detectar la cámara en la red a la que está y pulsando Parámetros de la cámara: conectado el ordenador.
  • Seite 120 All manuals and user guides at all-guides.com Cámara IP WIFI exterIor 720P D - CoNFIgurACIóN Y uso Cuando una cámara emite su imagen en la pantalla, Se abre un archivo de vídeo aparecen controles adicionales en el ángulo inferior externo derecho: Avance rápido Retroceso rápido Controles de Parada de la reproducción reproducción Avance imagen por imagen Inicio de la reproducción Este icono le indica la presencia de Pausa grabaciones en el ordenador usado (blanco Día en curso de visionado: los intervalos de en reposo, verde cuando se han realizado tiempo coloreados le indican la presencia...
  • Seite 121 All manuals and user guides at all-guides.com Cámara IP WIFI exterIor 720P D - CoNFIgurACIóN Y uso • Use los controles de reproducción para marque la casilla «Activer» (Activar) para reproducir, adelantar, ir hacia atrás o use la activar el envío de correos electrónicos zona «Positionner» (Posicionar) para indicar Servidor SMTP: depende del proveedor de precisamente a qué hora se debe colocar el correo de la dirección que envía la alerta. En...
  • Seite 122: Configuración Con Un Navegador De Internet

    All manuals and user guides at all-guides.com Cámara IP WIFI exterIor 720P D - CoNFIgurACIóN Y uso 3 - CONFIGURACIÓN CON UN NAVEGADOR DE INTERNET Atención: los frecuentes cambios de política de los principales desarrolladores de navegadores web, así como las numerosas confi guraciones y versiones posibles pueden complicar la confi guración de la cámara. Seleccione, en la medida de lo posible, el uso de un teléfono inteligente, una tableta o un programa específi co.
  • Seite 123 All manuals and user guides at all-guides.com Cámara IP WIFI exterIor 720P D - CoNFIgurACIóN Y uso Seleccione el idioma de visualización y después introduzca el identifi cador y la contraseña de conexión a la cámara. De forma predeterminada, el identifi cador es admin y la contraseña está vacía; Giro vertical de la imagen deje el campo en blanco. En la primera conexión, Antidestello: si la iluminación de la imagen...
  • Seite 124 All manuals and user guides at all-guides.com Cámara IP WIFI exterIor 720P D - CoNFIgurACIóN Y uso Encontrará aquí las mismas funciones que las accesibles desde el programa ThomView. Consulte el párrafo anterior para conocer cada una de ellas. ATENCIÓN: si usa el navegador para pasar la cámara de una red por cable a una red inalámbrica, la conexión se perderá porque la dirección IP de la cámara cambiará. Deberá reiniciar IP Camera Search Tool para volver a detectar la cámara.
  • Seite 125: E - Reinicio

    All manuals and user guides at all-guides.com Cámara IP WIFI exterIor 720P E - rEINICIo En caso de problema o de pérdida de los identificadores, la cámara puede reiniciarse con los valores predeterminados pulsando durante 10 segundos la tecla Reset.
  • Seite 126: F - Preguntas Frecuentes

    All manuals and user guides at all-guides.com Cámara IP WIFI exterIor 720P F - prEguNtAs FrECuENtEs Si su problema no figura a continuación, debe ponerse en contacto con nuestro servicio técnico. Síntomas Causas posibles Soluciones Conexión de la cámara Conecte temporalmente el La cámara no se detecta en línea demasiado lenta teléfono inteligente o la tableta cuando se la quiere asociar a un a la misma red de la cámara teléfono inteligente o una tableta cuando la añada a la aplicación. Problema de red / alimentación Compruebe sus conexiones de eléctrica red y eléctrica. En caso necesario, conecte temporalmente el cable de red si La conexión a la cámara es la cámara está en WiFi imposible desde la red local Problema de configuración de red Controle la configuración de red de la cámara. Reinicie la cámara si ya no puede acceder a ella.
  • Seite 127: Características Generales

    All manuals and user guides at all-guides.com Cámara IP WIFI exterIor 720P g - INFormACIóN téCNICA Y lEgAl 1 - CARACTERíSTICAS GENERALES Cámara 12 VCC 1 a Alimentación Interfaz de la red por cable Ethernet 10/100, auto-mDIx, RJ45 Interfaz de red inalámbrica IEE 802.11 b/g/n ¼’’ CmOS - ángulo de visión de 106°...
  • Seite 128: Garantía

    Póngase en contacto con los técnicos de nuestro servicio posventa en el: Asistencia técnica: + 34 902 101 633 De lunes a jueves de 8:00 a 17:00 h y los viernes de 08:00 a 13:00 h. Consulte toda nuestra gama Thomson en...
  • Seite 129 All manuals and user guides at all-guides.com...
  • Seite 130 All manuals and user guides at all-guides.com es una marca de TECHNICOLOR S.A. usada bajo licencia por: Avidsen France S.A.S - 32, rue Augustin Fresnel 37170 CHAmBRAY LES TOURS - Francia...
  • Seite 131 All manuals and user guides at all-guides.com Câmara IP Wi-Fi exterior 720P 723S DSC - 720p ref. 512399 www.thomsonbox.eu www.thomsonsecurity.eu...
  • Seite 132 All manuals and user guides at all-guides.com Câmara IP WI-FI exterIor 720P ÍNDICE A - INstruçõEs DE sEgurANçA 1 - precauções de utilização 2 - conservação e limpeza 3 - reciclagem B - DEsCrIção Do proDuto 1 - conteúdo do kit 2 - câmara 3 - adaptador de corrente C - INstAlAção...
  • Seite 133 All manuals and user guides at all-guides.com E - rEposIção F - FAQ g - INFormAçõEs téCNICAs E lEgAIs 1 - características gerais 2 - garantia 3 - assistência e conselHos 4 - devolução do produto/ spv 5 - declaração de conFormidade ce...
  • Seite 134 All manuals and user guides at all-guides.com...
  • Seite 135: A - Instruções De Segurança

    All manuals and user guides at all-guides.com Câmara IP WI-FI exterIor 720P A - INstruçõEs DE sEgurANçA 1 - PRECAUÇÕES DE UTILIZAÇÃO 3 - RECICLAGEM • A câmara não deve ser instalada em locais Este logótipo significa que os aparelhos onde o filtro da objetiva seja exposto a riscos inutilizados não devem ser eliminados em ou sujidade.
  • Seite 136: B - Descrição Do Produto

    All manuals and user guides at all-guides.com Câmara IP WI-FI exterIor 720P B - DEsCrIção Do proDuto 1 - CONTEúDO DO kIT 1 Câmara 5 Parafusos para fixação do pé 2 Adaptador de corrente 6 Cabo RJ45 para conexão com fio à rede 3 Antena 7 CD-ROM com o software 4 Buchas para fixação do pé 8 Chave sextavada 2 - CâMARA 1 Antena WiFi 5 Tomada de rede RJ45 2 Pé orientável...
  • Seite 137: Adaptador De Corrente

    All manuals and user guides at all-guides.com Câmara IP WI-FI exterIor 720P B - DEsCrIção Do proDuto 3 - ADAPTADOR DE CORRENTE Um adaptador de corrente de 230Vac 50Hz / 12Vdc é fornecido no kit para a alimentação da câmara. Não utilizar outros modelos de alimentação sob risco de deteriorar a câmara e anular a garantia.
  • Seite 138: C - Instalação

    All manuals and user guides at all-guides.com Câmara IP WI-FI exterIor 720P C - INstAlAção 1 - INSTALAÇÃO DA CâMARA Antes de fixar a câmara à respetiva localização, recomenda-se a realização de testes de ligação. • Fixe a câmara com a ajuda de parafusos e buchas apropriados ao tipo de suporte (os parafusos e buchas fornecidos são aconselháveis para paredes de material sólido).
  • Seite 139: Ligação Com Fios

    All manuals and user guides at all-guides.com Câmara IP WI-FI exterIor 720P C - INstAlAção • Em seguida, ligue o seu smartphone ou tablet à rede Wi-Fi que a câmara deve utilizar e execute a aplicação Thomview. Nota importante : a câmara não é compatível com redes sem fi os de frequência 5 gHz (rede Wi-Fi 802.11ac). Não ligue o seu smartphone ou tablet a uma rede desse tipo. • Clique no ícone e depois no ícone para digitalizar o código QR que existe na câmara.
  • Seite 140: Inserção De Um Cartão Microsd (Não Fornecido)

    All manuals and user guides at all-guides.com Câmara IP WI-FI exterIor 720P C - INstAlAção Na maioria dos casos, a câmara é imediatamente detectada pelo modem/roteador que lhe atribui um acesso à Internet. Após alguns segundos, o LED de atividade da rede da câmara pisca. Nota: se desejar utilizar a câmara numa rede Wi-Fi, mas não puder utilizar a função EzLink, utilize uma ligação com fios para poder passar a uma ligação sem fios. 3 - INSERÇÃO DE UM CARTÃO MICROSD (NÃO FORNECIDO) A sua câmara dispõe de um slot para cartão microSD que permite-lhe dispôr de uma memória de armazenamento interno. O espaço máximo é de 32 gB. ATENÇÃO: A instalação de um cartão microSD na câmara requer a abertura da câmara. Para evitar qualquer marca ou traço na câmara (face interna do vidro, objetiva…), é altamente recomendável efetuar a desmontagem sobre uma superfície plana, limpa e bem iluminada. Com a chave sextavada fornecida retirar os 2 parafusos na fachada da câmara. Retirar os 4 parafusos em torno da placa de circuitos. Atenção: não remova os 4 parafusos do lado interior.
  • Seite 141 All manuals and user guides at all-guides.com Câmara IP WI-FI exterIor 720P C - INstAlAção Retirar cuidadosamente a placa de circuitos. Inserir um cartão microSD na ranhura prevista para esse efeito sem desligar os cabos e conectores da câmara. Continuar no sentido inverso para fechar novamente a câmara. Verificar se a junta está corretamente posicionada para evitar a infiltração de água.
  • Seite 142: D - Configuração E Utilização

    All manuals and user guides at all-guides.com Câmara IP WI-FI exterIor 720P D - CoNFIgurAção E utIlIZAção 1 - CONFIGURAÇÃO ATRAVÉS DE UM Voltar à lista das câmaras registadas SMARTPHONE OU TABLET Execução/paragem de um registo (guardado n o smartphone ou tablet) Durante a primeira ligação com a aplicação Captura fotografia (guardada ThomView, a câmara vai imediatamente pedir para smartphone ou no tablet) substituir o nome de utilizador e a palavra-passe de...
  • Seite 143: Configuração Através Do Software Thomview

    All manuals and user guides at all-guides.com Câmara IP WI-FI exterIor 720P D - CoNFIgurAção E utIlIZAção 2 - CONFIGURAÇÃO ATRAVÉS DO Ativação ou desativação dos indicadores de SOFTWARE THOMVIEW f uncionamento da câmara Alteração do nome de utilizador e da palavra- O software ThomView é compatível com PC e passe de acesso à câmara (se pretender MacOS, permitindo confi gurar e gerir uma ou mais alterar o nome de utilizador e a palavra-passe câmaras ligadas à mesma rede local. Permite, ainda, da câmara para todos os utilizadores, poderá...
  • Seite 144 Seleção do número de câmaras em UID da câmara (código único indicado na simultâneo no ecrã c âmara) Página anterior/ seguinte. Como o software Nome de utilizador da câmara (por defeito, pode gerir até 64 câmaras, estas setas “admin”) permitem passar para as câmaras 5 a 8, 9 a Tipo de dispositivo: selecione «THOMSON IPC» 12, etc. Nome da câmara que vai aparecer Ativação do ecrã inteiro n o software (pode ser personalizado) Execução de uma patrulha (apenas câmaras Ligação P2P: a selecionar para adicionar uma compatíveis) câmara por meio do respetivo UID. O UID Interrupção da apresentação da imagem de...
  • Seite 145 All manuals and user guides at all-guides.com Câmara IP WI-FI exterIor 720P D - CoNFIgurAção E utIlIZAção • Selecione a caixa «Connexion P2P» (Ligação É possível aceder aos ajustes da câmara à distância. P2P). Para isso, clique com o botão direito do rato sobre • Clique no botão «Recherche» (Pesquisar) o nome da câmara na lista (ou sobre a imagem para procurar a câmara na rede a que o apresentada) e, depois, em «Paramètres caméra computador está ligado.
  • Seite 146 All manuals and user guides at all-guides.com Câmara IP WI-FI exterIor 720P D - CoNFIgurAção E utIlIZAção Quando uma câmara envia a imagem para o ecrã, Abertura de ficheiro de vídeo são apresentados comandos adicionais no canto externo inferior direito: Avançar Retroceder Controlos Paragem na leitura de leitura Avançar imagem a imagem Abertura da leitura Este ícone indica a presença de registos no Pausa computador utilizado (branco quando está...
  • Seite 147 All manuals and user guides at all-guides.com Câmara IP WI-FI exterIor 720P D - CoNFIgurAção E utIlIZAção Para acionar o envio de um e-mail em caso de Selecione a caixa «Activer» (Ativar) para ativar deteção de um movimento, irá precisar de 2 o envio de e-mails endereços de e-mail: o endereço do remetente Serveur SMTP (Servidor SMTP): depende do que será utilizado pela câmara e o endereço que fornecedor de e-mail do endereço que envia...
  • Seite 148: Configuração Através Do Navegador De Internet

    All manuals and user guides at all-guides.com Câmara IP WI-FI exterIor 720P D - CoNFIgurAção E utIlIZAção 3 - CONFIGURAÇÃO ATRAVÉS DO NAVEGADOR DE INTERNET Atenção: as frequentes alterações de política dos principais programadores de navegadores Web, bem como as inúmeras confi gurações e versões possíveis, podem difi cultar a confi guração da câmara. Se possível, prefi ra a utilização de um smartphone, tablet ou software dedicado.
  • Seite 149 All manuals and user guides at all-guides.com Câmara IP WI-FI exterIor 720P D - CoNFIgurAção E utIlIZAção Selecione o idioma de visualização e, em seguida, insira o nome de utilizador e a palavra-passe de ligação à câmara. O nome de utilizador predefi nido é admin e o campo da palavra-passe pode fi car Inversão vertical da imagem vazio. Durante a sua primeira conexão, a câmara Antibrilho: se a luz da imagem for artifi cial,...
  • Seite 150 All manuals and user guides at all-guides.com Câmara IP WI-FI exterIor 720P D - CoNFIgurAção E utIlIZAção Aqui, encontrará as mesmas funções disponíveis no software ThomView. Consulte o parágrafo seguinte para conhecer cada uma delas. ATENÇÃO: se utilizar um navegador para passar a câmara de uma rede com fi os para uma rede sem fi os, irá perder a ligação porque o endereço IP da câmara será alterado. Será necessário voltar a abrir a IP Camera Search Tool para detetar novamente a câmara.
  • Seite 151: E - Reposição

    All manuals and user guides at all-guides.com Câmara IP WI-FI exterIor 720P E - rEposIção Em caso de problema ou perda dos identificadores para o seu acesso, a câmara pode ser reinicializada em valores predefinidos ao premir 10 segundos a tecla Reset.
  • Seite 152: F - Faq

    All manuals and user guides at all-guides.com Câmara IP WI-FI exterIor 720P F - FAQ Se o seu problema não estiver indicado abaixo, deve entrar em contacto com o serviço de apoio técnico. Sintomas Causas possíveis Soluções A câmara não é detetada como Ligação da câmara muito lenta Ligue temporariamente estando ligada quando tentamos smartphone ou tablet à mesma associá-la por smartphone ou rede da câmara ao adicionar à tablet aplicação. Problema de rede/alimentação Verifique as ligações à rede e à elétrica eletricidade.
  • Seite 153: Características Gerais

    All manuals and user guides at all-guides.com Câmara IP WI-FI exterIor 720P g - INFormAçõEs téCNICAs E lEgAIs 1 - CARACTERíSTICAS GERAIS Câmara 12VDC 1a Alimentação Interface de rede com fios Ethernet 10/100, auto-MDIX, RJ45 Interface rede sem fio IEE 802.11b/g/n ¼’’ CMOS - Ângulo de visão 106° Sensor ótico 0 lux Intensidade luminosa mínima Manual ou automática...
  • Seite 154: Garantia

    25/10/16 Presidente de dossiê para voltar à loja. Sem o número do dossiê, a loja pode recusar-se a fazer a troca do seu produto. Contacte os técnicos do nosso serviço pós-venda através do: Helpline : 707 45 11 45 De segunda a sexta-feira entre as 9h e as 12h e entre as 14h e as 18h. Descubra a gama Thomson completa em...
  • Seite 155 All manuals and user guides at all-guides.com...
  • Seite 156 All manuals and user guides at all-guides.com é uma marca da TECHNICOLOR S.A. utilizada sob licença por: Avidsen France S.A.S - 32 Rue Augustin Fresnel 37170 CHAMBRAY LES TOURS - France...
  • Seite 157 All manuals and user guides at all-guides.com Telecamera IP Wi-Fi da esterno 720P 723S dsc - 720p cod. 512399 www.thomsonbox.eu www.thomsonsecurity.eu...
  • Seite 158 All manuals and user guides at all-guides.com Telecamera IP WI-FI da esTerno 720P INDICE A - IstruzIoNI DI sICurEzzA 1 - precauzioni per l'uso 2 - manutenzione e pulizia 3 - smaltimento B - DEsCrIzIoNE DEl proDotto 1 - contenuto del kit 2 - telecamera 3 - adattatore ac/dc C - INstAllAzIoNE...
  • Seite 159 All manuals and user guides at all-guides.com E - rEsEt F - FAQ G - NotE tECNIChE E lEGAlI 1 - caratteristicHe Generali 2 - Garanzia 3 - assistenza e consiGli 4 - reso del prodotto/serVizio post Vendita 5 - dicHiarazione di conFormità ce...
  • Seite 160 All manuals and user guides at all-guides.com...
  • Seite 161: A - Istruzioni Di Sicurezza

    All manuals and user guides at all-guides.com Telecamera IP WI-FI da esTerno 720P A - IstruzIoNI DI sICurEzzA 1 - PRECAUZIONI PER L'USO 3 - SMALTIMENTO • Non installare la telecamera in luoghi in cui Questo logo indica che i dispositivi non più il filtro dell'obiettivo potrebbe graffiarsi o utilizzabili non possono essere gettati nei sporcarsi.
  • Seite 162: B - Descrizione Del Prodotto

    All manuals and user guides at all-guides.com Telecamera IP WI-FI da esTerno 720P B - DEsCrIzIoNE DEl proDotto 1 - CONTENUTO DEL KIT 1 Telecamera 5 Viti per fissaggio del piede 2 Adattatore di alimentazione 6 Cavo RJ45 per connessione alla rete via cavo 3 Antenna 7 CD-ROM con software 4 Tasselli per fissaggio supporto 8 Brugola 2 - TELECAMERA 1 Antenna Wi-Fi 5 Presa cavo rete RJ45 2 Piede orientabile...
  • Seite 163: Adattatore Ac/Dc

    All manuals and user guides at all-guides.com Telecamera IP WI-FI da esTerno 720P B - DEsCrIzIoNE DEl proDotto 3 - ADATTATORE AC/DC Nel kit è incluso un adattatore di rete 230Vac 50Hz / 12Vdc per l'alimentazione della telecamera. Non utilizzare nessun'altra sorgente di alimentazione per evitare il rischio di danni alla telecamera e l'annullamento della garanzia.
  • Seite 164: C - Installazione

    All manuals and user guides at all-guides.com Telecamera IP WI-FI da esTerno 720P C - INstAllAzIoNE 1 - COME INSTALLARE LA TELECAMERA Prima di fissare la telecamera nella sua collocazione definitiva, si consiglia di verificare il funzionamento della connessione. • Fissare la telecamera usando viti e tasselli adatti al tipo di supporto (le viti e i tasselli forniti sono adatti per l'uso su muri pieni). • Assicurarsi che la telecamera sia saldamente fissata in modo da prevenire eventuali rischi di caduta. 2 - CONNESSIONE DELLA TELECAMERA • L'accesso della telecamera alla rete e a Internet può avvenire tramite connessione via cavo di rete oppure connessione wireless Wi-Fi. 2.1 - CONNeSSIONe SeNzA FILI: FUNzIONe ezLINk • La telecamera è dotata di funzione ezLink: se si dispone di un tablet o di uno smartphone Android o iOS, l'applicazione dedicata consente di connettersi alla telecamera semplicemente indicando quale rete Wi-Fi utilizzare.
  • Seite 165: Connessione Via Cavo

    All manuals and user guides at all-guides.com Telecamera IP WI-FI da esTerno 720P C - INstAllAzIoNE • Collegare lo smartphone o tablet alla rete Wi-Fi che la telecamera dovrà utilizzare, quindi avviare l'applicazione ThomView. Importante: la telecamera non è compatibile con reti wireless con frequenza di 5 GHz (reti Wi-Fi 802.11ac). Non collegare lo smartphone o tablet a una rete di questo tipo. • Fare clic sull'icona e poi sull'icona per eseguire la scansione del QRCode presente sulla telecamera.
  • Seite 166: Inserimento Della Scheda Microsd (Non Inclusa)

    All manuals and user guides at all-guides.com Telecamera IP WI-FI da esTerno 720P C - INstAllAzIoNE Nella maggior parte dei casi, la telecamera viene subito rilevata dal modem/router e le viene automaticamente attribuito accesso a Internet. Dopo pochi secondi il LeD di stato della rete sulla telecamera lampeggia. N.B: se si desidera utilizzare il dispositivo tramite Wi-Fi ma non è possibile utilizzare la funzione ezLink, effettuare la messa in servizio della telecamera con una connessione via cavo, per poi passare alla connessione wireless. 3 - INSERIMENTO DELLA SCHEDA MICROSD (NON INCLUSA) La telecamera prevede un alloggiamento per scheda microSD che consente di aggiungere una memoria interna al dispositivo. La capacità massima della scheda deve essere di 32GB. ATTENZIONE: Per inserire la scheda microSD è necessario aprire la telecamera. Per evitare di rigare o lasciare segni sulla telecamera (parte interna del vetro, obiettivo, ecc.), si consiglia vivamente di procedere allo smontaggio poggiando la telecamera su una superficie piana, pulita e ben illuminata. estrarre le 2 viti sulla parte anteriore della telecamera usando la brugola. estrarre le 4 viti sui bordi della scheda elettronica. Attenzione: non estrarre le 4 viti interne.
  • Seite 167 All manuals and user guides at all-guides.com Telecamera IP WI-FI da esTerno 720P C - INstAllAzIoNE estrarre la scheda elettronica tirandola delicatamente. Inserire la scheda microSDHC nell'apposito alloggiamento senza scollegare i cavi e i connettori della telecamera. Per richiudere la telecamera, ripetere le operazioni procedendo in senso inverso. Per prevenire eventuali infiltrazioni di acqua, controllare che la guarnizione sia correttamente posizionata.
  • Seite 168: D - Configurazione E Utilizzo

    All manuals and user guides at all-guides.com Telecamera IP WI-FI da esTerno 720P D - CoNFIGurAzIoNE E utIlIzzo 1 - CONFIGURAZIONE TRAMITE Torna all'elenco delle telecamere registrate SMARTPHONE O TABLET Avvio/arresto una registrazione (memorizzata sul telefono o tablet) Al momento della prima connessione alla telecamera Scatto di una foto (memorizzata sul telefono con l'applicazione ThomView e per garantire una o il tablet) maggiore sicurezza l'utente viene invitato a cambiare Attivazione del microfono e/o altoparlante nome utente e password di connessione della...
  • Seite 169: Configurazione Tramite Il Software Thomview

    All manuals and user guides at all-guides.com Telecamera IP WI-FI da esTerno 720P D - CoNFIGurAzIoNE E utIlIzzo 2 - CONFIGURAZIONE TRAMITE IL Attivazione o disattivazione delle spie di SOFTWARE THOMVIEW funzionamento della telecamera Modifi ca di nome utente e password di accesso Il software ThomView compatibile con PC e alla telecamera (se si desidera cambiare nome MacOS permette la confi gurazione e gestione di utente e password della telecamera per tutti i...
  • Seite 170 Scelta del numero di telecamere UID della telecamera (codice univoco indicato s imultaneamente sullo schermo s ulla telecamera) Pagina precedente/successiva, il software Nome utente della telecamera (per default, può gestire fi no a 64 telecamere, queste « admin») frecce permettono di passare alle camere da Tipo di dispositivo: selezionare «THOMSON IPC» 5 a 8, poi da 9 a 12, ecc. Nome sotto il quale la telecamera appare nel Passaggio allo schermo intero software (scelta a piacimento) Avvio di una pattuglia (solo telecamere Connessione P2P: da spuntare per aggiungere compatibili) una telecamera tramite il suo identifi cativo UID.
  • Seite 171 All manuals and user guides at all-guides.com Telecamera IP WI-FI da esTerno 720P D - CoNFIGurAzIoNE E utIlIzzo • Spuntare la casella «Connessione P2P». Tutte le impostazioni della telecamera sono • Fare clic sul pulsante «Recherche» (Cerca) accessibili in remoto facendo clic col tasto destro per rilevare la telecamera sulla rete collegata al sul nome della telecamera nell'elenco (oppure computer.
  • Seite 172 All manuals and user guides at all-guides.com Telecamera IP WI-FI da esTerno 720P D - CoNFIGurAzIoNE E utIlIzzo Quando una telecamera trasmette la sua ripresa allo Apertura di un file video esterno schermo, controlli aggiuntivi vengono visualizzati Scorrimento rapido in avanti nell'angolo in basso a destra: Scorrimento rapido all'indietro Comandi Arresto della riproduzione riproduzione Avanzamento fotogramma per fotogramma Avvio della riproduzione Questa icona indica la presenza di registrazioni Pausa sul computer utilizzato (bianco a riposo, verde Giorno in corso di visualizzazione: gli intervalli se sono presenti registrazioni programmate/ su rilevamento/manuali) di tempo colorati indicano la presenza di video e il loro orario approssimativo di inizio e di fine...
  • Seite 173 All manuals and user guides at all-guides.com Telecamera IP WI-FI da esTerno 720P D - CoNFIGurAzIoNE E utIlIzzo • Utilizzare i controlli di riproduzione per Applicare un segno di spunta su « Activer » riprodurre, andare avanti, tornare indietro (Attivare) per attivare l'invio di e-mail oppure utilizzare la casella «Positionner» Server SMTP: dipende dal provider (Posiziona) per indicare con precisione a che dell'indirizzo e-mail di invio degli allarmi. Nel ora collocare l'indicatore di riproduzione.
  • Seite 174: Configurazione Tramite Browser Internet

    All manuals and user guides at all-guides.com Telecamera IP WI-FI da esTerno 720P D - CoNFIGurAzIoNE E utIlIzzo 3 - CONFIGURAZIONE TRAMITE BROWSER INTERNET Attenzione: i frequenti cambiamenti nelle prassi dei principali sviluppatori dei browser Internet, come le numerose confi gurazioni e versioni esistenti, possono rendere complicata la confi gurazione della telecamera. È quindi preferibile, se possibile, utilizzare smartphone, tablet o software dedicati.
  • Seite 175 All manuals and user guides at all-guides.com Telecamera IP WI-FI da esTerno 720P D - CoNFIGurAzIoNE E utIlIzzo Selezionare la lingua di visualizzazione per inserire l'identifi cativo e la password di connessione alla telecamera. Per default il nome utente è admin e la password non è impostata, lasciare il campo vuoto. Capovolgimento immagine in verticale Al momento della prima connessione e per garantire Anti sfarfallamento: se l'illuminazione è una maggiore sicurezza, la telecamera invita l'utente artifi ciale, selezionare 50 Hz. Se è naturale, a modifi care il nome utente e la password.
  • Seite 176 All manuals and user guides at all-guides.com Telecamera IP WI-FI da esTerno 720P D - CoNFIGurAzIoNE E utIlIzzo Qui trovate le stesse funzioni accessibili tramite il software ThomView. Vedere il paragrafo precedente per maggiori dettagli su ciascuna di esse. ATTENZIONE: se si utilizza il browser per spostare la telecamera da una rete via cavo a una rete wireless, la connessione si interromperà a causa della variazione dell'indirizzo IP della telecamera.
  • Seite 177: E - Reset

    All manuals and user guides at all-guides.com Telecamera IP WI-FI da esTerno 720P E - rEsEt In caso di problemi o di perdita delle credenziali di accesso, la telecamera può essere riportata alle impostazioni di fabbrica tenendo premuto per 10 secondi il tasto Reset.
  • Seite 178: F - Faq

    All manuals and user guides at all-guides.com Telecamera IP WI-FI da esTerno 720P F - FAQ Se il problema non è elencato di seguito, si prega di contattare il nostro ufficio tecnico. Problema Possibili cause Soluzioni Connessione telecamera troppo Collegare temporaneamente lo La telecamera non viene rilevata lenta smartphone o tablet alla rete cui è come in linea quando la si vuole collegata la telecamera per poterla associare a smartphone o tablet aggiungere nell'applicazione. Problema di rete / alimentazione Verificare la connessione di rete e elettrica quella elettrica. Collegare temporaneamente utilizzando il cavo di rete, se la Impossibile collegare la telecamera è in Wi-Fi telecamera alla rete locale...
  • Seite 179: G - Note Tecniche E Legali

    All manuals and user guides at all-guides.com Telecamera IP WI-FI da esTerno 720P G - NotE tECNIChE E lEGAlI 1 - CARATTERISTICHE GENERALI Telecamera 12Vdc 1a Alimentazione Interfaccia rete filare ethernet 10/100, auto-MDIX, RJ45 Interfaccia rete senza fili Iee 802.11b/g/n ¼’’ CMOS - Angolo di campo 106° Sensore ottico 0 lux Intensità...
  • Seite 180: Garanzia

    In mancanza di tale numero di Chambray les Tours Alexandre Chaverot, pratica il rivenditore potrà rifiutarsi di sostituire il 25/10/2016 Presidente prodotto difettoso. I tecnici del servizio post-vendita sono disponibili al numero: Assistenza clienti: + 39 02 97 27 15 98 Dal lunedì al venerdì dalle 9:00 alle 13:00 e dalle 14:00 alle 18:00. Tutti prodotti della gamma Thomson sono disponibili su...
  • Seite 181 All manuals and user guides at all-guides.com...
  • Seite 182 All manuals and user guides at all-guides.com è un marchio di proprietà di TECHNICOLOR S.A. concesso in licenza a: Avidsen France S.A.S - 32 Rue Augustin Fresnel 37170 CHAMBRAY LeS TOURS - Francia...

Diese Anleitung auch für:

Dsc-723s

Inhaltsverzeichnis