EuroLite LED KLS-120 Bedienungsanleitung

Verwandte Anleitungen für EuroLite LED KLS-120


Inhaltszusammenfassung für EuroLite LED KLS-120
- Seite 1 KLS-1 20 Compact Light Set Bedienungsanleitung User manual LED KLS-120 Compact Light Set Komplette DMX-LED-Lichtanlage Complete DMX LED light set (optional) STAND MASTER REMOTE RGBW 18° SLAVE ALONE CONTROL STROBE No. 42109606 www.eurolite.de...
-
Seite 3: Inhaltsverzeichnis
Diese Bedienungsanleitung gilt für die Artikelnummer / This user manual is valid for the article number: 42109606 Das neueste Update dieser Bedienungsanleitung finden Sie im Internet unter: You can find the latest update of this user manual in the Internet under: www.eurolite.de... -
Seite 4: Einführung
• Geschwindigkeit, Dimmer, Musiksteuerung, Master/Slave-Betrieb Adressierung und Einstellungen über Steuereinheit mit 4-stelliger LED-Anzeige • Zusätzliche Steuermöglichkeit über EUROLITE IR-7 Fernsteuerung, im Lieferumfang enthalten • Schwarz lackierte Metallausführung mit schwenkbarem Montagebügel der Spots • Reine Konvektionskühlung über Kühlrippen, keine Lüfter, besonders leise im Betrieb •... -
Seite 5: Sicherheitshinweise
SICHERHEITSHINWEISE WARNUNG! Lesen Sie aufmerksam die Sicherheitshinweise und benutzen Sie das Produkt nur wie in dieser Anleitung beschrieben, damit es nicht versehentlich zu Verletzungen oder Schäden kommt. Verwendungszweck • Bei diesem Gerät handelt es sich um eine LED-Kompakt-Lichtset, mit dem sich dekorative Lichteffekte erzeugen lassen. - Seite 6 Warnung vor Verbrennung und Brand • Der zulässige Umgebungstemperaturbereich (Ta) beträgt -5 bis +45 °C. Verwenden Sie das Gerät niemals außerhalb dieses Temperaturbereichs. • Die Gehäusetemperatur (Tc) kann im Betrieb bis zu 50 °C betragen. Vermeiden Sie den Kontakt mit Personen oder Gegenständen.
-
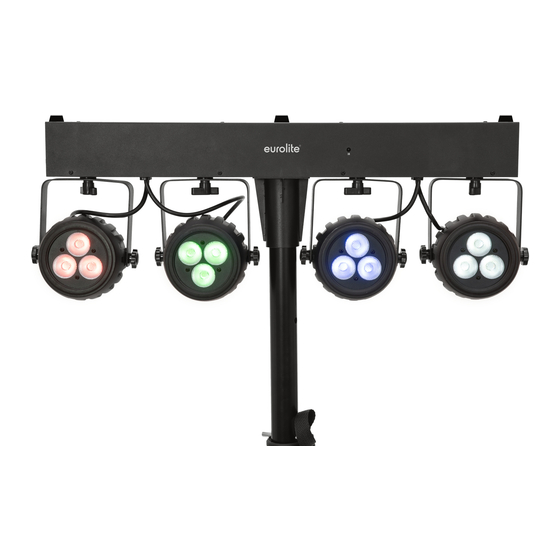
Seite 7: Gerätebeschreibung
GERÄTEBESCHREIBUNG Vorderseite (1) Gewinde für Montage einer (4) Montagebügel Traversenklammer (5) Feststellschrauben (2) Gummifüße (6) Stativhülse mit Feststellschraube (3) Infrarotsensor für die Fernbedienung (7) Spots mit RGBW-LEDs Rückseite 14 15 (8) Mikrofon (13)Netzausgang (9) LED-Anzeige mit Bedientasten (14) Sicherungshalter (10) DMX-Eingang (15) Netzanschluss (11) DMX-Ausgang (16) Fangsicherung... -
Seite 8: Installation
INSTALLATION Überkopfmontage WARNUNG! Verletzungsgefahr durch Herabfallen Über Kopf installierte Geräte können beim Herabstürzen erhebliche Verletzungen verursachen! Stellen Sie sicher, dass das Gerät sicher installiert ist und nicht herunterfallen kann. Die Montage darf nur durch eine Fachkraft erfolgen, die mit den Gefahren und den einschlägigen Vorschriften hierfür vertraut ist. -
Seite 9: Stativmontage
Stativmontage Für den mobilen Einsatz setzen Sie das Gerät über die Hülse auf ein Stativ auf und fixieren es mit der Feststellschraube. Passende Stative finden Sie im Kapitel Zubehör. Hinweise: • Bitte achten Sie beim Aufbringen der Last auf eine gleichmäßige Lastverteilung und überschreiten Sie nicht die Traglast des Stativs. -
Seite 10: Drahtlose Dmx-Übertragung Mit Quickdmx
Betriebsart. Nehmen Sie nun die notwendigen Menüeinstellungen für die jeweilige Betriebsart mit den Bedientasten vor. Auch wenn Sie das Gerät vom Stromnetz trennen, bleiben alle Einstellungen gespeichert. Das Gerät kann entweder im Standalone-Modus über das Bedienfeld und die Fernbedienung EUROLITE IR-7 oder im DMX-gesteuerten Modus über einen handelsüblichen DMX-Controller betrieben werden. -
Seite 11: Menüstruktur
Menüstruktur Anzeige Modus Funktion 19CH d001-512 19-Kanal-Modus und Startadresse 16CH d001-512 16-Kanal-Modus und Startadresse DMX-Betrieb Addr d001-512 7-Kanal-Modus und Startadresse d001-512 4-Kanal-Modus und Startadresse Farbvoreinstellungen Stat S 01 – S 19 Konstantes Leuchten in einer von 19 Farben Automatikbetrieb Auto Au01 –... - Seite 12 Drücken Sie die Taste MENU so oft, bis das Display SPEd anzeigt. Bestätigen Sie mit der Taste ENTER. Stellen Sie mit den Tasten UP und DOWN die Ablaufgeschwindigkeit des Programms von SP 01 (langsam) bis SP 09 (schnell) ein. Bestätigen Sie mit der Taste ENTER. Drücken Sie die Taste MENU so oft, bis das Display SEnS anzeigt.
-
Seite 13: Fernbedienung Ir-7
Fernbedienung IR-7 Das Gerät muss für die Ansteuerung per Fernbedienung aktiviert werden. Wählen Sie dazu im Menüpunkt InFr die Einstellung on. Halten Sie beim Betätigen einer Taste die Fernbedienung immer in Richtung des Sensors auf der Gerätevorderseite. Zwischen Fernbedienung und Sensor muss Sichtverbindung bestehen. In der DMX- und der Slave-Betriebsart sind die Funktionen der Fernbedienung deaktiviert. -
Seite 14: Dmx-Betrieb
DMX-Betrieb Anzahl der DMX-Kanäle und DMX-Startadresse einstellen Für den Betrieb über einen Controller mit DMX512-Protokoll verfügt das Gerät über 19 Steuerkanäle. Es kann aber auch in einen Modus mit 4, 7 oder 16 Kanälen umgeschaltet werden, wenn andere Funktionen benötigt werden. Damit das Gerät vom Controller angesteuert werden kann, muss außerdem die DMX- Startadresse eingestellt werden. - Seite 15 070 - 079 Cyan 080 - 089 Dunkelorange 090 - 099 Grüngelb 100 - 109 Lachs 110 - 119 Türkis 120 - 129 Hellgrün 130 - 139 Orange 140 - 149 Strohgelb 150 - 159 Lavendel 160 - 169 Hellblau 170 - 179 Dunkelblau 180 - 189...
- Seite 16 190 - 255 Alle an 000 – 009 Keine Funktion 010 – 039 Auto Programm 1 040 – 069 Auto Programm 2 070 – 099 Auto Programm 3 Auto- und 100 – 129 Auto Programm 4 Soundprogramme 130 – 159 Musikgesteuertes Programm 1 160 –...
-
Seite 17: Reinigung Und Wartung
000 – 255 Rot (0 – 100%) 000 – 255 Grün (0 – 100%) Spot 4 000 – 255 Blau (0 – 100%) 000 – 255 Weiß (0 – 100%) 000 – 009 Keine Funktion 010 – 039 Auto Programm 1 040 –... -
Seite 18: Technische Daten
TECHNISCHE DATEN Gesamtanschlusswert: 30 W Schutzklasse: Schutzart: IP20 Stromanschluss: Stromeinspeisung Kaltgeräte (M) Einbauversion Stromanschlusskabel mit Schutzkontaktstecker Stromausgang: 1 x Kaltgeräte (W) Einbauversion Sicherung: T träge, 1 A Sicherung auswechselbar LED: 12 x high-power 8 W 4in1 QCL RGBW (homogene Farbmischung) Blitzrate: 0 - 20 Hz DMX-Kanäle:... -
Seite 19: Zubehör
Zubehör EUROLITE TPC-10 Klammer, silber Best.-Nr. 59006856 EUROLITE Sicherungsseil A 3x600mm bis 5kg, silber Best.-Nr. 58010310 OMNITRONIC BS-1 EU Boxenhochständer Best.-Nr. 60004160 EUROLITE DMX Kabel XLR 3pol 3m sw Best.-Nr. 3022785H PSSO DMX Kabel XLR 3pol 3m sw Neutrik Best.-Nr. 30227810 EUROLITE IR-7 Fernbedienung Best.-Nr.