Herunterladen Inhalt Inhalt Diese Seite drucken
BFT MAXIMA ULTRA 36 Installations- Und Gebrauchsanleitung

BFT MAXIMA ULTRA 36 Installations- Und Gebrauchsanleitung

Automatische schranke

Werbung

Verfügbare Sprachen
  • DE

Verfügbare Sprachen

BARRIERA AUTOMATICA
AUTOMATIC BARRIER
BARRIÈRE AUTOMATIQUE
AUTOMATISCHE SCHRANKE
BARRERA AUTOMÁTICA
Attenzione! Leggere attentamente le "Avvertenze" all'interno! Caution! Read "Warnings" inside carefully! Attention! Veuillez lire attentivement les Avertissements qui se trouvent à l'intérieur!
Achtung! Bitte lesen Sie aufmerksam die „Hinweise" im Inneren! ¡Atención¡ Leer atentamente las "Advertencias" en el interior! Let op! Lees de "Waarschuwingen" aan de binnenkant zorgvuldig!

Werbung

Inhaltsverzeichnis
loading

Inhaltszusammenfassung für BFT MAXIMA ULTRA 36

  • Seite 1 BARRIERA AUTOMATICA AUTOMATIC BARRIER BARRIÈRE AUTOMATIQUE AUTOMATISCHE SCHRANKE BARRERA AUTOMÁTICA Attenzione! Leggere attentamente le “Avvertenze” all’interno! Caution! Read “Warnings” inside carefully! Attention! Veuillez lire attentivement les Avertissements qui se trouvent à l’intérieur! Achtung! Bitte lesen Sie aufmerksam die „Hinweise“ im Inneren! ¡Atención¡ Leer atentamente las “Advertencias” en el interior! Let op! Lees de “Waarschuwingen” aan de binnenkant zorgvuldig!
  • Seite 2: Sicurezza Generale

    1. Informazioni generali 1.1 INTRODUZIONE Leggere attentamente il libretto prima di installare il prodotto, utilizzarlo e prima di eseguire manutenzione ordinaria o straordinaria. Le indicazioni precedute da questo simbolo contengono informazioni di particolare importanza, il loro mancato rispetto può comportare la perdita della garanzia contrattuale. LE OPERAZIONI CHE EFFETTUATE IN MODO NON CORRETTO POSSONO PRESENTARE RISCHI SONO INDICATE CON I SIMBOLI: FOLGORAZIONE SCHIACCIAMENTO...
  • Seite 3: Dimensioni D'ingombro

    1. Informazioni generali / 2. Installazione 1.5 DIMENSIONI D’INGOMBRO Barriera SINISTRA Barriera DESTRA 2.1 ESEMPIO DI INSTALLAZIONE 1) Linea Monofase (2+T) x 1,5mm2 2) Fotocellula Trasmittente 2 x 0,5 mm2 3) Fotocellula Ricevente 4 x 0,5 mm2 4) Selettore a chiave 3 x 0,5 mm2 5) Ricevente 4 x 0,5 mm2...
  • Seite 4: Collegamenti Elettrici

    2. Installazione 2.3 COLLEGAMENTI ELETTRICI Aprire il coperchio e accedere all’interno della barriera per la rimozione degli sportelli Rimuovere il coperchio della centralina interna Bloccare con fascette Scheda di controllo CSB-Xtreme Consultare il manuale d’installazione e uso della centralina - 4 -...
  • Seite 5: Installazione Barra

    2. Installazione 2.4 INSTALLAZIONE BARRA L’installazione è obbligatoria nella confi gurazione XL (fornito). M14x70 Per versione STD è optional (non fornito). Ø14 IS BOOM PS Ø6x12 4.2x16 Ø6 M6x20 Ø6 Ø14 BOOM PS Ø5 M5x8 2.5 ALLINEAMENTO BARRA Portabarra regolabile Collegare elettricamente la centralina (vedi istruzioni Controllare che la barra sia...
  • Seite 6: Equilibratura Della Barra

    2. Installazione 2.6 EQUILIBRATURA DELLA BARRA Prima di eff ettuare qualsiasi intervento sull’impianto togliere l’alimentazione 24 mm elettrica. Rimuovere la vite fi ssaggio della leva EFFETTUARE SOLO CON BARRA MONTATA E POSIZIONATA IN VERTICALE 45° 22 mm Portare la barra Controllare che la barra in posizione verticale sia equilibrata a ~45°.
  • Seite 7: Manovra Manuale

    2. Installazione 2.8 MANOVRA MANUALE Prima di eff ettuare qualsiasi intervento sull’impianto togliere l’alimentazione elettrica. Sbloccaggio manuale EFFETTUARE SOLO CON BARRA MONTATA MANOVELLA DI SBLOCCO - 7 -...
  • Seite 8 3. Uso e manutenzione 3.1 SICUREZZA GENERALE • La barriera é ad uso esclusivamente veicolare, segnalare e delimitare tramite apposito cartello eventuali passaggi pedonali. • Tenere bambini, persone e cose fuori dal raggio d’azione dell’automazione, in particolare durante il funzionamento. •...
  • Seite 9: General Information

    1. General information 1.1 INTRODUCTION Carefully read the handbook before installing and using the product, and before performing routine or corrective maintenance. The directions preceded by this symbol contain information of particular importance. Non- compliance with such directions can result in the loss of the contractual warranty. THE OPERATIONS THAT, IF CARRIED OUT INCORRECTLY, CAN POSE RISKS, ARE INDICATED WITH THE SYMBOLS: ELECTROCUTION CRUSHING...
  • Seite 10: Overall Dimensions

    1. General information / 2. Installation 1.5 OVERALL DIMENSIONS LEFT barrier RIGHT barrier 2.1 INSTALLATION EXAMPLE 1) Single-phase line (2+G) x 1.5mm2 2) Transmitting Photocell 2 x 0.5 mm2 3) Receiving Photocell 4 x 0.5 mm2 4) Key selector switch 3 x 0.5 mm2 5) Receiver 4 x 0.5 mm2...
  • Seite 11: Electrical Connections

    2. Installation 2.3 ELECTRICAL CONNECTIONS Open the cover and access inside the barrier to remove of the doors Remove the cover of the internal control unit Secure with cable ties Control board CSB-Xtreme Refer to the use and installation manual of the control unit - 11 -...
  • Seite 12 2. Installation 2.4 BAR INSTALLATION Installation is mandatory in XL confi guration (supplied). M14x70 For STD version, it is optional (not supplied). Ø14 IS BOOM PS Ø6x12 4.2x16 Ø6 M6x20 Ø6 Ø14 BOOM PS Ø5 M5x8 2.5 BAR ALIGNMENT Adjustable bar holder Electrically connect the con- trol unit (see CSB-Xtreme Check that the bar is in horizontal...
  • Seite 13: Optional Items

    2. Installation 2.6 BAR BALANCING Before performing any task on the equipment, cut off the power supply. 24 mm Remove the screw which secures the lever DO IT ONLY WITH THE BAR MOUNTED AND POSITIONED VERTICALLY 45° 22 mm Bring the bar to verti- Check that the bar is balanced cal position at approximately 45°...
  • Seite 14: Manual Operation

    2. Installation 2.8 MANUAL OPERATION Before performing any task on the equipment, cut off the power supply. Manual release DO IT ONLY WHEN THE BAR IS MOUNTED RELEASE CRANK - 14 -...
  • Seite 15: Use And Maintenance

    3. Use and maintenance 3.1 GENERAL SAFETY • The barrier is intended exclusively for vehicle use. Indicate and delimit any walkways using a specifi c sign. • Keep children, people and objects out of the operating range of the automation, in particular during operation. •...
  • Seite 16: Sécurité Générale

    1. Information generales 1.1 INTRODUCTION Lire attentivement la notice avant d’installer le produit, de l’utiliser et d’eff ectuer un entretien courant ou supplémentaire. Les indications précédées de ce symbole contiennent des informations d’une grande importance. Leur non-respect peut rendre la garantie contractuelle caduque. LES OPÉRATIONS À...
  • Seite 17: Dimensions D'encombrement

    1. Information generales / 2. Installations 1.5 DIMENSIONS D’ENCOMBREMENT Barrière GAUCHE Barrière DROITE 2.1 EXEMPLE D’INSTALLATION 1) Ligne monophasée (2+T) x 1,5mm2 2) Cellule photoélectrique émettrice 2 x 0,5 mm2 3) Cellule photoélectrique réceptrice 4 x 0,5 mm2 4) Sélecteur à clé 3 x 0,5 mm2 5) Récepteur 4 x 0,5 mm2...
  • Seite 18: Branchements Électriques

    2. Installations 2.3 BRANCHEMENTS ÉLECTRIQUES Ouvrir le couvercle pour pouvoir accéder à l’intérieur de la barrière et retirer les portes Retirer le couvercle de l’unité de commande interne Bloquer avec des colliers Fiche de contrôle CSB-Xtreme Consulter le manuel d’installation et d’utilisation de l'unité...
  • Seite 19 2. Installations 2.4 INSTALLATION DE LA BARRE L’installation est obligatoire dans la confi guration XL (fournie). M14x70 Pour la version STD, elle est facultative (non fournie). Ø14 IS BOOM PS Ø6x12 4.2x16 Ø6 M6x20 Ø6 Ø14 BOOM PS Ø5 M5x8 2.5 ALIGNEMENT DE LA BARRE Porte-barre réglable Brancher l'unité...
  • Seite 20 2. Installations 2.6 ÉQUILIBRAGE DE LA BARRE Avant toute intervention sur l’installation, couper l’électricité. 24 mm Retirer la vis fi xant le levier À EFFECTUER UNIQUEMENT LORSQUE LA BARRE EST MONTÉE ET À LA VERTICALE 45° 22 mm Mettre la barre en Contrôler que la barre est position verticale équilibrée à...
  • Seite 21: Manœuvre Manuelle

    2. Installations 2.8 MANŒUVRE MANUELLE Avant toute intervention sur l’installation, couper l’électricité. Déblocage manuel NE DOIT ÊTRE EFFECTUÉ QUE LORSQUE LA BARRE EST MONTÉE MANIVELLE DE DÉBLOCAGE - 21 -...
  • Seite 22: Avertissements

    3. Utilisation et maintenance 3.1 SÉCURITÉ GÉNÉRALE • La barrière est réservée à l’usage des véhicules ; signaler et délimiter par un panneau spécial les passages éventuels de piétons. • Garder les enfants, personnes ou choses hors du rayon d'action de l’automatisme notamment pendant le fonctionnement.
  • Seite 23: Allgemeine Informationen

    1. Allgemeine informationen 1.1 EINFÜHRUNG Lesen Sie das Handbuch sorgfältig durch, bevor Sie das Produkt installieren, verwenden und gewöhnliche oder außerordentliche Wartungsarbeiten durchführen. Die mit diesem Symbol gekennzeichneten Angaben enthalten Informationen von besonderer Bedeutung, die Nichtbeachtung kann zum Verlust der vertraglichen Gewährleistung führen. OPERATIONEN, DIE BEI UNSACHGEMÄßER AUSFÜHRUNG GEFAHREN BERGEN KÖNNEN, SIND DURCH SYMBOLE GEKENNZEICHNET: STROMSCHLAG QUETSCHUNG...
  • Seite 24: Befestigung Der Struktur

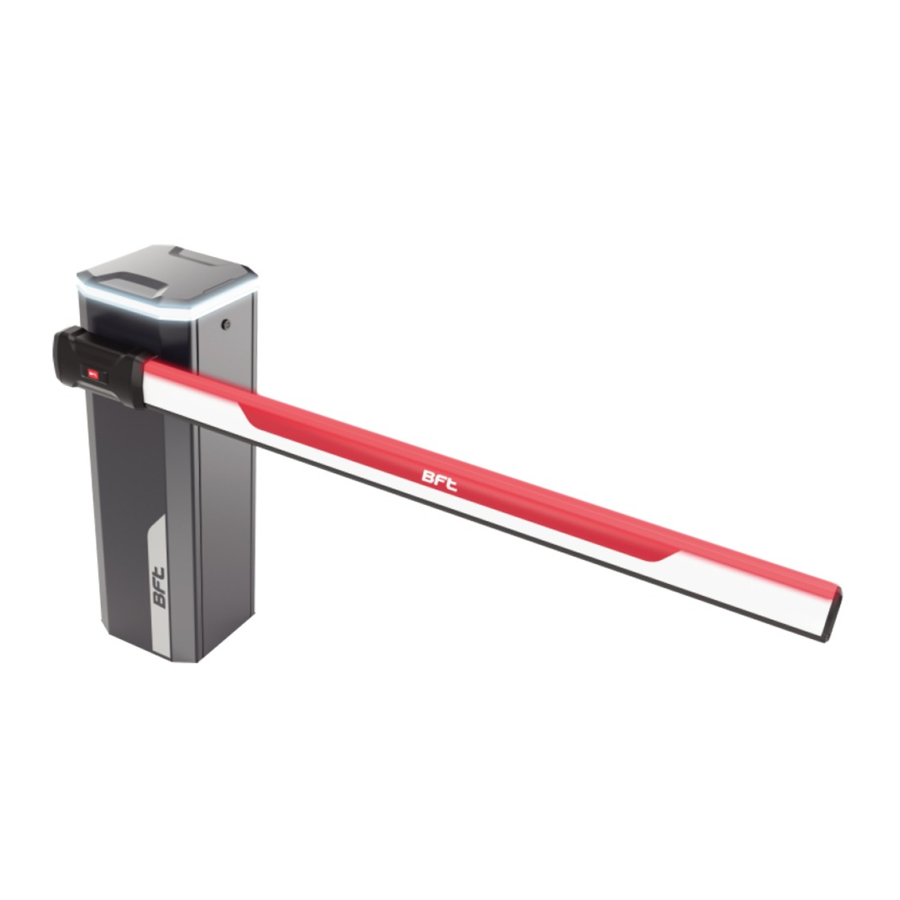
    1. Allgemeine informationen / 2. Installation 1.5 GESAMTABMESSUNGEN Schranke LINKS Schranke RECHTS 2.1 INSTALLATIONSBEISPIEL 1) Einphasige Leitung (2+T) x 1,5mm2 2) Fotozelle Sender 2 x 0,5 mm2 3) Fotozelle Empfänger 4 x 0,5 mm2 4) Schlüsselwahlschalter 3 x 0,5 mm2 5) Empfänger 4 x 0,5 mm2 5) Antenne...
  • Seite 25: Elektrische Anschlüsse

    2. Installation 2.3 ELEKTRISCHE ANSCHLÜSSE Öff nen Sie die Abdeckung und greifen Sie auf die Innenseite der Schranke zu, um die Türen zu entfernen. Entfernen Sie die Abdeckung der internen Steuereinheit. mit Kabelbindern fi xieren Steuerplatine CSB-Xtreme Beachten Sie die Montage- und Bedienungsanleitung der Steuereinheit.
  • Seite 26: Ausrichtung Des Baumes

    2. Installation 2.4 MONTAGE DES BAUMES Die Montage ist in der XL-Konfi guration (im Lieferumfang enthalten) M14x70 erforderlich. Ø14 Für die STD-Version ist sie optional (nicht im Lieferumfang enthalten). IS BOOM PS Ø6x12 4.2x16 Ø6 M6x20 Ø6 Ø14 BOOM PS Ø5 M5x8 2.5 AUSRICHTUNG DES BAUMES...
  • Seite 27: Auswuchten Des Baumes

    2. Installation 2.6 AUSWUCHTEN DES BAUMES Vor allen Arbeiten an der Anlage ist die Spannungsversorgung zu 24 mm unterbrechen. Die Befestigungsschraube des Hebels entfernen NUR MIT MONTIERTEM UND STEHENDEM BAUM DURCHFÜHREN 45° 22 mm Den Baum in vertikale Prüfen Sie, ob der Baum bei Position bringen ~45°...
  • Seite 28 2. Installation 2.8 HANDBETRIEB Vor allen Arbeiten an der Anlage ist die Spannungsversorgung zu unterbrechen. Manuelle Entriegelung NUR MIT MONTIERTEM BAUM DURCHFÜHREN ENTRIEGELUNGSKURBEL - 28 -...
  • Seite 29: Warnhinweise

    3. Gebrauchs und Wartungsanleitungen 3.1 ALLGEMEINE SICHERHEIT • Die Schranke ist nur für den Fahrzeuggebrauch bestimmt, signalisieren und begrenzen Sie Fußgängerübergänge durch ein spezielles Schild. • Halten Sie Kinder, Personen und Gegenstände außerhalb der Reichweite der Automatisierung, insbesondere während des Betriebs. •...
  • Seite 30: Informaciones Generales

    1. Informaciones generales 1.1 INTRODUCCIÓN Leer atentamente el manual antes de instalar el producto, utilizarlo y antes de realizar cualquier tarea de mantenimiento ordinario o extraordinario. Las indicaciones precedidas de este símbolo contienen información de especial importancia, su incumplimiento puede implicar la pérdida de la garantía contractual. LAS OPERACIONES QUE EFECTUADAS DE MODO INCORRECTO PUEDEN PRESENTAR RIESGOS SE INDICAN CON LOS SÍMBOLOS: ELECTROCUCIÓN APLASTAMIENTO...
  • Seite 31: Ejemplo De Instalación

    1. Informaciones generales / 2. Instalaciòn 1.5 DIMENSIONES Barrera IZQUIERDA Barrera DERECHA 2.1 EJEMPLO DE INSTALACIÓN 1) Línea Monofásica (2+T) x 1,5mm2 2) Célula fotoeléctrica de transmisión 2 x 0,5 mm2 3) Célula fotoeléctrica de recepción 4 x 0,5 mm2 4) Selector de llave 3 x 0,5 mm2 5) Receptor...
  • Seite 32: Conexiones Eléctricas

    2. Instalaciòn 2.3 CONEXIONES ELÉCTRICAS Abrir la tapa y acceder al interior de la barrera para retirar las portezuelas Retirar la tapa de la centralita interna Bloquear con abrazaderas Tarjeta de control CSB-Xtreme Consultar el manual de instalación y uso de la centralita - 32 -...
  • Seite 33: Instalación De La Barra

    2. Instalaciòn 2.4 INSTALACIÓN DE LA BARRA La instalación es obligatoria en la confi guración XL (incluido). M14x70 Para la versión STD es opcional (no incluido). Ø14 IS BOOM PS Ø6x12 4.2x16 Ø6 M6x20 Ø6 Ø14 BOOM PS Ø5 M5x8 2.5 ALINEACIÓN DE LA BARRA Portabarra regulable Conectar la centralita a la...
  • Seite 34: Equilibrado De La Barra

    2. Instalaciòn 2.6 EQUILIBRADO DE LA BARRA Antes de efectuar cualquier intervención en la instalación, cortar la 24 mm alimentación eléctrica. Retirar el tornillo de fi jación de la palanca EFECTUAR SOLO CON LA BARRA MONTA- DA Y POSICIONADA EN VERTICAL 45°...
  • Seite 35: Maniobra Manual

    2. Instalaciòn 2.8 MANIOBRA MANUAL Antes de efectuar cualquier intervención en la instalación, cortar la alimentación eléctrica. Desbloqueo manual EFECTUAR SOLO CON LA BARRA MONTADA MANIVELA DE DESBLOQUEO - 35 -...
  • Seite 36 3. Uso y mantenimiento 3.1 SEGURIDAD GENERAL • La barrera es de uso exclusivamente para vehículos, señalar y delimitar mediante el correspondiente cartel posibles pasos peatonales. • Mantener niños, personas y cosas fuera del radio de acción de la automación, en concreto durante el funcionamiento. •...
  • Seite 37 MAXIMA ULTRA 36 EQUILIBRATURA DELLA BARRA • BALANCING THE ARM • EQUILIBRAGE DE LA LISSE • AUSBILANCIERUNG DES BAUMES • EQUILIBRADO DE LA BARRA BOOM PS BOOM PS Non appesantire la barra applicando altri accessori Do not weigh the arm down by applying other accessories Ne pas alourdire la lisse en y appliqant d’autres accessoires...
  • Seite 38: Registro Di Manutenzione

    REGISTRO DI MANUTENZIONE MAINTENANCE LOG REGISTRE DES OPÉRATIONS D’ENTRETIEN INSTANDHALTUNGSPLAN RESISTRO DE MANTENIMIENTO Dati impianto / Installation data Installatore Installer Cliente Customer Matricola Serial number Data installazione Installation date Data attivazione Activation date Luogo Location Dati manutenzione / Maintenance date Data •...
  • Seite 39 Data • Date Descrizione intervento • Intervention description Firma • Signature Tecnico • Technician Cliente • Customer Tecnico • Technician Cliente • Customer Tecnico • Technician Cliente • Customer Tecnico • Technician Cliente • Customer Tecnico • Technician Cliente • Customer Tecnico •...
  • Seite 40 INSTALLATORE INSTALLER INSTALLATEUR INSTALLATEUR INSTALATOR DATA DATE DATE DATUM FECHA ITALY...

Diese Anleitung auch für:

Maxima ultra 36xl

Inhaltsverzeichnis