Herunterladen Inhalt Inhalt Diese Seite drucken

Werbung

Verfügbare Sprachen
  • DE

Verfügbare Sprachen

  • DEUTSCH, seite 10
User Manual
MODEL:X1 Pro
True Wireless Stereo Earphones

Werbung

Inhaltsverzeichnis
loading

Inhaltszusammenfassung für Mixcder X1 Pro
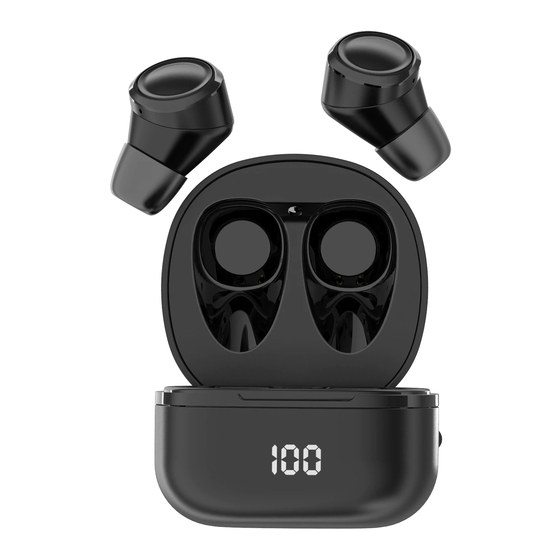
  • Seite 1 User Manual MODEL:X1 Pro True Wireless Stereo Earphones...
  • Seite 2 NOTE: The UV Sterilization light will turn on automatically when the charging case closed, and turn off when the charging case opened. 1. Overview Eartip (L size) Eartip (M size) Eartip (S size) Indicator light/ UV sterilizer Microphone Charging contacts Power display Charging jack Wireless charge...
  • Seite 3: Initial Use

    (more details as per the following instructions). 3.TWS Pairing and Connection with Cell Phone Open lid to activate the earbuds automatically, both earbuds will automatically be ready to pair. Search “Mixcder X1 Pro” in cellphone and connect them. EN-2...
  • Seite 4: Restore The Factory Setting (In Case Of Tws Pairing Failure)

    & purple lights turn off. Put the earbuds into charging case the power on the earbuds, they will automatically be ready to pair. Search “Mixcder X1 Pro” in cellphone and connect them. 5.Wearing earbuds Put the earbuds as per the microphone upwards into ears (as above photo shows).
  • Seite 5 6.Charging Charge the earbuds Put both earbuds into the charging case (since Pins are contacted well), the earbuds will be automatically power off and be charged when the lid is closed. Charge the charging case Note: check the battery digital display after connect with USB cable.
  • Seite 6 7.Functions Charge the earbuds Option 1: open lid of the charging case, the earbuds will be automatically power on. Option 2: press and hold the MFB button for 3 seconds. Long press for 3 seconds Power off Option 1: put the earbuds into the charging case and close the lid, the earbuds will be automatically power off.
  • Seite 7 Reject call Press the MFB button for 1-2 seconds to reject the incoming call. Long press for 1-2 seconds Automatically connect with last device Open the lid, the earbuds will automatically connect with the device which has been latest connected. Next track When playing music, press and hold MFB button of the right earbud for 2 seconds to switch to next track.
  • Seite 8 Last track When playing music, press and hold MFB button of the left earbud for 2 seconds to switch to next track. Keep press 2S Play/Stop When playing music, press MFB button of either earbud to play/stop. Single press Volume down When playing music, double press MFB button of the left earbud to turn down the volume.
  • Seite 9: Product Specifications

    When playing music, double press MFB button of the right earbud to turn up the volume. Double press 8. Product specifications Model: Mixcder X1 Pro Bluetooth version: 5.1 Bluetooth profiles: HSP, HFP, A2DP, AVRCP Frequency: 2.4GHz-2.48GHz Charge current of earbuds: 40mA Charge time: about 1.5 hours...
  • Seite 10: Übersicht

    HINWEIS: Die UV-Sterilisationslampe leuchtet sobald der Ladebehälter geschlossen wird, sie erlischt, sobald der Ladebehälter geöffnet ist. 1. Übersicht Ohrstöpsel (L) Ohrstöpsel (M) Ohrstöpsel (S) Meldeleuchte/ UV-Sterilisator Mikrofon Ladekontakte Netzanzeige Ladedock Kabelloses Aufladen Die Ohrstöpsel der Größe „M“ (Medium) sind für die meisten Menschen geeignet.
  • Seite 11: Erstmalige Verwendung

    Anleitungen). 3.TWS-Kopplung und Verbindung mit dem Mobiltelefon Bei geöffnetem Deckel werden die Ohrstöpsel automatisch aktiviert und die beiden Ohrstöpsel sind bereit zum Koppeln. Suchen Sie auf dem Mobiltelefon nach “Mixcder X1 Pro” und stellen Sie die Verbindung her. DE-2...
  • Seite 12: Tragen Der Ohrstöpsel

    Leuchten erlöschen. Legen Sie die Ohrstöpsel in den Ladebehälter, um die Ohrstöpsel aufzuladen. Sie sind automatisch für das Koppeln bereit. Suchen Sie auf dem Mobiltelefon nach “Mixcder X1 Pro” und stellen Sie die Verbindung her. 5.Tragen der Ohrstöpsel Setzen Sie die Ohrstöpsel entsprechend dem Mikrofon nach oben in die Ohren ein (siehe Abbildung).
  • Seite 13 6.Aufladen Aufladen der Ohrstöpsel Legen sie Ohrstöpsel in den Ladebehälter (die Pins müssen guten Kontakt haben). Die Ohrstöpsel werden automatisch ausgeschaltet und aufgeladen, während der Deckel geschlossen ist. Aufladen des Ladebehälters Hinweis: Stellen Sie die Verbindung über das USB-Kabel her und prüfen Sie die digitale Akkuanzeige.
  • Seite 14: Funktionen

    7.Funktionen Aufladen der Ohrstöpsel Option 1: Öffnen Sie den Ladebehälter, die Ohrstöpsel werden automatisch eingeschaltet. Option 2: Halten sie die MFB-Taste drei (3) Sekunden gedrückt. 3 Sekunden lang drücken Ausschalten Option 1: Legen Sie die Ohrstöpsel in den Ladebehälter und schließen Sie den Deckel.
  • Seite 15 Gespräch ablehnen Halten Sie die MFB-Taste 1-2 Sekunden gedrückt, um das eingehende Gespräch abzulehnen. 1-2 Sekunden lang drücken Automatische Verbindung mit dem letzten Gerät Öffnen Sie den Deckel. Die Ohrstöpsel verbinden sich automatisch mit dem Gerät, mit dem sie zuletzt verbunden waren. Nächster Titel Halten Sie während der Musikwiedergabe die MFB-Taste des rechten Ohrstöpsels für zwei (2) Sekunden gedrückt, um zum...
  • Seite 16 Vorheriger Titel Halten Sie während der Musikwiedergabe die MFB-Taste des linken Ohrstöpsels für zwei (2) Sekunden gedrückt, um zum vorherigen Titel zu wechseln. 2 Sek. gedrückt halten Wiedergabe/Stopp Halten Sie während der Musikwiedergabe die MFB-Taste eines Ohrstöpsels für die Wiedergabe/Pause gedrückt. Einmal drücken Lautstärke verringern Für die Verringerung der Lautstärke drücken Sie während der...
  • Seite 17 Lautstärke erhöhen Für die Erhöhung der Lautstärke drücken Sie während der Musikwiedergabe zweimal die rechte MFB-Taste. Zweimal drücken 8. Produktdaten Modell: Mixcder X1 Pro Bluetooth-Version: 5.1 Bluetooth-Profile: HSP, HFP, A2DP, AVRCP Frequenz: 2,4 GHz-2,48 GHz Ohrstöpsel-Ladestrom: 40mA Ladedauer: circa 1.5 Stunden Ladebehälter-Eingangsspannung: DC 5V/500mA...
  • Seite 18: Основные Компоненты

    ПРИМЕЧАНИЕ: УФ-стерилизация включается автоматически, когда зарядный футляр закрыт, и выключается, когда зарядный футляр открыт. 1. Основные компоненты Вкладыш (L) Вкладыш (M) Вкладыш (S) Многофункц Индикатор/ иональная УФ-стерилизатор Микрофон кнопка(MFB) Зарядные контакты Дисплей зарядки Зарядный чехол Беспроводная зарядка Ушные вкладыши среднего размера (M) подходят для большинства...
  • Seite 19: Первое Использование

    USB Type-C (более подробно см. в инструкциях ниже). 3. Сопряжение беспроводных наушников и подключение к сотовому телефону Откройте крышку, чтобы автоматически включить наушники, оба наушника будут готовы к сопряжению. Найдите в мобильном телефоне "Mixcder X1 Pro" в списке устройств для подключения и подключите устройство. RU-2...
  • Seite 20 чего красный и фиолетовый индикаторы погаснут. Поместите наушники в зарядный чехол для включения питания, они автоматически будут готовы к сопряжению. Найдите в мобильном телефоне "Mixcder X1 Pro" в списке устройств для подключения, и подключите устройство. 5. Ношение наушников-вкладышей Вставьте наушники-вкладыши в уши таким образом, чтобы...
  • Seite 21 6.Зарядка Зарядка наушников Поместите оба наушника в зарядный футляр, (при надежном касании контактов) наушники автоматически выключатся, и после закрытия крышки футляра начнется процесс их зарядки. Зарядка футляра Примечание: Проверьте цифровой дисплей зарядки батареи после подключения футляра к зарядному устройству с помощью кабеля...
  • Seite 22 7. Функции Зарядка наушников Вариант 1: Откройте крышку зарядного футляра, наушники автоматически включатся. Вариант 2: Нажмите и удерживайте кнопку MFB в течение 3 секунд. Длительное нажатие в течение 3 секунд Ausschalten Вариант 1: Поместите наушники в зарядный футляр и закройте крышку, наушники автоматически выключатся. Вариант...
  • Seite 23 Отклонить вызов Чтобы отклонить входящий вызов, нажмите кнопку MFB в течение 1 секунды. Длительное нажатие 1-2 секунды Автоматическое подключение к последнему устройству Откройте крышку, наушники-вкладыши автоматически подключатся к устройству, которое было подключено в последний раз. Следующий трек Во время воспроизведения музыки нажмите и удерживайте кнопку...
  • Seite 24 Последний трек Во время воспроизведения музыки нажмите и удерживайте кнопку MFB на левом наушнике в течение 2 секунд для переключения на следующую дорожку. Долгое нажатие 2 сек Воспроизведение/остановка Во время воспроизведения музыки нажмите кнопку MFB на любом наушнике, чтобы начать или остановить воспроизведение. Нажмите...
  • Seite 25: Технические Характеристики

    Во время воспроизведения музыки дважды нажмите кнопку MFB на правом наушнике, чтобы увеличить громкость. Нажмите два раза 8. Технические характеристики Модель: Mixcder X1 Pro Версия Bluetooth: 5.1 Профили Bluetooth: HSP, HFP, A2DP, AVRCP Частотный диапазон: 2,4 ГГц - 2,48 ГГц...
  • Seite 26: Vue D'ensemble

    NOTE : La lumière de stérilisation UV s'allume automatiquement lorsque le,boîtier de charge est fermé et s'éteint lorsque le boîtier de charge est ouvert. 1. Vue d'ensemble Embouts (L) Embouts (M) Embouts (S) Voyant lumineux/ Stérilisateur à UV microphone Contacts de charge Affichage de marche Station de recharge Recharge sans fil...
  • Seite 27: Utilisation Initiale

    3. Appairage TWS et connexion à un téléphone portable Ouvrez le couvercle pour activer automatiquement les écouteurs. Les deux seront automatiquement prêts à être appairés. Recherchez «Mixcder X1 Pro» dans le téléphone portable et connectez-les. FR-2...
  • Seite 28 écouteurs s’appairent automatiquement et les voyants rouge et violet s'éteignent. Mettez les écouteurs dans le boîtier de charge, les écouteurs sont sous tension, ils seront automatiquement prêts à être appairés. Recherchez «Mixcder X1 Pro» dans le téléphone portable et connectez-les. 5. Port des écouteurs Placez les écouteurs avec le microphone vers le haut dans les...
  • Seite 29: Mise En Charge

    6.Mise en charge Charge des écouteurs Placez les deux écouteurs dans le boîtier de charge (jusqu’à ce que les broches soient bien en contact), ils seront automatiquement mis hors tension et chargés lorsque le couvercle sera fermé. Charger le boîtier de charge Remarque: vérifiez l'affichage numérique de la batterie après la connexion avec un câble USB.
  • Seite 30 7. Fonctions Charge des écouteurs Option 1 : ouvrez le couvercle du boîtier de charge, les écouteurs seront automatiquement mis sous tension. Option 2 : maintenez le bouton MFB enfoncé pendant 3 secondes. Appui long pendant 3 secondes Mise hors tension Option 1 : placez les écouteurs dans le boîtier de charge et fermez le couvercle, les écouteurs s'éteindront automatiquement.
  • Seite 31 Refus d’appel Appuyez et maintenez la touche MFB pendant 1-2 secondes pour refuser l'appel entrant. Appuyez longuement pendant 1 à 2 secondes Connexion automatique au dernier appareil Ouvrez couvercle, écouteurs connecteront automatiquement à l'appareil qui a été connecté en dernier. Piste suivante Lors de la lecture de musique, maintenez le bouton MFB de l'écouteur droit enfoncé...
  • Seite 32 Dernière piste Lors de la lecture de musique, maintenez le bouton MFB de l'écouteur gauche enfoncé pendant 2 secondes pour passer à la piste suivante. Continuez d'appuyer pendant 2s Lecture/Arrêt Lors de la lecture de musique, appuyez sur le bouton MFB de l'un des écouteurs pour lire/arrêter.
  • Seite 33: Caractéristiques Du Produit

    Lors de la lecture de musique, appuyez deux fois sur le bouton MFB de l'écouteur droit pour augmenter le volume. Appui double 8. Caractéristiques du produit Modèle : Mixcder X1 Pro Version Bluetooth : 5.1 Profils Bluetooth : HSP/HFP/A2DP/AVRCP Fréquence : 2,4 GHz - 2,48GHz Courant de charge des écouteurs : 40mA...
  • Seite 34: Información General

    NOTA: La luz de esterilización UV se enciende automáticamente al cerrar el estuche de carga y se apaga al abrirlo. 1. Información general Almohadilla de Almohadilla de Almohadilla de silicona (L) silicona (M) silicona (S) Indicador luminoso/ Esterilizador UV Micrófono Contactos de carga Pantalla digital...
  • Seite 35: Primer Uso

    C (lea las instrucciones a continuación para más información). 3. Emparejamiento TWS y conexión con el teléfono móvil Al abrir la tapa, los auriculares se encenderán automáticamente y estarán listos para emparejarse. Busque “Mixcder X1 Pro” en el teléfono móvil y conéctelos. ES-2...
  • Seite 36: Colocación De Los Auriculares

    Introduzca los auriculares en el estuche de carga y, cuando se enciendan, estarán listos para emparejarse. Busque “Mixcder X1 Pro” en el teléfono móvil y conéctelos. 5. Colocación de los auriculares Introduzca los auriculares en los oídos de manera que el...
  • Seite 37 6.Cargando Carga de los auriculares Introduzca ambos auriculares en el estuche de carga (de manera que estén en contacto con los pines): los auriculares se apagarán automáticamente y se cargarán cuando se cierre la tapa. Carga del estuche de carga Nota: Compruebe la pantalla digital de la batería después de conectar el cable USB.
  • Seite 38 7. Funciones Encendido de los auriculares Opción 1: Abra la tapa del estuche de carga; los auriculares se encenderán automáticamente. Opción 2: Mantenga pulsado el botón MFB durante 3 segundos. Mantenga pulsado durante 3 segundos Apagado Opción 1: Introduzca los auriculares en el estuche de carga y cierre la tapa;...
  • Seite 39 Rechazar una llamada Mantenga pulsado el botón MFB durante 1-2 segundos para rechazar una llamada entrante. Mantenga pulsado durante 1-2 segundos Conectarse automáticamente con el último dispositivo Abra la tapa, los auriculares se conectarán automáticamente con el último dispositivo con el que se conectaron. Pista siguiente Durante la reproducción de música, mantenga pulsado el botón MFB del auricular derecho durante 2 segundos para ir a la pista...
  • Seite 40 Pista anterior Durante la reproducción de música, mantenga pulsado el botón MFB del auricular izquierdo durante 2 segundos para ir a la pista anterior. Mantener pulsado 2s Reproducir/Detener Durante la reproducción de música, pulse el botón MFB de cualquiera de los auriculares para reproducir/detener la música.
  • Seite 41: Especificaciones Del Producto

    Durante la reproducción de música, pulse dos veces el botón MFB del auricular derecho para subir el volumen. Pulsar dos veces 8. Especificaciones del producto Modelo: Mixcder X1 Pro Versión de Bluetooth: 5.1 Perfiles de Bluetooth: HSP, HFP, A2DP, AVRCP Frecuencia: 2,4 GHz-2,48 GHz Corriente de carga de los auriculares: 40mA Tiempo de carga: aprox.
  • Seite 42 NOTA: luce sterilizzazione accenderà automaticamente quando la,custodia di ricarica viene chiusa e si spegne quando la custodia di ricarica viene aperta. 1. Panoramica Punta Punta Punta auricolare(L) auricolare(M) auricolare(S) Sterilizzatore UV Spia/Microfono Contatti di ricarica Display di alimentazione Dock di ricarica Caricamento Wireless Le punte auricolari di media grandezza (M) sono adatte alla maggior parte delle persone.
  • Seite 43: Uso Iniziale

    3. Associazione TWS e collegamento con il telefono cellulare Aprire il coperchio per attivare automaticamente gli auricolari, entrambi gli auricolari saranno automaticamente pronti per l'associazione. Cercare “Mixcder X1 Pro” nel telefono cellulare ed eseguire la connessione. IT-2...
  • Seite 44 Mettere gli auricolari nella custodia di ricarica. Quando gli auricolari ricevono l'alimentazione, saranno automaticamente pronti per l'associazione. Cercare “Mixcder X1 Pro” nel telefono cellulare ed eseguire la connessione. 5. Indossare gli auricolari Mettere gli auricolari nelle orecchie con il microfono rivolto verso l'alto (come indicato nella foto qui sopra).
  • Seite 45 6.Ricarica Sostituire gli auricolari Mettere entrambi gli auricolari nella custodia di ricarica (i pin devono fare contatto); gli auricolari si spegneranno automaticamente e si caricheranno quando il coperchio sarà chiuso. Caricare la custodia di ricarica Nota: Controllare il display digitale della batteria dopo il collegamento con il cavo USB.
  • Seite 46 7. Funzioni Sostituire gli auricolari Opzione 1: aprire il coperchio della custodia di ricarica, gli auricolari si accenderanno automaticamente. Opzione 2: tenere premuto il tasto MFB per 3 secondi. Premere a lungo per 3 secondi Spegnimento Opzione 1: mettere gli auricolari nella custodia di ricarica e chiudere il coperchio, gli auricolari si spegneranno automaticamente.
  • Seite 47 Rifiutare una chiamata Premere il tasto MFB per 1-2 secondi per rifiutare la chiamata in arrivo. Premere a lungo per 1-2 secondi Collegamento automatico con l'ultimo dispositivo Aprire il coperchio, gli auricolari si collegheranno automaticamente con il dispositivo che è stato collegato per ultimo. Traccia successiva Durante la riproduzione di musica, tenere premuto il pulsante MFB dell'auricolare destro per 2 secondi per passare alla traccia...
  • Seite 48 Ultima traccia Durante la riproduzione di musica, tenere premuto il pulsante MFB dell'auricolare sinistro per 2 secondi per passare alla traccia successiva. Continuare a tenere premuto per 2S Play/Stop Durante la riproduzione di musica, premere il pulsante MFB di uno dei due auricolari per riprodurre/fermare la riproduzione.
  • Seite 49: Specifiche Tecniche Del Prodotto

    Durante la riproduzione di musica, premere due volte il pulsante MFB dell'auricolare destro per alzare il volume. Doppia pressione 8. Specifiche tecniche del prodotto Modello: Mixcder X1 Pro Versione Bluetooth: 5.1 Profili Bluetooth: HSP, HFP, A2DP, AVRCP Frequenza: 2.4GHz-2.48GHz Corrente di ricarica degli auricolari: 40mA Tempo di ricarica: indicativamente 1.5 ore...
  • Seite 50 注意 : 充電ケースを閉じると殺菌用の紫外線ライ トが自動的にオンに なります, 充電ケースを開く とオフになります。 1. 概要 イヤーチップ イヤーチップ イヤーチップ インジケータ 紫外線殺菌 マルチ機 ライ ト/マイク ライ ト 能ボタン 連絡先の充電 充電ドック 電源表示 ワイヤレス充電部 ほとんどの方はMサイズのイヤーチップでご満足いただけるはずで す。 Mサイズのイヤーチップ着用が推奨されます。 JP-1...
  • Seite 51 2. はじめての使用 蓋を開けるとイヤーバッ ドは自動的にオンになります。 注意 : イヤーバッ ドを充電ケースに入れて蓋を閉じると、 充電されま す。 イヤーバッ ドが充電されない場合、 充電ケースにUSB Type-Cケー ブルを接続してください (詳細は後ほどご説明いたします) 。 3. TWSのペアリングとスマートフォンとの接続 蓋を開けるとイヤーバッ ドは自動的にオンになり、 ペアリング可能な 状態になります。 スマートフォンで 「Mixcder X1 Pro」 を検索して接続 してください。 JP-2...
  • Seite 52 4. 工場出荷状態へのリセッ ト (TWSをペアリングできない場合) 両方のイヤーバッ ドのマルチ機能ボタンを8秒間推し続けると、 電源 がオフになります。 インジケータライトが赤色と紫色の交互に点滅し 始めるまで、 指を離さないでください。 この時点で、 両方のイヤーバッ ドは自動的に互いとペアリングし、 赤色と紫色のライトは消灯します。 イヤーバッ ドを充電ケースに入れると自動的に電源がオンになり、 ペ アリング可能な状態に入ります。 スマートフォンで 「Mixcder X1 Pro」 を 検索して接続してください。 5. イヤーバッ ドの装着 マイクが耳に挿入されるように、 イヤーバッ ドを装着してください (上の図を参照) 。 JP-3...
  • Seite 53 6.充電 イヤーバッ ドの充電 両方のイヤーバッ ドを充電ケースに入れます (ピンがしっかりと接続 されるようにしてください) 。 蓋を閉じると、 イヤーバッ ドは自動的にオ フになり、 充電されます。 充電用ケースの充電 注意 : USBケーブルと接続した後にバッテリーのデジタル表示を確認 してください。 表示されない場合、 接続し直して電源が通電しているか 確かめてください。 ワイヤレス充電も可能です。 JP-4...
  • Seite 54 7. 機能 イヤーバッ ドの充電 方法1 : 充電ケースの蓋を開けると、 イヤーバッ ドは自動的にオンにな ります。 方法2 : マルチ機能ボタンを3秒間押し続けます。 3秒間長押し 電源オフ 方法1 : イヤーバッ ドを充電ケースに入れて蓋を閉じると、 イヤーバッ ドは自動的にオフになります。 方法2 : マルチ機能ボタンを3秒間押し続けます。 3秒間長押し 着信応答/拒否 着信時にマルチ機能ボタンを押すと通話できます。 もう一度押すと 通話を終了します。 一回押す JP-5...
  • Seite 55 通話拒否 通話を拒否する場合はマルチ機能ボタンを1〜2秒間押し続けます。 1〜2秒長押し 最後に接続したデバイスと自動的に接続 蓋を開けると、 イヤーバッ ドは最後に接続したデバイスと自動的に接 続します。 次の曲 音楽を鑑賞中、 右イヤーバッ ドのマルチ機能ボタンを2秒間押し続け ると次の曲へ進みます。 2秒間押し続ける JP-6...
  • Seite 56 前の曲 音楽を鑑賞中、 左イヤーバッドのマルチ機能ボタンを2秒間押し続 けると前の曲へ戻ります。 2秒間押し続ける 再生/停止 音楽の鑑賞時に、 どちらかのイヤーバッ ドのマルチ機能ボタンを押すと 再生または停止します。 一回押す ボリ ュームを下げる 音楽を鑑賞中、 左イヤーバッドのマルチ機能ボタンを二回素早く押 すとボリュームが下がります。 二回押す JP-7...
  • Seite 57 ボリ ュームを上げる 音楽を鑑賞中、 右イヤーバッドのマルチ機能ボタンを二回素早く押 すとボリュームが上がります。 二回押す 8. 機能 モデル : Mixcder X1 Pro Bluetoothバージョン : 5.1 Bluetoothプロファイル : HSP、 HFP、 A2DP、 AVRCP 周波数応答 : 2.4GHz〜2.48GHz イヤーバッ ドの充電電流 : 40mA フル充電時間 : 約1.5時間 充電ケースの入力電圧 : DC 5V/500mA 充電ケースの出力電圧 : DC 5V 送信電力...
  • Seite 58 注: 当关闭充电盒时, 将自动打开UV灭菌灯; 当打开充电盒时, 将关闭UV灭菌灯。 1. 概述 耳塞(大号) 耳塞(中号) 耳塞(小号) UV灭菌器 指示灯/耳麦 充电触点 电源显示 充电座 无线充电 中号 (M) 耳塞适合大多数人,建议佩戴中号 (M) 耳塞。 CN-1...
  • Seite 59 2. 首次使用 一旦打开盖子, 就自动启动耳机。 备注: 将耳机均放入充电盒中并盖上盖子后, 将会对耳机进行充电。 如 果无法对耳机充电, 请同时插入C型线对充电盒充电 (更多详情见以下 说明) 。 3.TWS与手机配对和连接 打开盖子, 以自动启动耳机, 耳机均将准备自动配对。 在手机中搜索 “Mixcder X1 Pro” , 并将其连接。 CN-2...
  • Seite 60 4.恢复出厂设置 (如果TWS配对失败) 在关机模式下, 同时按住耳机的MFB按钮8秒钟。 请勿松开手指, 直到 红色和紫色灯交替闪烁。 此时, 耳机均将彼此自动配对, 红色灯和紫色 灯熄灭。 将耳机放入充电盒中。 打开耳机电源, 耳机将准备自动配对。 在手机中搜索 “Mixcder X1 Pro” , 并将其连接。 5.耳机佩戴 备 否 将耳麦向上放入耳朵中 (如上图所示) 。 CN-3...
  • Seite 61 6.充电 对耳机充电 将耳机均放入充电盒中 (保证插头接触良好) , 耳机电源将自动关闭, 当关闭盖子时, 耳机充电。 对充电盒充电 备注: 与USB线连接后, 检查电池数字显示。 如果无显示, 请检查其是 否连接正确和通电。 无线充电也可用。 CN-4...
  • Seite 62 7.功能 对耳机充电 选项1: 打开充电盒的盖子, 将自动打开耳机电源。 选项2: 按住MFB按钮3秒钟。 长按3秒 电源关闭 选项1: 将耳机放入充电盒中并关闭盖子, 将自动关闭耳机电源。 选项2: 按住MFB按钮3秒钟。 长按3秒 接听/拒接来电 按一次MFB按钮接听来电, 然后再按一次挂断。 单击1次 CN-5...
  • Seite 63 拒接来电 按住MFB按钮1~2秒钟拒接来电。 长按1-2秒 自动与最后一个装置连接 打开盖子, 耳机将自动与最后连接的装置连接。 下一个曲目 当播放音乐时, 按住右耳机的MFB按钮2秒钟来切换到下一个曲目。 按住2S CN-6...
  • Seite 64 最后一个曲目 当播放音乐时, 按住左耳机的MFB按钮2秒钟来切换到下一个曲目。 按住2S 播放/停止 当播放音乐时, 按任一耳机的MFB按钮来播放/停止。 单击1次 降低音量 当播放音乐时, 双击左耳机的MFB按钮来调低音量。 双击 CN-7...
  • Seite 65 调高音量 当播放音乐时, 双击右耳机的MFB按钮来调高音量。 双击 8. 产品规范 型号: Mixcder X1 Pro 蓝牙版本: 5.1 蓝牙配置文件: HSP、 HFP、 A2DP、 AVRCP 频率: 2.4GHz~2.48GHz 耳机充电电流: 40mA 充电时间: 约1.5小时 充电盒输入电压: DC 5V/500mA 充电盒输出电压: DC 5V 传输功率: II级 无线范围: >10m 通话时间: 约10小时 播放时间: 约10小时 阻抗: 16Ω 耳麦: 硅耳麦...
  • Seite 66 警告: 请勿将电池投入火中 产品中有毒有害物质或元素的名称及含量 电池浸水后禁止使用 请勿拆解及损伤电池 注意事项 ·切勿摔碰、 挤压、 自行拆卸或刺穿本产品。 ·切勿将本产品置于高温、 潮湿环境下。 ·切勿将本产品投入火中、 水中或含有腐蚀性的液体里。 ·请勿以高过等级之方式将电池充电。 ·充电时温度请保持在0℃~35℃之间。 ·充电时请勿将本产品放在易燃物质上 (床和毛毯) 。 ·如自行拆卸更换内置电池, 可能存在爆炸危险。 ·避免音量过大或长时间佩戴耳机, 以免听力受损。 有毒有害物质或元素 铅 汞 镉 六价铬 多溴联苯 多溴二苯醚 部件名称 (Pb) (Hg) (Cd) (Cr6+) (PBB) (PBDE) 电路板组件 × ○ ○ ○...
  • Seite 68 保修卡 保修期: 免费服务: 以下情况恕不免费维修: 客户服务资料 本产品的品质保证期限以产品购买日起12个月内有效。 在产品保修期内,凡属产品本身质量引起的故障,请用户凭 此保修卡和购货凭证与经销商取得联系,以享受免费保修。 1.无保修卡或损坏产品标签。 2.自行拆解造成的损坏。 3.因进水或跌落而造成的故障及人为机械损坏。 4.因不可抗力造成的故障或损坏。 客户姓名: 联系地址: 联系电话: 产品名称: 产品型号: 购买日期: 销 售 商: S / N 号: 维修记录:...
  • Seite 69: Warranty Card

    WARRANTY CARD ATTENTIONS: - Please read the return procedures and warranty policy carefully on www.ausdom.com before sending items back to point-of-purchase. - Please fill the card and send it to your reseller together with the product if your product's warranty is valid. S.N: Date of Purchase: Product Model:...
  • Seite 70 FCC Caution. This device complies with part 15 of the FCC Rules. Operation is subject to the following two conditions: (1) This device may not cause harmful interference, and (2) this device must accept any interference received, including interference that may cause undesired operation. Any Changes or modifications not expressly approved by the party responsible for compliance could void the user's authority to operate the equipment.
  • Seite 71 For more information, please visit our official website www.mixcder.com Your valuable comments and suggestions on improving Mixcder products are welcomed! support@mixcder.com www.mixcder.com...

Inhaltsverzeichnis