Alphacool ES 4U ServerRack Bedienungsanleitung
Inhaltsverzeichnis
Quicklinks
Inhaltsverzeichnis

Verwandte Anleitungen für Alphacool ES 4U ServerRack


Inhaltszusammenfassung für Alphacool ES 4U ServerRack
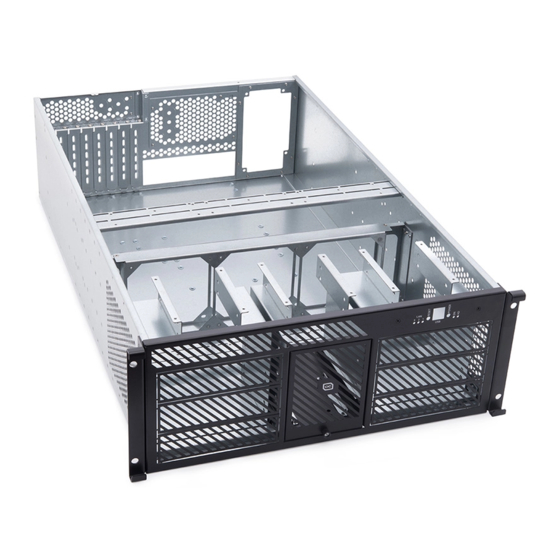
- Seite 1 Alphacool ES 4U - 19 - ServerRack - Watercooling ready...
-
Seite 2: Inhaltsverzeichnis
15376-Alphacool ES Reservoir 2U - DDC Version mit Laing DDC-Pumpe 12V DDC-1T 13295-Alphacool Eisstation VPP inkl. Alphacool Eispumpe VPP755 V.3 15376-Alphacool ES Reservoir 2U - DDC Version mit Alphacool ES Laing DDC310 Pump - Single black plastic bottom 13296-Alphacool Eisstation DDC inkl. Alphacool Laing DDC310 13297-Alphacool Eisstation DC-LT inkl. -
Seite 3: Safety Instruction
•Wear an antistatic smock or robe to cover any Zusatzkarten einen Schock verspürt. toute procédure décrite dans le présent clothing that may generate an electrostatic Alphacool International GmbH empfiehlt die document ou lors de la maintenance d'un charge. folgenden Schritte bei der Durchführung aller système informatique - le cas échéant, toute... - Seite 4 chassis, remove power from the server board Arbeitsstation durchgeführt werden. terre, des dispositifs de mise à la terre des before performing any integration or service. semelles et/ou des chaussures conductrices. •Tragen Sie ESD-Schutzkleidung wie ein •Touch all unpainted metal surfaces of the •Porter une blouse ou un peignoir antistatique geerdetes antistatisches Handgelenkband, chassis before performing any integration or...
-
Seite 5: Technical Data
2. TECHNICAL DATA TECHNISCHE DATEN DONNÉES TECHNIQUES... -
Seite 6: Compatibility List
Pumps Pompes •13295-Alphacool Eisstation VPP reservoir •13295-Alphacool Eisstation VPP inkl. •13295-Alphacool Eisstation VPP reservoir incl. Alphacool Eispumpe VPP755 V.3 pump Alphacool Eispumpe VPP755 V.3 incl. Alphacool Eispumpe VPP755 V.3 pump •13296-Alphacool Eisstation DDC inkl. •13296-Alphacool Eisstation DDC reservoir •13296-Alphacool Eisstation DDC reservoir incl. -
Seite 7: Accessories
4. ACCESSORIES ZUBEHÖR LES ACCESSOIRES UNC 6-32 Screw / Schraube / Vis UNC 6-32 long Screw / Schraube / M3x5 Screw / Schraube / Vis Fan Screw / Schraube / Vis M5 Stand-off / Abstandshalter UNC 6-32 Stand-off / Damper / Dämpfer / Amortisseur Slotbracket / Slotblende / Support l'entretoise Abstandshalter / l'entretoise... -
Seite 8: Remove Drivebracket
6. REMOVE DRIVEBRACKET LAUFWERKSHALTER ENTFERNEN RETIRER LES LECTEURS After removing the covers, pull the 5 ¼ zoll Nach der Demontage der Deckel ziehen Sie Après avoir retiré les couvercles, tirez insertion backwards to remove the mounting den 5 ¼ Zoll Einschub nach hinten, um den l'insertion de 5 ¼... -
Seite 9: 1/4 Drives
5 1/4 DRIVES 5 1/4 LAUFWERK LECTEUR DE 5 1/4 Remove the 5 ¼ inch tray as described above Entfernen Sie den 5 ¼ Zoll Einschub wie Retirez le plateau de 5 ¼ pouces comme in the section "Removing the drive holder". oben im Abschnitt „Laufwerkshalter décrit ci-dessus dans la section "Retrait du entfernen“... -
Seite 10: Hdd Fan
HDD FAN HDD LÜFTER HDD VENTILATEUR Remove the 5 ¼ inch tray as described above Entfernen Sie den 5 ¼ Zoll Einschub wie Retirez le plateau de 5 ¼ pouces comme in the section "Removing the drive holder". oben im Abschnitt „Laufwerkshalter décrit ci-dessus dans la section "Retrait du entfernen“... -
Seite 11: 1/2 Hdd Dirves
3 1/2 HDD DIRVES 3 1/2 HDD LAUFWERKE DISQUES DURS 3 1/2 Remove the 5 ¼ inch tray as described above Entfernen Sie den 5 ¼ Zoll Einschub wie Retirez le plateau de 5 ¼ pouces comme in the section "Removing the drive holder". oben im Abschnitt „Laufwerkshalter décrit ci-dessus dans la section "Retrait du entfernen“... - Seite 12 DE5. 5. Unscrew the middle screw from the pump 5. Lösen Sie die mittlere Schraube vom 5. Desserrez la vis centrale de l'insert de la insert so that you can pull the insert out. Pumpeneinschub, sodass Sie den Einschub pompe afin de pouvoir retirer l'insert. heraus ziehen können.
-
Seite 13: Ssd/Hdd Dirves
2,5 SSD/HDD DIRVES 2,5 SSD/HDD LAUFWERKE DISQUES DURS 2,5 SSD/HDD Remove the 5 ¼ inch tray as described above Entfernen Sie den 5 ¼ Zoll Einschub wie Retirez le plateau de 5 ¼ pouces comme in the section "Removing the drive holder". oben im Abschnitt „Laufwerkshalter décrit ci-dessus dans la section "Retrait du entfernen“... -
Seite 14: Remove Pumps
RETIRER LES POMPES 8. REMOVE PUMPS PUMPEN ENTFERNEN Unscrew the middle screw from the pump Lösen Sie die mittlere Schraube vom Desserrez la vis centrale de l'insert de la insert so that you can pull the insert out. Pumpeneinschub, sodass Sie den Einschub pompe afin de pouvoir retirer l'insert. -
Seite 15: 15377-Alphacool Es Reservoir 1U - Ddc Version
Pumpe, wie oben unter Punkt 9. ci-dessus au point 9. dargestellt in das Gehäuse. 15376-ALPHACOOL ES RESERVOIR 2U - DDC VERSION MIT LAING DDC-PUMPE 12V DDC-1T Remove the pump insert as shown above in Entfernen Sie den Pumpeneinschub wie Retirez l'insert de la pompe comme indiqué... -
Seite 16: 13295-Alphacool Eisstation Vpp Inkl. Alphacool Eispumpe Vpp755 V.3
15376-ALPHACOOL ES RESERVOIR 2U - DDC VERSION MIT ALPHACOOL ES LAING DDC310 PUMP - Remove the pump insert as shown above in Entfernen Sie den Pumpeneinschub wie Retirez l'insert de la pompe comme indiqué ci- point 8. oben unter Punkt 8. dargestellt. -
Seite 17: 49065-Laing Ddc-Pumpe 12V Ddc-1T Plus
49064-LAING DDC-PUMPE 12V DDC-1T 49065-LAING DDC-PUMPE 12V DDC-1T PLUS Remove the pump insert as shown above in Entfernen Sie den Pumpeneinschub wie Retirez l'insert de la pompe comme indiqué ci- point 8. oben unter Punkt 8. dargestellt. dessus au point 8. Mount the Montieren Sie die Monter le... -
Seite 18: Fan Controlling
1. Dévissez le support par les quatre vis shown. Schrauben wie dargestellt heraus. comme indiqué. 2. Place the 26158 - Alphacool Guardian 4Port 2. Platzieren Sie den 26158 - Alphacool 2. Placez le 26158 - Alphacool Guardian 4Port Powerfan Hub as shown in the picture. Use Guardian 4Port Powerfan Hub wie im Bild Powerfan Hub comme indiqué... -
Seite 19: Radiator Mounting
11. RADIATOR MOUNTING RADIOATOR MONTAGE MONTAGE DE RADIATEUR 1. Unscrew the bracket with the four screws 1. Lösen Sie die Halterung mit den vier 1. Dévissez le support avec les quatre vis as shown. Schrauben wie Dargestellt heraus. comme indiqué. 2. -
Seite 20: Distro Plate Mounting
1. Desserrez le support par les quatre vis shown. Schrauben wie Dargestellt heraus. comme indiqué. 2. Screw the 12992-Alphacool ES Distro Plate 2. Verschrauben Sie die 12992-Alphacool ES 2. Vissez la 12992-Alphacool ES Distro Plate C1 onto its holder with the two screws. The Distro Plate C1 mit den beiden Schrauben C1 sur son support à... -
Seite 21: 12993-Alphacool Es Distro Plate C2
1. Desserrez le support par les quatre vis shown. Schrauben wie Dargestellt heraus. comme indiqué. 2. Screw your Alphacool ES Distro Plate onto 2. Verschrauben Sie ihre Alphacool ES Distro 2. Vissez votre plaque Distro Alphacool ES sur its holder with the four screws. -
Seite 22: Front-Io Mounting
13. FRONT-IO MOUNTING FRONT-IO MONTAGE MONTAGE DE FRONT-IO 25054-ALPHACOOL FRONT I/O-PANEL MIT USB 2.0 UND KABELSATZ FÜR SERVERGEHÄUSE Note: Hinweis: Indice: The front panel is not included and must be Das Frontpanel ist nicht im Lieferumfang Le panneau avant n'est pas inclus et doit être purchased separately. -
Seite 23: Power Supply Unit
14. POWER SUPPLY UNIT NETZTEILE ALIMENTATION ÉLECTRIQUE STANDARD MOUNTING STANDARD MONTAGE MONTAGE STANDARDISÉ Mount the power supply unit as shown in the Montieren Sie das Netzteil wie im Bild Montez le bloc d'alimentation comme indiqué picture. Use the screws supplied with the dargestellt. -
Seite 24: Hot-Swap Mounting
HOT-SWAP MOUNTING HOT-SWAP MONTAGE MONTAGE DE HOT-SWAP Unscrew the standard power supply bracket Schrauben Sie den Standard Netzteilhalter Dévissez le support de l'alimentation by the 8 screws. mit den 8 Schrauben heraus. électrique standard par les 8 vis. Now mount your hot plug power supply unit. Montieren Sie nun ihr Hot Plug Netzteil. -
Seite 25: Mainboard Mounting
Abstandshalter im Gehäuse. Check the stand-offs. None must be Kontrollieren Sie die Abstandshalter. Es darf Vérifiez les entretoises. Aucun ne doit être forgotten. Alphacool International GmbH keiner vergessen werden. Alphacool oublié. Alphacool International GmbH accepts no liability for defective hardware. - Seite 26 Insert the Rear IO shield into the case from Klemmen Sie die Rear IO Panel- Bende von Insérez la lunette arrière du panneau IO dans the inside. innen in das Gehäuse ein. le boîtier par l'intérieur. Mount the mainboard on the spacers Montieren Sie das Mainboard auf den Montez la carte mère sur les entretoises en according to the layout of the mounting holes...
- Seite 27 16. EXTERNAL WATER COOLING EXTERNE WASSERKÜHLUNG REFROIDISSEMENT EXTERNE 17424-ALPHACOOL HF SCHOTTVERSCHRAUBUNG KURZE VERSION G1/4 - DEEP BLACK 17423-ALPHACOOL HF SCHOTTVERSCHRAUBUNG KURZE VERSION G1/4 - CHROM The case is also prepared for external water Das Gehäuse ist für eine externe Le boîtier est également préparé pour le cooling.
- Seite 28 17. SLIDE RAIL GLEITSCHIENE LA GLISSIÈRE Front Vorne La face Screw the slide rail into the rack as shown in Schrauben Sie die Gleitschiene wie im Bild Vissez la glissière dans le support comme the picture. dargestellt in das Rack ein. indiqué...
- Seite 30 V.2.00-09.2022 Alphacool International GmbH Marienberger Str. 1 D-38122 Braunschweig Germany Support: +49 (0) 531 28874 - 0 Fax: +49 (0) 531 28874 - 22 E-Mail: info@alphacool.com www.alphacool.com General Managers: Andreas Rudnicki, Nathanael Draht, Fabian Noelte WEEE-Reg.-Nr.: DE 54464644 Trade Register: Amtsgericht Braunschweig HRB 202390 VAT.ID.Nr.: DE270458421...