MADRIX ORION Kurzanleitung & Technisches Handbuch
Inhaltsverzeichnis
Verfügbare Sprachen
Verfügbare Sprachen
Inhaltsverzeichnis

Verwandte Anleitungen für MADRIX ORION


Inhaltszusammenfassung für MADRIX ORION
-
Seite 19: Eingetragene Marken
Erstbenutzung durch. Vergewissern Sie sich, dass Sie alle Informationen verstanden haben. Dieses Handbuch wurde in englischer und deutscher Sprache verfasst. (This MADRIX ® ORION Technical Manual is written in English and German.) Entwickelt und hergestellt in Deutschland. Impressum inoage GmbH Internet www.madrix.com... -
Seite 20: Urheberrecht Und Haftungsausschluss
Handhabung, durch Elektrizität oder durch anderweitige Ursachen beschädigt wurde. Alle Informationen erhalten Sie im Internet unter www.madrix.com/warranty Lieferumfang 1x MADRIX ® ORION 1x Set an Schraubklemmen (2x 6-polig und 1x 2-polig) 1x USB 2.0-Kabel (zertifiziert) 2x Wandhalterungen zur Wandmontage 1x Dieses Technische Handbuch / Kurzanleitung Hinweis: Überprüfen Sie den Verpackungsinhalt und das Gerät nach dem... -
Seite 21: Sicherheitshinweise
Sicherheitshinweise Bitte beachten Sie die nachstehenden Hinweise, um falsche Handhabung, gesundheitliche Schäden und Geräteschäden zu vermeiden: DAS GERÄT ARBEITET MIT KLEINSPANNUNG (5 V – 24 V GLEICHSTROM). NUTZEN SIE NUR DIESE SPANNUNG! Bei Verwendung von unzulässigen USB-Netzteilen besteht akute Brandgefahr. Max. 5.5 V⎓500 mA am Ausgang erlaubt. Eine externe Spannungsversorgung muss gemäß... -
Seite 22: Benutzung
Benutzung ® MADRIX ORION empfängt analoge Eingangssignale zur netzwerkbasierten Fernsteuerung und Interaktivität über Art-Net oder Streaming ACN. Verwenden Sie das Gerät nur zu seinem vorgesehenen Zweck. Eine breite Palette an Potenziometern, Schaltern, Tastern und Sensoren (wie z.B. Licht/Infrarot, Temperatur, usw.) kann direkt angeschlossen werden. -
Seite 23: Kompatibilität
(Siehe S. 14 für das Zurücksetzen des Gerätes, falls benötigt.) Kompatibilität MADRIX ® ORION ist ein standardisiertes Gerät für Art-Net und Streaming ACN. Es kann mit sämtlichen kompatiblen Netzwerk-Zuspielern betrieben werden. Siehe Kapitel "Technische Daten" auf S. 4 für weitere Informationen. ®... -
Seite 24: Anschlussmöglichkeiten
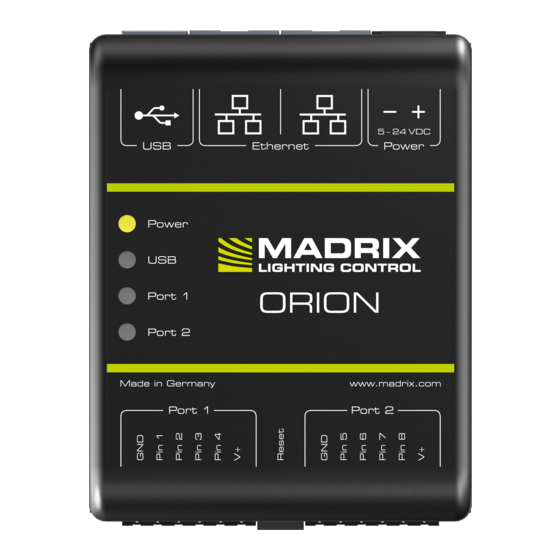
Anschlussmöglichkeiten 1) Spannungsversorgung 2) Netzwerkanschluss rechts, inkl. 2 Status-LEDs 3) Netzwerkanschluss links, inkl. 2 Status-LEDs 4) USB-Anschluss 5) Status-LED für Strom 6) Status-LED für USB 7) Status-LED für Anschluss 1 8) Status-LED für Anschluss 2 9) Anschluss 1 ("Port 1") 10) Reset-Taste 11) Hutschienen-Entriegelung 12) Anschluss 2 ("Port 2") -
Seite 25: Anschluss Von Eingabegeräten
über USB erfolgen (5 V). Schritt 3) Datenverbindung wie benötigt über USB oder Netzwerk herstellen. Schritt 4) Die Spannungsversorgung erst herstellen, wenn alle Stromkabel ® an das MADRIX ORION angeschlossen wurden. Schritt 5) Weiter mit Kapitel "3. Konfiguration des Gerätes" auf S. 13. -
Seite 26: Netzwerk-Reihenschaltung ("Daisy Chain")
Netzwerkdaten Spannungsversorg. Beschreibung: Die Spannungsversorgung wird nur einmal für ORION bereitgestellt und auch für die Eingabegeräte genutzt. Jeder Port ist mit max. 500 mA abgesichert. Ein Potenziometer wird z.B. an Port 1 über Masse, Signal an Pin 1 und V+ angeschlossen, während ein Schalter an Port 2 über Signal... - Seite 27 Ein Sensor ist z.B. an Port 1 über Masse, Signal an Pin 1 und V+ angeschlossen, um auch für das ORION Spannung bereitzustellen, während ein zweiter Sensor an Port 2 über Masse und Signal an Pin 5 verbunden ist, aber nicht V+!
- Seite 28 Anschlusses angeschlossen. Alle sind mit ORION zusammen über Masse verbunden. An Port 1 und 2 ist jeweils ein NPN-Ausgabesensor mit einem offenen Kollektor sowie ein Widerstand mit 1k Ω – 10k Ω angeschlossen. ORION wird separat mit DC 5 V – 24 V Spannung oder über 5 V USB versorgt. Beispiel F...
- Seite 29 Beschreibung: 4 verschiedene Sensoren sind an die 4 Pins eines Anschlusses und zusammen über Masse angeschlossen. 9 V für Sensor 1 werden von ORION bereitgestellt . 5 V für Sensor 3 werden separat/individuell bereitgestellt. Sensor 2 und Sensor 4 werden über 24 V separat versorgt, jedoch zusammen über eine Spannungsversorgung.
-
Seite 30: Spannungsverlaufsbeispiele
"Counter" Aktualisieren der Firmware Es wird empfohlen, immer die neueste Firmware für Geräte zu verwenden. ® MADRIX HARDWARE MANAGER ist eine separate Software, um Grund- einstellungen und das Aktualisieren der Firmware vorzunehmen. Sie kann auf www.madrix.com heruntergeladen werden und benötigt eine aktive Internetverbindung für das Herunterladen von Firmware-Dateien. -
Seite 31: Konfiguration Des Gerätes
Gerät je nach Anforderungen und Eingabegeräten richtig eingestellt werden. Konfiguration über einen Webbrowser Schritt 1) Verbinden Sie ORION und den PC mit demselben Netzwerk. Schritt 2) Stellen Sie die richtigen Netzwerkeinstellungen im Betriebssystem ein. (Empfohlen: IP-Adresse 10.0.0.1 / Subnetzmaske 255.0.0.0) Schritt 3) Öffnen Sie einen Webbrowser und geben Sie die IP-Adresse des... -
Seite 32: Anzeige Der Status-Leds
Anzeige der Status-LEDs -LED P TATUS TATUS OWER PANNUNGSVERSORGUNG Ausgeschaltet Keine Spannungsversorgung. � Das Gerät hat keinen Strom. Permanent grün Spannungsversorgung liegt an. � Das Gerät hat Strom. Bootloader aktiviert. � Zurücksetzen / Firmware einspielen. Grün blinkend -LED USB TATUS TATUS Ausgeschaltet USB nicht angeschlossen. -
Seite 33: Montage Auf Hutschienen
Schiene. Schritt 3) Heben Sie das Gerät von der Hutschiene. ® Nutzung der MADRIX -5-Software In Verbindung mit MADRIX ® 5 stehen 3 Betriebsmodi zur Verfügung: � DMX-Empfang über Art-Net � DMX-Empfang über Streaming ACN � DMX-Empfang über USB In MADRIX ®... -
Seite 34: Weitere Dokumentation
– Konsultieren Sie das allgemeine Benutzerhandbuch ("User Manual"), – Kontaktieren Sie Ihren Händler, – Besuchen Sie die Webseite und das Forum unter www.madrix.com, – Anfragen können auch direkt per Telefon oder per E-Mail erfolgen. Altgeräte und Entsorgung Das Gerät, sein Zubehör sowie Verpackungsmaterial müssen ordnungsgemäß... -
Seite 35: Häufig Gestellte Fragen
® Nutzen Sie die Software MADRIX HARDWARE MANAGER (siehe S. 12). ® Kann ich andere Zuspieler an Stelle von MADRIX 5 benutzen? Ja. Wenn Sie das Gerät als reines Netzwerkgerät nutzen möchten, ist die Verwendung mit anderen kompatiblen Zuspielern möglich. - Seite 36 www.madrix.com...