DNT UltraZoom PRO Bedienungsanleitung
Digitales mikroskop
Vorschau ausblenden
Andere Handbücher für UltraZoom PRO:
- Bedienungsanleitung (78 Seiten) ,
- Bedienungsanleitung (4 Seiten)
Inhaltsverzeichnis
Verfügbare Sprachen
Verfügbare Sprachen
Bedienungsanleitung
Digitales Mikroskop UltraZoom PRO
Bitte lesen Sie diese Bedienungsanleitung vor der Installation und Inbetriebnahme komplett durch
und bewahren Sie die Bedienungsanleitung für späteres Nachlesen auf. Wenn Sie das Gerät
anderen Personen zur Nutzung überlassen, übergeben Sie auch diese Bedienungsanleitung.
Art.-Nr. DNT000006
Importeur: dnt Innovation GmbH
Maiburger Straße 29 · 26789 Leer · Germany
www.dnt.de
1
Kapitel
Inhaltsverzeichnis

Verwandte Anleitungen für DNT UltraZoom PRO


Inhaltszusammenfassung für DNT UltraZoom PRO
- Seite 1 Bedienungsanleitung Digitales Mikroskop UltraZoom PRO Bitte lesen Sie diese Bedienungsanleitung vor der Installation und Inbetriebnahme komplett durch und bewahren Sie die Bedienungsanleitung für späteres Nachlesen auf. Wenn Sie das Gerät anderen Personen zur Nutzung überlassen, übergeben Sie auch diese Bedienungsanleitung.
-
Seite 2: Inhaltsverzeichnis
Inhalt Funktion ......................3 Bestimmungsgemäßer Einsatz, Lieferumfang ............. 4 Betriebs-, Wartungs- und Sicherheitshinweise ............ 4 Übersicht, Beschreibung ..................6 Bedienung ......................7 Inbetriebnahme ....................7 Akku laden ......................7 SD-Karte einlegen....................7 Displaysymbole ....................8 Ein- und Ausschalten ..................8 Grundeinstellungen/Menüfunktionen .............. -
Seite 3: Funktion
1. Funktion Das digitale Mikroskop dient mit einem hohen Vergrößerungsfaktor der einfachen Untersuchung bzw. der Handhabung von sehr kleinen bzw. feinen Objekten, so z. B. bei Untersuchungen in der Biologie, in der Feinmechanik oder der Elektronik. Eine integrierte Objektbeleuchtung und ein Polarizer ermöglichen dabei ein gleichmäßig ausgeleuchtetes, blendfreies Beobachtungsfeld. -
Seite 4: Bestimmungsgemäßer Einsatz, Lieferumfang
Jeder andere Einsatz ist nicht bestimmungsgemäß und führt zu Gewährleistungs- und Haftungsausschluss. Dies gilt auch für Umbauten und Veränderungen. Lieferumfang: - Digitales Mikroskop UltraZoom PRO - 5-V-USB-Netzteil - USB-Kabel für Netzteil- und PC-Anschluss - Videokabel, Klinkenstecker (3,5 mm) auf 1x Cinch/RCA... - Seite 5 - Verpackungsmaterial nicht achtlos liegen lassen! Plastikfolien/-tüten, Styroporteile etc. könnten für Kinder zu einem gefährlichen Spielzeug werden. - Das Gerät ist kein Spielzeug. Es darf nicht im Zugriffsbereich von Kindern aufbewahrt oder betrieben werden. - Starke mechanische Beanspruchungen wie, Anstoß, Druck oder Vibration sind zu vermeiden.
-
Seite 6: Übersicht, Beschreibung
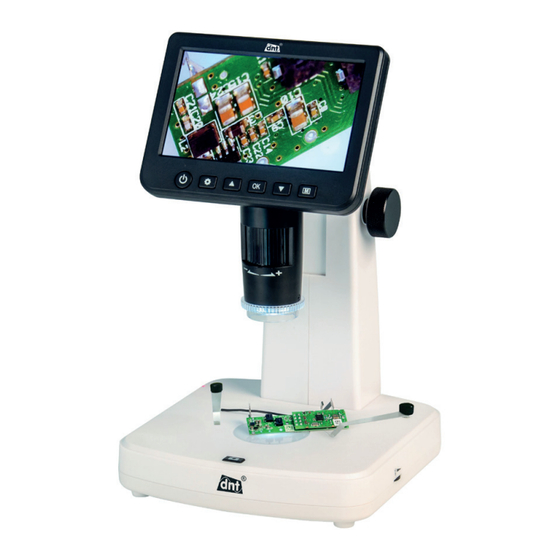
4. Übersicht, Beschreibung microSD-Kartenslot Videoausgang (FBAS, PAL/NTSC) HDMI-Ausgang Fokus-Einstellung Polarizer Ladeanzeige Objekt-Durchleuchtung Höhenverstellung Aufnahmetaste 10 Display 11 Helligkeitseinstellung für Objekt-Auflicht 12 Digital-Zoom 13 Helligkeitseinstellung für die Objekt-Durchleuchtung 14 USB-Port für Akku-Laden (5 V/USB) und PC-Verbindung 15 Ein-/Aus-Taste 16 Setup-Taste 17 Taste 18 OK-Taste 19 Taste ... -
Seite 7: Bedienung
5. Bedienung 5.1 Inbetriebnahme Akku laden - Vor der ersten Benutzung laden Sie den internen Akku mit dem mitgelieferten Ladegerät. - Verbinden Sie dazu den USB-Port (14) des Gerätes über das mitgelieferte USB-Kabel mit dem 5-V-USB-Ladeausgang des Ladegerätes und stecken Sie dieses in eine Netzsteckdose. -
Seite 8: Displaysymbole
Displaysymbole Einzelbild-Modus (Foto-Mode) Video-Modus Abspielmodus 00012/01618 Anzahl der Aufnahmen/Verbleibende Einzelbildanzahl 12 M Gewählte Auflösung microSD-Karte erkannt, wenn nicht: durchgestrichen Akku-Ladezustand (3x blau = voll, leeres Symbol = entladen) Die Symbole im Display werden 10 s nach der letzten Tastenbetätigung abgeschaltet. Ein- und Ausschalten - Drücken Sie die Ein-/Aus-Taste (15) für ca. -
Seite 9: Grundeinstellungen/Menüfunktionen
5.2 Grundeinstellungen/Menüfunktionen - Wählen Sie das Menü des Gerätes mit der Taste an. Jetzt erscheint die erste Menüseite, die per Pfeiltasten anwählbare Option ist blau hinterlegt. - Die zweite und dritte Menüseite erreichen Sie durch mehrmaliges Drücken der Pfeiltasten. - Eine Option öffnen Sie nach Anwahl mit der Taste „OK” Hinweis: Aus allen Unter-Menüs können Sie mit der Taste wieder zurück in den... -
Seite 10: Datum Einstellen
Datum einstellen - Wählen Sie mit den Pfeiltasten / die Zeile „Date/Time; Datum/Uhrzeit” an und bestätigen die Auswahl mit der OK-Taste. - Im Einstellmenü wechseln Sie nun mit der OK-Taste die jeweils hinterlegte Anzeige- stelle, und stellen jeweils die Stelle mit den Pfeiltasten /... -
Seite 11: Video-Auflösung Einstellen
- Jetzt wählen Sie mit den Pfeiltasten / die gewünschte Videoauflösung an und bestätigen die Auswahl mit der Taste Selbstauslöser für Einzelbilder einstellen Mit dieser Einstellung können Sie eine durch die Aufnahmetaste (9) zu startende Selbstauslöserzeit einstellen, nach deren Ablauf das Gerät jeweils ein Einzelbild auto- matisch aufnimmt. -
Seite 12: Datumsstempel Einstellen, Datumsstempel Bei Videoaufnahme
- Wählen Sie mit der Taste Videoaufnahme ( ) an. - Wählen Sie dann das Menü des Gerätes mit der Taste - Hier wählen Sie mit den Pfeiltasten / die Zeile „Loop-Recording/Auf- name” an und bestätigen die Auswahl mit der OK-Taste. - Jetzt wählen Sie mit den Pfeiltasten /... -
Seite 13: Tv-Norm Einstellen
TV-Norm einstellen - Wählen Sie das Menü des Gerätes mit der Taste - Hier wählen Sie mit den Pfeiltasten / die Zeile „TV-Out/-Modus” an und bestätigen die Auswahl mit der OK-Taste. - Im Einstellmenü wählen Sie nun mit den Pfeiltasten / die gewünschte Norm je nach angeschlossenem TV-Gerät/ Monitor an und bestätigen die Auswahl mit der OK-Taste. -
Seite 14: Bedienung/Aufnahme/Abspielen
5.3 Bedienung/Aufnahme/Abspielen Bild-Fokussierung, Vergrößerungsstufen Sie können, je nach Aufgabe, die Vergrößerungsbereich grob mit der Höhenverstel- lung (8) vorwählen und dann das Beobachtungsfeld fein mit der Fokus-Einstellung (4) fokussieren: Geringe Vergrößerung Mittlere Vergrößerung Hohe Vergrößerung Zoomfunktion - Sie können, wenn Sie das Beobachtungsobjekt fokussiert haben, das Bild digital zoomen, und so Details noch feiner darstellen können. -
Seite 15: Einzelbilder/Video Aufzeichnen
Einzelbilder/Video aufzeichnen - Wenn Sie das Bild scharf eingestellt haben, können Sie mit der Taste zwischen Video- aufnahme ( ) oder Einzelbildaufnahme ) wählen. - Mit der Aufnahmetaste (9) starten und stoppen Sie die Aufnahme. Bei der Videoaufzeichnung signalisiert ein blinkender roter Punkt die lau- fende Aufnahme. - Seite 16 Aufnahmen löschen - Wählen Sie mit den Pfeiltasten / die Option „Delete/Löschen” an und drücken anschließend die OK-Taste. - Jetzt erscheint die Abfrage, ob die gewählte Aufnahme („Löschungen z.Z.”) oder alle Aufnahmen auf der Speicherkarte („Alle”) gelöscht werden sollen. Wählen Sie wieder mit den Pfeiltasten /...
-
Seite 17: Aufnahmen Auf Einen Pc Kopieren
- Jetzt erscheint im Abspielmodus bei einer geschützten Datei ein Schlüsselsymbol, bei einer entsperrten Datei ist das vorher aktive Schlüsselsymbol verschwunden. - Jetzt können Sie den Schutzdialog mit der Taste verlassen. Slide Show - Wählen Sie mit den Pfeiltasten / die Option „Slide Show/Diashow”... -
Seite 18: Monitor/Fernsehgerät Anschließen
5.5 Monitor/Fernsehgerät anschließen - Schließen Sie das Gerät über das mitgelieferte FBAS-Kabel (Cinch) oder ein HDMI-Kabel an Ihren Monitor/TV-Gerät an und schalten Sie das Gerät ein. - Jetzt agiert der angeschlossene Monitor als Gerätemonitor, das interne Gerätedisplay wird abgeschaltet. 6. PC-Software 6.1 Software installieren - Installieren Sie das für Ihr System passende Programmfile „PortableCapture Plus”... -
Seite 19: Programmmenü/Funktionen
software by clicking the icon generated on the desktop after installation and you will see the following - Bei ordnungsgemäßem Anschluss erscheint das Startbild des Programms und die screen pop up. Abbildung des Mikroskopbildes: When the Microscope is disconnected from your PC - Erscheint statt des Kamerabildes die Meldung: „Kein Gerät erkannt, verbinden Sie das Mikroskop mit der USB-Schnittstelle”, schalten Sie das Mikroskop aus (evtl. - Seite 20 Menü „Optionen” - In diesem Menü können Sie: Unter „Resolution/Auflösung” die Auflösung der Vorschau wählen. Unter „Date/Time;Datum/Zeit” die Einblendung eines Zeit-/Datumsstempels in die Aufnahme aktivieren oder abschalten. Unter „Language/Sprache” die Menüsprache wählen. Unter „X/Y Guide/Fadenkreuz” ein Fadenkreuz in das Vorschau-Bild einblenden ...
- Seite 21 Das aufgenommene Bild erscheint rechts in der Fotoliste und wird gleichzeitig im Ordner „Microcapture Photo” (bzw. dem von Ihnen unter „File/Datei” eingerichteten Bilderordner) abgespeichert. Es kann nach anklicken mit der rechten Maustaste in der Liste auch an einem anderen Ort gespeichert, gelöscht usw. werden. Videoaufnahme und Abspiel - Klicken Sie auf das Videosymbol in der Menüleiste bzw.
-
Seite 22: Kalibrier- Und Messfunktion, Bearbeitung
6.4 Kalibrier- und Messfunktion, Bearbeitung cus microscope on the attached calibration ruler Das Programm ermöglicht es, mit Hilfe der mitgelieferten Kalibriervorlage aufgenom- mene Bilder so anzupassen, dass in diesen genaue Messungen vorgenommen und eingetragen werden können. Gleichzeitig erfolgt dabei die genaue Ermittlung des and then adjust the magnification till the picture aktuellen Vergrößerungsfaktors in der Darstellung des Programms. - Seite 23 Then the software will automatically calibrate the magnification rate. Click ‘OK’ and the adjusted - Zur genauen Detailansicht können Sie das Bild mit dem Schieberegler unten zoomen. magnification rate will show in the upper right corner. - Klicken Sie nun das Kalibrier-Icon an und gehen Sie mit dem Mauszeiger in das Bild.
- Seite 24 1. Double click to open the picture, Click ‘ > Reset magnification > Reset picture magnification’ as Kalibrierung ändern below. And then start calibration again (Calibration details Sie können je nach weiterem Beobachtungsobjekt und Veränderung der Fokussierung please refer to page24). die Vergrößerungsrate durch eine erneute Kalibrierung ändern.
- Seite 25 magnification >Set capture magnification’. Now all pictures will use the same magnification rate and you can - Im folgenden Dialog tragen Sie nun die aktuelle Vergrößerungsrate ein, die nach start measurement directly. einem Klick auf „OK” übernommen wird. Messungen - Öffnen Sie das Messwerkzeug und wählen Sie dort ein Werkzeug an, mit dem Sie messen wollen: ...
-
Seite 26: Fehlerhinweise
1. Click icon to choose any kinds of drawing under the pull-down manual as below. under the pull-down manual as below. Die Linieneigenschaften sind dabei wählbar: - Mit dem Werkzeug können Sie nach Anwahl der Schriftart (Auswahl aus den 2. Click icon and set the font for the text in the 2. -
Seite 27: Netzteil-Angaben
- Berühren Sie die Linse nicht. Wenn Sie das Gerät nicht benutzen, decken Sie es zum Staubschutz ab. - Zur Reinigung der Objektivlinse spezielle Linsenreinigungswerkzeuge wie z. B. Reini- gungspinsel und Spezial-Reinigungstücher verwenden. 9. Netzteil-Angaben Wert und Genauigkeit Einheit Name Hersteller SHENZHEN FANGXIN TECHNOLOGY CO., LTD –... -
Seite 28: Konformitätserklärung, Entsorgung, Kontakt
11. Konformitätserklärung Hiermit erklärt die dnt Innovation GmbH, Maiburger Straße 29, 26789 Leer, Deutschland, dass sich das Gerät „Digitales Mikroskop UltraZoom PRO“ in Übereinstimmung mit den grundlegenden Anforderungen und den übrigen einschlägigen Bestimmungen der Richtlinie 2014/30/EU befindet. Die Konformitätserklärung kann unter folgender Adresse gefunden werden: www.dnt.de... - Seite 29 1. Ausgabe Deutsch 07/2021 Dokumentation © 2020 dnt Innovation GmbH Alle Rechte vorbehalten. Ohne schriftliche Zustimmung des Herausgebers darf diese Bedienungs- anleitung auch nicht auszugsweise in irgendeiner Form reproduziert oder vervielfältigt werden. Es ist möglich, dass die vorliegende Bedienungsanleitung noch druck tech nische Mängel oder Druckfehler aufweist.