Herunterladen Inhalt Inhalt Diese Seite drucken

Werbung

Verfügbare Sprachen
  • DE

Verfügbare Sprachen

  • DEUTSCH, seite 1
AROMATICA
TASTE 6
Kaffeemaschine
Coffee Machine
Machine à café
Máquina de café
Macchina del caffè
10035653
www.klarstein.com

Werbung

Inhaltsverzeichnis
loading

Inhaltszusammenfassung für Klarstein AROMATICA TASTE 6

  • Seite 1: Technical Data

    AROMATICA TASTE 6 Kaffeemaschine Coffee Machine Machine à café Máquina de café Macchina del caffè 10035653 www.klarstein.com...
  • Seite 3: Inhaltsverzeichnis

    Sehr geehrter Kunde, wir gratulieren Ihnen zum Erwerb Ihres Gerätes. Lesen Sie die folgenden Hinweise sorgfältig durch und befolgen Sie diese, um möglichen Schäden vorzubeugen. Für Schäden, die durch Missachtung der Hinweise und unsachgemäßen Gebrauch entstehen, übernehmen wir keine Haftung. Scannen Sie den folgenden QR-Code, um Zugriff auf die aktuellste Bedienungsanleitung und weitere Informationen rund um das Produkt zu erhalten.
  • Seite 4: Sicherheitshinweise

    SICHERHEITSHINWEISE Allgemeine Sicherheitshinweise • Lesen Sie alle Hinweise vor Gebrauch sorgfältig durch und bewahren Sie die Anleitung zum Nachschlagen auf. • Verwenden Sie das Gerät und das Zubehör nur für den vorgesehenen Zweck und nicht für andere Zwecke als in der Bedienungsanleitung beschrieben werden. •...
  • Seite 5: Verpackungsentsorgung

    • Halten Sie das Netzkabel von Hitze, Öl und scharfen Kanten fern. • Verwenden Sie das Gerät nicht, wenn das Netzkabel oder der Netzstecker beschädigt oder defekt sind. • Wenn das Netzkabel oder der Netzstecker beschädigt oder defekt sind, müssen sie durch den Hersteller, einen autorisierten Fachbetrieb oder einer ähnlich qualifi zierten Person ersetzt werden.
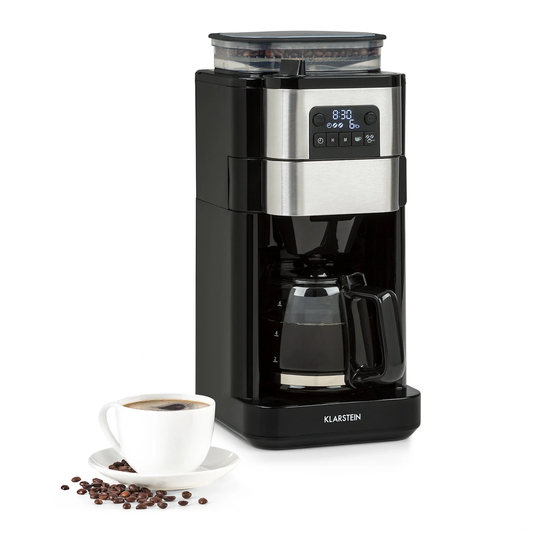
  • Seite 6: Geräteübersicht

    GERÄTEÜBERSICHT Reinigungsbürste Wassertankdeckel Filterkorb Dampfauslass Filterkorbhalterung 10 Display Glaskanne 1 1 Wasserfüllstandanzeige Bohnenkastendeckel 12 Wärmeplatte Bohnenkasten Mahlwerk...
  • Seite 7: Bedienfeld

    BEDIENFELD Tastenfunktionen Ein/Aus-Schalter. Das Gerät starten oder anhalten. Timer-Taste: Einschalt-Timer 1) Diese Taste kurz drücken, um den Einschalt-Timer zu starten oder zu beenden. 2) Halten Sie diese Taste für einige Sekunden gedrückt, um in den automatischen Einschaltmodus zu gelangen. Drücken Sie dann die Taste «H»...
  • Seite 8: Bedienung

    Entkalkung: Drücken, um in den Entkalkungsmodus zu gehen. Erneut drücken, um den Entkalkungsmodus zu verlassen. BEDIENUNG 1. Das Gerät an die Stromversorgung anschließen. In der Anzeige erscheint die Zeitanzeige 12:00 00. Das Uhrsymbol blinkt, ohne die Zeit zu zählen. Die Voreinstellung ist 6 Tassen (zwei Bohnen im Display).
  • Seite 9: Reinigung Und Pflege

    Betriebsleuchte blinkt. Mahlen und Aufbrühen Wenn in der Anzeige das Symbol oder leuchtet, befi ndet sich das Gerät im Mahl- und Brühmodus. Mit der Mahl-und Brühtaste stellen Sie die Kaffeestärke ein. Mit der Tassen-Taste stellen Sie die Anzahl der Tassen ein. Drücken Sie zum Starten des Vorgangs die Ein/Aus-Taste .
  • Seite 10: Hinweise Zur Entsorgung

    HINWEISE ZUR ENTSORGUNG Wenn es in Ihrem Land eine gesetzliche Regelung zur Entsorgung von elektrischen und elektronischen Geräten gibt, weist dieses Symbol auf dem Produkt oder auf der Verpackung darauf hin, dass dieses Produkt nicht im Hausmüll entsorgt werden darf. Stattdessen muss es zu einer Sammelstelle für das Recycling von elektrischen und elektronischen Geräten gebracht werden.
  • Seite 11: Technical Data

    Dear Customer, Congratulations on purchasing this equipment. Please read this manual carefully and take care of the following hints to avoid damages. Any failure caused by ignoring the items and cautions mentioned in the instruction manual are not covered by our warranty and any liability. Scan the QR code to get access to the latest user manual and other information about the product.
  • Seite 12: Safety Instructions

    SAFETY INSTRUCTIONS General safety • Read the manual carefully before use and keep the manual for future reference. • Only use the appliance and the accessories for their intended purposes and do not use the appliance and the accessories for other purposes than described in the manual.
  • Seite 13 • Do not pull the mains cable to disconnect the mains plug from the mains. • Disconnect the mains plug from the mains when the appliance is not in use, before assembly or disassembly and before cleaning and maintenance. Safety instructions for coffee makers •...
  • Seite 14: Product Overview

    PRODUCT OVERVIEW Cleaning brush Grinding plant Filter basket Water tank lid Filter basket holder Steam outlet Glass carafe 10 Display Bean box lid 1 1 Water level indicator Bean Box 12 Hot plate...
  • Seite 15: Control Panel

    CONTROL PANEL Button fuctions instruction On/Off switch. Turn the appliance on or off. Timer button: Switch-on timer 1) Press this button briefl y to start or end the power-on timer. 2) Press and hold this button for a few seconds to enter the automatic power-up mode.
  • Seite 16: Operation

    Button of grinding, brewing and setting coffee strength. In standby mode, press this button to select for coffee strength, or to select for brewing directly. Decalcifi cation: Press to enter decalcifi cation mode. Press again to exit the decalcifi cation mode. OPERATION 1.
  • Seite 17: Cleaning And Care

    Grinding and brewing When the on-bean or tow-bean symbol is lit on the display, the machine is in grinding and brewing mode. You can set the coffee strength with the grinding and brewing button. Press the cup button to set the number of cups. Press the On/off button to start the process.
  • Seite 18: Hints On Disposal

    HINTS ON DISPOSAL If there is a legal regulation for the disposal of electrical and electronic devices in your country, this symbol on the product or on the packaging indicates that this product must not be disposed of with household waste. Instead, it must be taken to a collection point for the recycling of electrical and electronic equipment.
  • Seite 19: Fiche Technique

    Chère cliente, cher client, Toutes nos félicitations pour l’acquisition de ce nouvel appareil. Veuillez lire attentivement et respecter les instructions de ce mode d’emploi afin d’éviter d’éventuels dommages. Nous ne saurions être tenus pour responsables des dommages dus au non-respect des consignes et à la mauvaise utilisation de l’appareil.
  • Seite 20: Consignes De Sécurité

    CONSIGNES DE SÉCURITÉ Consignes générales de sécurité • Lisez attentivement toutes les instructions avant utilisation et conservez le mode d'emploi pour référence ultérieure. • N'utilisez l'appareil et les accessoires qu'aux fins prévues et non à des fins autres que celles décrites dans le mode d'emploi. •...
  • Seite 21 • Si le cordon d'alimentation ou la prise est endommagé ou défectueux, il doit être remplacé par le fabricant, un spécialiste agréé ou une personne de qualifi cation similaire. • Ne tirez pas sur le cordon d'alimentation pour retirer la fi che d'alimentation de la prise.
  • Seite 22: Aperçu De L'appareil

    APERÇU DE L'APPAREIL Brosse de nettoyage Couvercle du réservoir d'eau Panier fi ltre Sortie de vapeur Support du panier fi ltre 10 Écran Carafe en verre 1 1 Affi chage du niveau d'eau Couvercle de la boîte à grains 12 Plaque de maintien au chaud Boîte à...
  • Seite 23: Panneau De Commande

    PANNEAU DE COMMANDE Fonctions des touches Bouton de marche/arrêt : pour allumer et éteindre l›appareil Minuterie : minuterie de démarrage Appuyez brièvement pour démarrer ou arrêter la minuterie de démarrage. Appuyez et maintenez pendant quelques secondes pour accéder au mode de démarrage automatique. Appuyez ensuite sur la touche H ou M pour régler l›heure de mise en marche automatique.
  • Seite 24: Utilisation

    Détartrage : appuyez pour passer en mode détartrage. Appuyez à nouveau pour quitter le mode détartrage. UTILISATION 1. Connectez l‘appareil à l‘alimentation électrique. L‘affi chage de l‘heure indique 12:00 00. Le symbole de l‘horloge clignote sans compter l‘heure. Le réglage par défaut est de 6 tasses (deux grains à...
  • Seite 25: Mode Détartrage

    processus de préparation. Le voyant de fonctionnement clignote. Betriebsleuchte blinkt. Moudre et infuser Lorsque le symbole s‘allume, l‘appareil est en mode de mouture et d‘infusion. Utilisez la touche de mouture et d‘infusion pour régler l‘intensité du café. Utilisez la touche tasse pour régler le nombre de tasses. Appuyez sur le bouton d‘alimentation pour démarrer le processus.
  • Seite 26: Informations Sur Le Recyclage

    INFORMATIONS SUR LE RECYCLAGE S‘il existe une réglementation pour l‘élimination ou le recyclage des appareils électriques et électroniques dans votre pays, ce symbole sur le produit ou sur l‘emballage indique que cet appareil ne doit pas être jeté avec les ordures ménagères.
  • Seite 27: Datos Técnicos

    Estimado cliente: Le felicitamos por la adquisición de este producto. Lea atentamente el siguiente manual y siga cuidadosamente las instrucciones de uso con el fin de evitar posibles daños. La empresa no se responsabiliza de los daños ocasionados por un uso indebido del producto o por haber desatendido las indicaciones de seguridad.
  • Seite 28: Indicaciones De Seguridad

    INDICACIONES DE SEGURIDAD Indicaciones generales de seguridad • Lea atentamente todas las indicaciones antes de utilizar el aparato y conserve este manual de instrucciones para consultas posteriores. • Utilice el aparato y los accesorios solamente para el fin previsto y no para otros fines que no estén descritos en el manual de instrucciones.
  • Seite 29 marcha, antes de montarlo o desmontarlo y antes de limpiarlo y realizar labores de mantenimiento. Indicaciones de seguridad para cafeteras • Utilice el aparato únicamente en el interior. • No utilice el aparato en entornos húmedos. • Cuando el aparato esté lleno de agua, utilícelo solamente en entornos libres de escarcha.
  • Seite 30: Vista General Del Aparato

    VISTA GENERAL DEL APARATO Cepillo de limpieza Molinillo Cesto de fi ltro Tapa del depósito de agua Soporte del cesto de fi ltros Salida de vapor Jarra de vidrio 10 Pantalla Tapa del recipiente para 1 1 Indicador de llenado del agua granos de café...
  • Seite 31: Panel De Control

    PANEL DE CONTROL Teclas de función Botón de encendido/apagado. Enciende o apaga el aparato. Botón de Temporizador: Temporizador de encendido Pulse brevemente este botón para activar o desactivar el temporizador de encendido. Mantenga este botón pulsado durante unos segundos para acceder automáticamente al modo de Encendido. Pulse el botón «H»...
  • Seite 32 Retirar la cal: Pulse este botón para acceder al modo de retiro de cal. Vuelva a pulsar este botón para salir del modo de retiro de cal. FUNCIONAMIENTO 1. Conecte el aparato al suministro eléctrico. En la pantalla aparece la hora 12:00 00.
  • Seite 33: Limpieza Y Cuidado

    hervir el café. El indicador luminoso de funcionamiento empieza a parpadear. Moler y hervir Cuando en la pantalla se ilumina el icono signifi ca que la cafetera se encuentra en el modo de Moler y hervir. Utilice el botón de moler y hervir para elegir la intensidad de café.
  • Seite 34: Retirada Del Aparato

    RETIRADA DEL APARATO Si en su país existe una disposición legal relativa a la eliminación de aparatos eléctricos y electrónicos, este símbolo estampado en el producto o en el embalaje advierte que no debe eliminarse como residuo doméstico. En lugar de ello, debe depositarse en un punto de recogida de reciclaje de aparatos eléctricos y electrónicos.
  • Seite 35: Dati Tecnici

    Gentile cliente, La ringraziamo per aver acquistato il dispositivo. La preghiamo di leggere attentamente le seguenti istruzioni per l’uso e di seguirle per evitare possibili danni tecnici. Non ci assumiamo alcuna responsabilità per danni scaturiti da una mancata osservazione delle avvertenze di sicurezza e da un uso improprio del dispositivo.
  • Seite 36: Avvertenze Di Sicurezza

    AVVERTENZE DI SICUREZZA Avvertenze di sicurezza generiche • Leggere attentamente tutte le avvertenze prima dell’utilizzo e conservare il manuale per consultazioni future. • Utilizzare il dispositivo e gli accessori solo per gli scopi previsti e secondo le modalità descritte nel manuale. •...
  • Seite 37: Smaltimento Dell'imballaggio

    • Staccare la spina quando il dispositivo non è in funzione, prima del montaggio e smontaggio e prima di ogni operazione di pulizia e manutenzione. Avvertenze di sicurezza per macchine del caffè • Non utilizzare il dispositivo all’aperto. • Non utilizzare il dispositivo in ambienti umidi. •...
  • Seite 38: Descrizione Del Prodotto

    DESCRIZIONE DEL PRODOTTO Spazzola Coperchio serbatoio Cestello fi ltro dell'acqua Supporto cestello fi ltro Uscita vapore Brocca di vetro 10 Display Coperchio contenitore chicchi 1 1 Indicazione del livello di caffè dell'acqua Contenitore chicchi di caffè 12 Piastra riscaldante Macinino...
  • Seite 39: Pannello Di Controllo

    PANNELLO DI CONTROLLO Funzione dei tasti Interruttore on/off. Per accendere o fermare il dispositivo. Tasto timer: timer di accensione Premere brevemente questo tasto per accendere o spegnere il timer di accensione. Tenere premuto il tasto per alcuni secondi per accedere alla modalità...
  • Seite 40 Disincrostazione dal calcare: premere per entrare in modalità di disincrostazione. Premere nuovamente per uscire dalla modalità di disincrostazione. UTILIZZO 1. Collegare il dispositivo alla corrente elettrica. Sul display appare l’indicazione dell’ora 12:00. La spia dell’ora lampeggia senza contare il tempo. L’impostazione di default è...
  • Seite 41: Pulizia E Manutenzione

    Macinatura e infusione Se sul display appare il simbolo signifi ca che il dispositivo si trova in modalità di macinatura e di infusione. Con il tasto di macinatura e di infusione è possibile impostare il grado di intensità del caffè, mentre con il tasto delle tazze si imposta la quantità...
  • Seite 42: Smaltimento

    SMALTIMENTO Se nel proprio paese si applicano le regolamentazioni inerenti lo smaltimento di dispositivi elettrici ed elettronici, questo simbolo sul prodotto o sulla confezione segnala che questi prodotti non possono essere smaltiti con i rifiuti normali e devono essere portati a un punto di raccolta di dispositivi elettrici ed elettronici.

Diese Anleitung auch für:

10035653

Inhaltsverzeichnis