Herunterladen Inhalt Inhalt Diese Seite drucken
Parkside PKO 270 B2 Bedienungs- Und Sicherheitshinweise
Vorschau ausblenden Andere Handbücher für PKO 270 B2:
Inhaltsverzeichnis

Werbung

Verfügbare Sprachen
  • DE

Verfügbare Sprachen

  • DEUTSCH, seite 57
Anleitung_LB5_4010404:_
COMPRESOR
Instrucciones de utilización y de seguridad
Manual de instrucciones original
COMPRESSOR
Instruções de utilização e de segurança
Manual de instruções original
KOMPRESSOR
Bedienungs- und Sicherheitshinweise
Originalbetriebsanleitung
24.02.2011
11:06 Uhr
Seite 1
COMPRESSORE
Indicazioni per l'uso e per la sicurezza
Istruzioni per l'uso originali
COMPRESSOR
Operation and Safety Notes
Original operating instructions
PKO 270 B2
5

Werbung

Inhaltsverzeichnis
loading

Inhaltszusammenfassung für Parkside PKO 270 B2

  • Seite 1 Anleitung_LB5_4010404:_ 24.02.2011 11:06 Uhr Seite 1 PKO 270 B2 COMPRESOR COMPRESSORE Instrucciones de utilización y de seguridad Indicazioni per l’uso e per la sicurezza Manual de instrucciones original Istruzioni per l’uso originali COMPRESSOR COMPRESSOR Instruções de utilização e de segurança Operation and Safety Notes Manual de instruções original...
  • Seite 2 Anleitung_LB5_4010404:_ 24.02.2011 11:06 Uhr Seite 2 Antes de empezar a leer abra la página que contiene las imágenes y, en seguida, familiarícese con todas las funciones del dispositivo. Prima di leggere aprire la pagina con le immagini e prendere confidenza con le diverse funzioni dell’apparecchio.
  • Seite 3 Anleitung_LB5_4010404:_ 24.02.2011 11:07 Uhr Seite 3...
  • Seite 4 Anleitung_LB5_4010404:_ 24.02.2011 11:08 Uhr Seite 4 22 23 24...
  • Seite 5 Anleitung_LB5_4010404:_ 24.02.2011 11:09 Uhr Seite 5...
  • Seite 6: Inhaltsverzeichnis

    Anleitung_LB5_4010404:_ 24.02.2011 11:09 Uhr Seite 6 Índice de contenidos: Página 1. Introducción ................8 2. Instrucciones de seguridad ............8-10 3. Descripción del aparato ............10-11 4. Uso adecuado ................11 5. Características técnicas ............11 6. Antes de la puesta en marcha ..........12 7. Montaje y puesta en marcha ..........12-13 8.
  • Seite 7: Instrucciones De Seguridad Adicionales

    Anleitung_LB5_4010404:_ 24.02.2011 11:09 Uhr Seite 7 Instrucciones de seguridad adicionales ¡Tener en cuenta el manual de instrucciones! ¡Ponerse protectores para los oídos! ¡Atención! Tensión eléctrica ¡Atención! Piezas calientes Aviso: La unidad está teledirigida y se puede poner en marcha sin necesidad de aviso ¡Atención! No abrir el grifo/ regulador de presión antes de haber conectado la manguera de aire.
  • Seite 8: Introducción

    Anleitung_LB5_4010404:_ 24.02.2011 11:09 Uhr Seite 8 1. Introducción No utilizar el compresor cerca de líquidos o gases inflamables. ¡Peligro de explosión! Protegerse contra descargas eléctricas ■ ¡Atención! Evitar el contacto corporal con cualquier Al usar aparatos es preciso tener en cuenta una tipo de piezas con toma de tierra como, por serie de medidas de seguridad para evitar ejemplo, tuberías, calefactores, cocinas...
  • Seite 9 Anleitung_LB5_4010404:_ 24.02.2011 11:09 Uhr Seite 9 Es preciso evitar una puesta en marcha Ruido ■ ■ de la máquina no intencionada Ponerse protección para los oídos cuando Asegurarse de que el interruptor esté se esté empleando el compresor. desconectado antes de enchufar la Cambio del conducto de conexión ■...
  • Seite 10: Descripción Del Aparato

    Anleitung_LB5_4010404:_ 24.02.2011 11:09 Uhr Seite 10 ni limpiar ropa puesta. ¡Peligro de sufrir 2.4 Funcionamiento de recipientes de daños! presión El recipiente de presión se deberá recibir en ■ 2.3 Instrucciones de seguridad en la perfecto estado, operar de manera pulverización correcta, supervisar, realizar de manera No procesar pinturas ni disolventes con un...
  • Seite 11: Uso Adecuado

    Anleitung_LB5_4010404:_ 24.02.2011 11:09 Uhr Seite 11 17. Interruptor ON/OFF 5. Características técnicas 18. Mirilla para controlar el aceite 19. Válvula de seguridad Tensión de red: 230 V ~ 50 Hz 20. Acoplamiento rápido (aire comprimido no Potencia del motor kW: 1,8 kW regulado) 21.
  • Seite 12: Antes De La Puesta En Marcha

    Anleitung_LB5_4010404:_ 24.02.2011 11:09 Uhr Seite 12 6. Antes de la puesta en marcha 7.3 Montaje del filtro de aire (15) Quitar los tapones para el transporte (B) y atornillar el filtro de aire (15) al aparato (fig. Comprobar que el aparato no haya sufrido ■...
  • Seite 13: Cambio Del Cable De Conexión A La Red Eléctrica

    Anleitung_LB5_4010404:_ 24.02.2011 11:09 Uhr Seite 13 7.8 Ajuste del controlador de presión 9.1 Limpieza (fig. 1) Evitar al máximo posible que la suciedad y ■ El controlador de presión (2) viene ajustado de el polvo se acumulen en el aparato. Frotar fábrica.
  • Seite 14: Pedido De Piezas De Repuesto Y Transporte

    Anleitung_LB5_4010404:_ 24.02.2011 11:09 Uhr Seite 14 9.3 Válvula de seguridad (fig. 3) 9.6 Limpiar el filtro de aspiración La válvula de seguridad (19) está regulada a la (fig. 3, 12, 13) presión mayor admitida del recipiente de El filtro de aspiración impide aspirar polvo y presión.
  • Seite 15: Eliminación Y Reciclaje

    Anleitung_LB5_4010404:_ 24.02.2011 11:09 Uhr Seite 15 9.9 Transporte (fig. 1) Alternativa de reciclaje en caso de devolución: Desconectar y desenchufar el compresor El propietario del aparato eléctrico, en caso de ■ para moverlo y elevarlo. no optar por su devolución, está obligado a Para mover el compresor, utilizar la reciclar adecuadamente dicho aparato ■...
  • Seite 16: Posibles Causas De Fallo

    Anleitung_LB5_4010404:_ 24.02.2011 11:09 Uhr Seite 16 11. Posibles causas de fallo Problema Causa Solución El compresor no funciona. 1. No dispone de tensión de 1. Comprobar el cable, el red. enchufe, el fusible y la toma de corriente. 2. Tensión de red demasiado 2.
  • Seite 17: Declaración De Conformidad

    EÚ a noriem pre výrobok E Lýsir uppfyllingu EU-reglna og annarra staðla vöru A a cikkekhez az EU-irányvonal és Normák szerint a következő konformitást jelenti ki Kompressor PKO 270 B2 (Parkside) 87/404/EC_2009/105/EC 2006/42/EC Annex IV 2005/32/EC_2009/125/EC...
  • Seite 18: Certificado De Garantía

    Anleitung_LB5_4010404:_ 24.02.2011 11:09 Uhr Seite 18 13. CERTIFICADO DE GARANTÍA Estimado cliente: Nuestros productos están sometidos a un estricto control de calidad. No obstante, lamentaríamos que este aparato dejara de funcionar correctamente, en tal caso, le rogamos que se dirija a nuestro servicio de atención al cliente en la dirección indicada en la parte inferior de la presente tarjeta de garantía.
  • Seite 19 Anleitung_LB5_4010404:_ 24.02.2011 11:09 Uhr Seite 19 Indice Pagina 1. Introduzione ................21 2. Avvertenze di sicurezza ............21-23 3. Descrizione dell’apparecchio ..........23 4. Utilizzo proprio ...............24 5. Caratteristiche tecniche ............24 6. Prima della messa in esercizio ..........25 7. Montaggio e messa in esercizio ..........25-26 8.
  • Seite 20: Ulteriori Avvertenze Di Sicurezza

    Anleitung_LB5_4010404:_ 24.02.2011 11:09 Uhr Seite 20 Ulteriori avvertenze di sicurezza Osservate le istruzioni per l’uso! Indossate cuffie antirumore! Fate attenzione alla tensione elettrica! Fate attenzione alle parti molto calde! Avvertimento! L’unità è telecomandata e può mettersi in moto senza avvertimento. Attenzione! Non aprire il rubinetto/regolatore di pressione prima di aver collegato il tubo flessibile dell’aria.
  • Seite 21: Introduzione

    Anleitung_LB5_4010404:_ 24.02.2011 11:09 Uhr Seite 21 1. Introduzione Proteggetevi dalle scosse elettriche ■ Evitate di toccare con parti del corpo elementi collegati a massa, per esempio Attenzione! tubi, caloriferi, fornelli o frigoriferi. Nell’usare gli apparecchi si devono prendere Tenete lontani i bambini! ■...
  • Seite 22 Anleitung_LB5_4010404:_ 24.02.2011 11:09 Uhr Seite 22 omologati per questo e contrassegnati in Gonfiare i pneumatici ■ modo corrispondente. Controllate la pressione dei pneumatici Siate sempre attenti subito dopo averli gonfiati tramite un ■ Osservate il vostro lavoro. Lavorate in modo apposito manometro, ad es.
  • Seite 23: Descrizione Dell'apparecchio

    Anleitung_LB5_4010404:_ 24.02.2011 11:09 Uhr Seite 23 protettivi di filtrazione (maschere). Tenete Prima di ogni utilizzo controllate che il ■ presente anche le indicazioni circa le serbatoio a pressione non presenti danni e misure protettive fornite dal produttore di tali ruggine. Il compressore non deve venire sostanze.
  • Seite 24: Utilizzo Proprio

    Anleitung_LB5_4010404:_ 24.02.2011 11:09 Uhr Seite 24 4. Utilizzo proprio 5. Caratteristiche tecniche Il compressore serve per produrre aria Collegamento alla rete: 230 V ~ 50 Hz compressa per utensili da azionare con una Potenza del motore kW: 1,8 kW quantità di aria compressa fino a ca. 270 l/min Modalità...
  • Seite 25: Prima Della Messa In Esercizio

    Anleitung_LB5_4010404:_ 24.02.2011 11:09 Uhr Seite 25 6. Prima della messa in esercizio 7.3 Montaggio del filtro dell’aria (15) Togliete il tappo di trasporto (B) e avvitate saldamente all’apparecchio il filtro dell’aria (15) Verificate che l’apparecchio non presenti ■ (Fig. 7,8). Fate attenzione che l’apertura danni dovuti al trasporto.
  • Seite 26: Sostituzione Del Cavo Di Alimentazione

    Anleitung_LB5_4010404:_ 24.02.2011 11:09 Uhr Seite 26 7.8 Impostazione del pressostato (Fig. 1) 9.1 Pulizia Il pressostato (2) è stato impostato in fabbrica. Tenete l’apparecchio il più possibile libero ■ Pressione di inserimento ca. 6 bar da polvere e sporco. Passate un panno Pressione di disinserimento ca.
  • Seite 27: Ordinazione Di Pezzi Di Ricambio E Trasporto

    Anleitung_LB5_4010404:_ 24.02.2011 11:09 Uhr Seite 27 9.3 Valvola di sicurezza (Fig. 3) 9.6 Pulizia del filtro di aspirazione La valvola di sicurezza (19) è impostata sulla (Fig. 3, 12, 13) massima pressione consentita per il recipiente Il filtro di aspirazione impedisce che vengano a pressione.
  • Seite 28: Smaltimento E Riciclaggio

    Anleitung_LB5_4010404:_ 24.02.2011 11:09 Uhr Seite 28 9.9 Trasporto (Fig. 1) Alternativa di riciclaggio alla richiesta di Spegnete sempre l’apparecchio per lo restituzione ■ spostamento e il sollevamento e staccate la Il proprietario dell’apparecchio elettrico è spina dalla presa di corrente. tenuto, in alternativa alla restituzione, a Usate la maniglia di trasporto (1) per collaborare in modo che lo smaltimento venga...
  • Seite 29: Possibili Cause Di Anomalie

    Anleitung_LB5_4010404:_ 24.02.2011 11:09 Uhr Seite 29 11. Possibili cause di anomalie Problema Causa Soluzione Il compressore non 1. Manca la tensione di rete. 1. Controllare cavo, spina di funziona. rete, fusibile e presa di corrente. 2. Tensione di rete troppo 2.
  • Seite 30: Dichiarazione Di Conformità

    EÚ a noriem pre výrobok E Lýsir uppfyllingu EU-reglna og annarra staðla vöru A a cikkekhez az EU-irányvonal és Normák szerint a következő konformitást jelenti ki Kompressor PKO 270 B2 (Parkside) 87/404/EC_2009/105/EC 2006/42/EC Annex IV 2005/32/EC_2009/125/EC...
  • Seite 31: Certificato Di Garanzia

    Anleitung_LB5_4010404:_ 24.02.2011 11:09 Uhr Seite 31 13. CERTIFICATO DI GARANZIA Gentili clienti, i nostri prodotti sono soggetti ad un rigido controllo di qualità. Se l’apparecchio non dovesse tuttavia funzionare correttamente, ci scusiamo e vi preghiamo di rivolgervi al nostro servizio di assistenza clienti all’indirizzo indicato in questa scheda di garanzia.
  • Seite 32 Anleitung_LB5_4010404:_ 24.02.2011 11:09 Uhr Seite 32 Índice Página 1. Introdução ................34 2. Instruções de segurança ............34-36 3. Descrição do aparelho ............36-37 4. Utilização adequada ...............37 5. Dados técnicos ..............37 6. Antes da colocação em funcionamento .........38 7. Montagem e colocação em funcionamento ......38-39 8.
  • Seite 33: Instruções De Segurança Complementares

    Anleitung_LB5_4010404:_ 24.02.2011 11:09 Uhr Seite 33 Instruções de segurança complementares Respeite as instruções de serviço! Use protecção auditiva! Aviso sobre tensão eléctrica! Aviso sobre peças quentes! Aviso! A unidade é comandada à distância e pode começar a funcionar sem qualquer aviso prévio. Atenção! Não abra a torneira/o redutor antes de o tubo de ar estar ligado.
  • Seite 34: Introdução

    Anleitung_LB5_4010404:_ 24.02.2011 11:09 Uhr Seite 34 1. Introdução Proteja-se contra choques eléctricos ■ Evite o contacto físico com peças ligadas à terra, como sejam tubos, radiadores, Atenção! fogões, frigoríficos. Ao utilizar ferramentas, devem ser respeitadas Mantenha as crianças afastadas! ■ algumas medidas de segurança para prevenir Não deixe outras pessoas tocar no ferimentos e danos.
  • Seite 35 Anleitung_LB5_4010404:_ 24.02.2011 11:09 Uhr Seite 35 encontra desligado ao ligar a máquina à ligação for danificado, tem de ser corrente. substituído pelo fabricante ou por um Extensões ao ar livre electricista. Perigo de choques eléctricos! ■ Ao ar livre use unicamente cabos de Enchimento dos pneus ■...
  • Seite 36: Descrição Do Aparelho

    Anleitung_LB5_4010404:_ 24.02.2011 11:09 Uhr Seite 36 2.3 Instruções de segurança ao pintar com necessárias. ar comprimido A entidade de supervisão pode, num caso ■ Não utilize tinta ou solventes com um ponto isolado, ordenar medidas de monitorização ■ de inflamação inferior a 75° C. Perigo de necessárias.
  • Seite 37: Utilização Adequada

    Anleitung_LB5_4010404:_ 24.02.2011 11:09 Uhr Seite 37 22. Anilha 5. Dados técnicos 23. Anilha de mola 24. Porca Ligação à rede: 230 V ~ 50 Hz Potência do motor kW: 1,8 kW 4. Utilização adequada Modo de funcionamento: Rotações do compressor r.p.m.: 2850 O compressor destina-se à...
  • Seite 38: Antes Da Colocação Em Funcionamento

    Anleitung_LB5_4010404:_ 24.02.2011 11:09 Uhr Seite 38 6. Antes da colocação em 7.3 Montagem do filtro do ar (15) Remova o tampão de transporte (B) e fixe bem funcionamento o filtro de ar (15) no aparelho (figuras 7,8). Certifique-se de que a abertura de aspiração Verifique se o aparelho apresenta danos de ■...
  • Seite 39: Substituição Do Cabo De Ligação À Rede

    Anleitung_LB5_4010404:_ 24.02.2011 11:09 Uhr Seite 39 7.8 Ajuste do interruptor manométrico 9. Limpeza, manutenção, (figura 1) armazenagem, encomenda de O interruptor manométrico (2) encontra-se peças sobressalentes e ajustado de fábrica. Pressão de ligação aprox. 6 bar transporte Pressão de corte aprox. 8 bar Atenção! 7.9 Montagem da mangueira de ar Retire a ficha de alimentação da respectiva...
  • Seite 40 Anleitung_LB5_4010404:_ 24.02.2011 11:09 Uhr Seite 40 parafuso de descarga rodando-o para a 9.5 Mudança de óleo (figuras 1,10, 11) esquerda (direcção do olhar do lado inferior do Desligue o motor e retire a ficha de alimentação compressor para o parafuso), de modo a que a da tomada.
  • Seite 41: Encomenda De Peças Sobressalentes E Transporte

    Anleitung_LB5_4010404:_ 24.02.2011 11:09 Uhr Seite 41 9.7 Armazenagem 10. Eliminação e reciclagem Atenção! Retire a ficha da corrente eléctrica, faça a O aparelho encontra-se dentro de uma sangria do aparelho e de todas as embalagem para evitar danos de transporte. ferramentas de ar comprimido ligadas ao Esta embalagem é...
  • Seite 42: Causas Para Possíveis Falhas

    Anleitung_LB5_4010404:_ 24.02.2011 11:09 Uhr Seite 42 11. Causas para possíveis falhas Problema Causa Solução O compressor não funciona 1. Tensão de rede inexistente. 1. Verifique o cabo, a ficha de alimentação, o fusível e a tomada. 2. Tensão de rede demasiado 2.
  • Seite 43: Declaração De Conformidade

    EÚ a noriem pre výrobok E Lýsir uppfyllingu EU-reglna og annarra staðla vöru A a cikkekhez az EU-irányvonal és Normák szerint a következő konformitást jelenti ki Kompressor PKO 270 B2 (Parkside) 87/404/EC_2009/105/EC 2006/42/EC Annex IV 2005/32/EC_2009/125/EC...
  • Seite 44: Certificado De Garantia

    Anleitung_LB5_4010404:_ 24.02.2011 11:09 Uhr Seite 44 13. CERTIFICADO DE GARANTIA Estimado(a) cliente, Os nossos produtos são submetidos a um rigoroso controlo de qualidade. Se, ainda assim, o aparelho não funcionar nas devidas condições, lamentamos esse facto e pedimos-lhe que se dirija ao nosso serviço de assistência técnica na morada indicada no presente certificado de garantia.
  • Seite 45 Anleitung_LB5_4010404:_ 24.02.2011 11:09 Uhr Seite 45 Table of contents: Page 1. Introduction ................47 2. Safety information ..............47-49 3. Layout ..................49 4. Intended use ................49 5. Technical data ................50 6. Before starting the equipment ..........50 7. Assembly and starting ............50-51 8. Replacing the power cable .............51 9.
  • Seite 46: Additional Safety Instructions

    Anleitung_LB5_4010404:_ 24.02.2011 11:09 Uhr Seite 46 Additional safety instructions Note the instructions for use! Wear ear-muffs! Beware of electrical voltage! Beware of hot parts! Warning! The equipment is remote-controlled and may start-up without warning. Important! Do not open the stopcock/pressure regulator until the air hose is connected.
  • Seite 47: Introduction

    Anleitung_LB5_4010404:_ 24.02.2011 11:09 Uhr Seite 47 1. Introduction compressor or cable, keep them away from your work area. Keep your compressor in a safe place ■ Important! When unused, the compressor must be When using the equipment, a few safety stored in a dry, locked room out of children’s precautions must be observed to avoid injuries reach.
  • Seite 48 Anleitung_LB5_4010404:_ 24.02.2011 11:09 Uhr Seite 48 moving parts are working correctly, that they recommended to use an air line with a do not jam, and that no parts are damaged. safety cable. Make sure that all parts are fitted correctly to ensure that the equipment remains safe to 2.2 Safety instructions for working with use.
  • Seite 49: Layout

    Anleitung_LB5_4010404:_ 24.02.2011 11:09 Uhr Seite 49 health. 11. Wheel The work area must exceed 30 m 12. Oil drain plug ■ sufficient ventilation must be ensured during 13. Compressor pump spraying and drying. Do not spray against 14. Compressed air hose the wind.
  • Seite 50: Technical Data

    Anleitung_LB5_4010404:_ 24.02.2011 11:09 Uhr Seite 50 5. Technical data 6. Before starting the equipment Check the equipment for damage which ■ Mains connection: 230 V ~ 50 Hz may have occurred in transit. Report any Motor rating kW: 1.8 kW damage immediately to the transport Operating mode: company which was used to deliver the...
  • Seite 51: Replacing The Power Cable

    Anleitung_LB5_4010404:_ 24.02.2011 11:09 Uhr Seite 51 7.3 Fitting the air filter (15) 7.9 Fitting the compressed air hose Remove the transportation stopper (B) and (Fig. 1, 3) screw the air filter (15) securely to the Use the compressed air hose (14) if you intend equipment (Fig.
  • Seite 52 Anleitung_LB5_4010404:_ 24.02.2011 11:09 Uhr Seite 52 into the interior of the equipment. the oil must be drained and replaced with new You must disconnect the hose and any oil after every 500 hours in operation. ■ spraying tools from the compressor before cleaning.
  • Seite 53: Ordering Spare Parts

    Anleitung_LB5_4010404:_ 24.02.2011 11:09 Uhr Seite 53 9.7 Storage 10. Disposal and recycling Important! Pull out the mains plug and ventilate the The equipment is supplied in packaging to equipment and all connected pneumatic prevent it from being damaged in transit. The tools (see 9.7.1).
  • Seite 54: Possible Causes Of Failure

    Anleitung_LB5_4010404:_ 24.02.2011 11:09 Uhr Seite 54 11. Possible causes of failure Problem Cause Solution The compressor does not 1. No supply voltage. 1. Check the supply voltage, start. the power plug and the socket-outlet. 2. Insufficient supply voltage. 2. Make sure that the extension cable is not too long.
  • Seite 55: Declaration Of Conformity

    EÚ a noriem pre výrobok E Lýsir uppfyllingu EU-reglna og annarra staðla vöru A a cikkekhez az EU-irányvonal és Normák szerint a következő konformitást jelenti ki Kompressor PKO 270 B2 (Parkside) 87/404/EC_2009/105/EC 2006/42/EC Annex IV 2005/32/EC_2009/125/EC...
  • Seite 56: Guarantee Certificate

    Anleitung_LB5_4010404:_ 24.02.2011 11:09 Uhr Seite 56 13. GUARANTEE CERTIFICATE Dear Customer, All of our products undergo strict quality checks to ensure that they reach you in perfect condition. In the unlikely event that your device develops a fault, please contact our service department at the address shown on this guarantee card.
  • Seite 57 Anleitung_LB5_4010404:_ 24.02.2011 11:09 Uhr Seite 57 DE/AT/ Inhaltsverzeichnis Seite 1. Einleitung ................59 2. Sicherheitshinweise ..............59-61 3. Gerätebeschreibung ...............61-62 4. Bestimmungsgemäße Verwendung ........62 5. Technische Daten ..............62 6. Vor Inbetriebnahme..............63 7. Montage und Inbetriebnahme ..........63-64 8. Austausch der Netzanschlussleitung ........64 9. Reinigung, Wartung, Lagerung, Ersatzteilbestellung und Transport..........64-66 10.
  • Seite 58: Zusätzliche Sicherheitshinweise

    Anleitung_LB5_4010404:_ 24.02.2011 11:10 Uhr Seite 58 DE/AT/ Zusätzliche Sicherheitshinweise Gebrauchsanweisung beachten! Gehörschutz tragen! Warnung vor elektrischer Spannung Warnung vor heißen Teilen Warnung! Die Einheit ist ferngesteuert und darf ohne Warnung anlaufen Achtung! Den Hahn/Druckregler nicht öffnen, bevor der Luftschlauch angeschlossen ist.
  • Seite 59: Einleitung

    Anleitung_LB5_4010404:_ 24.02.2011 11:10 Uhr Seite 59 DE/AT/ 1. Einleitung Gefahr durch Stromschlag! Sorgen Sie für gute Beleuchtung. Benutzen Sie den Kompressor nicht in der Achtung! Nähe von brennbaren Flüssigkeiten oder Beim Benutzen von Geräten müssen einige Gasen. Explosionsgefahr! Sicherheitsvorkehrungen eingehalten werden, Schützen Sie sich vor elektrischem ■...
  • Seite 60 Anleitung_LB5_4010404:_ 24.02.2011 11:10 Uhr Seite 60 DE/AT/ Vergewissern Sie sich, dass der Schalter Austausch der Anschlussleitung ■ beim Anschluss an das Stromnetz Wenn die Anschlussleitung beschädigt wird, ausgeschaltet ist. muss sie vom Hersteller oder einer Elektro- Verlängerungskabel im Freien fachkraft ersetzt werden, um Gefährdungen ■...
  • Seite 61: Sicherheitshinweise Beim Farbspritzen

    Anleitung_LB5_4010404:_ 24.02.2011 11:10 Uhr Seite 61 DE/AT/ 2.3 Sicherheitshinweise beim Farbspritzen 2.4 Betrieb von Druckbehältern Keine Lacke oder Lösungsmittel mit einem Wer einen Druckbehälter betreibt, hat ■ ■ Flammpunkt von weniger als 75° C diesen in einem ordnungsgemäßen Zustand verarbeiten. Explosionsgefahr! zu erhalten, ordnungsgemäß...
  • Seite 62: Bestimmungsgemäße Verwendung

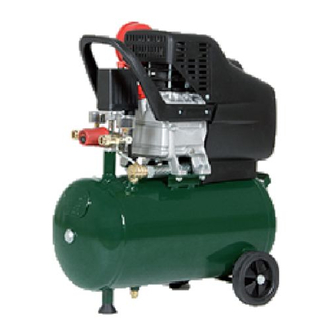
    Anleitung_LB5_4010404:_ 24.02.2011 11:10 Uhr Seite 62 DE/AT/ 17. Ein- / Aus - Schalter 5. Technische Daten 18. Öl – Schauglas 19. Sicherheitsventil Netzanschluss: 230 V ~ 50 Hz 20. Schnellkupplung (ungeregelte Druckluft) Motorleistung kW: 1,8 kW 21. Öl – Einfüllöffnung 22.
  • Seite 63: Vor Inbetriebnahme

    Anleitung_LB5_4010404:_ 24.02.2011 11:10 Uhr Seite 63 DE/AT/ 6. Vor Inbetriebnahme 7.3 Montage des Luftfilters (15) Entfernen Sie den Transportstopfen (B) und schrauben Sie den Luftfilter (15) am Gerät fest Überprüfen Sie das Gerät auf ■ (Bild 7,8). Achten Sie darauf, dass die Transportschäden.
  • Seite 64: Austausch Der Netzanschlussleitung

    Anleitung_LB5_4010404:_ 24.02.2011 11:10 Uhr Seite 64 DE/AT/ 7.8 Druckschaltereinstellung (Bild 1) 9.1 Reinigung Der Druckschalter (2) ist werkseitig eingestellt. Halten Sie das Gerät so staub- und ■ Einschaltdruck ca. 6 bar schmutzfrei wie möglich. Reiben Sie das Ausschaltdruck ca. 8 bar Gerät mit einem sauberen Tuch ab oder blasen Sie es mit Druckluft bei niedrigem 7.9 Montage des Duckluftschlauchs...
  • Seite 65 Anleitung_LB5_4010404:_ 24.02.2011 11:10 Uhr Seite 65 DE/AT/ 9.3 Sicherheitsventil (Bild 3) Das Altöl entsorgen Sie bei einer Das Sicherheitsventil (19) ist auf den entsprechenden Annahmestelle für Altöl. höchstzulässigen Druck des Druckbehälters Um die richtige Ölmenge zu befüllen, achten eingestellt. Es ist nicht zulässig, das Sie darauf, das der Kompressor auf einer Sicherheitsventil zu verstellen oder dessen geraden Fläche steht.
  • Seite 66: Entsorgung Und Wiederverwertung

    Anleitung_LB5_4010404:_ 24.02.2011 11:10 Uhr Seite 66 DE/AT/ 9.7.1 Ablassen des Überdrucks 10. Entsorgung und Lassen Sie den Überdruck im Kompressor ab, Wiederverwertung indem Sie den Kompressor ausschalten und die noch im Druckbehälter vorhandene Das Gerät befindet sich in einer Verpackung Druckluft verbrauchen, z.B.
  • Seite 67: Mögliche Ausfallursachen

    Anleitung_LB5_4010404:_ 24.02.2011 11:10 Uhr Seite 67 DE/AT/ 11. Mögliche Ausfallursachen Problem Ursache Lösung Kompressor läuft nicht. 1. Netzspannung nicht 1. Kabel, Netzstecker, vorhanden. Sicherung und Steckdose überprüfen. 2. Netzspannung zu niedrig. 2. Zu lange Verlängerungs- kabel vermeiden. Verlängerungskabel mit ausreichendem Aderquer- schnitt verwenden.
  • Seite 68: Konformitätserklärung

    EÚ a noriem pre výrobok E Lýsir uppfyllingu EU-reglna og annarra staðla vöru A a cikkekhez az EU-irányvonal és Normák szerint a következő konformitást jelenti ki Kompressor PKO 270 B2 (Parkside) 87/404/EC_2009/105/EC 2006/42/EC Annex IV 2005/32/EC_2009/125/EC...
  • Seite 69: Garantieurkunde

    Anleitung_LB5_4010404:_ 24.02.2011 11:10 Uhr Seite 69 DE/AT/ GARANTIEURKUNDE Sehr geehrte Kundin, sehr geehrter Kunde, unsere Produkte unterliegen einer strengen Qualitätskontrolle. Sollte dieses Gerät dennoch einmal nicht ein- wandfrei funktionieren, bedauern wir dies sehr und bitten Sie, sich an unseren Servicedienst unter der auf die- ser Garantiekarte angegebenen Adresse zu wenden.
  • Seite 70 Anleitung_LB5_4010404:_ 24.02.2011 11:10 Uhr Seite 70...
  • Seite 71 Anleitung_LB5_4010404:_ 24.02.2011 11:10 Uhr Seite 71...
  • Seite 72 Anleitung_LB5_4010404:_ 24.02.2011 11:10 Uhr Seite 72 COMPRESOR IAN: 64575 PKO 270 B2 Einhell Germany AG Wiesenweg 22 D-94405 Landau/Isar COMPRESSOR Estado de las informaciones · Versione delle informazioni KOMPRESSOR Estado das informações · Last Information Update Stand der Informationen: 02/2011 Ident.-No.: 40.104.04 022011 - 5...

Diese Anleitung auch für:

Ian 64575

Inhaltsverzeichnis