Sharp XV-Z90E Serviceanleitung
Theater projektor
Vorschau ausblenden
Andere Handbücher für XV-Z90E:
- Bedienungsanleitung (62 Seiten) ,
- Bedienungsanleitung (61 Seiten)
Inhaltsverzeichnis
Verfügbare Sprachen
Verfügbare Sprachen
Quicklinks
In the interests of user-safety (Required by safety regulations in some countries) the set should be restored
to its original condition and only parts identical to those specified should be used.
Im lnteresse der Benutzersicherheit (erforderliche Sicherheitsregeln in einigen Ländern) muß das Gerät in seinen
Originalzustand gebracht werden. Außerdem dürfen für die spezifizierten Bauteile nur identische Teile verwendet
werden.
CONTENTS
» SPECIFICATIONS ............................................. 2
» NOTE TO SERVICE PERSONNEL ................... 3
» OPERATION MANUAL ...................................... 5
» REMOVING OF MAJOR PARTS ..................... 10
» RESETTING THE TOTAL LAMP TIMER ......... 15
» ELECTRICAL ADJUSTMENT ........................... 16
» TROUBLE SHOOTING TABLE ....................... 21
» CHASSIS LAYOUT .......................................... 60
» BLOCK DIAGRAM ........................................... 62
» OVERALL WIRING DIAGRAM ........................ 64
» SCHEMATIC DIAGRAM .................................. 66
» PRINTED WIRING BOARD ASSEMBLIES ..... 99
Ë ELECTRICAL PARTS ................................ 105
Ë CABINET AND MECHANICAL PARTS ..... 116
Ë ACCESSORIES PARTS ............................ 120
Ë PACKING PARTS ...................................... 120
» PACKING OF THE SET ................................. 121
SERVICE MANUAL
SERVICE-ANLEITUNG
MODELS
MODELLE
Page
» TECHNISCHE DATEN .................................... 31
» BEDIENUNGSANLEITUNG ............................ 34
» ENTFERNEN DER HAUPTTEILE ................... 39
» ELEKTRISCH EINSTELLUNG ........................ 45
» FEHLERSUCHTABELLE ................................. 50
» CHASSIS-ANORDNUNG ................................ 60
» BLOCKSCHALTBILD ....................................... 62
» GESAMTSCHALTPLAN .................................. 64
» SCHEMATISCHER SCHALTPLAN ................. 66
» LEITERPLATTENEINHEITEN ......................... 99
» VERPACKEN DES GERÄTS ......................... 121
SHARP CORPORATION
THEATER PROJECTOR
THEATER PROJEKTOR
XV-Z90E
XV-Z91E
INHALT
WARTUNGSPERSONAL ................................ 32
LAMPENBETRIEBSZEIT-TIMERS .................. 44
Ë ELEKTRISCHE BAUTEILE ....................... 105
BAUTEILE ................................................. 116
Ë ZUBEHÖRTEILE ....................................... 120
Ë VERPACKUNGSTEILE ............................. 120
XV-Z90E
XV-Z91E
S13V7XV-Z90E/
Seite
Inhaltsverzeichnis

Verwandte Anleitungen für Sharp XV-Z90E


Inhaltszusammenfassung für Sharp XV-Z90E
-
Seite 31: Technische Daten
Linsenkappenriemen (UBNDT0013CEZZ), Bedienungsanleitungen für 7 europäische Sprachen (TINS- A326WJZZ) / für Chinesisch, Koreanisch und Arabisch (TINS-A327WJZZ) Dieser SHARP-Projektor verwendet einen DMD-Chip. Dieser hochentwickelte Chip beinhaltet 480.000 Pixel. Wie bei allen hochtechnologischen Elektronikgeräten wie großen Fernsehbildschirmen, Videosystemen und Videokameras, gibt es auch hier bestimmte akzeptable Toleranzen, denen das Gerät entsprechen muß. -
Seite 32: Hinweise Für Das Wartungspersonal
XV-Z90E XV-Z91E HINWEIS FÜR DAS WARTUNGSPERSONAL 1 2 3 4 5 6 7 8 9 0 1 2 3 4 5 6 7 8 9 0 1 2 3 4 5 6 7 8 9 0 1 2 1 2 3 4 5 6 7 8 9 0 1 2 3 4 5 1 2 3 4 5 6 7 8 9 0 1 2 3 4 5 6 7 8 9 0 1 2 3 4 5 6 7 8 9 0 1 2 1 2 3 4 5 6 7 8 9 0 1 2 3 4 5 Ë... -
Seite 33: Vorsichtsmaßregeln Für Bleifreien Lötzinn
XV-Z90E XV-Z91E Vorsichtsmaßregeln für bleifreien Lötzinn 1 Verwendung von bleifreiem Lötzinn Bei den Platinen für vorderen und hinteren Fernbedienungsempfänger, Terminal 1, Terminal 2 und Tasten dieses Modells wird bleifreies Lot verwendet. Das Symbol LF kennzeichnet bleifreies Lot und findet sich an den Platinen und in den Wartungshandbüchern. -
Seite 34: Bedienelemente
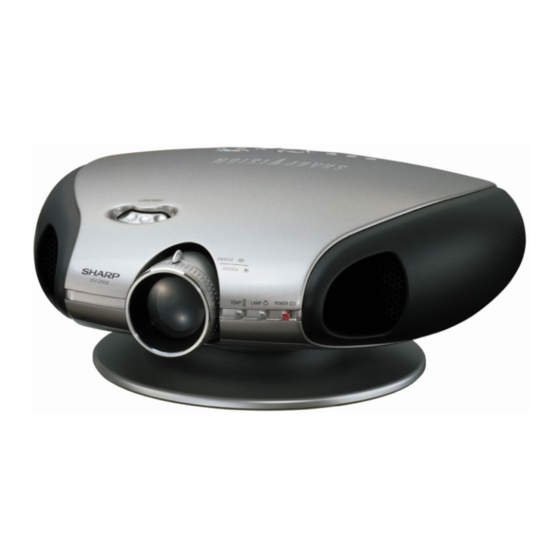
XV-Z90E XV-Z91E Bedienelemente Projektor Ansicht von vorne und oben Linsenversteller Temperatur-Warnung-Anzeige (TEMP .) Zoom-Knopf Lampenaustausch-Anzeige (LAMP) Auslass-Lüftungsöffnung Netzanzeige (POWER) Fokusring Auslass-Lüftungsöffnung Fernbedienungssensor Linsenkappe Menü-Taste (MENU) Einstelltasten (ADJUSTMENT) ('/"/\ /| ) Netztasten Eingangstaste (POWER) Rückgängig-Taste (UNDO) (INPUT) Ein/Aus (ON/OFF) Trapeztaste (KEYSTONE) -
Seite 35: Anbringen Der Linsenkappe
XV-Z90E XV-Z91E Projektor Seiten- und Rückansicht Fernbedienungssensor Einlass-Lüftungsöffnung Einlass-Lüftungsöffnung RS-232C-Port Eingang 3 S-Video-Buchse Eingang 2 Komponenten/RGB-Port (9-Pin D-Sub) (INPUT 2 COMPONENT/RGB) (INPUT 3 S-VIDEO) (4-Pin Mini DIN) Wechselstrom-Buchse Eingang 1 Komponenten-Buchsen (INPUT 1 COMPONENT) (RCA) Eingang 4 Video-Buchsen (INPUT4 VIDEO) (RCA) -
Seite 36: Fernbedienung
XV-Z90E XV-Z91E Fernbedienung Top View Vorderansicht Netztasten (POWER) Ein/Aus (ON/OFF) Trapeztaste (KEYSTONE) Menü-Taste (MENU) Eingabetaste (ENTER) Einstelltasten (ADJUSTMENT) ('/"/\ /| ) Rückgängig-Taste (UNDO) Eingang 1-Taste (INPUT 1) Eingang 3-Taste (INPUT 3) Eingang 2-Taste (INPUT 2) Eingang 4-Taste (INPUT 4) Grösse-Ändern-Taste (RESIZE) Taste für automatische Synchronisation... -
Seite 37: Pin-Belegung
XV-Z90E XV-Z91E Pin-Belegung INPUT 2 COMPONENT/RGB-Port: 15-Pin Mini-D-Sub-Buchse • RGB-Eingang Pin Nr. Signal Pin Nr. Signal Videoeingang (r ot) Nicht angeschlossen Videoeingang Erdung (Grün/Sync. auf Grün) Erdung Videoeingang (blau) Bi-direktionale Daten Horizontales Sync.- Nicht angeschlossen Gemischtes Sync. Signal Erdung (rot) Vertikales Sync.-... -
Seite 38: Abmessungen
XV-Z90E XV-Z91E Abmessungen Ansicht der Rückseite Seitenansicht Ansicht von oben Seitenansicht Ansicht von vorne Ansicht von unten Einheit: mm... -
Seite 39: Entfernen Der Hauptteile
XV-Z90E XV-Z91E ENTFERNEN DER HAUPTTEILE 1. Ausbau von Schwenksockel und Lampenkasten 1-1. Den Arretierhebel freigeben und den Schwenksockel abnehmen. 1-2. Die 1 Schraube losdrehen und die Lampenklappe abnehmen. 1-3. Die 3 Schrauben losdrehen und den Lampenkasten herausnehmen. Lampenkasten Lampenklappe Arretierhebel für Schwenksockel Schwenksockel 2. -
Seite 40: Ausbau Der Hauptplatine
XV-Z90E XV-Z91E 3. Ausbau der Hauptplatine 3-1. D i e 2 S c h r a u b e n h e r a u s d r e h e n u n d d a s Abschirmblech abnehmen. -
Seite 41: Ausbau Der Stromversorgung
XV-Z90E XV-Z91E 6. Ausbau der Stromversorgung 6-1. D i e e i n z e l n e n S t e c k v e r b i n d e r v o n d e r Stromversorgungs-Platine abziehen. - Seite 42 XV-Z90E XV-Z91E Vorsichtsmaßregeln zur Auswechslung des DMD (Digital-Mikrospiegel-Vorrichtung) -Chips Spiegeleinstellplatte Hinweis: Sicherstellen, daß sich keine Staube und Fingerabdrücke auf dem Deckglas des DMD-Chips und der Prismen-Oberfläche Formattierer-Platineneinheit des Optikapparats zurücklassen. 1. Beim Festziehen der 4 Schrauben der R ü c k h a l t e p l a t t e n - B a u g r u p p e d i e Rückhalteplatte auf die Formatier-Platine...
- Seite 43 XV-Z90E XV-Z91E Kurzbeschreibung des Optikapparats <Layout> Relaislinsen Stablinse Reflektor Projektionsobjektiv Lampe UV/IR-Filter Prisma Farbrad DMD-Chip Zoom-Einstellring Fokussierring Breite Funktion Gegenstand Lichtquelle. Gleichstrombetriebene Hochdruck- Lampe Quecksilberdampflampe. UV/IR-Filter Zur Absorption von Ultraviolett- und Infrarotstrahlen. Dient zum Durchlassen der Lichtquelle durch den Farbfilter Farbrad und Aufspalten in die Farben R, G und B.
-
Seite 44: Rückstellung Des Lampen-Timers
Gerät ist zu Warnung) hoch. • Verstopfte • Lüftungsöffnungen reinigen. Belüftungsöffnungen • Kühlventilator beschädigt . • Den Projektor einem von Sharp • I nterne Schaltkreise autorisierten Händler für Projektoren oder beschädigt . dem Kundendienst zur Reparatur übergeben. LAMP-Anzeige Die Lampe •... -
Seite 45: Elektrisch Einstellung
XV-Z90E XV-Z91E ELEKTRISCH EINSTELLUNG Einstellposten Einstellbedingungen Einstellverfahren Initialisierung des 1. Das Gerät einschalten (Lampe 1. Folgende Einstellungen ausführen. EEPROM leuchtet auf) und das System für 15 D e n P r o z e s s m o d u s ü b e r d i e Minuten aufwärmen lassen. - Seite 46 XV-Z90E XV-Z91E Einstellposten Einstellbedingungen Einstellverfahren Einstellung von B- 1. Die nachfolgende Gruppe bzw. die 1. Auf dem bitlosen Schirm bei der Helligkeit/Kontrast Position wählen. E i n s t e l l u n g f o l g e n d e A b f o l g e...
-
Seite 47: Einstellung Beim Zusammenbau
XV-Z90E XV-Z91E Einstellposten Einstellbedingungen Einstellverfahren Einstellung der 1.Die nachfolgende Gruppe bzw. die 1. Den festgelegten Wert bestätigen. DVD- Position wählen. Color: 10 Farbsättigung Gruppe: DVD Posten: Color Einstellung für 1. Ein NTSC 10STEP-Signal (ohne 1. Den Einstellwert der Helligkeit auf Video/ Einstellung) zuführen. -
Seite 48: Bestätigung
XV-Z90E XV-Z91E Bestätigung Einstellposten Einstellbedingungen Einstellverfahren Bestätigung und Die Einstellbedingungen von Parameter Sicherstellen, dass der Weißabgleich Neueinstellung 13 bei DTV-Eingabe optimal ist. der Weißbalance Bei Neueinstellung nur DVD-Eingabe ausführen. Bestätigung der 1. Das Farbbildsignal empfangen. 1. L1 im Prozeßmodus empfangen. -
Seite 49: Eingabe Des Einstellprozeßmodus
XV-Z90E XV-Z91E » Eingabe des Einstellprozeßmodus Es gibt die folgenden zwei Verfahren. » Den SW2001 an der Tastenplatinen-Einheit drücken. » Die folgenden Tasten in der vorgeschriebenen Reihenfolge betätigen. Einstell oben→Einstell oben→Einstell unten→Einstell unten→Einstellung rechts→Einstellung links→ENTER » Einstellmodus-Prozessmenü Gruppe Gegenstand Gruppe... -
Seite 50: Fehlersuchtabelle
XV-Z90E XV-Z91E FEHLERSUCHTABELLE Üerprüfen der grundlegenden Funktionen Nein Zu “Überprüfen des Netzteils” Leuchtet die POWER LED auf, weitergehen. oder blinkt sie in Rot bzw. Grün? Funktioniert das Gerät durch den Die Peripheriekreise von IC8001 und Geräteschlüssel oder die Nein IC2002 prüfen. - Seite 51 XV-Z90E XV-Z91E Überprüfen des Netzteils Nein Die einzelnen Steckverbinder Sind die Anschlüsse des Netzteils sicher einstecken. vollständig eingesteckt? Nein Ist die Lampentür vollständig Die Lampentür mit den Schrauben geschlossen? vollständig schlie§en. Den Bimetallschalter austauschen Nein Ist der Bimetallschalter nicht oder durch Drücken des roten deaktiviert? Knopfes reaktivieren.
- Seite 52 XV-Z90E XV-Z91E Die Lampe leuchtet nicht auf. Den Stromversorgungskreis bzw. Nein Dreht sich das Kühlgebläse? den Lüfterkreis der Hauptschaltung prüfen. Am IC9101-Schaltkreis, Motor- Nein Ist der Rotationston der Treiber-IC und IC9102/9003 Farbscheibe hörbar? prüfen. Normal Abnormal Die Formatierungs- Die Farbscheibe platine überprüfen.
- Seite 53 XV-Z90E XV-Z91E Prüfung von IC2002 und am Ein-/ Ausgang Nein Blinkt die POWER LED in Rot? Ist er wegen eines Fehlers Nein Nein auf Betriebsbereitschafts- Ist Kontakt (9) an P1701 auf H- Defekt bei IC2002 pegel? Pegel (P CON0)? Die Stromversorgung erneut einschalten.
- Seite 54 XV-Z90E XV-Z91E Überprüfen des SOG-Schaltkreises Den Stift (7) von IC5012 mit dem Oszilloskop überprüfen. Wird das Farbbildsignal mit dem Der SOG-Schaltkreis ist normal. korrekten Timing reproduziert? Ende. Nein Das Signal an Kontakt (7) von IC5010 mit einem Oszilloskop messen. Nein Nein Liegt ein Y-Signal (einschl.
- Seite 55 XV-Z90E XV-Z91E Überprüfen des Videoeingangs Das Farbbildsignal dem INPUT 4 z uführen. INPUT 4 mit der Ende. Gerätetaste bzw. mit der - Fernbedienung anwählen. Nein Wird Synchronsignal Wird ein Bild ausgegeben? Bestehen Bildstörungen? Kontakt (28) und (29) von Nein IC3102 zugeführt?
- Seite 56 XV-Z90E XV-Z91E Prüfung des Komponentensignals an Kontakt 15 von D-Sub-Eingang. Eingabe des Komponentensignals von INPUT 1. INPUT 1 mit den Tasten an der Haupteinheit oder über die Fernbedienung wählen. Nein Erfolgt Bildausgabe? Ende. Ist das Bild verfälscht? Nein Nein Wird das Signal Steckverbinder Terminal 2-Platine prüfen.
- Seite 57 XV-Z90E XV-Z91E Überprüfen des Synchronisationssignals Liegt am Stift (6) von IC5001 ein Nein Horizontal- Synchronisationssignal Nein Liegt am Stift (6) von IC5002 ein Platine des Signaleingabeteils Vertikal- Synchronisationssignal an? prüfen. Ausgang des Synchronsignals Die einzelnen IC und den Nein über IC5009, IC5005, IC5006,...
- Seite 58 XV-Z90E XV-Z91E » Störungssuche bei der Formatiereinheit -1/2 Abnormales Bild Regenbogenfarben auf Breite weiße Stromausfall Andere dem Schirm. Keine Vertikalstreifen (blinkend) korrekte Anpassung bei Nein Nein Nein Rot, Grün und Blau. Staubablagerung auf DMD, Verbindungen mit Einstellungen über Verbindung mit Buchse Formatier-Platine und →...
- Seite 59 XV-Z90E XV-Z91E » Störungssuche bei der Formatiereinheit-2/2 Nein Ist die Spannung an IC9301 oder zugehöriger 60-MHz-Impulssignal Kontakt (1) von P2002 Peripheriekreis defekt. an TP9025? der Hauptplatine auf H-Pegel? Nein Ist Steckverbinder P2002 richtig angeschlossen? Liegt die vorgeschriebene Nein Ballasteinheit und Strom- Spannung an versorgung prüfen.
-
Seite 60: Chassis Layout
XV-Z90E XV-Z91E CHASSIS LAYOUT / CHASSIS-ANORDNUNG... - Seite 61 XV-Z90E XV-Z91E...
-
Seite 62: Block Diagram
XV-Z90E XV-Z91E BLOCK DIAGRAM / BLOCKSCHALTBILD THC4538T IC503... - Seite 63 XV-Z90E XV-Z91E THC4538T IC503...
-
Seite 64: Overall Wiring Diagram
XV-Z90E XV-Z91E OVERALL WIRING DIAGRAM / GESAMTSCHALTPLAN... - Seite 65 XV-Z90E XV-Z91E...
-
Seite 66: Description Of Schematic Diagram
XV-Z90E XV-Z91E DESCRIPTION OF BESCHREIBUNG DES SCHEMATIC DIAGRAM SCHEMATISCHEN SCHALTPLANS VOLTAGE MEASUREMENT CONDITION: SPANNUNGSMESSUNGEN: 1. Spannungen an den Prüfpunkten werden bei einer 1. Voltages at test points are measured at the Netzspannung von 220V gemessen, Signale werden supply voltage of AC 220V. Signals are fed by a für die Wartung mit einem Farbbalken-Signal generator... - Seite 67 XV-Z90E XV-Z91E WAVEFORMS / WELLENFORMEN IC3102(35)PIN IC3102(28)PIN IC3102(29)PIN IC3102(31)PIN (R-OUT) (VS-OUT) (HS-OUT) (SCP-IN) H : 20 s/div H : 5ms/div H : 10 s/div H : 10 s/div V : 1V/div V : 1V/div V : 1V/div V : 1V/div...
-
Seite 68: Ë Main Unit / Haupt-Einheit -1
XV-Z90E XV-Z91E Ë MAIN UNIT / HAUPT-EINHEIT -1/8... - Seite 69 XV-Z90E XV-Z91E...
-
Seite 70: Ë Main Unit / Haupt-Einheit -2
XV-Z90E XV-Z91E Ë MAIN UNIT / HAUPT-EINHEIT -2/8... - Seite 71 XV-Z90E XV-Z91E...
-
Seite 72: Ë Main Unit / Haupt-Einheit -3
XV-Z90E XV-Z91E Ë MAIN UNIT / HAUPT-EINHEIT -3/8... - Seite 73 XV-Z90E XV-Z91E...
-
Seite 74: Ë Main Unit / Haupt-Einheit -4
XV-Z90E XV-Z91E Ë MAIN UNIT / HAUPT-EINHEIT -4/8... - Seite 75 XV-Z90E XV-Z91E...
-
Seite 76: Ë Main Unit / Haupt-Einheit -5
XV-Z90E XV-Z91E Ë MAIN UNIT / HAUPT-EINHEIT -5/8... - Seite 77 XV-Z90E XV-Z91E...
-
Seite 78: Ë Main Unit / Haupt-Einheit -6
XV-Z90E XV-Z91E Ë MAIN UNIT / HAUPT-EINHEIT -6/8... - Seite 79 XV-Z90E XV-Z91E...
-
Seite 80: Ë Main Unit / Haupt-Einheit -7
XV-Z90E XV-Z91E Ë MAIN UNIT / HAUPT-EINHEIT -7/8... - Seite 81 XV-Z90E XV-Z91E...
-
Seite 82: Ë Main Unit / Haupt-Einheit -8
XV-Z90E XV-Z91E Ë MAIN UNIT / HAUPT-EINHEIT -8/8... - Seite 83 XV-Z90E XV-Z91E...
-
Seite 84: Ë Formatter Unit / Formatter-Einheit-1
XV-Z90E XV-Z91E Ë FORMATTER UNIT / FORMATTER-EINHEIT-1/5... - Seite 85 XV-Z90E XV-Z91E...
-
Seite 86: Ë Formatter Unit / Formatter-Einheit-2
XV-Z90E XV-Z91E Ë FORMATTER UNIT / FORMATTER-EINHEIT-2/5... - Seite 87 XV-Z90E XV-Z91E...
-
Seite 88: Ë Formatter Unit / Formatter-Einheit-3
XV-Z90E XV-Z91E Ë FORMATTER UNIT / FORMATTER-EINHEIT-3/5... - Seite 89 XV-Z90E XV-Z91E...
-
Seite 90: Ë Formatter Unit / Formatter-Einheit-4
XV-Z90E XV-Z91E Ë FORMATTER UNIT / FORMATTER-EINHEIT-4/5... - Seite 91 XV-Z90E XV-Z91E...
-
Seite 92: Ë Formatter Unit / Formatter-Einheit-5
XV-Z90E XV-Z91E Ë FORMATTER UNIT / FORMATTER-EINHEIT-5/5... - Seite 93 XV-Z90E XV-Z91E...
-
Seite 94: Ë Key Unit / Taste-Einheit
XV-Z90E XV-Z91E Ë KEY UNIT / TASTE-EINHEIT Ë TERMINAL1 UNIT / TERMINAL1-EINHEIT... -
Seite 95: Ë Led Unit/ Led-Einheit
XV-Z90E XV-Z91E Ë TERMINAL2 UNIT / TERMINAL2-EINHEIT Ë LED UNIT/ LED-EINHEIT... -
Seite 96: Ë Power Unit / Netzteinheit
XV-Z90E XV-Z91E Ë POWER UNIT / NETZTEINHEIT... - Seite 97 XV-Z90E XV-Z91E...
-
Seite 98: Hintere-Fernbedienungsempfänger-Einheit
XV-Z90E XV-Z91E Ë FRONT R/C UNIT FORDERE-FERNBEDIENUNGSEMPFÄNGER-EINHEIT Ë Ë Ë Ë Ë REAR R/C UNIT HINTERE-FERNBEDIENUNGSEMPFÄNGER-EINHEIT... -
Seite 99: Printed Wiring Board Assemblies
XV-Z90E XV-Z91E PRINTED WIRING BOARD ASSEMBLIES LEITERPLATTENEINHEITEN LED Unit (Side-A) LED Unit (Side-B) LED-Einheit (Seite-A) LED-Einheit (Seite-B) FRONT R/C Unit (Side-A) FRONT R/C Unit (Side-B) FORDERE-FERNBEDIENUNGS- FORDERE-FERNBEDIENUNGS- EMPFÄNGER-Einheit (Seite-A) EMPFÄNGER-Einheit (Seite-B) REAR R/C Unit (Side-A) REAR R/C Unit (Side-B) HINTERE-FERNBEDIENUNGS- HINTERE-FERNBEDIENUNGS- EMPFÄNGER-Einheit (Seite-A) - Seite 100 XV-Z90E XV-Z91E MAIN Unit (Side-A) HAUPT-Einheit (Seite-A)
- Seite 101 XV-Z90E XV-Z91E MAIN Unit (Side-B) HAUPT-Einheit (Seite-B)
- Seite 102 XV-Z90E XV-Z91E FORMATTER Unit (Side-A) / FORMATTER-Einheit (Seite-A) TERMINAL 1 Unit (Side-A) TERMINAL 2 Unit (Side-A) TERMINAL 1 Unit-Einheit (Seite-A) TERMINAL 2 Unit-Einheit (Seite-A) KEY Unit (Side-A) TASTE-Einheit (Seite-A)
- Seite 103 XV-Z90E XV-Z91E FORMATTER Unit (Side-B) / FORMATTER-Einheit (Seite-B) TERMINAL 2 Unit (Side-B) TERMINAL 1 Unit (Side-B) TERMINAL 2-Einheit (Seite-B) TERMINAL 1-Einheit (Seite-B) KEY Unit (Side-B) TASTE-Einheit (Seite-B)
- Seite 104 XV-Z90E XV-Z91E POWER Unit (Side-A) / Netzteinheit (Seite-A) POWER Unit (Side-B) / Netzteinheit (Seite-B)
-
Seite 105: Parts List
XV-Z90E XV-Z91E Ref. No. Part No. Description Code Ref. No. Part No. Description Code PARTS LIST ERSATZTEILLISTE AUSTAUSCH VON TEILEN PARTS REPLACEMENT Ersatzteile, die besondere Sicherheitseigenschften haben, sind in Parts marked with “å” are important for maintaining the safety of dieser Anleitung markiert. - Seite 117 XV-Z90E XV-Z91E CABINET AND MECHANICAL PARTS 1-1-3 1-1-4 1-1-5 1-1-1 1-1-2 2-3-11 2-3-6 2-3-10 2-3-1 2-2-1-3 2-3-5 2-2-1-4 2-2-1-2 2-3-3 2-2-1-5 2-3-9 2-2-3 2-3-4 2-3-2 2-3-7 2-2-3 2-3-8 2-2-2 2-1-4 2-1-1 2-1-3 2-2-1-4 2-1-1-1 2-1-2 2-2-1-5 2-2-1 2-10 2-2-1-1...
- Seite 119 XV-Z90E XV-Z91E OPTICS MECHANISM PARTS 6-1-36 6-1-7 6-1-6 6-1-2 6-1-5 6-1-10 6-1-8 6-1-35 6-1-4 6-1-9 6-1-3 6-1-21 6-1-35 6-1-20 6-1-1 6-1-22 6-1-34 6-1-33...
- Seite 122 XV-Z90E XV-Z91E COPYRIGHT © 2003 BY SHARP CORPORATION ALL RIGHTS RESERVED. No part of this publication may be reproduced, stored in a retrieval system, or transmitted in any form or by any means, electronic, mechanical, photocopying, recording, or otherwise, without prior written permission of the publisher.